This is the multi-page printable view of this section. Click here to print.
Guides
- 1: Adding a proprietary kernel module to Talos Linux
- 2: Advanced Networking
- 3: Air-gapped Environments
- 4: Configuring Ceph with Rook
- 5: Configuring Certificate Authorities
- 6: Configuring Containerd
- 7: Configuring Corporate Proxies
- 8: Configuring Network Connectivity
- 9: Configuring Pull Through Cache
- 10: Configuring the Cluster Endpoint
- 11: Configuring Wireguard Network
- 12: Customizing the Kernel
- 13: Customizing the Root Filesystem
- 14: Deploying Cilium CNI
- 15: Deploying Metrics Server
- 16: Disaster Recovery
- 17: Discovery
- 18: Disk Encryption
- 19: Editing Machine Configuration
- 20: KubeSpan
- 21: Logging
- 22: Managing PKI
- 23: Resetting a Machine
- 24: Role-based access control (RBAC)
- 25: Storage
- 26: Troubleshooting Control Plane
- 27: Upgrading Kubernetes
- 28: Upgrading Talos
- 29: Virtual (shared) IP
1 - Adding a proprietary kernel module to Talos Linux
Patching and building the kernel image
Clone the
pkgsrepository from Github and check out the revision corresponding to your version of Talos Linuxgit clone https://github.com/talos-systems/pkgs pkgs && cd pkgs git checkout v0.8.0Clone the Linux kernel and check out the revision that pkgs uses (this can be found in
kernel/kernel-prepare/pkg.yamland it will be something like the following:https://cdn.kernel.org/pub/linux/kernel/v5.x/linux-x.xx.x.tar.xz)git clone https://git.kernel.org/pub/scm/linux/kernel/git/torvalds/linux.git && cd linux git checkout v5.15Your module will need to be converted to be in-tree. The steps for this are different depending on the complexity of the module to port, but generally it would involve moving the module source code into the
driverstree and creating a new Makefile and Kconfig.Stage your changes in Git with
git add -A.Run
git diff --cached --no-prefix > foobar.patchto generate a patch from your changes.Copy this patch to
kernel/kernel/patchesin thepkgsrepo.Add a
patchline in thepreparesegment ofkernel/kernel/pkg.yaml:patch -p0 < /pkg/patches/foobar.patchBuild the kernel image. Make sure you are logged in to
ghcr.iobefore running this command, and you can change or omitPLATFORMdepending on what you want to target.make kernel PLATFORM=linux/amd64 USERNAME=your-username PUSH=trueMake a note of the image name the
makecommand outputs.
Building the installer image
Copy the following into a new
Dockerfile:FROM scratch AS customization COPY --from=ghcr.io/your-username/kernel:<kernel version> /lib/modules /lib/modules FROM ghcr.io/talos-systems/installer:<talos version> COPY --from=ghcr.io/your-username/kernel:<kernel version> /boot/vmlinuz /usr/install/${TARGETARCH}/vmlinuzRun to build and push the installer:
INSTALLER_VERSION=<talos version>
IMAGE_NAME="ghcr.io/your-username/talos-installer:$INSTALLER_VERSION"
DOCKER_BUILDKIT=0 docker build --build-arg RM="/lib/modules" -t "$IMAGE_NAME" . && docker push "$IMAGE_NAME"
Deploying to your cluster
talosctl upgrade --image ghcr.io/your-username/talos-installer:<talos version> --preserve=true
2 - Advanced Networking
Static Addressing
Static addressing is comprised of specifying addresses, routes ( remember to add your default gateway ), and interface.
Most likely you’ll also want to define the nameservers so you have properly functioning DNS.
machine:
  network:
    hostname: talos
    nameservers:
      - 10.0.0.1
    interfaces:
      - interface: eth0
        addresses:
          - 10.0.0.201/8
        mtu: 8765
        routes:
          - network: 0.0.0.0/0
            gateway: 10.0.0.1
      - interface: eth1
        ignore: true
  time:
    servers:
      - time.cloudflare.com
Additional Addresses for an Interface
In some environments you may need to set additional addresses on an interface. In the following example, we set two additional addresses on the loopback interface.
machine:
  network:
    interfaces:
      - interface: lo
        addresses:
          - 192.168.0.21/24
          - 10.2.2.2/24
Bonding
The following example shows how to create a bonded interface.
machine:
  network:
    interfaces:
      - interface: bond0
        dhcp: true
        bond:
          mode: 802.3ad
          lacpRate: fast
          xmitHashPolicy: layer3+4
          miimon: 100
          updelay: 200
          downdelay: 200
          interfaces:
            - eth0
            - eth1
VLANs
To setup vlans on a specific device use an array of VLANs to add. The master device may be configured without addressing by setting dhcp to false.
machine:
  network:
    interfaces:
      - interface: eth0
        dhcp: false
        vlans:
          - vlanId: 100
            addresses:
              - "192.168.2.10/28"
            routes:
              - network: 0.0.0.0/0
                gateway: 192.168.2.1
3 - Air-gapped Environments
In this guide we will create a Talos cluster running in an air-gapped environment with all the required images being pulled from an internal registry.
We will use the QEMU provisioner available in talosctl to create a local cluster, but the same approach could be used to deploy Talos in bigger air-gapped networks.
Requirements
The follow are requirements for this guide:
- Docker 18.03 or greater
- Requirements for the Talos QEMU cluster
Identifying Images
In air-gapped environments, access to the public Internet is restricted, so Talos can’t pull images from public Docker registries (docker.io, ghcr.io, etc.)
We need to identify the images required to install and run Talos.
The same strategy can be used for images required by custom workloads running on the cluster.
The talosctl images command provides a list of default images used by the Talos cluster (with default configuration
settings).
To print the list of images, run:
talosctl images
This list contains images required by a default deployment of Talos. There might be additional images required for the workloads running on this cluster, and those should be added to this list.
Preparing the Internal Registry
As access to the public registries is restricted, we have to run an internal Docker registry. In this guide, we will launch the registry on the same machine using Docker:
$ docker run -d -p 6000:5000 --restart always --name registry-aigrapped registry:2
1bf09802bee1476bc463d972c686f90a64640d87dacce1ac8485585de69c91a5
This registry will be accepting connections on port 6000 on the host IPs. The registry is empty by default, so we have fill it with the images required by Talos.
First, we pull all the images to our local Docker daemon:
$ for image in `talosctl images`; do docker pull $image; done
v0.12.0-amd64: Pulling from coreos/flannel
Digest: sha256:6d451d92c921f14bfb38196aacb6e506d4593c5b3c9d40a8b8a2506010dc3e10
...
All images are now stored in the Docker daemon store:
$ docker images
ghcr.io/talos-systems/install-cni    v0.3.0-12-g90722c3      980d36ee2ee1        5 days ago          79.7MB
k8s.gcr.io/kube-proxy-amd64          v1.20.0                 33c60812eab8        2 weeks ago         118MB
...
Now we need to re-tag them so that we can push them to our local registry.
We are going to replace the first component of the image name (before the first slash) with our registry endpoint 127.0.0.1:6000:
$ for image in `talosctl images`; do \
    docker tag $image `echo $image | sed -E 's#^[^/]+/#127.0.0.1:6000/#'` \
  done
As the next step, we push images to the internal registry:
$ for image in `talosctl images`; do \
    docker push `echo $image | sed -E 's#^[^/]+/#127.0.0.1:6000/#'` \
  done
We can now verify that the images are pushed to the registry:
$ curl  http://127.0.0.1:6000/v2/_catalog
{"repositories":["autonomy/kubelet","coredns","coreos/flannel","etcd-development/etcd","kube-apiserver-amd64","kube-controller-manager-amd64","kube-proxy-amd64","kube-scheduler-amd64","talos-systems/install-cni","talos-systems/installer"]}
Note: images in the registry don’t have the registry endpoint prefix anymore.
Launching Talos in an Air-gapped Environment
For Talos to use the internal registry, we use the registry mirror feature to redirect all the image pull requests to the internal registry. This means that the registry endpoint (as the first component of the image reference) gets ignored, and all pull requests are sent directly to the specified endpoint.
We are going to use a QEMU-based Talos cluster for this guide, but the same approach works with Docker-based clusters as well. As QEMU-based clusters go through the Talos install process, they can be used better to model a real air-gapped environment.
The talosctl cluster create command provides conveniences for common configuration options.
The only required flag for this guide is --registry-mirror '*'=http://10.5.0.1:6000 which redirects every pull request to the internal registry.
The endpoint being used is 10.5.0.1, as this is the default bridge interface address which will be routable from the QEMU VMs (127.0.0.1 IP will be pointing to the VM itself).
$ sudo -E talosctl cluster create --provisioner=qemu --registry-mirror '*'=http://10.5.0.1:6000 --install-image=ghcr.io/talos-systems/installer:v0.14.0
validating CIDR and reserving IPs
generating PKI and tokens
creating state directory in "/home/smira/.talos/clusters/talos-default"
creating network talos-default
creating load balancer
creating dhcpd
creating master nodes
creating worker nodes
waiting for API
...
Note:
--install-imageshould match the image which was copied into the internal registry in the previous step.
You can be verify that the cluster is air-gapped by inspecting the registry logs: docker logs -f registry-airgapped.
Closing Notes
Running in an air-gapped environment might require additional configuration changes, for example using custom settings for DNS and NTP servers.
When scaling this guide to the bare-metal environment, following Talos config snippet could be used as an equivalent of the --registry-mirror flag above:
machine:
  ...
  registries:
      mirrors:
      '*':
          endpoints:
          - http://10.5.0.1:6000/
...
Other implementations of Docker registry can be used in place of the Docker registry image used above to run the registry.
If required, auth can be configured for the internal registry (and custom TLS certificates if needed).
4 - Configuring Ceph with Rook
Preparation
Talos Linux reserves an entire disk for the OS installation, so machines with multiple available disks are needed for a reliable Ceph cluster with Rook and Talos Linux.
Rook requires that the block devices or partitions used by Ceph have no partitions or formatted filesystems before use.
Rook also requires a minimum Kubernetes version of v1.16 and Helm v3.0 for installation of charts.
It is highly recommended that the Rook Ceph overview is read and understood before deploying a Ceph cluster with Rook.
Installation
Creating a Ceph cluster with Rook requires two steps; first the Rook Operator needs to be installed which can be done with a Helm Chart.
The example below installs the Rook Operator into the rook-ceph namespace, which is the default for a Ceph cluster with Rook.
$ helm repo add rook-release https://charts.rook.io/release
"rook-release" has been added to your repositories

$ helm install --create-namespace --namespace rook-ceph rook-ceph rook-release/rook-ceph
W0327 17:52:44.277830   54987 warnings.go:70] policy/v1beta1 PodSecurityPolicy is deprecated in v1.21+, unavailable in v1.25+
W0327 17:52:44.612243   54987 warnings.go:70] policy/v1beta1 PodSecurityPolicy is deprecated in v1.21+, unavailable in v1.25+
NAME: rook-ceph
LAST DEPLOYED: Sun Mar 27 17:52:42 2022
NAMESPACE: rook-ceph
STATUS: deployed
REVISION: 1
TEST SUITE: None
NOTES:
The Rook Operator has been installed. Check its status by running:
  kubectl --namespace rook-ceph get pods -l "app=rook-ceph-operator"

Visit https://rook.io/docs/rook/latest for instructions on how to create and configure Rook clusters

Important Notes:
- You must customize the 'CephCluster' resource in the sample manifests for your cluster.
- Each CephCluster must be deployed to its own namespace, the samples use `rook-ceph` for the namespace.
- The sample manifests assume you also installed the rook-ceph operator in the `rook-ceph` namespace.
- The helm chart includes all the RBAC required to create a CephCluster CRD in the same namespace.
- Any disk devices you add to the cluster in the 'CephCluster' must be empty (no filesystem and no partitions).
Once that is complete, the Ceph cluster can be installed with the official Helm Chart. The Chart can be installed with default values, which will attempt to use all nodes in the Kubernetes cluster, and all unused disks on each node for Ceph storage, and make available block storage, object storage, as well as a shared filesystem. Generally more specific node/device/cluster configuration is used, and the Rook documentation explains all the available options in detail. For this example the defaults will be adequate.
$ helm install --create-namespace --namespace rook-ceph rook-ceph-cluster --set operatorNamespace=rook-ceph rook-release/rook-ceph-cluster
NAME: rook-ceph-cluster
LAST DEPLOYED: Sun Mar 27 18:12:46 2022
NAMESPACE: rook-ceph
STATUS: deployed
REVISION: 1
TEST SUITE: None
NOTES:
The Ceph Cluster has been installed. Check its status by running:
  kubectl --namespace rook-ceph get cephcluster

Visit https://rook.github.io/docs/rook/latest/ceph-cluster-crd.html for more information about the Ceph CRD.

Important Notes:
- You can only deploy a single cluster per namespace
- If you wish to delete this cluster and start fresh, you will also have to wipe the OSD disks using `sfdisk`
Now the Ceph cluster configuration has been created, the Rook operator needs time to install the Ceph cluster and bring all the components online. The progression of the Ceph cluster state can be followed with the following command.
$ watch kubectl --namespace rook-ceph get cephcluster rook-ceph
Every 2.0s: kubectl --namespace rook-ceph get cephcluster rook-ceph

NAME        DATADIRHOSTPATH   MONCOUNT   AGE   PHASE         MESSAGE                 HEALTH   EXTERNAL
rook-ceph   /var/lib/rook     3          57s   Progressing   Configuring Ceph Mons
Depending on the size of the Ceph cluster and the availability of resources the Ceph cluster should become available, and with it the storage classes that can be used with Kubernetes Physical Volumes.
$ kubectl --namespace rook-ceph get cephcluster rook-ceph
NAME        DATADIRHOSTPATH   MONCOUNT   AGE   PHASE   MESSAGE                        HEALTH      EXTERNAL
rook-ceph   /var/lib/rook     3          40m   Ready   Cluster created successfully   HEALTH_OK

$ kubectl  get storageclass
NAME                   PROVISIONER                     RECLAIMPOLICY   VOLUMEBINDINGMODE   ALLOWVOLUMEEXPANSION   AGE
ceph-block (default)   rook-ceph.rbd.csi.ceph.com      Delete          Immediate           true                   77m
ceph-bucket            rook-ceph.ceph.rook.io/bucket   Delete          Immediate           false                  77m
ceph-filesystem        rook-ceph.cephfs.csi.ceph.com   Delete          Immediate           true                   77m
Talos Linux Considerations
It is important to note that a Rook Ceph cluster saves cluster information directly onto the node (be default dataDirHostPath is set to /var/lib/rook) which under Talos Linux is ephemeral.
This makes cluster management a little bit more involved, as any time a Talos Linux node is reconfigured or upgraded, the ephemeral partition is wiped.
When performing maintenance on a Talos Linux node with a Rook Ceph cluster, it is imperative that care be taken to maintain the health of the Ceph cluster, for instance when upgrading the Talos Linux version. Before upgrading, you should always check the health status of the Ceph cluster to ensure that it is healthy.
$ kubectl --namespace rook-ceph get cephclusters.ceph.rook.io rook-ceph
NAME        DATADIRHOSTPATH   MONCOUNT   AGE   PHASE   MESSAGE                        HEALTH      EXTERNAL
rook-ceph   /var/lib/rook     3          98m   Ready   Cluster created successfully   HEALTH_OK
If it is, you can begin the upgrade process for the Talos Linux node, during which time the Ceph cluster will become unhealthy as the node is reconfigured. Before performing any other action on the Talos Linux nodes, the Ceph cluster must return to a healthy status.
$ talosctl upgrade --nodes 172.20.15.5 --image ghcr.io/talos-systems/installer:v0.14.3
NODE          ACK                        STARTED
172.20.15.5   Upgrade request received   2022-03-27 20:29:55.292432887 +0200 CEST m=+10.050399758

$ kubectl --namespace rook-ceph get cephclusters.ceph.rook.io
NAME        DATADIRHOSTPATH   MONCOUNT   AGE   PHASE         MESSAGE                   HEALTH        EXTERNAL
rook-ceph   /var/lib/rook     3          99m   Progressing   Configuring Ceph Mgr(s)   HEALTH_WARN

$ kubectl --namespace rook-ceph wait --timeout=1800s --for=jsonpath='{.status.ceph.health}=HEALTH_OK' rook-ceph
cephcluster.ceph.rook.io/rook-ceph condition met
The above steps need to be performed for each Talos Linux node undergoing maintenance, one at a time.
Cleaning Up
Rook Ceph Cluster Removal
Removing a Rook Ceph cluster requires a few steps, starting with signalling to Rook that the Ceph cluster is really being destroyed. Then all Persistent Volumes (and Claims) backed by the Ceph cluster must be deleted, followed by the Storage Classes and the Ceph storage types.
$ kubectl --namespace rook-ceph patch cephcluster rook-ceph --type merge -p '{"spec":{"cleanupPolicy":{"confirmation":"yes-really-destroy-data"}}}'
cephcluster.ceph.rook.io/rook-ceph patched

$ kubectl delete storageclasses ceph-block ceph-bucket ceph-filesystem
storageclass.storage.k8s.io "ceph-block" deleted
storageclass.storage.k8s.io "ceph-bucket" deleted
storageclass.storage.k8s.io "ceph-filesystem" deleted

$ kubectl --namespace rook-ceph delete cephblockpools ceph-blockpool
cephblockpool.ceph.rook.io "ceph-blockpool" deleted

$ kubectl --namespace rook-ceph delete cephobjectstore ceph-objectstore
cephobjectstore.ceph.rook.io "ceph-objectstore" deleted

$ kubectl --namespace rook-ceph delete cephfilesystem ceph-filesystem
cephfilesystem.ceph.rook.io "ceph-filesystem" deleted
Once that is complete, the Ceph cluster itself can be removed, along with the Rook Ceph cluster Helm chart installation.
$ kubectl --namespace rook-ceph delete cephcluster rook-ceph
cephcluster.ceph.rook.io "rook-ceph" deleted

$ helm --namespace rook-ceph uninstall rook-ceph-cluster
release "rook-ceph-cluster" uninstalled
If needed, the Rook Operator can also be removed along with all the Custom Resource Definitions that it created.
$ helm --namespace rook-ceph uninstall rook-ceph
W0328 12:41:14.998307  147203 warnings.go:70] policy/v1beta1 PodSecurityPolicy is deprecated in v1.21+, unavailable in v1.25+
These resources were kept due to the resource policy:
[CustomResourceDefinition] cephblockpools.ceph.rook.io
[CustomResourceDefinition] cephbucketnotifications.ceph.rook.io
[CustomResourceDefinition] cephbuckettopics.ceph.rook.io
[CustomResourceDefinition] cephclients.ceph.rook.io
[CustomResourceDefinition] cephclusters.ceph.rook.io
[CustomResourceDefinition] cephfilesystemmirrors.ceph.rook.io
[CustomResourceDefinition] cephfilesystems.ceph.rook.io
[CustomResourceDefinition] cephfilesystemsubvolumegroups.ceph.rook.io
[CustomResourceDefinition] cephnfses.ceph.rook.io
[CustomResourceDefinition] cephobjectrealms.ceph.rook.io
[CustomResourceDefinition] cephobjectstores.ceph.rook.io
[CustomResourceDefinition] cephobjectstoreusers.ceph.rook.io
[CustomResourceDefinition] cephobjectzonegroups.ceph.rook.io
[CustomResourceDefinition] cephobjectzones.ceph.rook.io
[CustomResourceDefinition] cephrbdmirrors.ceph.rook.io
[CustomResourceDefinition] objectbucketclaims.objectbucket.io
[CustomResourceDefinition] objectbuckets.objectbucket.io

release "rook-ceph" uninstalled

$ kubectl delete crds cephblockpools.ceph.rook.io cephbucketnotifications.ceph.rook.io cephbuckettopics.ceph.rook.io \
                      cephclients.ceph.rook.io cephclusters.ceph.rook.io cephfilesystemmirrors.ceph.rook.io \
                      cephfilesystems.ceph.rook.io cephfilesystemsubvolumegroups.ceph.rook.io \
                      cephnfses.ceph.rook.io cephobjectrealms.ceph.rook.io cephobjectstores.ceph.rook.io \
                      cephobjectstoreusers.ceph.rook.io cephobjectzonegroups.ceph.rook.io cephobjectzones.ceph.rook.io \
                      cephrbdmirrors.ceph.rook.io objectbucketclaims.objectbucket.io objectbuckets.objectbucket.io
customresourcedefinition.apiextensions.k8s.io "cephblockpools.ceph.rook.io" deleted
customresourcedefinition.apiextensions.k8s.io "cephbucketnotifications.ceph.rook.io" deleted
customresourcedefinition.apiextensions.k8s.io "cephbuckettopics.ceph.rook.io" deleted
customresourcedefinition.apiextensions.k8s.io "cephclients.ceph.rook.io" deleted
customresourcedefinition.apiextensions.k8s.io "cephclusters.ceph.rook.io" deleted
customresourcedefinition.apiextensions.k8s.io "cephfilesystemmirrors.ceph.rook.io" deleted
customresourcedefinition.apiextensions.k8s.io "cephfilesystems.ceph.rook.io" deleted
customresourcedefinition.apiextensions.k8s.io "cephfilesystemsubvolumegroups.ceph.rook.io" deleted
customresourcedefinition.apiextensions.k8s.io "cephnfses.ceph.rook.io" deleted
customresourcedefinition.apiextensions.k8s.io "cephobjectrealms.ceph.rook.io" deleted
customresourcedefinition.apiextensions.k8s.io "cephobjectstores.ceph.rook.io" deleted
customresourcedefinition.apiextensions.k8s.io "cephobjectstoreusers.ceph.rook.io" deleted
customresourcedefinition.apiextensions.k8s.io "cephobjectzonegroups.ceph.rook.io" deleted
customresourcedefinition.apiextensions.k8s.io "cephobjectzones.ceph.rook.io" deleted
customresourcedefinition.apiextensions.k8s.io "cephrbdmirrors.ceph.rook.io" deleted
customresourcedefinition.apiextensions.k8s.io "objectbucketclaims.objectbucket.io" deleted
customresourcedefinition.apiextensions.k8s.io "objectbuckets.objectbucket.io" deleted
Talos Linux Rook Metadata Removal
If the Rook Operator is cleanly removed following the above process, the node metadata and disks should be clean and ready to be re-used.
In the case of an unclean cluster removal, there may be still a few instances of metadata stored on the system disk, as well as the partition information on the storage disks.
First the node metadata needs to be removed, make sure to update the nodeName with the actual name of a storage node that needs cleaning, and path with the Rook configuration dataDirHostPath set when installing the chart.
The following will need to be repeated for each node used in the Rook Ceph cluster.
$ cat <<EOF | kubectl apply -f -
apiVersion: v1
kind: Pod
metadata:
  name: disk-clean
spec:
  restartPolicy: Never
  nodeName: <storage-node-name>
  volumes:
  - name: rook-data-dir
    hostPath:
      path: <dataDirHostPath>
  containers:
  - name: disk-clean
    image: busybox
    securityContext:
      privileged: true
    volumeMounts:
    - name: rook-data-dir
      mountPath: /node/rook-data
    command: ["/bin/sh", "-c", "rm -rf /node/rook-data/*"]
EOF
pod/disk-clean created

$ kubectl wait --timeout=900s --for=jsonpath='{.status.phase}=Succeeded' pod disk-clean
pod/disk-clean condition met

$ kubectl delete pod disk-clean
pod "disk-clean" deleted
Lastly, the disks themselves need the partition and filesystem data wiped before they can be reused.
Again, the following as to be repeated for each node and disk used in the Rook Ceph cluster, updating nodeName and of= in the command as needed.
$ cat <<EOF | kubectl apply -f -
apiVersion: v1
kind: Pod
metadata:
  name: disk-wipe
spec:
  restartPolicy: Never
  nodeName: <storage-node-name>
  containers:
  - name: disk-wipe
    image: busybox
    securityContext:
      privileged: true
    command: ["/bin/sh", "-c", "dd if=/dev/zero bs=1M count=100 oflag=direct of=<device>"]
EOF
pod/disk-wipe created

$ kubectl wait --timeout=900s --for=jsonpath='{.status.phase}=Succeeded' pod disk-wipe
pod/disk-wipe condition met

$ kubectl delete pod disk-clean
pod "disk-wipe" deleted
5 - Configuring Certificate Authorities
Appending the Certificate Authority
Put into each machine the PEM encoded certificate:
machine:
  ...
  files:
    - content: |
        -----BEGIN CERTIFICATE-----
        ...
        -----END CERTIFICATE-----
      permissions: 0644
      path: /etc/ssl/certs/ca-certificates
      op: append
6 - Configuring Containerd
The base containerd configuration expects to merge in any additional configs present in /var/cri/conf.d/*.toml.
An example of exposing metrics
Into each machine config, add the following:
machine:
  ...
  files:
    - content: |
        [metrics]
          address = "0.0.0.0:11234"
      path: /var/cri/conf.d/metrics.toml
      op: create
Create cluster like normal and see that metrics are now present on this port:
$ curl 127.0.0.1:11234/v1/metrics
# HELP container_blkio_io_service_bytes_recursive_bytes The blkio io service bytes recursive
# TYPE container_blkio_io_service_bytes_recursive_bytes gauge
container_blkio_io_service_bytes_recursive_bytes{container_id="0677d73196f5f4be1d408aab1c4125cf9e6c458a4bea39e590ac779709ffbe14",device="/dev/dm-0",major="253",minor="0",namespace="k8s.io",op="Async"} 0
container_blkio_io_service_bytes_recursive_bytes{container_id="0677d73196f5f4be1d408aab1c4125cf9e6c458a4bea39e590ac779709ffbe14",device="/dev/dm-0",major="253",minor="0",namespace="k8s.io",op="Discard"} 0
...
...
7 - Configuring Corporate Proxies
Appending the Certificate Authority of MITM Proxies
Put into each machine the PEM encoded certificate:
machine:
  ...
  files:
    - content: |
        -----BEGIN CERTIFICATE-----
        ...
        -----END CERTIFICATE-----
      permissions: 0644
      path: /etc/ssl/certs/ca-certificates
      op: append
Configuring a Machine to Use the Proxy
To make use of a proxy:
machine:
  env:
    http_proxy: <http proxy>
    https_proxy: <https proxy>
    no_proxy: <no proxy>
Additionally, configure the DNS nameservers, and NTP servers:
machine:
  env:
  ...
  time:
    servers:
      - <server 1>
      - <server ...>
      - <server n>
  ...
  network:
    nameservers:
      - <ip 1>
      - <ip ...>
      - <ip n>
8 - Configuring Network Connectivity
Configuring Network Connectivity
The simplest way to deploy Talos is by ensuring that all the remote components of the system (talosctl, the control plane nodes, and worker nodes) all have layer 2 connectivity.
This is not always possible, however, so this page lays out the minimal network access that is required to configure and operate a talos cluster.
Note: These are the ports required for Talos specifically, and should be configured in addition to the ports required by kubernetes. See the kubernetes docs for information on the ports used by kubernetes itself.
Control plane node(s)
| Protocol | Direction | Port Range | Purpose | Used By |
|---|---|---|---|---|
| TCP | Inbound | 50000* | apid | talosctl |
| TCP | Inbound | 50001* | trustd | Control plane nodes, worker nodes |
Ports marked with a
*are not currently configurable, but that may change in the future. Follow along here.
Worker node(s)
| Protocol | Direction | Port Range | Purpose | Used By |
|---|---|---|---|---|
| TCP | Inbound | 50001* | trustd | Control plane nodes |
Ports marked with a
*are not currently configurable, but that may change in the future. Follow along here.
9 - Configuring Pull Through Cache
In this guide we will create a set of local caching Docker registry proxies to minimize local cluster startup time.
When running Talos locally, pulling images from Docker registries might take a significant amount of time. We spin up local caching pass-through registries to cache images and configure a local Talos cluster to use those proxies. A similar approach might be used to run Talos in production in air-gapped environments. It can be also used to verify that all the images are available in local registries.
Video Walkthrough
To see a live demo of this writeup, see the video below:
Requirements
The follow are requirements for creating the set of caching proxies:
Launch the Caching Docker Registry Proxies
Talos pulls from docker.io, k8s.gcr.io, quay.io, gcr.io, and ghcr.io by default.
If your configuration is different, you might need to modify the commands below:
docker run -d -p 5000:5000 \
    -e REGISTRY_PROXY_REMOTEURL=https://registry-1.docker.io \
    --restart always \
    --name registry-docker.io registry:2

docker run -d -p 5001:5000 \
    -e REGISTRY_PROXY_REMOTEURL=https://k8s.gcr.io \
    --restart always \
    --name registry-k8s.gcr.io registry:2

docker run -d -p 5002:5000 \
    -e REGISTRY_PROXY_REMOTEURL=https://quay.io \
    --restart always \
    --name registry-quay.io registry:2.5

docker run -d -p 5003:5000 \
    -e REGISTRY_PROXY_REMOTEURL=https://gcr.io \
    --restart always \
    --name registry-gcr.io registry:2

docker run -d -p 5004:5000 \
    -e REGISTRY_PROXY_REMOTEURL=https://ghcr.io \
    --restart always \
    --name registry-ghcr.io registry:2
Note: Proxies are started as docker containers, and they’re automatically configured to start with Docker daemon. Please note that
quay.ioproxy doesn’t support recent Docker image schema, so we run older registry image version (2.5).
As a registry container can only handle a single upstream Docker registry, we launch a container per upstream, each on its own host port (5000, 5001, 5002, 5003 and 5004).
Using Caching Registries with QEMU Local Cluster
With a QEMU local cluster, a bridge interface is created on the host. As registry containers expose their ports on the host, we can use bridge IP to direct proxy requests.
sudo talosctl cluster create --provisioner qemu \
    --registry-mirror docker.io=http://10.5.0.1:5000 \
    --registry-mirror k8s.gcr.io=http://10.5.0.1:5001 \
    --registry-mirror quay.io=http://10.5.0.1:5002 \
    --registry-mirror gcr.io=http://10.5.0.1:5003 \
    --registry-mirror ghcr.io=http://10.5.0.1:5004
The Talos local cluster should now start pulling via caching registries.
This can be verified via registry logs, e.g. docker logs -f registry-docker.io.
The first time cluster boots, images are pulled and cached, so next cluster boot should be much faster.
Note:
10.5.0.1is a bridge IP with default network (10.5.0.0/24), if using custom--cidr, value should be adjusted accordingly.
Using Caching Registries with docker Local Cluster
With a docker local cluster we can use docker bridge IP, default value for that IP is 172.17.0.1.
On Linux, the docker bridge address can be inspected with ip addr show docker0.
talosctl cluster create --provisioner docker \
    --registry-mirror docker.io=http://172.17.0.1:5000 \
    --registry-mirror k8s.gcr.io=http://172.17.0.1:5001 \
    --registry-mirror quay.io=http://172.17.0.1:5002 \
    --registry-mirror gcr.io=http://172.17.0.1:5003 \
    --registry-mirror ghcr.io=http://172.17.0.1:5004
Cleaning Up
To cleanup, run:
docker rm -f registry-docker.io
docker rm -f registry-k8s.gcr.io
docker rm -f registry-quay.io
docker rm -f registry-gcr.io
docker rm -f registry-ghcr.io
Note: Removing docker registry containers also removes the image cache. So if you plan to use caching registries, keep the containers running.
10 - Configuring the Cluster Endpoint
In this section, we will step through the configuration of a Talos based Kubernetes cluster. There are three major components we will configure:
apidandtalosctl- the master nodes
- the worker nodes
Talos enforces a high level of security by using mutual TLS for authentication and authorization.
We recommend that the configuration of Talos be performed by a cluster owner. A cluster owner should be a person of authority within an organization, perhaps a director, manager, or senior member of a team. They are responsible for storing the root CA, and distributing the PKI for authorized cluster administrators.
Recommended settings
Talos runs great out of the box, but if you tweak some minor settings it will make your life a lot easier in the future. This is not a requirement, but rather a document to explain some key settings.
Endpoint
To configure the talosctl endpoint, it is recommended you use a resolvable DNS name.
This way, if you decide to upgrade to a multi-controlplane cluster you only have to add the ip address to the hostname configuration.
The configuration can either be done on a Loadbalancer, or simply trough DNS.
For example:
This is in the config file for the cluster e.g. controlplane.yaml and worker.yaml. for more details, please see: v1alpha1 endpoint configuration
.....
cluster:
  controlPlane:
    endpoint: https://endpoint.example.local:6443
.....
If you have a DNS name as the endpoint, you can upgrade your talos cluster with multiple controlplanes in the future (if you don’t have a multi-controlplane setup from the start) Using a DNS name generates the corresponding Certificates (Kubernetes and Talos) for the correct hostname.
11 - Configuring Wireguard Network
Configuring Wireguard Network
Quick Start
The quickest way to try out Wireguard is to use talosctl cluster create command:
talosctl cluster create --wireguard-cidr 10.1.0.0/24
It will automatically generate Wireguard network configuration for each node with the following network topology:
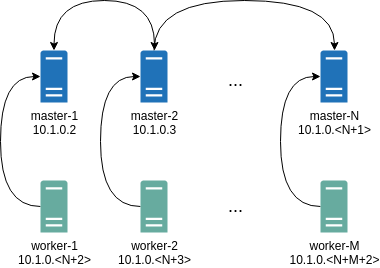
Where all controlplane nodes will be used as Wireguard servers which listen on port 51111.
All controlplanes and workers will connect to all controlplanes.
It also sets PersistentKeepalive to 5 seconds to establish controlplanes to workers connection.
After the cluster is deployed it should be possible to verify Wireguard network connectivity.
It is possible to deploy a container with hostNetwork enabled, then do kubectl exec <container> /bin/bash and either do:
ping 10.1.0.2
Or install wireguard-tools package and run:
wg show
Wireguard show should output something like this:
interface: wg0
  public key: OMhgEvNIaEN7zeCLijRh4c+0Hwh3erjknzdyvVlrkGM=
  private key: (hidden)
  listening port: 47946

peer: 1EsxUygZo8/URWs18tqB5FW2cLVlaTA+lUisKIf8nh4=
  endpoint: 10.5.0.2:51111
  allowed ips: 10.1.0.0/24
  latest handshake: 1 minute, 55 seconds ago
  transfer: 3.17 KiB received, 3.55 KiB sent
  persistent keepalive: every 5 seconds
It is also possible to use generated configuration as a reference by pulling generated config files using:
talosctl read -n 10.5.0.2 /system/state/config.yaml > controlplane.yaml
talosctl read -n 10.5.0.3 /system/state/config.yaml > worker.yaml
Manual Configuration
All Wireguard configuration can be done by changing Talos machine config files. As an example we will use this official Wireguard quick start tutorial.
Key Generation
This part is exactly the same:
wg genkey | tee privatekey | wg pubkey > publickey
Setting up Device
Inline comments show relations between configs and wg quickstart tutorial commands:
...
network:
  interfaces:
    ...
      # ip link add dev wg0 type wireguard
    - interface: wg0
      mtu: 1500
      # ip address add dev wg0 192.168.2.1/24
      addresses:
        - 192.168.2.1/24
      # wg set wg0 listen-port 51820 private-key /path/to/private-key peer ABCDEF... allowed-ips 192.168.88.0/24 endpoint 209.202.254.14:8172
      wireguard:
        privateKey: <privatekey file contents>
        listenPort: 51820
        peers:
          allowedIPs:
            - 192.168.88.0/24
          endpoint: 209.202.254.14.8172
          publicKey: ABCDEF...
...
When networkd gets this configuration it will create the device, configure it and will bring it up (equivalent to ip link set up dev wg0).
All supported config parameters are described in the Machine Config Reference.
12 - Customizing the Kernel
The installer image contains ONBUILD instructions that handle the following:
- the decompression, and unpacking of the
initramfs.xz - the unsquashing of the rootfs
- the copying of new rootfs files
- the squashing of the new rootfs
- and the packing, and compression of the new
initramfs.xz
When used as a base image, the installer will perform the above steps automatically with the requirement that a customization stage be defined in the Dockerfile.
Build and push your own kernel:
git clone https://github.com/talos-systems/pkgs.git
cd pkgs
make kernel-menuconfig USERNAME=_your_github_user_name_

docker login ghcr.io --username _your_github_user_name_
make kernel USERNAME=_your_github_user_name_ PUSH=true
Using a multi-stage Dockerfile we can define the customization stage and build FROM the installer image:
FROM scratch AS customization
COPY --from=<custom kernel image> /lib/modules /lib/modules

FROM ghcr.io/talos-systems/installer:latest
COPY --from=<custom kernel image> /boot/vmlinuz /usr/install/${TARGETARCH}/vmlinuz
When building the image, the customization stage will automatically be copied into the rootfs.
The customization stage is not limited to a single COPY instruction.
In fact, you can do whatever you would like in this stage, but keep in mind that everything in / will be copied into the rootfs.
To build the image, run:
DOCKER_BUILDKIT=0 docker build --build-arg RM="/lib/modules" -t installer:kernel .
Note: buildkit has a bug #816, to disable it use
DOCKER_BUILDKIT=0
Now that we have a custom installer we can build Talos for the specific platform we wish to deploy to.
13 - Customizing the Root Filesystem
The installer image contains ONBUILD instructions that handle the following:
- the decompression, and unpacking of the
initramfs.xz - the unsquashing of the rootfs
- the copying of new rootfs files
- the squashing of the new rootfs
- and the packing, and compression of the new
initramfs.xz
When used as a base image, the installer will perform the above steps automatically with the requirement that a customization stage be defined in the Dockerfile.
For example, say we have an image that contains the contents of a library we wish to add to the Talos rootfs.
We need to define a stage with the name customization:
FROM scratch AS customization
COPY --from=<name|index> <src> <dest>
Using a multi-stage Dockerfile we can define the customization stage and build FROM the installer image:
FROM scratch AS customization
COPY --from=<name|index> <src> <dest>

FROM ghcr.io/talos-systems/installer:latest
When building the image, the customization stage will automatically be copied into the rootfs.
The customization stage is not limited to a single COPY instruction.
In fact, you can do whatever you would like in this stage, but keep in mind that everything in / will be copied into the rootfs.
Note:
<dest>is the path relative to the rootfs that you wish to place the contents of<src>.
To build the image, run:
docker build --squash -t <organization>/installer:latest .
In the case that you need to perform some cleanup before adding additional files to the rootfs, you can specify the RM build-time variable:
docker build --squash --build-arg RM="[<path> ...]" -t <organization>/installer:latest .
This will perform a rm -rf on the specified paths relative to the rootfs.
Note:
RMmust be a whitespace delimited list.
The resulting image can be used to:
- generate an image for any of the supported providers
- perform bare-metall installs
- perform upgrades
We will step through common customizations in the remainder of this section.
14 - Deploying Cilium CNI
From v1.9 onwards Cilium does no longer provide a one-liner install manifest that can be used to install Cilium on a node via kubectl apply -f or passing it in as an extra url in the urls part in the Talos machine configuration.
Installing Cilium the new way via the
ciliumcli is broken, so we’ll be usinghelmto install Cilium. For more information: Install with CLI fails, works with Helm
Refer to Installing with Helm for more information.
First we’ll need to add the helm repo for Cilium.
helm repo add cilium https://helm.cilium.io/
helm repo update
This documentation will outline installing Cilium CNI v1.11.2 on Talos in four different ways. Adhering to Talos principles we’ll deploy Cilium with IPAM mode set to Kubernetes. Each method can either install Cilium using kube proxy (default) or without: Kubernetes Without kube-proxy
Machine config preparation
When generating the machine config for a node set the CNI to none. For example using a config patch:
talosctl gen config \
    my-cluster https://mycluster.local:6443 \
    --config-patch '[{"op":"add", "path": "/cluster/network/cni", "value": {"name": "none"}}]'
Or if you want to deploy Cilium in strict mode without kube-proxy, you also need to disable kube proxy:
talosctl gen config \
    my-cluster https://mycluster.local:6443 \
    --config-patch '[{"op": "add", "path": "/cluster/proxy", "value": {"disabled": true}}, {"op":"add", "path": "/cluster/network/cni", "value": {"name": "none"}}]'
Method 1: Helm install
After applying the machine config and bootstrapping Talos will appear to hang on phase 18/19 with the message: retrying error: node not ready. This happens because nodes in Kubernetes are only marked as ready once the CNI is up. As there is no CNI defined, the boot process is pending and will reboot the node to retry after 10 minutes, this is expected behavior.
During this window you can install Cilium manually by running the following:
helm install cilium cilium/cilium \
    --version 1.11.2 \
    --namespace kube-system \
    --set ipam.mode=kubernetes
Or if you want to deploy Cilium in strict mode without kube-proxy, also set some extra paramaters:
export KUBERNETES_API_SERVER_ADDRESS=<>
export KUBERNETES_API_SERVER_PORT=6443

helm install cilium cilium/cilium \
    --version 1.11.2 \
    --namespace kube-system \
    --set ipam.mode=kubernetes \
    --set kubeProxyReplacement=strict \
    --set k8sServiceHost="${KUBERNETES_API_SERVER_ADDRESS}" \
    --set k8sServicePort="${KUBERNETES_API_SERVER_PORT}"
After Cilium is installed the boot process should continue and complete successfully.
Method 2: Helm manifests install
Instead of directly installing Cilium you can instead first generate the manifest and then apply it:
helm template cilium cilium/cilium \
    --version 1.11.2 \
    --namespace kube-system
    --set ipam.mode=kubernetes > cilium.yaml

kubectl apply -f cilium.yaml
Without kube-proxy:
export KUBERNETES_API_SERVER_ADDRESS=<>
export KUBERNETES_API_SERVER_PORT=6443

helm template cilium cilium/cilium \
    --version 1.11.2 \
    --namespace kube-system \
    --set ipam.mode=kubernetes \
    --set kubeProxyReplacement=strict \
    --set k8sServiceHost="${KUBERNETES_API_SERVER_ADDRESS}" \
    --set k8sServicePort="${KUBERNETES_API_SERVER_PORT}" > cilium.yaml

kubectl apply -f cilium.yaml
Method 3: Helm manifests hosted install
After generating cilium.yaml using helm template, instead of applying this manifest directly during the Talos boot window (before the reboot timeout).
You can also host this file somewhere and patch the machine config to apply this manifest automatically during bootstrap.
To do this patch your machine configuration to include this config instead of the above:
talosctl gen config \
    my-cluster https://mycluster.local:6443 \
    --config-patch '[{"op":"add", "path": "/cluster/network/cni", "value": {"name": "custom", "urls": ["https://server.yourdomain.tld/some/path/cilium.yaml"]}}]'
Resulting in a config that look like this:
name: custom # Name of CNI to use.
# URLs containing manifests to apply for the CNI.
urls:
    - https://server.yourdomain.tld/some/path/cilium.yaml
However, beware of the fact that the helm generated Cilium manifest contains sensitive key material. As such you should definitely not host this somewhere publicly accessible.
Method 4: Helm manifests inline install
A more secure option would be to include the helm template output manifest inside the machine configuration.
The machine config should be generated with CNI set to none
talosctl gen config \
    my-cluster https://mycluster.local:6443 \
    --config-patch '[{"op":"add", "path": "/cluster/network/cni", "value": {"name": "none"}}]'
if deploying Cilium with kube-proxy disabled, you can also include the following:
talosctl gen config \
    my-cluster https://mycluster.local:6443 \
    --config-patch '[{"op": "add", "path": "/cluster/proxy", "value": {"disabled": true}}, {"op":"add", "path": "/cluster/network/cni", "value": {"name": "none"}}]'
To do so patch this into your machine configuration:
inlineManifests:
    - name: cilium
      contents: |
        --
        # Source: cilium/templates/cilium-agent/serviceaccount.yaml
        apiVersion: v1
        kind: ServiceAccount
        metadata:
          name: "cilium"
          namespace: kube-system
        ---
        # Source: cilium/templates/cilium-operator/serviceaccount.yaml
        apiVersion: v1
        kind: ServiceAccount
        -> Your cilium.yaml file will be pretty long....
This will install the Cilium manifests at just the right time during bootstrap.
Beware though:
- Changing the namespace when templating with Helm does not generate a manifest containing the yaml to create that namespace. As the inline manifest is processed from top to bottom make sure to manually put the namespace yaml at the start of the inline manifest.
- Only add the Cilium inline manifest to the control plane nodes machine configuration.
- Make sure all control plane nodes have an identical configuration.
- If you delete any of the generated resources they will be restored whenever a control plane node reboots.
- As a safety measure Talos only creates missing resources from inline manifests, it never deletes or updates anything.
- If you need to update a manifest make sure to first edit all control plane machine configurations and then run
talosctl upgrade-k8sas it will take care of updating inline manifests.
Known issues
Currently there is an interaction between a Kubespan enabled Talos cluster and Cilium that results in the cluster going down during bootstrap after applying the Cilium manifests. For more details: Kubespan and Cilium compatiblity: etcd is failing
When running Cilium with a kube-proxy eBPF replacement (strict mode) there is a conflicting kernel module that results in locked tx queues. This can be fixed by blacklisting
aoe_initwith extraKernelArgs. For more details: Cilium on talos “aoe: packet could not be sent on *. consider increasing tx_queue_len”There are some gotchas when using Talos and Cilium on the Google cloud platform when using internal load balancers. For more details: GCP ILB support / support scope local routes to be configured
Some kernel values changed by kube-proxy are not set to good defaults when running the cilium kernel-proxy alternative. For more details: Kernel default values (sysctl)
Other things to know
Talos has full kernel module support for eBPF, See:
Talos also includes the modules:
CONFIG_NETFILTER_XT_TARGET_TPROXY=mCONFIG_NETFILTER_XT_TARGET_CT=mCONFIG_NETFILTER_XT_MATCH_MARK=mCONFIG_NETFILTER_XT_MATCH_SOCKET=m
This allows you to set
--set enableXTSocketFallback=falseon the helm install/template command preventing Cilium from disabling theip_early_demuxkernel feature. This will win back some performance.
15 - Deploying Metrics Server
Metrics Server enables use of the Horizontal Pod Autoscaler and Vertical Pod Autoscaler. It does this by gathering metrics data from the kubelets in a cluster. By default, the certificates in use by the kubelets will not be recognized by metrics-server. This can be solved by either configuring metrics-server to do no validation of the TLS certificates, or by modifying the kubelet configuration to rotate its certificates and use ones that will be recognized by metrics-server.
Node Configuration
To enable kubelet certificate rotation, all nodes should have the following Machine Config snippet:
machine:
  kubelet:
    extraArgs:
      rotate-server-certificates: true
Install During Bootstrap
We will want to ensure that new certificates for the kubelets are approved automatically. This can easily be done with the Kubelet Serving Certificate Approver, which will automatically approve the Certificate Signing Requests generated by the kubelets.
We can have Kubelet Serving Certificate Approver and metrics-server installed on the cluster automatically during bootstrap by adding the following snippet to the Cluster Config of the node that will be handling the bootstrap process:
cluster:
  extraManifests:
    - https://raw.githubusercontent.com/alex1989hu/kubelet-serving-cert-approver/main/deploy/standalone-install.yaml
    - https://github.com/kubernetes-sigs/metrics-server/releases/latest/download/components.yaml
Install After Bootstrap
If you choose not to use extraManifests to install Kubelet Serving Certificate Approver and metrics-server during bootstrap, you can install them once the cluster is online using kubectl:
kubectl apply -f https://raw.githubusercontent.com/alex1989hu/kubelet-serving-cert-approver/main/deploy/standalone-install.yaml
kubectl apply -f https://github.com/kubernetes-sigs/metrics-server/releases/latest/download/components.yaml
16 - Disaster Recovery
etcd database backs Kubernetes control plane state, so if the etcd service is unavailable
Kubernetes control plane goes down, and the cluster is not recoverable until etcd is recovered with contents.
The etcd consistency model builds around the consensus protocol Raft, so for highly-available control plane clusters,
loss of one control plane node doesn’t impact cluster health.
In general, etcd stays up as long as a sufficient number of nodes to maintain quorum are up.
For a three control plane node Talos cluster, this means that the cluster tolerates a failure of any single node,
but losing more than one node at the same time leads to complete loss of service.
Because of that, it is important to take routine backups of etcd state to have a snapshot to recover cluster from
in case of catastrophic failure.
Backup
Snapshotting etcd Database
Create a consistent snapshot of etcd database with talosctl etcd snapshot command:
$ talosctl -n <IP> etcd snapshot db.snapshot
etcd snapshot saved to "db.snapshot" (2015264 bytes)
snapshot info: hash c25fd181, revision 4193, total keys 1287, total size 3035136
Note: filename
db.snapshotis arbitrary.
This database snapshot can be taken on any healthy control plane node (with IP address <IP> in the example above),
as all etcd instances contain exactly same data.
It is recommended to configure etcd snapshots to be created on some schedule to allow point-in-time recovery using the latest snapshot.
Disaster Database Snapshot
If etcd cluster is not healthy, the talosctl etcd snapshot command might fail.
In that case, copy the database snapshot directly from the control plane node:
talosctl -n <IP> cp /var/lib/etcd/member/snap/db .
This snapshot might not be fully consistent (if the etcd process is running), but it allows
for disaster recovery when latest regular snapshot is not available.
Machine Configuration
Machine configuration might be required to recover the node after hardware failure. Backup Talos node machine configuration with the command:
talosctl -n IP get mc v1alpha1 -o yaml | yq eval '.spec' -
Recovery
Before starting a disaster recovery procedure, make sure that etcd cluster can’t be recovered:
- get
etcdcluster member list on all healthy control plane nodes withtalosctl -n IP etcd memberscommand and compare across all members. - query
etcdhealth across control plane nodes withtalosctl -n IP service etcd.
If the quorum can be restored, restoring quorum might be a better strategy than performing full disaster recovery procedure.
Latest Etcd Snapshot
Get hold of the latest etcd database snapshot.
If a snapshot is not fresh enough, create a database snapshot (see above), even if the etcd cluster is unhealthy.
Init Node
Make sure that there are no control plane nodes with machine type init:
$ talosctl -n <IP1>,<IP2>,... get machinetype
NODE         NAMESPACE   TYPE          ID             VERSION   TYPE
172.20.0.2   config      MachineType   machine-type   2         controlplane
172.20.0.4   config      MachineType   machine-type   2         controlplane
172.20.0.3   config      MachineType   machine-type   2         controlplane
Nodes with init type are incompatible with etcd recovery procedure.
init node can be converted to controlplane type with talosctl edit mc --on-reboot command followed
by node reboot with talosctl reboot command.
Preparing Control Plane Nodes
If some control plane nodes experienced hardware failure, replace them with new nodes. Use machine configuration backup to re-create the nodes with the same secret material and control plane settings to allow workers to join the recovered control plane.
If a control plane node is healthy but etcd isn’t, wipe the node’s EPHEMERAL partition to remove the etcd
data directory (make sure a database snapshot is taken before doing this):
talosctl -n <IP> reset --graceful=false --reboot --system-labels-to-wipe=EPHEMERAL
At this point, all control plane nodes should boot up, and etcd service should be in the Preparing state.
Kubernetes control plane endpoint should be pointed to the new control plane nodes if there were any changes to the node addresses.
Recovering from the Backup
Make sure all etcd service instances are in Preparing state:
$ talosctl -n <IP> service etcd
NODE     172.20.0.2
ID       etcd
STATE    Preparing
HEALTH   ?
EVENTS   [Preparing]: Running pre state (17s ago)
         [Waiting]: Waiting for service "cri" to be "up", time sync (18s ago)
         [Waiting]: Waiting for service "cri" to be "up", service "networkd" to be "up", time sync (20s ago)
Execute the bootstrap command against any control plane node passing the path to the etcd database snapshot:
$ talosctl -n <IP> bootstrap --recover-from=./db.snapshot
recovering from snapshot "./db.snapshot": hash c25fd181, revision 4193, total keys 1287, total size 3035136
Note: if database snapshot was copied out directly from the
etcddata directory usingtalosctl cp, add flag--recover-skip-hash-checkto skip integrity check on restore.
Talos node should print matching information in the kernel log:
recovering etcd from snapshot: hash c25fd181, revision 4193, total keys 1287, total size 3035136
{"level":"info","msg":"restoring snapshot","path":"/var/lib/etcd.snapshot","wal-dir":"/var/lib/etcd/member/wal","data-dir":"/var/lib/etcd","snap-dir":"/var/li}
{"level":"info","msg":"restored last compact revision","meta-bucket-name":"meta","meta-bucket-name-key":"finishedCompactRev","restored-compact-revision":3360}
{"level":"info","msg":"added member","cluster-id":"a3390e43eb5274e2","local-member-id":"0","added-peer-id":"eb4f6f534361855e","added-peer-peer-urls":["https:/}
{"level":"info","msg":"restored snapshot","path":"/var/lib/etcd.snapshot","wal-dir":"/var/lib/etcd/member/wal","data-dir":"/var/lib/etcd","snap-dir":"/var/lib/etcd/member/snap"}
Now etcd service should become healthy on the bootstrap node, Kubernetes control plane components
should start and control plane endpoint should become available.
Remaining control plane nodes join etcd cluster once control plane endpoint is up.
Single Control Plane Node Cluster
This guide applies to the single control plane clusters as well.
In fact, it is much more important to take regular snapshots of the etcd database in single control plane node
case, as loss of the control plane node might render the whole cluster irrecoverable without a backup.
17 - Discovery
Video Walkthrough
To see a live demo of Cluster Discovery, see the video below:
Registries
Peers are aggregated from a number of optional registries.
By default, Talos will use the kubernetes and service registries.
Either one can be disabled.
To disable a registry, set disabled to true (this option is the same for all registries):
For example, to disable the service registry:
cluster:
  discovery:
    enabled: true
    registries:
      service:
        disabled: true
Disabling all registries effectively disables member discovery altogether.
As of v0.14, Talos supports the
kubernetesandserviceregistries.
Kubernetes registry uses Kubernetes Node resource data and additional Talos annotations:
$ kubectl describe node <nodename>
Annotations:        cluster.talos.dev/node-id: Utoh3O0ZneV0kT2IUBrh7TgdouRcUW2yzaaMl4VXnCd
                    networking.talos.dev/assigned-prefixes: 10.244.0.0/32,10.244.0.1/24
                    networking.talos.dev/self-ips: 172.20.0.2,fd83:b1f7:fcb5:2802:8c13:71ff:feaf:7c94
...
Service registry uses external Discovery Service to exchange encrypted information about cluster members.
Resource Definitions
Talos v0.14 introduces seven new resources that can be used to introspect the new discovery and KubeSpan features.
Discovery
Identities
The node’s unique identity (base62 encoded random 32 bytes) can be obtained with:
Note: Using base62 allows the ID to be URL encoded without having to use the ambiguous URL-encoding version of base64.
$ talosctl get identities -o yaml
...
spec:
    nodeId: Utoh3O0ZneV0kT2IUBrh7TgdouRcUW2yzaaMl4VXnCd
Node identity is used as the unique Affiliate identifier.
Node identity resource is preserved in the STATE partition in node-identity.yaml file.
Node identity is preserved across reboots and upgrades, but it is regenerated if the node is reset (wiped).
Affiliates
An affiliate is a proposed member attributed to the fact that the node has the same cluster ID and secret.
$ talosctl get affiliates
ID                                             VERSION   HOSTNAME                 MACHINE TYPE   ADDRESSES
2VfX3nu67ZtZPl57IdJrU87BMjVWkSBJiL9ulP9TCnF    2         talos-default-master-2   controlplane   ["172.20.0.3","fd83:b1f7:fcb5:2802:986b:7eff:fec5:889d"]
6EVq8RHIne03LeZiJ60WsJcoQOtttw1ejvTS6SOBzhUA   2         talos-default-worker-1   worker         ["172.20.0.5","fd83:b1f7:fcb5:2802:cc80:3dff:fece:d89d"]
NVtfu1bT1QjhNq5xJFUZl8f8I8LOCnnpGrZfPpdN9WlB   2         talos-default-worker-2   worker         ["172.20.0.6","fd83:b1f7:fcb5:2802:2805:fbff:fe80:5ed2"]
Utoh3O0ZneV0kT2IUBrh7TgdouRcUW2yzaaMl4VXnCd    4         talos-default-master-1   controlplane   ["172.20.0.2","fd83:b1f7:fcb5:2802:8c13:71ff:feaf:7c94"]
b3DebkPaCRLTLLWaeRF1ejGaR0lK3m79jRJcPn0mfA6C   2         talos-default-master-3   controlplane   ["172.20.0.4","fd83:b1f7:fcb5:2802:248f:1fff:fe5c:c3f"]
One of the Affiliates with the ID matching node identity is populated from the node data, other Affiliates are pulled from the registries.
Enabled discovery registries run in parallel and discovered data is merged to build the list presented above.
Details about data coming from each registry can be queried from the cluster-raw namespace:
$ talosctl get affiliates --namespace=cluster-raw
ID                                                     VERSION   HOSTNAME                 MACHINE TYPE   ADDRESSES
k8s/2VfX3nu67ZtZPl57IdJrU87BMjVWkSBJiL9ulP9TCnF        3         talos-default-master-2   controlplane   ["172.20.0.3","fd83:b1f7:fcb5:2802:986b:7eff:fec5:889d"]
k8s/6EVq8RHIne03LeZiJ60WsJcoQOtttw1ejvTS6SOBzhUA       2         talos-default-worker-1   worker         ["172.20.0.5","fd83:b1f7:fcb5:2802:cc80:3dff:fece:d89d"]
k8s/NVtfu1bT1QjhNq5xJFUZl8f8I8LOCnnpGrZfPpdN9WlB       2         talos-default-worker-2   worker         ["172.20.0.6","fd83:b1f7:fcb5:2802:2805:fbff:fe80:5ed2"]
k8s/b3DebkPaCRLTLLWaeRF1ejGaR0lK3m79jRJcPn0mfA6C       3         talos-default-master-3   controlplane   ["172.20.0.4","fd83:b1f7:fcb5:2802:248f:1fff:fe5c:c3f"]
service/2VfX3nu67ZtZPl57IdJrU87BMjVWkSBJiL9ulP9TCnF    23        talos-default-master-2   controlplane   ["172.20.0.3","fd83:b1f7:fcb5:2802:986b:7eff:fec5:889d"]
service/6EVq8RHIne03LeZiJ60WsJcoQOtttw1ejvTS6SOBzhUA   26        talos-default-worker-1   worker         ["172.20.0.5","fd83:b1f7:fcb5:2802:cc80:3dff:fece:d89d"]
service/NVtfu1bT1QjhNq5xJFUZl8f8I8LOCnnpGrZfPpdN9WlB   20        talos-default-worker-2   worker         ["172.20.0.6","fd83:b1f7:fcb5:2802:2805:fbff:fe80:5ed2"]
service/b3DebkPaCRLTLLWaeRF1ejGaR0lK3m79jRJcPn0mfA6C   14        talos-default-master-3   controlplane   ["172.20.0.4","fd83:b1f7:fcb5:2802:248f:1fff:fe5c:c3f"]
Each Affiliate ID is prefixed with k8s/ for data coming from the Kubernetes registry and with service/ for data coming from the discovery service.
Members
A member is an affiliate that has been approved to join the cluster. The members of the cluster can be obtained with:
$ talosctl get members
ID                       VERSION   HOSTNAME                 MACHINE TYPE   OS                ADDRESSES
talos-default-master-1   2         talos-default-master-1   controlplane   Talos (v0.14.0)   ["172.20.0.2","fd83:b1f7:fcb5:2802:8c13:71ff:feaf:7c94"]
talos-default-master-2   1         talos-default-master-2   controlplane   Talos (v0.14.0)   ["172.20.0.3","fd83:b1f7:fcb5:2802:986b:7eff:fec5:889d"]
talos-default-master-3   1         talos-default-master-3   controlplane   Talos (v0.14.0)   ["172.20.0.4","fd83:b1f7:fcb5:2802:248f:1fff:fe5c:c3f"]
talos-default-worker-1   1         talos-default-worker-1   worker         Talos (v0.14.0)   ["172.20.0.5","fd83:b1f7:fcb5:2802:cc80:3dff:fece:d89d"]
talos-default-worker-2   1         talos-default-worker-2   worker         Talos (v0.14.0)   ["172.20.0.6","fd83:b1f7:fcb5:2802:2805:fbff:fe80:5ed2"]
18 - Disk Encryption
It is possible to enable encryption for system disks at the OS level.
As of this writing, only STATE and EPHEMERAL partitions can be encrypted.
STATE contains the most sensitive node data: secrets and certs.
EPHEMERAL partition may contain some sensitive workload data.
Data is encrypted using LUKS2, which is provided by the Linux kernel modules and cryptsetup utility.
The operating system will run additional setup steps when encryption is enabled.
If the disk encryption is enabled for the STATE partition, the system will:
- Save STATE encryption config as JSON in the META partition.
- Before mounting the STATE partition, load encryption configs either from the machine config or from the META partition. Note that the machine config is always preferred over the META one.
- Before mounting the STATE partition, format and encrypt it. This occurs only if the STATE partition is empty and has no filesystem.
If the disk encryption is enabled for the EPHEMERAL partition, the system will:
- Get the encryption config from the machine config.
- Before mounting the EPHEMERAL partition, encrypt and format it. This occurs only if the EPHEMERAL partition is empty and has no filesystem.
Configuration
Right now this encryption is disabled by default. To enable disk encryption you should modify the machine configuration with the following options:
machine:
  ...
  systemDiskEncryption:
    ephemeral:
      keys:
        - nodeID: {}
          slot: 0
    state:
      keys:
        - nodeID: {}
          slot: 0
Encryption Keys
Note: What the LUKS2 docs call “keys” are, in reality, a passphrase. When this passphrase is added, LUKS2 runs argon2 to create an actual key from that passphrase.
LUKS2 supports up to 32 encryption keys and it is possible to specify all of them in the machine configuration. Talos always tries to sync the keys list defined in the machine config with the actual keys defined for the LUKS2 partition. So if you update the keys list you should have at least one key that is not changed to be used for keys management.
When you define a key you should specify the key kind and the slot:
machine:
  ...
  state:
    keys:
      - nodeID: {} # key kind
        slot: 1

  ephemeral:
    keys:
      - static:
          passphrase: supersecret
        slot: 0
Take a note that key order does not play any role on which key slot is used. Every key must always have a slot defined.
Encryption Key Kinds
Talos supports two kinds of keys:
nodeIDwhich is generated using the node UUID and the partition label (note that if the node UUID is not really random it will fail the entropy check).staticwhich you define right in the configuration.
Note: Use static keys only if your STATE partition is encrypted and only for the EPHEMERAL partition. For the STATE partition it will be stored in the META partition, which is not encrypted.
Key Rotation
It is necessary to do talosctl apply-config a couple of times to rotate keys, since there is a need to always maintain a single working key while changing the other keys around it.
So, for example, first add a new key:
machine:
  ...
  ephemeral:
    keys:
      - static:
          passphrase: oldkey
        slot: 0
      - static:
          passphrase: newkey
        slot: 1
  ...
Run:
talosctl apply-config -n <node> -f config.yaml
Then remove the old key:
machine:
  ...
  ephemeral:
    keys:
      - static:
          passphrase: newkey
        slot: 1
  ...
Run:
talosctl apply-config -n <node> -f config.yaml
Going from Unencrypted to Encrypted and Vice Versa
Ephemeral Partition
There is no in-place encryption support for the partitions right now, so to avoid losing any data only empty partitions can be encrypted.
As such, migration from unencrypted to encrypted needs some additional handling, especially around explicitly wiping partitions.
apply-configshould be called with--on-rebootflag.- Partition should be wiped after
apply-config, but before the reboot.
Edit your machine config and add the encryption configuration:
vim config.yaml
Apply the configuration with --on-reboot flag:
talosctl apply-config -f config.yaml -n <node ip> --on-reboot
Wipe the partition you’re going to encrypt:
talosctl reset --system-labels-to-wipe EPHEMERAL -n <node ip> --reboot=true
That’s it! After you run the last command, the partition will be wiped and the node will reboot. During the next boot the system will encrypt the partition.
State Partition
Calling wipe against the STATE partition will make the node lose the config, so the previous flow is not going to work.
The flow should be to first wipe the STATE partition:
talosctl reset --system-labels-to-wipe STATE -n <node ip> --reboot=true
Node will enter into maintenance mode, then run apply-config with --insecure flag:
talosctl apply-config --insecure -n <node ip> -f config.yaml
After installation is complete the node should encrypt the STATE partition.
19 - Editing Machine Configuration
Talos node state is fully defined by machine configuration. Initial configuration is delivered to the node at bootstrap time, but configuration can be updated while the node is running.
Note: Be sure that config is persisted so that configuration updates are not overwritten on reboots. Configuration persistence was enabled by default since Talos 0.5 (
persist: truein machine configuration).
There are three talosctl commands which facilitate machine configuration updates:
talosctl apply-configto apply configuration from the filetalosctl edit machineconfigto launch an editor with existing node configuration, make changes and apply configuration backtalosctl patch machineconfigto apply automated machine configuration via JSON patch
Each of these commands can operate in one of three modes:
- apply change with a reboot (default): update configuration, reboot Talos node to apply configuration change
- apply change immediately (
--immediateflag): change is applied immediately without a reboot, only.clustersub-tree of the machine configuration can be updated in Talos 0.9 - apply change on next reboot (
--on-reboot): change is staged to be applied after a reboot, but node is not rebooted
Note: applying change on next reboot (
--on-reboot) doesn’t modify current node configuration, so next call totalosctl edit machineconfig --on-rebootwill not see changes
talosctl apply-config
This command is mostly used to submit initial machine configuration to the node (generated by talosctl gen config).
It can be used to apply new configuration from the file to the running node as well, but most of the time it’s not convenient, as it doesn’t operate on the current node machine configuration.
Example:
talosctl -n <IP> apply-config -f config.yaml
Command apply-config can also be invoked as apply machineconfig:
talosctl -n <IP> apply machineconfig -f config.yaml
Applying machine configuration immediately (without a reboot):
talosctl -n IP apply machineconfig -f config.yaml --immediate
taloctl edit machineconfig
Command talosctl edit loads current machine configuration from the node and launches configured editor to modify the config.
If config hasn’t been changed in the editor (or if updated config is empty), update is not applied.
Note: Talos uses environment variables
TALOS_EDITOR,EDITORto pick up the editor preference. If environment variables are missing,vieditor is used by default.
Example:
talosctl -n <IP> edit machineconfig
Configuration can be edited for multiple nodes if multiple IP addresses are specified:
talosctl -n <IP1>,<IP2>,... edit machineconfig
Applying machine configuration change immediately (without a reboot):
talosctl -n <IP> edit machineconfig --immediate
talosctl patch machineconfig
Command talosctl patch works similar to talosctl edit command - it loads current machine configuration, but instead of launching configured editor it applies JSON patch to the configuration and writes result back to the node.
Example, updating kubelet version (with a reboot):
$ talosctl -n <IP> patch machineconfig -p '[{"op": "replace", "path": "/machine/kubelet/image", "value": "ghcr.io/talos-systems/kubelet:v1.20.5"}]'
patched mc at the node <IP>
Updating kube-apiserver version in immediate mode (without a reboot):
$ talosctl -n <IP> patch machineconfig --immediate -p '[{"op": "replace", "path": "/cluster/apiServer/image", "value": "k8s.gcr.io/kube-apiserver:v1.20.5"}]'
patched mc at the node <IP>
Patch might be applied to multiple nodes when multiple IPs are specified:
taloctl -n <IP1>,<IP2>,... patch machineconfig --immediate -p '[{...}]'
Recovering from Node Boot Failures
If a Talos node fails to boot because of wrong configuration (for example, control plane endpoint is incorrect), configuration can be updated to fix the issue.
If the boot sequence is still running, Talos might refuse applying config in default mode.
In that case --on-reboot mode can be used coupled with talosctl reboot command to trigger a reboot and apply configuration update.
20 - KubeSpan
KubeSpan is a feature of Talos that automates the setup and maintenance of a full mesh WireGuard network for your cluster, giving you the ability to operate hybrid Kubernetes clusters that can span the edge, datacenter, and cloud. Management of keys and discovery of peers can be completely automated for a zero-touch experience that makes it simple and easy to create hybrid clusters.
Video Walkthrough
To learn more about KubeSpan, see the video below:
To see a live demo of KubeSpan, see one the videos below:
Enabling
Creating a New Cluster
To generate configuration files for a new cluster, we can use the --with-kubespan flag in talosctl gen config.
This will enable peer discovery and KubeSpan.
...
    # Provides machine specific network configuration options.
    network:
        # Configures KubeSpan feature.
        kubespan:
            enabled: true # Enable the KubeSpan feature.
...
    # Configures cluster member discovery.
    discovery:
        enabled: true # Enable the cluster membership discovery feature.
        # Configure registries used for cluster member discovery.
        registries:
            # Kubernetes registry uses Kubernetes API server to discover cluster members and stores additional information
            kubernetes: {}
            # Service registry is using an external service to push and pull information about cluster members.
            service: {}
...
# Provides cluster specific configuration options.
cluster:
    id: yui150Ogam0pdQoNZS2lZR-ihi8EWxNM17bZPktJKKE= # Globally unique identifier for this cluster.
    secret: dAmFcyNmDXusqnTSkPJrsgLJ38W8oEEXGZKM0x6Orpc= # Shared secret of cluster.
The default discovery service is an external service hosted for free by Sidero Labs. The default value is
https://discovery.talos.dev/. Contact Sidero Labs if you need to run this service privately.
Upgrading an Existing Cluster
In order to enable KubeSpan for an existing cluster, upgrade to the latest v0.14. Once your cluster is upgraded, the configuration of each node must contain the globally unique identifier, the shared secret for the cluster, and have KubeSpan and discovery enabled.
Note: Discovery can be used without KubeSpan, but KubeSpan requires at least one discovery registry.
Talos v0.11 or Less
If you are migrating from Talos v0.11 or less, we need to generate a cluster ID and secret.
To generate an id:
$ openssl rand -base64 32
EUsCYz+oHNuBppS51P9aKSIOyYvIPmbZK944PWgiyMQ=
To generate a secret:
$ openssl rand -base64 32
AbdsWjY9i797kGglghKvtGdxCsdllX9CemLq+WGVeaw=
Now, update the configuration of each node with the cluster with the generated id and secret.
You should end up with the addition of something like this (your id and secret should be different):
cluster:
  id: EUsCYz+oHNuBppS51P9aKSIOyYvIPmbZK944PWgiyMQ=
  secret: AbdsWjY9i797kGglghKvtGdxCsdllX9CemLq+WGVeaw=
Note: This can be applied in immediate mode (no reboot required) by passing
--immediateto either theedit machineconfigorapply-configsubcommands.
Talos v0.12
Enable kubespan and discovery.
machine:
  network:
    kubespan:
      enabled: true
cluster:
  discovery:
    enabled: true
Resource Definitions
KubeSpanIdentities
A node’s WireGuard identities can be obtained with:
$ talosctl get kubespanidentities -o yaml
...
spec:
    address: fd83:b1f7:fcb5:2802:8c13:71ff:feaf:7c94/128
    subnet: fd83:b1f7:fcb5:2802::/64
    privateKey: gNoasoKOJzl+/B+uXhvsBVxv81OcVLrlcmQ5jQwZO08=
    publicKey: NzW8oeIH5rJyY5lefD9WRoHWWRr/Q6DwsDjMX+xKjT4=
Talos automatically configures unique IPv6 address for each node in the cluster-specific IPv6 ULA prefix.
Wireguard private key is generated for the node, private key never leaves the node while public key is published through the cluster discovery.
KubeSpanIdentity is persisted across reboots and upgrades in STATE partition in the file kubespan-identity.yaml.
KubeSpanPeerSpecs
A node’s WireGuard peers can be obtained with:
$ talosctl get kubespanpeerspecs
ID                                             VERSION   LABEL                    ENDPOINTS
06D9QQOydzKrOL7oeLiqHy9OWE8KtmJzZII2A5/FLFI=   2         talos-default-master-2   ["172.20.0.3:51820"]
THtfKtfNnzJs1nMQKs5IXqK0DFXmM//0WMY+NnaZrhU=   2         talos-default-master-3   ["172.20.0.4:51820"]
nVHu7l13uZyk0AaI1WuzL2/48iG8af4WRv+LWmAax1M=   2         talos-default-worker-2   ["172.20.0.6:51820"]
zXP0QeqRo+CBgDH1uOBiQ8tA+AKEQP9hWkqmkE/oDlc=   2         talos-default-worker-1   ["172.20.0.5:51820"]
The peer ID is the Wireguard public key.
KubeSpanPeerSpecs are built from the cluster discovery data.
KubeSpanPeerStatuses
The status of a node’s WireGuard peers can be obtained with:
$ talosctl get kubespanpeerstatuses
ID                                             VERSION   LABEL                    ENDPOINT           STATE   RX         TX
06D9QQOydzKrOL7oeLiqHy9OWE8KtmJzZII2A5/FLFI=   63        talos-default-master-2   172.20.0.3:51820   up      15043220   17869488
THtfKtfNnzJs1nMQKs5IXqK0DFXmM//0WMY+NnaZrhU=   62        talos-default-master-3   172.20.0.4:51820   up      14573208   18157680
nVHu7l13uZyk0AaI1WuzL2/48iG8af4WRv+LWmAax1M=   60        talos-default-worker-2   172.20.0.6:51820   up      130072     46888
zXP0QeqRo+CBgDH1uOBiQ8tA+AKEQP9hWkqmkE/oDlc=   60        talos-default-worker-1   172.20.0.5:51820   up      130044     46556
KubeSpan peer status includes following information:
- the actual endpoint used for peer communication
- link state:
unknown: the endpoint was just changed, link state is not known yetup: there is a recent handshake from the peerdown: there is no handshake from the peer
- number of bytes sent/received over the Wireguard link with the peer
If the connection state goes down, Talos will be cycling through the available endpoints until it finds the one which works.
Peer status information is updated every 30 seconds.
KubeSpanEndpoints
A node’s WireGuard endpoints (peer addresses) can be obtained with:
$ talosctl get kubespanendpoints
ID                                             VERSION   ENDPOINT           AFFILIATE ID
06D9QQOydzKrOL7oeLiqHy9OWE8KtmJzZII2A5/FLFI=   1         172.20.0.3:51820   2VfX3nu67ZtZPl57IdJrU87BMjVWkSBJiL9ulP9TCnF
THtfKtfNnzJs1nMQKs5IXqK0DFXmM//0WMY+NnaZrhU=   1         172.20.0.4:51820   b3DebkPaCRLTLLWaeRF1ejGaR0lK3m79jRJcPn0mfA6C
nVHu7l13uZyk0AaI1WuzL2/48iG8af4WRv+LWmAax1M=   1         172.20.0.6:51820   NVtfu1bT1QjhNq5xJFUZl8f8I8LOCnnpGrZfPpdN9WlB
zXP0QeqRo+CBgDH1uOBiQ8tA+AKEQP9hWkqmkE/oDlc=   1         172.20.0.5:51820   6EVq8RHIne03LeZiJ60WsJcoQOtttw1ejvTS6SOBzhUA
The endpoint ID is the base64 encoded WireGuard public key.
The observed endpoints are submitted back to the discovery service (if enabled) so that other peers can try additional endpoints to establish the connection.
21 - Logging
Viewing logs
Kernel messages can be retrieved with talosctl dmesg command:
$ talosctl -n 172.20.1.2 dmesg

172.20.1.2: kern:    info: [2021-11-10T10:09:37.662764956Z]: Command line: init_on_alloc=1 slab_nomerge pti=on consoleblank=0 nvme_core.io_timeout=4294967295 random.trust_cpu=on printk.devkmsg=on ima_template=ima-ng ima_appraise=fix ima_hash=sha512 console=ttyS0 reboot=k panic=1 talos.shutdown=halt talos.platform=metal talos.config=http://172.20.1.1:40101/config.yaml
[...]
Service logs can be retrieved with talosctl logs command:
$ talosctl -n 172.20.1.2 services

NODE         SERVICE      STATE     HEALTH   LAST CHANGE   LAST EVENT
172.20.1.2   apid         Running   OK       19m27s ago    Health check successful
172.20.1.2   containerd   Running   OK       19m29s ago    Health check successful
172.20.1.2   cri          Running   OK       19m27s ago    Health check successful
172.20.1.2   etcd         Running   OK       19m22s ago    Health check successful
172.20.1.2   kubelet      Running   OK       19m20s ago    Health check successful
172.20.1.2   machined     Running   ?        19m30s ago    Service started as goroutine
172.20.1.2   trustd       Running   OK       19m27s ago    Health check successful
172.20.1.2   udevd        Running   OK       19m28s ago    Health check successful

$ talosctl -n 172.20.1.2 logs machined

172.20.1.2: [talos] task setupLogger (1/1): done, 106.109µs
172.20.1.2: [talos] phase logger (1/7): done, 564.476µs
[...]
Container logs for Kubernetes pods can be retrieved with talosctl logs -k command:
$ talosctl -n 172.20.1.2 containers -k
NODE         NAMESPACE   ID                                                 IMAGE                                                         PID    STATUS
172.20.1.2   k8s.io      kube-system/kube-flannel-dk6d5                     k8s.gcr.io/pause:3.5                                          1329   SANDBOX_READY
172.20.1.2   k8s.io      └─ kube-system/kube-flannel-dk6d5:install-cni      ghcr.io/talos-systems/install-cni:v0.7.0-alpha.0-1-g2bb2efc   0      CONTAINER_EXITED
172.20.1.2   k8s.io      └─ kube-system/kube-flannel-dk6d5:install-config   quay.io/coreos/flannel:v0.13.0                                0      CONTAINER_EXITED
172.20.1.2   k8s.io      └─ kube-system/kube-flannel-dk6d5:kube-flannel     quay.io/coreos/flannel:v0.13.0                                1610   CONTAINER_RUNNING
172.20.1.2   k8s.io      kube-system/kube-proxy-gfkqj                       k8s.gcr.io/pause:3.5                                          1311   SANDBOX_READY
172.20.1.2   k8s.io      └─ kube-system/kube-proxy-gfkqj:kube-proxy         k8s.gcr.io/kube-proxy:v1.23.0                                 1379   CONTAINER_RUNNING

$ talosctl -n 172.20.1.2 logs -k kube-system/kube-proxy-gfkqj:kube-proxy
172.20.1.2: 2021-11-30T19:13:20.567825192Z stderr F I1130 19:13:20.567737       1 server_others.go:138] "Detected node IP" address="172.20.0.3"
172.20.1.2: 2021-11-30T19:13:20.599684397Z stderr F I1130 19:13:20.599613       1 server_others.go:206] "Using iptables Proxier"
[...]
Sending logs
Service logs
You can enable logs sendings in machine configuration:
machine:
  logging:
    destinations:
      - endpoint: "udp://127.0.0.1:12345/"
        format: "json_lines"
      - endpoint: "tcp://host:5044/"
        format: "json_lines"
Several destinations can be specified.
Supported protocols are UDP and TCP.
The only currently supported format is json_lines:
{
  "msg": "[talos] apply config request: immediate true, on reboot false",
  "talos-level": "info",
  "talos-service": "machined",
  "talos-time": "2021-11-10T10:48:49.294858021Z"
}
Messages are newline-separated when sent over TCP.
Over UDP messages are sent with one message per packet.
msg, talos-level, talos-service, and talos-time fields are always present; there may be additional fields.
Kernel logs
Kernel log delivery can be enabled with the talos.logging.kernel kernel command line argument, which can be specified
in the .machine.installer.extraKernelArgs:
machine:
  install:
    extraKernelArgs:
      - talos.logging.kernel=tcp://host:5044/
Kernel log destination is specified in the same way as service log endpoint.
The only supported format is json_lines.
Sample message:
{
  "clock":6252819, // time relative to the kernel boot time
  "facility":"user",
  "msg":"[talos] task startAllServices (1/1): waiting for 6 services\n",
  "priority":"warning",
  "seq":711,
  "talos-level":"warn", // Talos-translated `priority` into common logging level
  "talos-time":"2021-11-26T16:53:21.3258698Z" // Talos-translated `clock` using current time
}
extraKernelArgsin the machine configuration are only applied on Talos upgrades, not just by applying the config. (Upgrading to the same version is fine).
Filebeat example
To forward logs to other Log collection services, one way to do this is sending them to a Filebeat running in the cluster itself (in the host network), which takes care of forwarding it to other endpoints (and the necessary transformations).
If Elastic Cloud on Kubernetes is being used, the following Beat (custom resource) configuration might be helpful:
apiVersion: beat.k8s.elastic.co/v1beta1
kind: Beat
metadata:
  name: talos
spec:
  type: filebeat
  version: 7.15.1
  elasticsearchRef:
    name: talos
  config:
    filebeat.inputs:
      - type: "udp"
        host: "127.0.0.1:12345"
        processors:
          - decode_json_fields:
              fields: ["message"]
              target: ""
          - timestamp:
              field: "talos-time"
              layouts:
                - "2006-01-02T15:04:05.999999999Z07:00"
          - drop_fields:
              fields: ["message", "talos-time"]
          - rename:
              fields:
                - from: "msg"
                  to: "message"

  daemonSet:
    updateStrategy:
      rollingUpdate:
        maxUnavailable: 100%
    podTemplate:
      spec:
        dnsPolicy: ClusterFirstWithHostNet
        hostNetwork: true
        securityContext:
          runAsUser: 0
        containers:
          - name: filebeat
            ports:
              - protocol: UDP
                containerPort: 12345
                hostPort: 12345
The input configuration ensures that messages and timestamps are extracted properly. Refer to the Filebeat documentation on how to forward logs to other outputs.
Also note the hostNetwork: true in the daemonSet configuration.
This ensures filebeat uses the host network, and listens on 127.0.0.1:12345
(UDP) on every machine, which can then be specified as a logging endpoint in
the machine configuration.
22 - Managing PKI
Generating an Administrator Key Pair
In order to create a key pair, you will need the root CA.
Save the CA public key, and CA private key as ca.crt, and ca.key respectively.
Now, run the following commands to generate a certificate:
talosctl gen key --name admin
talosctl gen csr --key admin.key --ip 127.0.0.1
talosctl gen crt --ca ca --csr admin.csr --name admin
Now, base64 encode admin.crt, and admin.key:
cat admin.crt | base64
cat admin.key | base64
You can now set the crt and key fields in the talosconfig to the base64 encoded strings.
Renewing an Expired Administrator Certificate
In order to renew the certificate, you will need the root CA, and the admin private key. The base64 encoded key can be found in any one of the control plane node’s configuration file. Where it is exactly will depend on the specific version of the configuration file you are using.
Save the CA public key, CA private key, and admin private key as ca.crt, ca.key, and admin.key respectively.
Now, run the following commands to generate a certificate:
talosctl gen csr --key admin.key --ip 127.0.0.1
talosctl gen crt --ca ca --csr admin.csr --name admin
You should see admin.crt in your current directory.
Now, base64 encode admin.crt:
cat admin.crt | base64
You can now set the certificate in the talosconfig to the base64 encoded string.
23 - Resetting a Machine
From time to time, it may be beneficial to reset a Talos machine to its “original” state. Bear in mind that this is a destructive action for the given machine. Doing this means removing the machine from Kubernetes, Etcd (if applicable), and clears any data on the machine that would normally persist a reboot.
WARNING: Running a
talosctl reseton cloud VM’s might result in the VM being unable to boot as this wipes the entire disk. It might be more useful to just wipe theSTATEandEPHEMERALpartitions on a cloud VM if not booting viaiPXE.talosctl reset --system-labels-to-wipe STATE --system-labels-to-wipe EPHEMERAL
The API command for doing this is talosctl reset.
There are a couple of flags as part of this command:
Flags:
      --graceful                        if true, attempt to cordon/drain node and leave etcd (if applicable) (default true)
      --reboot                          if true, reboot the node after resetting instead of shutting down
      --system-labels-to-wipe strings   if set, just wipe selected system disk partitions by label but keep other partitions intact keep other partitions intact
The graceful flag is especially important when considering HA vs. non-HA Talos clusters.
If the machine is part of an HA cluster, a normal, graceful reset should work just fine right out of the box as long as the cluster is in a good state.
However, if this is a single node cluster being used for testing purposes, a graceful reset is not an option since Etcd cannot be “left” if there is only a single member.
In this case, reset should be used with --graceful=false to skip performing checks that would normally block the reset.
24 - Role-based access control (RBAC)
Talos v0.11 introduced initial support for role-based access control (RBAC). This guide will explain what that is and how to enable it without losing access to the cluster.
RBAC in Talos
Talos uses certificates to authorize users. The certificate subject’s organization field is used to encode user roles. There is a set of predefined roles that allow access to different API methods:
os:admingrants access to all methods;os:readergrants access to “safe” methods (for example, that includes the ability to list files, but does not include the ability to read files content);os:etcd:backupgrants access to/machine.MachineService/EtcdSnapshotmethod.
Roles in the current talosconfig can be checked with the following command:
$ talosctl config info

[...]
Roles:               os:admin
[...]
RBAC is enabled by default in new clusters created with talosctl v0.11+ and disabled otherwise.
Enabling RBAC
First, both the Talos cluster and talosctl tool should be upgraded.
Then the talosctl config new command should be used to generate a new client configuration with the os:admin role.
Additional configurations and certificates for different roles can be generated by passing --roles flag:
talosctl config new --roles=os:reader reader
That command will create a new client configuration file reader with a new certificate with os:reader role.
After that, RBAC should be enabled in the machine configuration:
machine:
  features:
    rbac: true
25 - Storage
In Kubernetes, using storage in the right way is well-facilitated by the API.
However, unless you are running in a major public cloud, that API may not be hooked up to anything.
This frequently sends users down a rabbit hole of researching all the various options for storage backends for their platform, for Kubernetes, and for their workloads.
There are a lot of options out there, and it can be fairly bewildering.
For Talos, we try to limit the options somewhat to make the decision-making easier.
Public Cloud
If you are running on a major public cloud, use their block storage. It is easy and automatic.
Storage Clusters
Talos recommends having a separate disks (apart from the Talos install disk) to be used for storage.
Redundancy in storage is usually very important. Scaling capabilities, reliability, speed, maintenance load, and ease of use are all factors you must consider when managing your own storage.
Running a storage cluster can be a very good choice when managing your own storage, and there are two project we recommend, depending on your situation.
If you need vast amounts of storage composed of more than a dozen or so disks, just use Rook to manage Ceph. Also, if you need both mount-once and mount-many capabilities, Ceph is your answer. Ceph also bundles in an S3-compatible object store. The down side of Ceph is that there are a lot of moving parts.
Please note that most people should never use mount-many semantics. NFS is pervasive because it is old and easy, not because it is a good idea. While it may seem like a convenience at first, there are all manner of locking, performance, change control, and reliability concerns inherent in any mount-many situation, so we strongly recommend you avoid this method.
If your storage needs are small enough to not need Ceph, use Mayastor.
Rook/Ceph
Ceph is the grandfather of open source storage clusters. It is big, has a lot of pieces, and will do just about anything. It scales better than almost any other system out there, open source or proprietary, being able to easily add and remove storage over time with no downtime, safely and easily. It comes bundled with RadosGW, an S3-compatible object store. It comes with CephFS, a NFS-like clustered filesystem. And of course, it comes with RBD, a block storage system.
With the help of Rook, the vast majority of the complexity of Ceph is hidden away by a very robust operator, allowing you to control almost everything about your Ceph cluster from fairly simple Kubernetes CRDs.
So if Ceph is so great, why not use it for everything?
Ceph can be rather slow for small clusters. It relies heavily on CPUs and massive parallelisation to provide good cluster performance, so if you don’t have much of those dedicated to Ceph, it is not going to be well-optimised for you. Also, if your cluster is small, just running Ceph may eat up a significant amount of the resources you have available.
Troubleshooting Ceph can be difficult if you do not understand its architecture. There are lots of acronyms and the documentation assumes a fair level of knowledge. There are very good tools for inspection and debugging, but this is still frequently seen as a concern.
Mayastor
Mayastor is an OpenEBS project built in Rust utilising the modern NVMEoF system. (Despite the name, Mayastor does not require you to have NVME drives.) It is fast and lean but still cluster-oriented and cloud native. Unlike most of the other OpenEBS project, it is not built on the ancient iSCSI system.
Unlike Ceph, Mayastor is just a block store. It focuses on block storage and does it well. It is much less complicated to set up than Ceph, but you probably wouldn’t want to use it for more than a few dozen disks.
Mayastor is new, maybe too new. If you’re looking for something well-tested and battle-hardened, this is not it. If you’re looking for something lean, future-oriented, and simpler than Ceph, it might be a great choice.
Video Walkthrough
To see a live demo of this section, see the video below:
Prep Nodes
Either during initial cluster creation or on running worker nodes, several machine config values should be edited.
This information is gathered from the Mayastor documentation.
We need to set the vm.nr_hugepages sysctl and add openebs.io/engine=mayastor labels to the nodes which are meant to be storage nodes
This can be done with talosctl patch machineconfig or via config patches during talosctl gen config.
Some examples are shown below, modify as needed.
Using gen config
talosctl gen config my-cluster https://mycluster.local:6443 --config-patch '[{"op": "add", "path": "/machine/sysctls", "value": {"vm.nr_hugepages": "1024"}}, {"op": "add", "path": "/machine/kubelet/extraArgs", "value": {"node-labels": "openebs.io/engine=mayastor"}}]'
Patching an existing node
talosctl patch --immediate machineconfig -n <node ip> --patch '[{"op": "add", "path": "/machine/sysctls", "value": {"vm.nr_hugepages": "1024"}}, {"op": "add", "path": "/machine/kubelet/extraArgs", "value": {"node-labels": "openebs.io/engine=mayastor"}}]'
Note: If you are adding/updating the
vm.nr_hugepageson a node which already had theopenebs.io/engine=mayastorlabel set, you’d need to restart kubelet so that it picks up the new value, by issuing the following command
talosctl -n <node ip> service kubelet restart
Deploy Mayastor
Continue setting up Mayastor using the official documentation.
NFS
NFS is an old pack animal long past its prime. However, it is supported by a wide variety of systems. You don’t want to use it unless you have to, but unfortunately, that “have to” is too frequent.
NFS is slow, has all kinds of bottlenecks involving contention, distributed locking, single points of service, and more.
The NFS client is part of the kubelet image maintained by the Talos team.
This means that the version installed in your running kubelet is the version of NFS supported by Talos.
You can reduce some of the contention problems by parceling Persistent Volumes from separate underlying directories.
Object storage
Ceph comes with an S3-compatible object store, but there are other options, as well. These can often be built on top of other storage backends. For instance, you may have your block storage running with Mayastor but assign a Pod a large Persistent Volume to serve your object store.
One of the most popular open source add-on object stores is MinIO.
Others (iSCSI)
The most common remaining systems involve iSCSI in one form or another. This includes things like the original OpenEBS, Rancher’s Longhorn, and many proprietary systems. Unfortunately, Talos does not support iSCSI-based systems. iSCSI in Linux is facilitated by open-iscsi. This system was designed long before containers caught on, and it is not well suited to the task, especially when coupled with a read-only host operating system.
One day, we hope to work out a solution for facilitating iSCSI-based systems, but this is not yet available.
26 - Troubleshooting Control Plane
This guide is written as series of topics and detailed answers for each topic. It starts with basics of control plane and goes into Talos specifics.
In this guide we assume that Talos client config is available and Talos API access is available.
Kubernetes client configuration can be pulled from control plane nodes with talosctl -n <IP> kubeconfig
(this command works before Kubernetes is fully booted).
What is a control plane node?
Talos nodes which have .machine.type of init and controlplane are control plane nodes.
The only difference between init and controlplane nodes is that init node automatically
bootstraps a single-node etcd cluster on a first boot if the etcd data directory is empty.
A node with type init can be replaced with a controlplane node which is triggered to run etcd bootstrap
with talosctl --nodes <IP> bootstrap command.
Use of init type nodes is discouraged, as it might lead to split-brain scenario if one node in
existing cluster is reinstalled while config type is still init.
It is critical to make sure only one control plane runs in bootstrap mode (either with node type init or
via bootstrap API/talosctl bootstrap), as having more than node in bootstrap mode leads to split-brain
scenario (multiple etcd clusters are built instead of a single cluster).
What is special about control plane node?
Control plane nodes in Talos run etcd which provides data store for Kubernetes and Kubernetes control plane
components (kube-apiserver, kube-controller-manager and kube-scheduler).
Control plane nodes are tainted by default to prevent workloads from being scheduled to control plane nodes.
How many control plane nodes should be deployed?
With a single control plane node, cluster is not HA: if that single node experiences hardware failure, cluster control plane is broken and can’t be recovered. Single control plane node clusters are still used as test clusters and in edge deployments, but it should be noted that this setup is not HA.
Number of control plane should be odd (1, 3, 5, …), as with even number of nodes, etcd quorum doesn’t tolerate failures correctly: e.g. with 2 control plane nodes quorum is 2, so failure of any node breaks quorum, so this setup is almost equivalent to single control plane node cluster.
With three control plane nodes cluster can tolerate a failure of any single control plane node. With five control plane nodes cluster can tolerate failure of any two control plane nodes.
What is control plane endpoint?
Kubernetes requires having a control plane endpoint which points to any healthy API server running on a control plane node.
Control plane endpoint is specified as URL like https://endpoint:6443/.
At any point in time, even during failures control plane endpoint should point to a healthy API server instance.
As kube-apiserver runs with host network, control plane endpoint should point to one of the control plane node IPs: node1:6443, node2:6443, …
For single control plane node clusters, control plane endpoint might be https://IP:6443/ or https://DNS:6443/, where IP is the IP of the control plane node and DNS points to IP.
DNS form of the endpoint allows to change the IP address of the control plane if that IP changes over time.
For HA clusters, control plane can be implemented as:
- TCP L7 loadbalancer with active health checks against port 6443
- round-robin DNS with active health checks against port 6443
- BGP anycast IP with health checks
- virtual shared L2 IP
It is critical that control plane endpoint works correctly during cluster bootstrap phase, as nodes discover each other using control plane endpoint.
kubelet is not running on control plane node
Service kubelet should be running on control plane node as soon as networking is configured:
$ talosctl -n <IP> service kubelet
NODE     172.20.0.2
ID       kubelet
STATE    Running
HEALTH   OK
EVENTS   [Running]: Health check successful (2m54s ago)
         [Running]: Health check failed: Get "http://127.0.0.1:10248/healthz": dial tcp 127.0.0.1:10248: connect: connection refused (3m4s ago)
         [Running]: Started task kubelet (PID 2334) for container kubelet (3m6s ago)
         [Preparing]: Creating service runner (3m6s ago)
         [Preparing]: Running pre state (3m15s ago)
         [Waiting]: Waiting for service "timed" to be "up" (3m15s ago)
         [Waiting]: Waiting for service "cri" to be "up", service "timed" to be "up" (3m16s ago)
         [Waiting]: Waiting for service "cri" to be "up", service "networkd" to be "up", service "timed" to be "up" (3m18s ago)
If kubelet is not running, it might be caused by wrong configuration, check kubelet logs
with talosctl logs:
$ talosctl -n <IP> logs kubelet
172.20.0.2: I0305 20:45:07.756948    2334 controller.go:101] kubelet config controller: starting controller
172.20.0.2: I0305 20:45:07.756995    2334 controller.go:267] kubelet config controller: ensuring filesystem is set up correctly
172.20.0.2: I0305 20:45:07.757000    2334 fsstore.go:59] kubelet config controller: initializing config checkpoints directory "/etc/kubernetes/kubelet/store"
etcd is not running on bootstrap node
etcd should be running on bootstrap node immediately (bootstrap node is either init node or controlplane node
after talosctl bootstrap command was issued).
When node boots for the first time, etcd data directory /var/lib/etcd directory is empty and Talos launches etcd in a mode to build the initial cluster of a single node.
At this time /var/lib/etcd directory becomes non-empty and etcd runs as usual.
If etcd is not running, check service etcd state:
$ talosctl -n <IP> service etcd
NODE     172.20.0.2
ID       etcd
STATE    Running
HEALTH   OK
EVENTS   [Running]: Health check successful (3m21s ago)
         [Running]: Started task etcd (PID 2343) for container etcd (3m26s ago)
         [Preparing]: Creating service runner (3m26s ago)
         [Preparing]: Running pre state (3m26s ago)
         [Waiting]: Waiting for service "cri" to be "up", service "networkd" to be "up", service "timed" to be "up" (3m26s ago)
If service is stuck in Preparing state for bootstrap node, it might be related to slow network - at this stage
Talos pulls etcd image from the container registry.
If etcd service is crashing and restarting, check service logs with talosctl -n <IP> logs etcd.
Most common reasons for crashes are:
- wrong arguments passed via
extraArgsin the configuration; - booting Talos on non-empty disk with previous Talos installation,
/var/lib/etcdcontains data from old cluster.
etcd is not running on non-bootstrap control plane node
Service etcd on non-bootstrap control plane node waits for Kubernetes to boot successfully on bootstrap node to find
other peers to build a cluster.
As soon as bootstrap node boots Kubernetes control plane components, and kubectl get endpoints returns IP of bootstrap control plane node, other control plane nodes will start joining the cluster followed by Kubernetes control plane components on each control plane node.
Kubernetes static pod definitions are not generated
Talos should write down static pod definitions for the Kubernetes control plane:
$ talosctl -n <IP> ls /etc/kubernetes/manifests
NODE         NAME
172.20.0.2   .
172.20.0.2   talos-kube-apiserver.yaml
172.20.0.2   talos-kube-controller-manager.yaml
172.20.0.2   talos-kube-scheduler.yaml
If static pod definitions are not rendered, check etcd and kubelet service health (see above),
and controller runtime logs (talosctl logs controller-runtime).
Talos prints error an error on the server ("") has prevented the request from succeeding
This is expected during initial cluster bootstrap and sometimes after a reboot:
[   70.093289] [talos] task labelNodeAsMaster (1/1): starting
[   80.094038] [talos] retrying error: an error on the server ("") has prevented the request from succeeding (get nodes talos-default-master-1)
Initially kube-apiserver component is not running yet, and it takes some time before it becomes fully up
during bootstrap (image should be pulled from the Internet, etc.)
Once control plane endpoint is up Talos should proceed.
If Talos doesn’t proceed further, it might be a configuration issue.
In any case, status of control plane components can be checked with talosctl containers -k:
$ talosctl -n <IP> containers --kubernetes
NODE         NAMESPACE   ID                                                                                      IMAGE                                        PID    STATUS
172.20.0.2   k8s.io      kube-system/kube-apiserver-talos-default-master-1                                       k8s.gcr.io/pause:3.2                         2539   SANDBOX_READY
172.20.0.2   k8s.io      └─ kube-system/kube-apiserver-talos-default-master-1:kube-apiserver                     k8s.gcr.io/kube-apiserver:v1.20.4            2572   CONTAINER_RUNNING
If kube-apiserver shows as CONTAINER_EXITED, it might have exited due to configuration error.
Logs can be checked with taloctl logs --kubernetes (or with -k as a shorthand):
$ talosctl -n <IP> logs -k kube-system/kube-apiserver-talos-default-master-1:kube-apiserver
172.20.0.2: 2021-03-05T20:46:13.133902064Z stderr F 2021/03/05 20:46:13 Running command:
172.20.0.2: 2021-03-05T20:46:13.133933824Z stderr F Command env: (log-file=, also-stdout=false, redirect-stderr=true)
172.20.0.2: 2021-03-05T20:46:13.133938524Z stderr F Run from directory:
172.20.0.2: 2021-03-05T20:46:13.13394154Z stderr F Executable path: /usr/local/bin/kube-apiserver
...
Talos prints error nodes "talos-default-master-1" not found
This error means that kube-apiserver is up, and control plane endpoint is healthy, but kubelet hasn’t got
its client certificate yet and wasn’t able to register itself.
For the kubelet to get its client certificate, following conditions should apply:
- control plane endpoint is healthy (
kube-apiserveris running) - bootstrap manifests got successfully deployed (for CSR auto-approval)
kube-controller-manageris running
CSR state can be checked with kubectl get csr:
$ kubectl get csr
NAME        AGE   SIGNERNAME                                    REQUESTOR                 CONDITION
csr-jcn9j   14m   kubernetes.io/kube-apiserver-client-kubelet   system:bootstrap:q9pyzr   Approved,Issued
csr-p6b9q   14m   kubernetes.io/kube-apiserver-client-kubelet   system:bootstrap:q9pyzr   Approved,Issued
csr-sw6rm   14m   kubernetes.io/kube-apiserver-client-kubelet   system:bootstrap:q9pyzr   Approved,Issued
csr-vlghg   14m   kubernetes.io/kube-apiserver-client-kubelet   system:bootstrap:q9pyzr   Approved,Issued
Talos prints error node not ready
Node in Kubernetes is marked as Ready once CNI is up.
It takes a minute or two for the CNI images to be pulled and for the CNI to start.
If the node is stuck in this state for too long, check CNI pods and logs with kubectl, usually
CNI resources are created in kube-system namespace.
For example, for Talos default Flannel CNI:
$ kubectl -n kube-system get pods
NAME                                             READY   STATUS    RESTARTS   AGE
...
kube-flannel-25drx                               1/1     Running   0          23m
kube-flannel-8lmb6                               1/1     Running   0          23m
kube-flannel-gl7nx                               1/1     Running   0          23m
kube-flannel-jknt9                               1/1     Running   0          23m
...
Talos prints error x509: certificate signed by unknown authority
Full error might look like:
x509: certificate signed by unknown authority (possiby because of crypto/rsa: verification error" while trying to verify candidate authority certificate "kubernetes"
Commonly, the control plane endpoint points to a different cluster, as the client certificate generated by Talos doesn’t match CA of the cluster at control plane endpoint.
etcd is running on bootstrap node, but stuck in pre state on non-bootstrap nodes
Please see question etcd is not running on non-bootstrap control plane node.
Checking kube-controller-manager and kube-scheduler
If control plane endpoint is up, status of the pods can be performed with kubectl:
$ kubectl get pods -n kube-system -l k8s-app=kube-controller-manager
NAME                                             READY   STATUS    RESTARTS   AGE
kube-controller-manager-talos-default-master-1   1/1     Running   0          28m
kube-controller-manager-talos-default-master-2   1/1     Running   0          28m
kube-controller-manager-talos-default-master-3   1/1     Running   0          28m
If control plane endpoint is not up yet, container status can be queried with
talosctl containers --kubernetes:
$ talosctl -n <IP> c -k
NODE         NAMESPACE   ID                                                                                      IMAGE                                        PID    STATUS
...
172.20.0.2   k8s.io      kube-system/kube-controller-manager-talos-default-master-1                              k8s.gcr.io/pause:3.2                         2547   SANDBOX_READY
172.20.0.2   k8s.io      └─ kube-system/kube-controller-manager-talos-default-master-1:kube-controller-manager   k8s.gcr.io/kube-controller-manager:v1.20.4   2580   CONTAINER_RUNNING
172.20.0.2   k8s.io      kube-system/kube-scheduler-talos-default-master-1                                       k8s.gcr.io/pause:3.2                         2638   SANDBOX_READY
172.20.0.2   k8s.io      └─ kube-system/kube-scheduler-talos-default-master-1:kube-scheduler                     k8s.gcr.io/kube-scheduler:v1.20.4            2670   CONTAINER_RUNNING
...
If some of the containers are not running, it could be that image is still being pulled.
Otherwise process might crashing, in that case logs can be checked with talosctl logs --kubernetes <containerID>:
$ talosctl -n <IP> logs -k kube-system/kube-controller-manager-talos-default-master-1:kube-controller-manager
172.20.0.3: 2021-03-09T13:59:34.291667526Z stderr F 2021/03/09 13:59:34 Running command:
172.20.0.3: 2021-03-09T13:59:34.291702262Z stderr F Command env: (log-file=, also-stdout=false, redirect-stderr=true)
172.20.0.3: 2021-03-09T13:59:34.291707121Z stderr F Run from directory:
172.20.0.3: 2021-03-09T13:59:34.291710908Z stderr F Executable path: /usr/local/bin/kube-controller-manager
172.20.0.3: 2021-03-09T13:59:34.291719163Z stderr F Args (comma-delimited): /usr/local/bin/kube-controller-manager,--allocate-node-cidrs=true,--cloud-provider=,--cluster-cidr=10.244.0.0/16,--service-cluster-ip-range=10.96.0.0/12,--cluster-signing-cert-file=/system/secrets/kubernetes/kube-controller-manager/ca.crt,--cluster-signing-key-file=/system/secrets/kubernetes/kube-controller-manager/ca.key,--configure-cloud-routes=false,--kubeconfig=/system/secrets/kubernetes/kube-controller-manager/kubeconfig,--leader-elect=true,--root-ca-file=/system/secrets/kubernetes/kube-controller-manager/ca.crt,--service-account-private-key-file=/system/secrets/kubernetes/kube-controller-manager/service-account.key,--profiling=false
172.20.0.3: 2021-03-09T13:59:34.293870359Z stderr F 2021/03/09 13:59:34 Now listening for interrupts
172.20.0.3: 2021-03-09T13:59:34.761113762Z stdout F I0309 13:59:34.760982      10 serving.go:331] Generated self-signed cert in-memory
...
Checking controller runtime logs
Talos runs a set of controllers which work on resources to build and support Kubernetes control plane.
Some debugging information can be queried from the controller logs with talosctl logs controller-runtime:
$ talosctl -n <IP> logs controller-runtime
172.20.0.2: 2021/03/09 13:57:11  secrets.EtcdController: controller starting
172.20.0.2: 2021/03/09 13:57:11  config.MachineTypeController: controller starting
172.20.0.2: 2021/03/09 13:57:11  k8s.ManifestApplyController: controller starting
172.20.0.2: 2021/03/09 13:57:11  v1alpha1.BootstrapStatusController: controller starting
172.20.0.2: 2021/03/09 13:57:11  v1alpha1.TimeStatusController: controller starting
...
Controllers run reconcile loop, so they might be starting, failing and restarting, that is expected behavior. Things to look for:
v1alpha1.BootstrapStatusController: bootkube initialized status not found: control plane is not self-hosted, running with static pods.
k8s.KubeletStaticPodController: writing static pod "/etc/kubernetes/manifests/talos-kube-apiserver.yaml": static pod definitions were rendered successfully.
k8s.ManifestApplyController: controller failed: error creating mapping for object /v1/Secret/bootstrap-token-q9pyzr: an error on the server ("") has prevented the request from succeeding: control plane endpoint is not up yet, bootstrap manifests can’t be injected, controller is going to retry.
k8s.KubeletStaticPodController: controller failed: error refreshing pod status: error fetching pod status: an error on the server ("Authorization error (user=apiserver-kubelet-client, verb=get, resource=nodes, subresource=proxy)") has prevented the request from succeeding: kubelet hasn’t been able to contact kube-apiserver yet to push pod status, controller
is going to retry.
k8s.ManifestApplyController: created rbac.authorization.k8s.io/v1/ClusterRole/psp:privileged: one of the bootstrap manifests got successfully applied.
secrets.KubernetesController: controller failed: missing cluster.aggregatorCA secret: Talos is running with 0.8 configuration, if the cluster was upgraded from 0.8, this is expected, and conversion process will fix machine config
automatically.
If this cluster was bootstrapped with version 0.9, machine configuration should be regenerated with 0.9 talosctl.
If there are no new messages in controller-runtime log, it means that controllers finished reconciling successfully.
Checking static pod definitions
Talos generates static pod definitions for kube-apiserver, kube-controller-manager, and kube-scheduler
components based on machine configuration.
These definitions can be checked as resources with talosctl get staticpods:
$ talosctl -n <IP> get staticpods -o yaml
get staticpods -o yaml
node: 172.20.0.2
metadata:
    namespace: controlplane
    type: StaticPods.kubernetes.talos.dev
    id: kube-apiserver
    version: 2
    phase: running
    finalizers:
        - k8s.StaticPodStatus("kube-apiserver")
spec:
    apiVersion: v1
    kind: Pod
    metadata:
        annotations:
            talos.dev/config-version: "1"
            talos.dev/secrets-version: "1"
        creationTimestamp: null
        labels:
            k8s-app: kube-apiserver
            tier: control-plane
        name: kube-apiserver
        namespace: kube-system
...
Status of the static pods can queried with talosctl get staticpodstatus:
$ talosctl -n <IP> get staticpodstatus
NODE         NAMESPACE      TYPE              ID                                                           VERSION   READY
172.20.0.2   controlplane   StaticPodStatus   kube-system/kube-apiserver-talos-default-master-1            1         True
172.20.0.2   controlplane   StaticPodStatus   kube-system/kube-controller-manager-talos-default-master-1   1         True
172.20.0.2   controlplane   StaticPodStatus   kube-system/kube-scheduler-talos-default-master-1            1         True
Most important status is Ready printed as last column, complete status can be fetched by adding -o yaml flag.
Checking bootstrap manifests
As part of bootstrap process, Talos injects bootstrap manifests into Kubernetes API server. There are two kinds of manifests: system manifests built-in into Talos and extra manifests downloaded (custom CNI, extra manifests in the machine config):
$ talosctl -n <IP> get manifests
NODE         NAMESPACE      TYPE       ID                               VERSION
172.20.0.2   controlplane   Manifest   00-kubelet-bootstrapping-token   1
172.20.0.2   controlplane   Manifest   01-csr-approver-role-binding     1
172.20.0.2   controlplane   Manifest   01-csr-node-bootstrap            1
172.20.0.2   controlplane   Manifest   01-csr-renewal-role-binding      1
172.20.0.2   controlplane   Manifest   02-kube-system-sa-role-binding   1
172.20.0.2   controlplane   Manifest   03-default-pod-security-policy   1
172.20.0.2   controlplane   Manifest   05-https://docs.projectcalico.org/manifests/calico.yaml   1
172.20.0.2   controlplane   Manifest   10-kube-proxy                    1
172.20.0.2   controlplane   Manifest   11-core-dns                      1
172.20.0.2   controlplane   Manifest   11-core-dns-svc                  1
172.20.0.2   controlplane   Manifest   11-kube-config-in-cluster        1
Details of each manifests can be queried by adding -o yaml:
$ talosctl -n <IP> get manifests 01-csr-approver-role-binding --namespace=controlplane -o yaml
node: 172.20.0.2
metadata:
    namespace: controlplane
    type: Manifests.kubernetes.talos.dev
    id: 01-csr-approver-role-binding
    version: 1
    phase: running
spec:
    - apiVersion: rbac.authorization.k8s.io/v1
      kind: ClusterRoleBinding
      metadata:
        name: system-bootstrap-approve-node-client-csr
      roleRef:
        apiGroup: rbac.authorization.k8s.io
        kind: ClusterRole
        name: system:certificates.k8s.io:certificatesigningrequests:nodeclient
      subjects:
        - apiGroup: rbac.authorization.k8s.io
          kind: Group
          name: system:bootstrappers
Worker node is stuck with apid health check failures
Control plane nodes have enough secret material to generate apid server certificates, but worker nodes
depend on control plane trustd services to generate certificates.
Worker nodes wait for kubelet to join the cluster, then apid queries Kubernetes endpoints via control plane
endpoint to find trustd endpoints, and use trustd to issue the certficiate.
So if apid health checks is failing on worker node:
- make sure control plane endpoint is healthy
- check that worker node
kubeletjoined the cluster
27 - Upgrading Kubernetes
This guide covers Kubernetes control plane upgrade for clusters running Talos-managed control plane. If the cluster is still running self-hosted control plane (after upgrade from Talos 0.8), please refer to 0.8 docs.
Video Walkthrough
To see a live demo of this writeup, see the video below:
Automated Kubernetes Upgrade
To check what is going to be upgraded you can run talosctl upgrade-k8s with --dry-run flag:
$ talosctl --nodes <master node> upgrade-k8s --to 1.23.0 --dry-run
WARNING: found resources which are going to be deprecated/migrated in the version 1.22.0
RESOURCE                                                               COUNT
validatingwebhookconfigurations.v1beta1.admissionregistration.k8s.io   4
mutatingwebhookconfigurations.v1beta1.admissionregistration.k8s.io     3
customresourcedefinitions.v1beta1.apiextensions.k8s.io                 25
apiservices.v1beta1.apiregistration.k8s.io                             54
leases.v1beta1.coordination.k8s.io                                     4
automatically detected the lowest Kubernetes version 1.22.4
checking for resource APIs to be deprecated in version 1.23.0
discovered master nodes ["172.20.0.2" "172.20.0.3" "172.20.0.4"]
discovered worker nodes ["172.20.0.5" "172.20.0.6"]
updating "kube-apiserver" to version "1.23.0"
 > "172.20.0.2": starting update
 > update kube-apiserver: v1.22.4 -> 1.23.0
 > skipped in dry-run
 > "172.20.0.3": starting update
 > update kube-apiserver: v1.22.4 -> 1.23.0
 > skipped in dry-run
 > "172.20.0.4": starting update
 > update kube-apiserver: v1.22.4 -> 1.23.0
 > skipped in dry-run
updating "kube-controller-manager" to version "1.23.0"
 > "172.20.0.2": starting update
 > update kube-controller-manager: v1.22.4 -> 1.23.0
 > skipped in dry-run
 > "172.20.0.3": starting update
 > update kube-controller-manager: v1.22.4 -> 1.23.0
 > skipped in dry-run
 > "172.20.0.4": starting update
 > update kube-controller-manager: v1.22.4 -> 1.23.0
 > skipped in dry-run
updating "kube-scheduler" to version "1.23.0"
 > "172.20.0.2": starting update
 > update kube-scheduler: v1.22.4 -> 1.23.0
 > skipped in dry-run
 > "172.20.0.3": starting update
 > update kube-scheduler: v1.22.4 -> 1.23.0
 > skipped in dry-run
 > "172.20.0.4": starting update
 > update kube-scheduler: v1.22.4 -> 1.23.0
 > skipped in dry-run
updating daemonset "kube-proxy" to version "1.23.0"
skipped in dry-run
updating kubelet to version "1.23.0"
 > "172.20.0.2": starting update
 > update kubelet: v1.22.4 -> 1.23.0
 > skipped in dry-run
 > "172.20.0.3": starting update
 > update kubelet: v1.22.4 -> 1.23.0
 > skipped in dry-run
 > "172.20.0.4": starting update
 > update kubelet: v1.22.4 -> 1.23.0
 > skipped in dry-run
 > "172.20.0.5": starting update
 > update kubelet: v1.22.4 -> 1.23.0
 > skipped in dry-run
 > "172.20.0.6": starting update
 > update kubelet: v1.22.4 -> 1.23.0
 > skipped in dry-run
updating manifests
 > apply manifest Secret bootstrap-token-3lb63t
 > apply skipped in dry run
 > apply manifest ClusterRoleBinding system-bootstrap-approve-node-client-csr
 > apply skipped in dry run
 > apply manifest ClusterRoleBinding system-bootstrap-node-bootstrapper
 > apply skipped in dry run
 > apply manifest ClusterRoleBinding system-bootstrap-node-renewal
 > apply skipped in dry run
 > apply manifest ClusterRoleBinding system:default-sa
 > apply skipped in dry run
 > apply manifest ClusterRole psp:privileged
 > apply skipped in dry run
 > apply manifest ClusterRoleBinding psp:privileged
 > apply skipped in dry run
 > apply manifest PodSecurityPolicy privileged
 > apply skipped in dry run
 > apply manifest ClusterRole flannel
 > apply skipped in dry run
 > apply manifest ClusterRoleBinding flannel
 > apply skipped in dry run
 > apply manifest ServiceAccount flannel
 > apply skipped in dry run
 > apply manifest ConfigMap kube-flannel-cfg
 > apply skipped in dry run
 > apply manifest DaemonSet kube-flannel
 > apply skipped in dry run
 > apply manifest ServiceAccount kube-proxy
 > apply skipped in dry run
 > apply manifest ClusterRoleBinding kube-proxy
 > apply skipped in dry run
 > apply manifest ServiceAccount coredns
 > apply skipped in dry run
 > apply manifest ClusterRoleBinding system:coredns
 > apply skipped in dry run
 > apply manifest ClusterRole system:coredns
 > apply skipped in dry run
 > apply manifest ConfigMap coredns
 > apply skipped in dry run
 > apply manifest Deployment coredns
 > apply skipped in dry run
 > apply manifest Service kube-dns
 > apply skipped in dry run
 > apply manifest ConfigMap kubeconfig-in-cluster
 > apply skipped in dry run
To upgrade Kubernetes from v1.22.4 to v1.23.0 run:
$ talosctl --nodes <master node> upgrade-k8s --to 1.24.0
automatically detected the lowest Kubernetes version 1.22.4
checking for resource APIs to be deprecated in version 1.23.0
discovered master nodes ["172.20.0.2" "172.20.0.3" "172.20.0.4"]
discovered worker nodes ["172.20.0.5" "172.20.0.6"]
updating "kube-apiserver" to version "1.23.0"
 > "172.20.0.2": starting update
 > update kube-apiserver: v1.22.4 -> 1.23.0
 > "172.20.0.2": machine configuration patched
 > "172.20.0.2": waiting for API server state pod update
 < "172.20.0.2": successfully updated
 > "172.20.0.3": starting update
 > update kube-apiserver: v1.22.4 -> 1.23.0
 > "172.20.0.3": machine configuration patched
 > "172.20.0.3": waiting for API server state pod update
 < "172.20.0.3": successfully updated
 > "172.20.0.4": starting update
 > update kube-apiserver: v1.22.4 -> 1.23.0
 > "172.20.0.4": machine configuration patched
 > "172.20.0.4": waiting for API server state pod update
 < "172.20.0.4": successfully updated
updating "kube-controller-manager" to version "1.23.0"
 > "172.20.0.2": starting update
 > update kube-controller-manager: v1.22.4 -> 1.23.0
 > "172.20.0.2": machine configuration patched
 > "172.20.0.2": waiting for API server state pod update
 < "172.20.0.2": successfully updated
 > "172.20.0.3": starting update
 > update kube-controller-manager: v1.22.4 -> 1.23.0
 > "172.20.0.3": machine configuration patched
 > "172.20.0.3": waiting for API server state pod update
 < "172.20.0.3": successfully updated
 > "172.20.0.4": starting update
 > update kube-controller-manager: v1.22.4 -> 1.23.0
 > "172.20.0.4": machine configuration patched
 > "172.20.0.4": waiting for API server state pod update
 < "172.20.0.4": successfully updated
updating "kube-scheduler" to version "1.23.0"
 > "172.20.0.2": starting update
 > update kube-scheduler: v1.22.4 -> 1.23.0
 > "172.20.0.2": machine configuration patched
 > "172.20.0.2": waiting for API server state pod update
 < "172.20.0.2": successfully updated
 > "172.20.0.3": starting update
 > update kube-scheduler: v1.22.4 -> 1.23.0
 > "172.20.0.3": machine configuration patched
 > "172.20.0.3": waiting for API server state pod update
 < "172.20.0.3": successfully updated
 > "172.20.0.4": starting update
 > update kube-scheduler: v1.22.4 -> 1.23.0
 > "172.20.0.4": machine configuration patched
 > "172.20.0.4": waiting for API server state pod update
 < "172.20.0.4": successfully updated
updating daemonset "kube-proxy" to version "1.23.0"
updating kubelet to version "1.23.0"
 > "172.20.0.2": starting update
 > update kubelet: v1.22.4 -> 1.23.0
 > "172.20.0.2": machine configuration patched
 > "172.20.0.2": waiting for kubelet restart
 > "172.20.0.2": waiting for node update
 < "172.20.0.2": successfully updated
 > "172.20.0.3": starting update
 > update kubelet: v1.22.4 -> 1.23.0
 > "172.20.0.3": machine configuration patched
 > "172.20.0.3": waiting for kubelet restart
 > "172.20.0.3": waiting for node update
 < "172.20.0.3": successfully updated
 > "172.20.0.4": starting update
 > update kubelet: v1.22.4 -> 1.23.0
 > "172.20.0.4": machine configuration patched
 > "172.20.0.4": waiting for kubelet restart
 > "172.20.0.4": waiting for node update
 < "172.20.0.4": successfully updated
 > "172.20.0.5": starting update
 > update kubelet: v1.22.4 -> 1.23.0
 > "172.20.0.5": machine configuration patched
 > "172.20.0.5": waiting for kubelet restart
 > "172.20.0.5": waiting for node update
 < "172.20.0.5": successfully updated
 > "172.20.0.6": starting update
 > update kubelet: v1.22.4 -> 1.23.0
 > "172.20.0.6": machine configuration patched
 > "172.20.0.6": waiting for kubelet restart
 > "172.20.0.6": waiting for node update
 < "172.20.0.6": successfully updated
updating manifests
 > apply manifest Secret bootstrap-token-3lb63t
 > apply skipped: nothing to update
 > apply manifest ClusterRoleBinding system-bootstrap-approve-node-client-csr
 > apply skipped: nothing to update
 > apply manifest ClusterRoleBinding system-bootstrap-node-bootstrapper
 > apply skipped: nothing to update
 > apply manifest ClusterRoleBinding system-bootstrap-node-renewal
 > apply skipped: nothing to update
 > apply manifest ClusterRoleBinding system:default-sa
 > apply skipped: nothing to update
 > apply manifest ClusterRole psp:privileged
 > apply skipped: nothing to update
 > apply manifest ClusterRoleBinding psp:privileged
 > apply skipped: nothing to update
 > apply manifest PodSecurityPolicy privileged
 > apply skipped: nothing to update
 > apply manifest ClusterRole flannel
 > apply skipped: nothing to update
 > apply manifest ClusterRoleBinding flannel
 > apply skipped: nothing to update
 > apply manifest ServiceAccount flannel
 > apply skipped: nothing to update
 > apply manifest ConfigMap kube-flannel-cfg
 > apply skipped: nothing to update
 > apply manifest DaemonSet kube-flannel
 > apply skipped: nothing to update
 > apply manifest ServiceAccount kube-proxy
 > apply skipped: nothing to update
 > apply manifest ClusterRoleBinding kube-proxy
 > apply skipped: nothing to update
 > apply manifest ServiceAccount coredns
 > apply skipped: nothing to update
 > apply manifest ClusterRoleBinding system:coredns
 > apply skipped: nothing to update
 > apply manifest ClusterRole system:coredns
 > apply skipped: nothing to update
 > apply manifest ConfigMap coredns
 > apply skipped: nothing to update
 > apply manifest Deployment coredns
 > apply skipped: nothing to update
 > apply manifest Service kube-dns
 > apply skipped: nothing to update
 > apply manifest ConfigMap kubeconfig-in-cluster
 > apply skipped: nothing to update
Script runs in several phases:
- Every control plane node machine configuration is patched with new image version for each control plane component. Talos renders new static pod definition on configuration update which is picked up by the kubelet. Script waits for the change to propagate to the API server state.
- The script updates
kube-proxydaemonset with the new image version. - On every node in the cluster,
kubeletversion is updated. The script waits for thekubeletservice to be restarted, become healthy. Update is verified with theNoderesource state. - Kubernetes bootstrap manifests are re-applied to the cluster. The script never deletes any resources from the cluster, they should be deleted manually. Updated bootstrap manifests might come with new Talos version (e.g. CoreDNS version update), or might be result of machine configuration change.
If the script fails for any reason, it can be safely restarted to continue upgrade process from the moment of the failure.
Manual Kubernetes Upgrade
Kubernetes can be upgraded manually as well by following the steps outlined below.
They are equivalent to the steps performed by the talosctl upgrade-k8s command.
Kubeconfig
In order to edit the control plane, we will need a working kubectl config.
If you don’t already have one, you can get one by running:
talosctl --nodes <master node> kubeconfig
API Server
Patch machine configuration using talosctl patch command:
$ talosctl -n <CONTROL_PLANE_IP_1> patch mc --immediate -p '[{"op": "replace", "path": "/cluster/apiServer/image", "value": "k8s.gcr.io/kube-apiserver:v1.20.4"}]'
patched mc at the node 172.20.0.2
JSON patch might need to be adjusted if current machine configuration is missing .cluster.apiServer.image key.
Also machine configuration can be edited manually with talosctl -n <IP> edit mc --immediate.
Capture new version of kube-apiserver config with:
$ talosctl -n <CONTROL_PLANE_IP_1> get kcpc kube-apiserver -o yaml
node: 172.20.0.2
metadata:
    namespace: config
    type: KubernetesControlPlaneConfigs.config.talos.dev
    id: kube-apiserver
    version: 5
    phase: running
spec:
    image: k8s.gcr.io/kube-apiserver:v1.20.4
    cloudProvider: ""
    controlPlaneEndpoint: https://172.20.0.1:6443
    etcdServers:
        - https://127.0.0.1:2379
    localPort: 6443
    serviceCIDR: 10.96.0.0/12
    extraArgs: {}
    extraVolumes: []
In this example, new version is 5.
Wait for the new pod definition to propagate to the API server state (replace talos-default-master-1 with the node name):
$ kubectl get pod -n kube-system -l k8s-app=kube-apiserver --field-selector spec.nodeName=talos-default-master-1 -o jsonpath='{.items[0].metadata.annotations.talos\.dev/config\-version}'
5
Check that the pod is running:
$ kubectl get pod -n kube-system -l k8s-app=kube-apiserver --field-selector spec.nodeName=talos-default-master-1
NAME                                    READY   STATUS    RESTARTS   AGE
kube-apiserver-talos-default-master-1   1/1     Running   0          16m
Repeat this process for every control plane node, verifying that state got propagated successfully between each node update.
Controller Manager
Patch machine configuration using talosctl patch command:
$ talosctl -n <CONTROL_PLANE_IP_1> patch mc --immediate -p '[{"op": "replace", "path": "/cluster/controllerManager/image", "value": "k8s.gcr.io/kube-controller-manager:v1.20.4"}]'
patched mc at the node 172.20.0.2
JSON patch might need be adjusted if current machine configuration is missing .cluster.controllerManager.image key.
Capture new version of kube-controller-manager config with:
$ talosctl -n <CONTROL_PLANE_IP_1> get kcpc kube-controller-manager -o yaml
node: 172.20.0.2
metadata:
    namespace: config
    type: KubernetesControlPlaneConfigs.config.talos.dev
    id: kube-controller-manager
    version: 3
    phase: running
spec:
    image: k8s.gcr.io/kube-controller-manager:v1.20.4
    cloudProvider: ""
    podCIDR: 10.244.0.0/16
    serviceCIDR: 10.96.0.0/12
    extraArgs: {}
    extraVolumes: []
In this example, new version is 3.
Wait for the new pod definition to propagate to the API server state (replace talos-default-master-1 with the node name):
$ kubectl get pod -n kube-system -l k8s-app=kube-controller-manager --field-selector spec.nodeName=talos-default-master-1 -o jsonpath='{.items[0].metadata.annotations.talos\.dev/config\-version}'
3
Check that the pod is running:
$ kubectl get pod -n kube-system -l k8s-app=kube-controller-manager --field-selector spec.nodeName=talos-default-master-1
NAME                                             READY   STATUS    RESTARTS   AGE
kube-controller-manager-talos-default-master-1   1/1     Running   0          35m
Repeat this process for every control plane node, verifying that state got propagated successfully between each node update.
Scheduler
Patch machine configuration using talosctl patch command:
$ talosctl -n <CONTROL_PLANE_IP_1> patch mc --immediate -p '[{"op": "replace", "path": "/cluster/scheduler/image", "value": "k8s.gcr.io/kube-scheduler:v1.20.4"}]'
patched mc at the node 172.20.0.2
JSON patch might need be adjusted if current machine configuration is missing .cluster.scheduler.image key.
Capture new version of kube-scheduler config with:
$ talosctl -n <CONTROL_PLANE_IP_1> get kcpc kube-scheduler -o yaml
node: 172.20.0.2
metadata:
    namespace: config
    type: KubernetesControlPlaneConfigs.config.talos.dev
    id: kube-scheduler
    version: 3
    phase: running
spec:
    image: k8s.gcr.io/kube-scheduler:v1.20.4
    extraArgs: {}
    extraVolumes: []
In this example, new version is 3.
Wait for the new pod definition to propagate to the API server state (replace talos-default-master-1 with the node name):
$ kubectl get pod -n kube-system -l k8s-app=kube-scheduler --field-selector spec.nodeName=talos-default-master-1 -o jsonpath='{.items[0].metadata.annotations.talos\.dev/config\-version}'
3
Check that the pod is running:
$ kubectl get pod -n kube-system -l k8s-app=kube-scheduler --field-selector spec.nodeName=talos-default-master-1
NAME                                    READY   STATUS    RESTARTS   AGE
kube-scheduler-talos-default-master-1   1/1     Running   0          39m
Repeat this process for every control plane node, verifying that state got propagated successfully between each node update.
Proxy
In the proxy’s DaemonSet, change:
kind: DaemonSet
...
spec:
  ...
  template:
    ...
    spec:
      containers:
        - name: kube-proxy
          image: k8s.gcr.io/kube-proxy:v1.20.1
      tolerations:
        - ...
to:
kind: DaemonSet
...
spec:
  ...
  template:
    ...
    spec:
      containers:
        - name: kube-proxy
          image: k8s.gcr.io/kube-proxy:v1.20.4
      tolerations:
        - ...
        - key: node-role.kubernetes.io/control-plane
          operator: Exists
          effect: NoSchedule
To edit the DaemonSet, run:
kubectl edit daemonsets -n kube-system kube-proxy
Bootstrap Manifests
Bootstrap manifests can be retrieved in a format which works for kubectl with the following command:
talosctl -n <master IP> get manifests -o yaml | yq eval-all '.spec | .[] | splitDoc' - > manifests.yaml
Diff the manifests with the cluster:
kubectl diff -f manifests.yaml
Apply the manifests:
kubectl apply -f manifests.yaml
Note: if some boostrap resources were removed, they have to be removed from the cluster manually.
kubelet
For every node, patch machine configuration with new kubelet version, wait for the kubelet to restart with new version:
$ talosctl -n <IP> patch mc --immediate -p '[{"op": "replace", "path": "/machine/kubelet/image", "value": "ghcr.io/talos-systems/kubelet:v1.23.0"}]'
patched mc at the node 172.20.0.2
Once kubelet restarts with the new configuration, confirm upgrade with kubectl get nodes <name>:
$ kubectl get nodes talos-default-master-1
NAME                     STATUS   ROLES                  AGE    VERSION
talos-default-master-1   Ready    control-plane,master   123m   v1.23.0
28 - Upgrading Talos
Talos upgrades are effected by an API call.
The talosctl CLI utility will facilitate this.
Video Walkthrough
To see a live demo of this writeup, see the video below:
After Upgrade to 0.14
No actions required.
talosctl Upgrade
To manually upgrade a Talos node, you will specify the node’s IP address and the installer container image for the version of Talos to which you wish to upgrade.
For instance, if your Talos node has the IP address 10.20.30.40 and you want
to install the official version v0.14.0, you would enter a command such
as:
  $ talosctl upgrade --nodes 10.20.30.40 \
      --image ghcr.io/talos-systems/installer:v0.14.0
There is an option to this command: --preserve, which can be used to explicitly tell Talos to either keep intact its ephemeral data or not.
In most cases, it is correct to just let Talos perform its default action.
However, if you are running a single-node control-plane, you will want to make sure that --preserve=true.
If Talos fails to run the upgrade, the --stage flag may be used to perform the upgrade after a reboot
which is followed by another reboot to upgraded version.
Machine Configuration Changes
Talos 0.14 enables cluster discovery by default for new clusters. Cluster discovery feature won’t be enabled after an upgrade if the feature wasn’t enabled before the upgrade.
29 - Virtual (shared) IP
One of the biggest pain points when building a high-availability controlplane is giving clients a single IP or URL at which they can reach any of the controlplane nodes. The most common approaches all require external resources: reverse proxy, load balancer, BGP, and DNS.
Using a “Virtual” IP address, on the other hand, provides high availability without external coordination or resources, so long as the controlplane members share a layer 2 network. In practical terms, this means that they are all connected via a switch, with no router in between them.
The term “virtual” is misleading here. The IP address is real, and it is assigned to an interface. Instead, what actually happens is that the controlplane machines vie for control of the shared IP address. There can be only one owner of the IP address at any given time, but if that owner disappears or becomes non-responsive, another owner will be chosen, and it will take up the mantle: the IP address.
Talos has (as of version 0.9) built-in support for this form of shared IP address,
and it can utilize this for both the Kubernetes API server and the Talos endpoint set.
Talos uses etcd for elections and leadership (control) of the IP address.
Video Walkthrough
To see a live demo of this writeup, see the video below:
Choose your Shared IP
To begin with, you should choose your shared IP address. It should generally be a reserved, unused IP address in the same subnet as your controlplane nodes. It should not be assigned or assignable by your DHCP server.
For our example, we will assume that the controlplane nodes have the following IP addresses:
192.168.0.10192.168.0.11192.168.0.12
We then choose our shared IP to be:
192.168.0.15
Configure your Talos Machines
The shared IP setting is only valid for controlplane nodes.
For the example above, each of the controlplane nodes should have the following Machine Config snippet:
machine:
  network:
    interfaces:
    - interface: eth0
      dhcp: true
      vip:
        ip: 192.168.0.15
Virtual IP’s can also be configured on a VLAN interface.
machine:
  network:
    interfaces:
    - interface: eth0
      dhcp: true
      vip:
        ip: 192.168.0.15
      vlans:
        - vlanId: 100
          dhcp: true
          vip:
            ip: 192.168.1.15
Obviously, for your own environment, the interface and the DHCP setting may
differ.
You are free to use static addressing (cidr) instead of DHCP.
Caveats
In general, the shared IP should just work.
However, since it relies on etcd for elections, the shared IP will not come
alive until after you have bootstrapped Kubernetes.
In general, this is not a problem, but it does mean that you cannot use the
shared IP when issuing the talosctl bootstrap command.
Instead, that command will need to target one of the controlplane nodes
discretely.