QEMU
In this guide we will create a Kubernetes cluster using QEMU.
Video Walkthrough
To see a live demo of this writeup, see the video below:
Requirements
- Linux
- a kernel with
- KVM enabled (
/dev/kvmmust exist) CONFIG_NET_SCH_NETEMenabledCONFIG_NET_SCH_INGRESSenabled
- KVM enabled (
- at least
CAP_SYS_ADMINandCAP_NET_ADMINcapabilities - QEMU
bridge,staticandfirewallCNI plugins from the standard CNI plugins, andtc-redirect-tapCNI plugin from the awslabs tc-redirect-tap installed to/opt/cni/bin(installed automatically bytalosctl)- iptables
/var/run/netnsdirectory should exist
Installation
How to get QEMU
Install QEMU with your operating system package manager. For example, on Ubuntu for x86:
apt install qemu-system-x86 qemu-kvmInstall talosctl
You can download talosctl and all required binaries via
github.com/talos-systems/talos/releases
curl https://github.com/siderolabs/talos/releases/download/<version>/talosctl-<platform>-<arch> -L -o talosctlFor example version v0.7.0 for linux platform:
curl https://github.com/siderolabs/talos/releases/download/v0.7.0/talosctl-linux-amd64 -L -o talosctl
sudo cp talosctl /usr/local/bin
sudo chmod +x /usr/local/bin/talosctl
Install Talos kernel and initramfs
QEMU provisioner depends on Talos kernel (vmlinuz) and initramfs (initramfs.xz).
These files can be downloaded from the Talos release:
mkdir -p _out/
curl https://github.com/siderolabs/talos/releases/download/<version>/vmlinuz-<arch> -L -o _out/vmlinuz-<arch>
curl https://github.com/siderolabs/talos/releases/download/<version>/initramfs-<arch>.xz -L -o _out/initramfs-<arch>.xz
For example version v0.7.0:
curl https://github.com/siderolabs/talos/releases/download/v0.7.0/vmlinuz-amd64 -L -o _out/vmlinuz-amd64
curl https://github.com/siderolabs/talos/releases/download/v0.7.0/initramfs-amd64.xz -L -o _out/initramfs-amd64.xz
Create the Cluster
For the first time, create root state directory as your user so that you can inspect the logs as non-root user:
mkdir -p ~/.talos/clustersCreate the cluster:
sudo -E talosctl cluster create --provisioner qemuBefore the first cluster is created, talosctl will download the CNI bundle for the VM provisioning and install it to ~/.talos/cni directory.
Once the above finishes successfully, your talosconfig (~/.talos/config) will be configured to point to the new cluster, and kubeconfig will be
downloaded and merged into default kubectl config location (~/.kube/config).
Cluster provisioning process can be optimized with registry pull-through caches.
Using the Cluster
Once the cluster is available, you can make use of talosctl and kubectl to interact with the cluster.
For example, to view current running containers, run talosctl -n 10.5.0.2 containers for a list of containers in the system namespace, or talosctl -n 10.5.0.2 containers -k for the k8s.io namespace.
To view the logs of a container, use talosctl -n 10.5.0.2 logs <container> or talosctl -n 10.5.0.2 logs -k <container>.
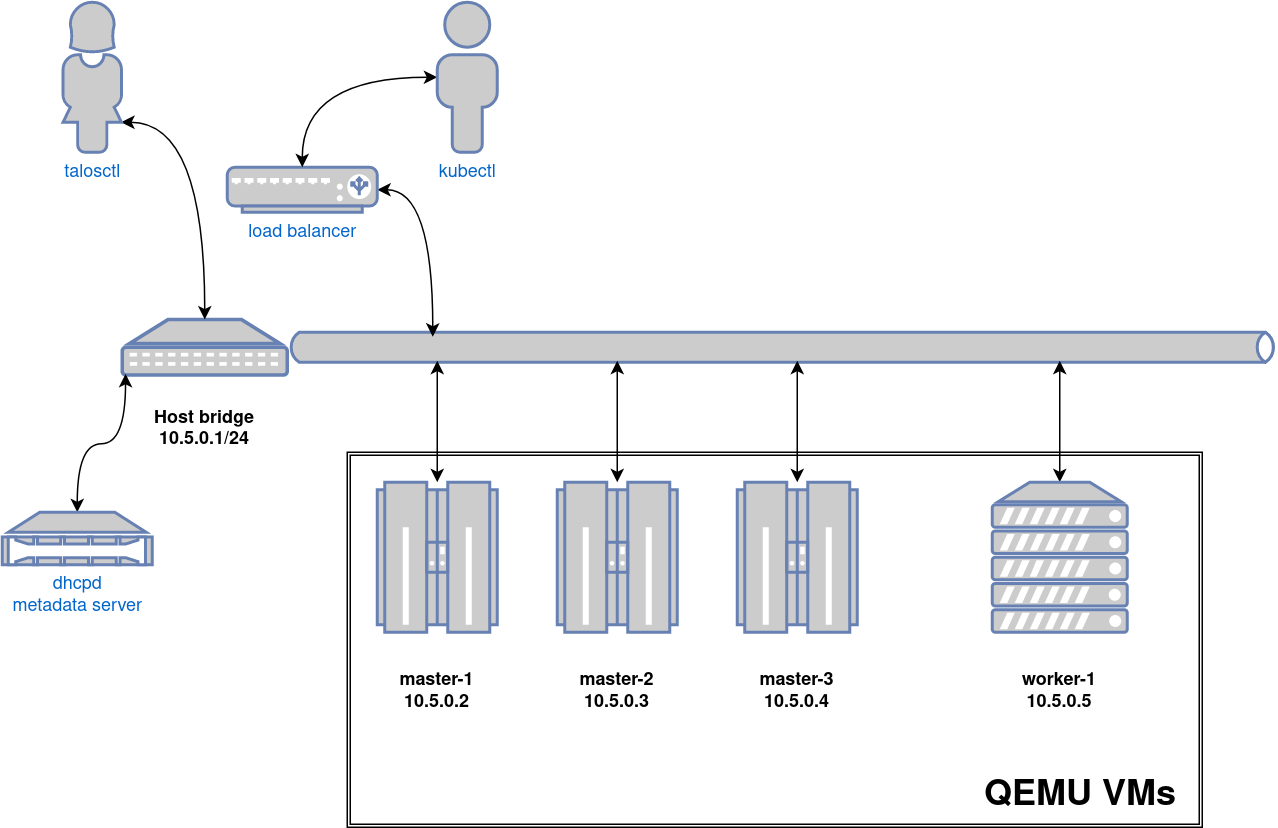
A bridge interface will be created, and assigned the default IP 10.5.0.1. Each node will be directly accessible on the subnet specified at cluster creation time. A loadbalancer runs on 10.5.0.1 by default, which handles loadbalancing for the Kubernetes APIs.
You can see a summary of the cluster state by running:
$ talosctl cluster show --provisioner qemu
PROVISIONER       qemu
NAME              talos-default
NETWORK NAME      talos-default
NETWORK CIDR      10.5.0.0/24
NETWORK GATEWAY   10.5.0.1
NETWORK MTU       1500

NODES:

NAME                     TYPE           IP         CPU    RAM      DISK
talos-default-master-1   Init           10.5.0.2   1.00   1.6 GB   4.3 GB
talos-default-master-2   ControlPlane   10.5.0.3   1.00   1.6 GB   4.3 GB
talos-default-master-3   ControlPlane   10.5.0.4   1.00   1.6 GB   4.3 GB
talos-default-worker-1   Join           10.5.0.5   1.00   1.6 GB   4.3 GB
Cleaning Up
To cleanup, run:
sudo -E talosctl cluster destroy --provisioner qemuNote: In that case that the host machine is rebooted before destroying the cluster, you may need to manually remove
~/.talos/clusters/talos-default.
Manual Clean Up
The talosctl cluster destroy command depends heavily on the clusters state directory.
It contains all related information of the cluster.
The PIDs and network associated with the cluster nodes.
If you happened to have deleted the state folder by mistake or you would like to cleanup the environment, here are the steps how to do it manually:
Remove VM Launchers
Find the process of talosctl qemu-launch:
ps -elf | grep 'talosctl qemu-launch'To remove the VMs manually, execute:
sudo kill -s SIGTERM <PID>Example output, where VMs are running with PIDs 157615 and 157617
ps -elf | grep '[t]alosctl qemu-launch'
0 S root      157615    2835  0  80   0 - 184934 -     07:53 ?        00:00:00 talosctl qemu-launch
0 S root      157617    2835  0  80   0 - 185062 -     07:53 ?        00:00:00 talosctl qemu-launch
sudo kill -s SIGTERM 157615
sudo kill -s SIGTERM 157617
Stopping VMs
Find the process of qemu-system:
ps -elf | grep 'qemu-system'To stop the VMs manually, execute:
sudo kill -s SIGTERM <PID>Example output, where VMs are running with PIDs 158065 and 158216
ps -elf | grep qemu-system
2 S root     1061663 1061168 26  80   0 - 1786238 -    14:05 ?        01:53:56 qemu-system-x86_64 -m 2048 -drive format=raw,if=virtio,file=/home/username/.talos/clusters/talos-default/bootstrap-master.disk -smp cpus=2 -cpu max -nographic -netdev tap,id=net0,ifname=tap0,script=no,downscript=no -device virtio-net-pci,netdev=net0,mac=1e:86:c6:b4:7c:c4 -device virtio-rng-pci -no-reboot -boot order=cn,reboot-timeout=5000 -smbios type=1,uuid=7ec0a73c-826e-4eeb-afd1-39ff9f9160ca -machine q35,accel=kvm
2 S root     1061663 1061170 67  80   0 - 621014 -     21:23 ?        00:00:07 qemu-system-x86_64 -m 2048 -drive format=raw,if=virtio,file=/homeusername/.talos/clusters/talos-default/pxe-1.disk -smp cpus=2 -cpu max -nographic -netdev tap,id=net0,ifname=tap0,script=no,downscript=no -device virtio-net-pci,netdev=net0,mac=36:f3:2f:c3:9f:06 -device virtio-rng-pci -no-reboot -boot order=cn,reboot-timeout=5000 -smbios type=1,uuid=ce12a0d0-29c8-490f-b935-f6073ab916a6 -machine q35,accel=kvm
sudo kill -s SIGTERM 1061663
sudo kill -s SIGTERM 1061663
Remove load balancer
Find the process of talosctl loadbalancer-launch:
ps -elf | grep 'talosctl loadbalancer-launch'To remove the LB manually, execute:
sudo kill -s SIGTERM <PID>Example output, where loadbalancer is running with PID 157609
ps -elf | grep '[t]alosctl loadbalancer-launch'
4 S root      157609    2835  0  80   0 - 184998 -     07:53 ?        00:00:07 talosctl loadbalancer-launch --loadbalancer-addr 10.5.0.1 --loadbalancer-upstreams 10.5.0.2
sudo kill -s SIGTERM 157609
Remove DHCP server
Find the process of talosctl dhcpd-launch:
ps -elf | grep 'talosctl dhcpd-launch'To remove the LB manually, execute:
sudo kill -s SIGTERM <PID>Example output, where loadbalancer is running with PID 157609
ps -elf | grep '[t]alosctl dhcpd-launch'
4 S root      157609    2835  0  80   0 - 184998 -     07:53 ?        00:00:07 talosctl dhcpd-launch --state-path /home/username/.talos/clusters/talos-default --addr 10.5.0.1 --interface talosbd9c32bc
sudo kill -s SIGTERM 157609
Remove network
This is more tricky part as if you have already deleted the state folder.
If you didn’t then it is written in the state.yaml in the
~/.talos/clusters/<cluster-name> directory.
sudo cat ~/.talos/clusters/<cluster-name>/state.yaml | grep bridgename
bridgename: talos<uuid>
If you only had one cluster, then it will be the interface with name
talos<uuid>
46: talos<uuid>: <NO-CARRIER,BROADCAST,MULTICAST,UP> mtu 1500 qdisc noqueue state DOWN group default qlen 1000
    link/ether a6:72:f4:0a:d3:9c brd ff:ff:ff:ff:ff:ff
    inet 10.5.0.1/24 brd 10.5.0.255 scope global talos17c13299
       valid_lft forever preferred_lft forever
    inet6 fe80::a472:f4ff:fe0a:d39c/64 scope link
       valid_lft forever preferred_lft forever
To remove this interface:
sudo ip link del talos<uuid>Remove state directory
To remove the state directory execute:
sudo rm -Rf /home/$USER/.talos/clusters/<cluster-name>Troubleshooting
Logs
Inspect logs directory
sudo cat ~/.talos/clusters/<cluster-name>/*.logLogs are saved under <cluster-name>-<role>-<node-id>.log
For example in case of k8s cluster name:
ls -la ~/.talos/clusters/k8s | grep log
-rw-r--r--. 1 root root      69415 Apr 26 20:58 k8s-master-1.log
-rw-r--r--. 1 root root      68345 Apr 26 20:58 k8s-worker-1.log
-rw-r--r--. 1 root root      24621 Apr 26 20:59 lb.log
Inspect logs during the installation
tail -f ~/.talos/clusters/<cluster-name>/*.log