If you’re interested in this project and would like to help in engineering efforts, or have general usage questions, we are happy to have you!
We hold a weekly meeting that all audiences are welcome to attend.
We would appreciate your feedback so that we can make Talos even better!
To do so, you can take our survey.
You can subscribe to this meeting by joining the community forum above.
Note: You can convert the meeting hours to your local time.
Enterprise
If you are using Talos in a production setting, and need consulting services to get started or to integrate Talos into your existing environment, we can help.
Sidero Labs, Inc. offers support contracts with SLA (Service Level Agreement)-bound terms for mission-critical environments.
A quick introduction in to what Talos is and why it should be used.
Talos is a container optimized Linux distro; a reimagining of Linux for distributed systems such as Kubernetes.
Designed to be as minimal as possible while still maintaining practicality.
For these reasons, Talos has a number of features unique to it:
it is immutable
it is atomic
it is ephemeral
it is minimal
it is secure by default
it is managed via a single declarative configuration file and gRPC API
Talos can be deployed on container, cloud, virtualized, and bare metal platforms.
Why Talos
In having less, Talos offers more.
Security.
Efficiency.
Resiliency.
Consistency.
All of these areas are improved simply by having less.
1.2 - Quickstart
A short guide on setting up a simple Talos Linux cluster locally with Docker.
Local Docker Cluster
The easiest way to try Talos is by using the CLI (talosctl) to create a cluster on a machine with docker installed.
Download kubectl via one of methods outlined in the documentation.
Create the Cluster
Now run the following:
talosctl cluster create
Verify that you can reach Kubernetes:
$ kubectl get nodes -o wide
NAME                     STATUS   ROLES    AGE    VERSION   INTERNAL-IP   EXTERNAL-IP   OS-IMAGE         KERNEL-VERSION   CONTAINER-RUNTIME
talos-default-master-1   Ready    master   115s   v1.23.5   10.5.0.2      <none>        Talos (v1.0.6)   <host kernel>    containerd://1.5.5
talos-default-worker-1   Ready    <none>   115s   v1.23.5   10.5.0.3      <none>        Talos (v1.0.6)   <host kernel>    containerd://1.5.5
Destroy the Cluster
When you are all done, remove the cluster:
talosctl cluster destroy
1.3 - Getting Started
A guide to setting up a Talos Linux cluster on multiple machines.
This document will walk you through installing a full Talos Cluster.
You may wish to try the Quickstart first, to quickly create a local virtual cluster on your workstation.
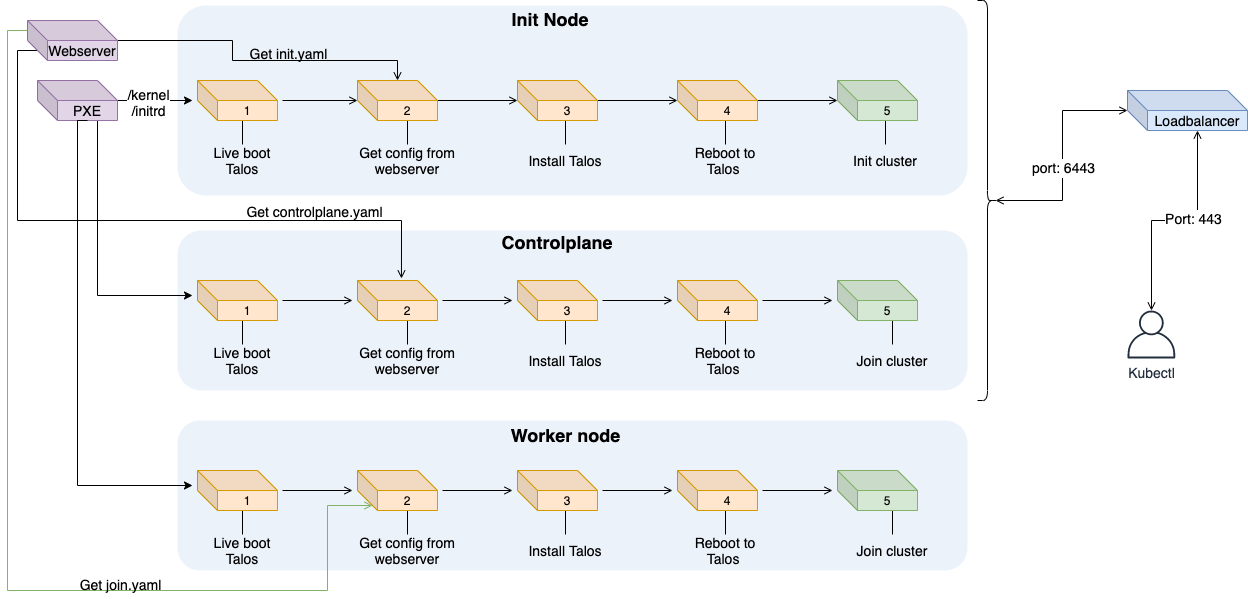
Regardless of where you run Talos, there is a pattern to deploying it.
In general you need to:
acquire the installation image
decide on the endpoint for Kubernetes
optionally create a load balancer
configure Talos
configure talosctl
bootstrap Kubernetes
Prerequisites
talosctl
talosctl is a CLI tool which interfaces with the Talos API in
an easy manner.
It also includes a number of useful options for creating and managing clusters.
When booted from the ISO, Talos will run in RAM, and it will not install itself
until it is provided a configuration.
Thus, it is safe to boot the ISO onto any machine.
Alternative Booting
For network booting and self-built media, you can use the published kernel and initramfs images:
Note that to use alternate booting, there are a number of required kernel parameters.
Please see the kernel docs for more information.
Decide the Kubernetes Endpoint
In order to configure Kubernetes and bootstrap the cluster, Talos needs to know
what the endpoint (DNS name or IP address) of the Kubernetes API Server will be.
The endpoint should be the fully-qualified HTTP(S) URL for the Kubernetes API
Server, which (by default) runs on port 6443 using HTTPS.
Thus, the format of the endpoint may be something like:
https://192.168.0.10:6443
https://kube.mycluster.mydomain.com:6443
https://[2001:db8:1234::80]:6443
Because the Kubernetes controlplane is meant to be highly
available, we must also choose how to bind the API server endpoint to the servers
themselves.
There are three common ways to do this:
Dedicated Load-balancer
If you are using a cloud provider or have your own load-balancer available (such
as HAProxy, nginx reverse proxy, or an F5 load-balancer), using
a dedicated load balancer is a natural choice.
Create an appropriate frontend matching the endpoint, and point the backends at each of the addresses of the Talos controlplane nodes.
Layer 2 Shared IP
Talos has integrated support for serving Kubernetes from a shared (sometimes
called “virtual”) IP address.
This method relies on OSI Layer 2 connectivity between controlplane Talos nodes.
In this case, we choose an IP address on the same subnet as the Talos
controlplane nodes which is not otherwise assigned to any machine.
For instance, if your controlplane node IPs are:
192.168.0.10
192.168.0.11
192.168.0.12
you could choose the ip 192.168.0.15 as your shared IP address.
Just make sure that 192.168.0.15 is not used by any other machine and that your DHCP
will not serve it to any other machine.
Once chosen, form the full HTTPS URL from this IP:
https://192.168.0.15:6443
You are free to set a DNS record to this IP address to identify the Kubernetes API endpoint, but you will need to use the IP address itself, not the DNS name, to configure the shared IP (machine.network.interfaces[].vip.ip) in the Talos configuration.
For more information about using a shared IP, see the related
Guide
DNS records
If neither of the other methods work for you, you can use DNS records to
provide a measure of redundancy.
In this case, you would add multiple A or AAAA records (one for each controlpane node) to a DNS name.
For instance, you could add:
kube.cluster1.mydomain.com  IN  A  192.168.0.10
kube.cluster1.mydomain.com  IN  A  192.168.0.11
kube.cluster1.mydomain.com  IN  A  192.168.0.12
Then, your endpoint would be:
https://kube.cluster1.mydomain.com:6443
Decide how to access the Talos API
Since Talos is entirely API-driven, Talos comes with a number of mechanisms to make accessing the API easier.
Controlplane nodes can proxy requests for worker nodes.
This means that you only need access to the controlplane nodes in order to access
the rest of the network.
This is useful for security (your worker nodes do not need to have
public IPs or be otherwise connected to the Internet), and it also makes working
with highly-variable clusters easier, since you only need to know the
controlplane nodes in advance.
Even better, the talosctl tool will automatically load balance requests and fail over
between all of your controlplane nodes, so long as it is informed of the
controlplane node IPs.
This means you need to tell your client (talosctl) how to communicate with the controlplane nodes, which is done by defining the endpoints.
In general, it is recommended that these point to the set of control plane
nodes, either directly or through a reverse proxy or load balancer, similarly to accessing the Kubernetes API.
The difference is that the Talos API listens on port 50000/tcp.
Whichever way you wish to access the Talos API, be sure to note the IP(s) or
hostname(s) so that you can configure your talosctl tool’s endpoints below.
NOTE: The Virtual IP method is not recommended when accessing the Talos API as it requires etcd to be bootstrapped and functional.
This can make debugging any issues via the Talos API more difficult as issues with Talos configuration may result in etcd not achieving quorum, and therefore the Virtual IP not being available.
In this case setting the endpoints to the IP or hostnames of the control plane nodes themselves is preferred.
Configure Talos
When Talos boots without a configuration, such as when using the Talos ISO, it
enters a limited maintenance mode and waits for a configuration to be provided.
Alternatively, the Talos installer can be booted with the talos.config kernel
commandline argument set to an HTTP(s) URL from which it should receive its
configuration.
In cases where a PXE server can be available, this is much more efficient than
manually configuring each node.
If you do use this method, just note that Talos does require a number of other
kernel commandline parameters.
See the required kernel parameters for more information.
In either case, we need to generate the configuration which is to be provided.
Luckily, the talosctl tool comes with a configuration generator for exactly
this purpose.
talosctl gen config "cluster-name""cluster-endpoint"
Here, cluster-name is an arbitrary name for the cluster which will be used
in your local client configuration as a label.
It does not affect anything in the cluster itself, but it should be unique in the configuration on your local workstation.
The cluster-endpoint is where you insert the Kubernetes Endpoint you
selected from above.
This is the Kubernetes API URL, and it should be a complete URL, with https://
and port.
(The default port is 6443.)
When you run this command, you will receive a number of files in your current
directory:
controlplane.yaml
worker.yaml
talosconfig
The .yaml files are what we call Machine Configs.
They are installed onto the Talos servers, and they provide their complete configuration,
describing everything from what disk Talos should be installed to, to what
sysctls to set, to what network settings it should have.
In the case of the controlplane.yaml, it even describes how Talos should form its Kubernetes cluster.
The talosconfig file (which is also YAML) is your local client configuration
file.
Controlplane and Worker
The two types of Machine Configs correspond to the two roles of Talos nodes.
The Controlplane Machine Config describes the configuration of a Talos server on
which the Kubernetes Controlplane should run.
The Worker Machine Config describes everything else: workload servers.
The main difference between Controlplane Machine Config files and Worker Machine
Config files is that the former contains information about how to form the
Kubernetes cluster.
Templates
The generated files can be thought of as templates.
Individual machines may need specific settings (for instance, each may have a
different static IP address).
When different files are needed for machines of the same type, simply
copy the source template (controlplane.yaml or worker.yaml) and make whatever
modifications need to be done.
For instance, if you had three controlplane nodes and three worker nodes, you
may do something like this:
  for i in $(seq 0 2); do
    cp controlplane.yaml cp$i.yaml
  end
  for i in $(seq 0 2); do
    cp worker.yaml w$i.yaml
  end
In cases where there is no special configuration needed, you may use the same
file for each machine of the same type.
Apply Configuration
After you have generated each machine’s Machine Config, you need to load them
into the machines themselves.
For that, you need to know their IP addresses.
If you have access to the console or console logs of the machines, you can read
them to find the IP address(es).
Talos will print them out during the boot process:
The insecure flag is necessary at this point because the PKI infrastructure has
not yet been made available to the node.
Note that the connection will be encrypted, it is just unauthenticated.
If you have console access, though, you can extract the server
certificate fingerprint and use it for an additional layer of validation:
Using the fingerprint allows you to be sure you are sending the configuration to
the right machine, but it is completely optional.
After the configuration is applied to a node, it will reboot.
You may repeat this process for each of the nodes in your cluster.
Configure your talosctl client
Now that the nodes are running Talos with its full PKI security suite, you need
to use that PKI to talk to the machines.
That means configuring your client, and that is what that talosconfig file is for.
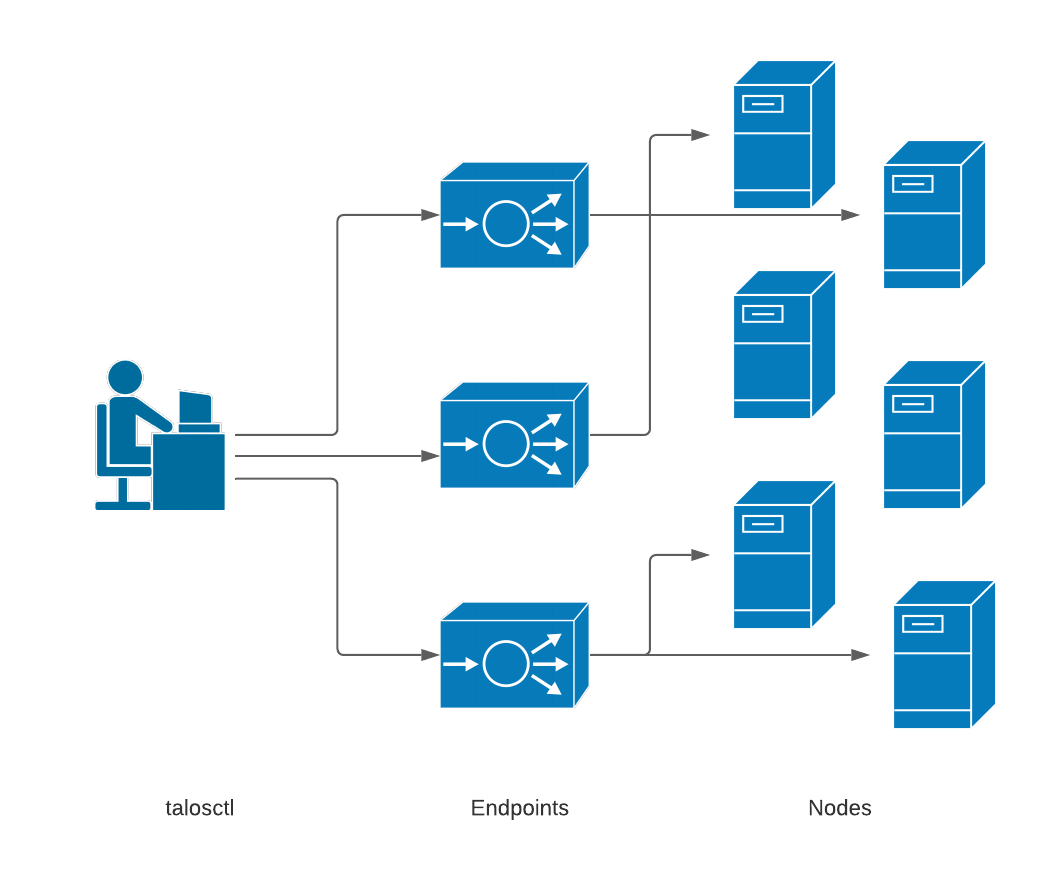
Endpoints
Endpoints are the communication endpoints to which the client directly talks.
These can be load balancers, DNS hostnames, a list of IPs, etc.
In general, it is recommended that these point to the set of control plane
nodes, either directly or through a reverse proxy or load balancer.
Each endpoint will automatically proxy requests destined to another node through
it, so it is not necessary to change the endpoint configuration just because you
wish to talk to a different node within the cluster.
Endpoints do, however, need to be members of the same Talos cluster as the
target node, because these proxied connections reply on certificate-based
authentication.
We need to set the endpoints in your talosconfig.
talosctl will automatically load balance and fail over among the endpoints,
so no external load balancer or DNS abstraction is required
(though you are free to use them).
As an example, if the IP addresses of our controlplane nodes are:
The node is the target node on which you wish to perform the API call.
Keep in mind, when specifying nodes, their IPs and/or hostnames are as seen by the endpoint servers, not as from the client.
This is because all connections are proxied through the endpoints.
Some people also like to set a default set of nodes in the talosconfig.
This can be done in the same manner, replacing endpoint with node.
If you do this, however, know that you could easily reboot the wrong machine
by forgetting to declare the right one explicitly.
Worse, if you set several nodes as defaults, you could, with one talosctl upgrade
command upgrade your whole cluster all at the same time.
It’s a powerful tool, and with that comes great responsibility.
The author of this document generally sets a single controlplane node to be the
default node, which provides the most flexible default operation while limiting
the scope of the disaster should a command be entered erroneously:
You may simply provide -n or --nodes to any talosctl command to
supply the node or (comma-delimited) nodes on which you wish to perform the
operation.
Supplying the commandline parameter will override any default nodes
in the configuration file.
To verify default node(s) you’re currently configured to use, you can run:
$ talosctl version
Client:
        ...
Server:
        NODE:        <node>
        ...
For a more in-depth discussion of Endpoints and Nodes, please see
talosctl.
Default configuration file
You can reference which configuration file to use directly with the --talosconfig parameter:
  talosctl --talosconfig=./talosconfig \
    --nodes 192.168.0.2 version
However, talosctl comes with tooling to help you integrate and merge this
configuration into the default talosctl configuration file.
This is done with the merge option.
talosctl config merge ./talosconfig
This will merge your new talosconfig into the default configuration file
($XDG_CONFIG_HOME/talos/config.yaml), creating it if necessary.
Like Kubernetes, the talosconfig configuration files has multiple “contexts”
which correspond to multiple clusters.
The <cluster-name> you chose above will be used as the context name.
Kubernetes Bootstrap
All of your machines are configured, and your talosctl client is set up.
Now, you are ready to bootstrap your Kubernetes cluster.
If that sounds daunting, you haven’t used Talos before.
Bootstrapping your Kubernetes cluster with Talos is as simple as:
talosctl bootstrap --nodes 192.168.0.2
IMPORTANT: the bootstrap operation should only be called ONCE and only on a SINGLE
controlplane node!
The IP can be any of your controlplanes (or the loadbalancer, if you have
one).
It should only be issued once.
At this point, Talos will form an etcd cluster, generate all of the core
Kubernetes assets, and start the Kubernetes controlplane components.
After a few moments, you will be able to download your Kubernetes client
configuration and get started:
talosctl kubeconfig
Running this command will add (merge) you new cluster into you local Kubernetes
configuration in the same way as talosctl config merge merged the Talos client
configuration into your local Talos client configuration file.
If you would prefer for the configuration to not be merged into your default
Kubernetes configuration file, simple tell it a filename:
talosctl kubeconfig alternative-kubeconfig
If all goes well, you should now be able to connect to Kubernetes and see your
nodes:
kubectl get nodes
1.4 - Theila UI for Talos
An intro to Theila - a UI for Talos clusters.
Once you have a Talos cluster running, you may find it easier to get insights on your cluster(s) using a visual user interface rather than the talosctl CLI.
For this, Sidero Labs provides Theila, a simple, single-binary web-based visual user interface for Talos clusters.
Prerequisites
You should have a Talos cluster up & running, and the talosconfig file for Theila to access it.
Installation
Theila is published as a single static binary compiled for various platforms and architectures, as well as a container image.
Binary
You can download the correct binary for your system from the releases page, or use the following commands in your terminal.
Once it is running you should be able to point a browser at http://localhost:8080 to open the Theila UI.
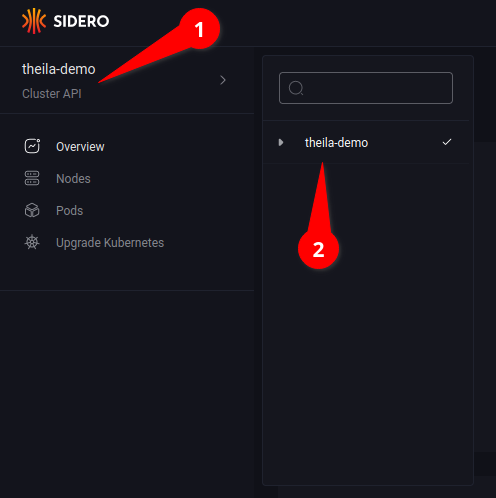
Clusters
You can navigate around various Talos clusters using the menu at the upper-left corner (see 1.1), then selecting the specific cluster from the list (see 1.2).
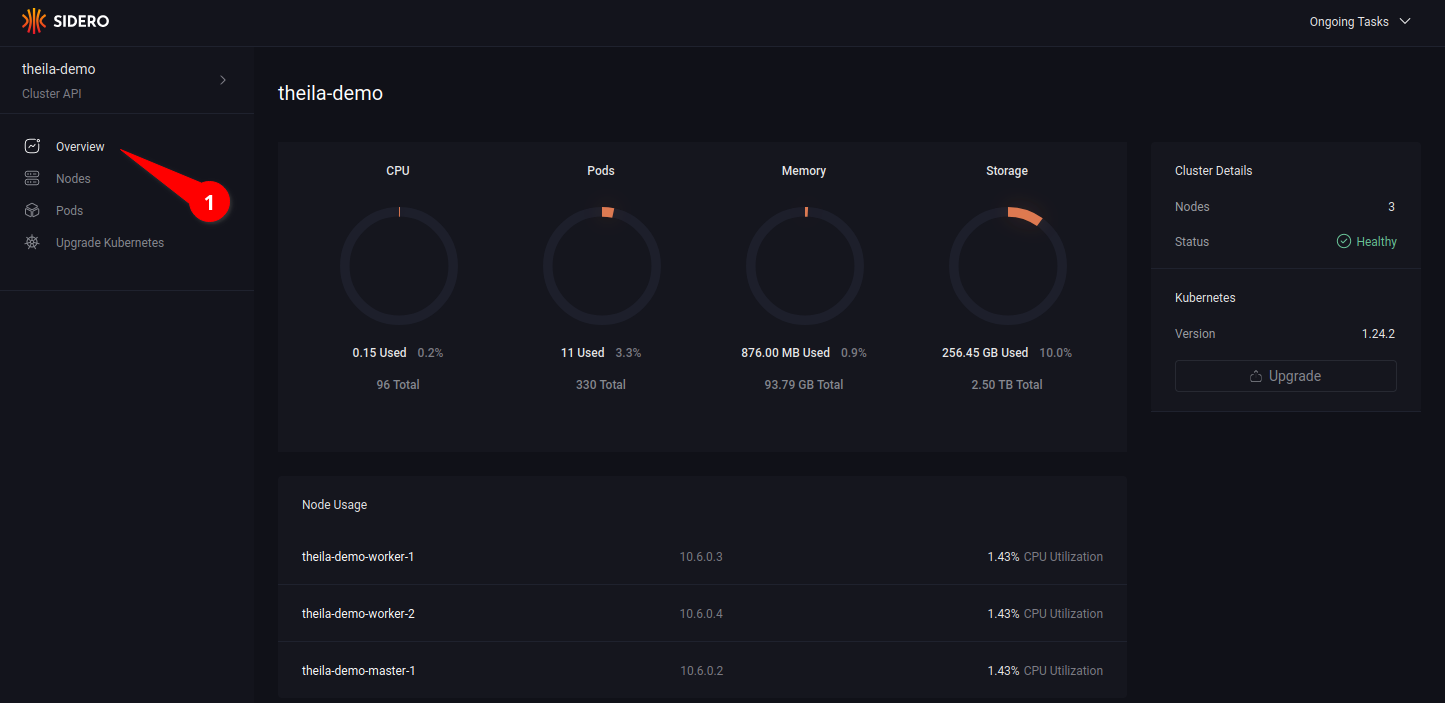
Cluster Overview
Clicking on the “Overview” option in the menu (see 2.1) will display an overview of resource use & health of the cluster.
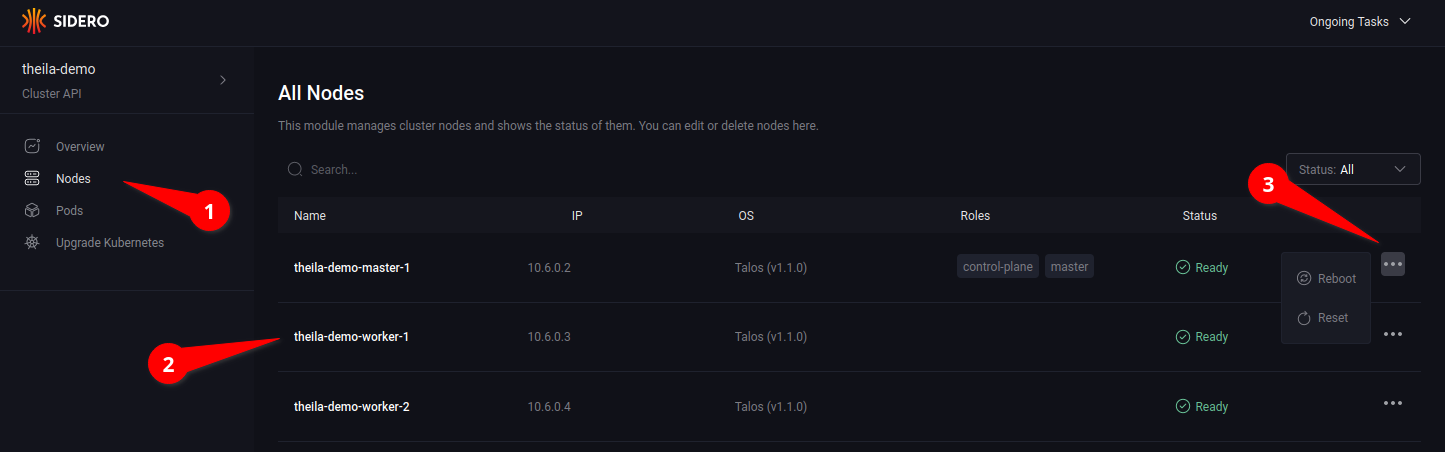
Nodes
Entering the “Nodes” section on the menu (see 3.1) will give a list of nodes in the cluster (see 3.2), along with information such as IP address, status, and any roles assigned to the node.
Opening the node menu (see 3.3) show the actions that can be taken on a specific node.
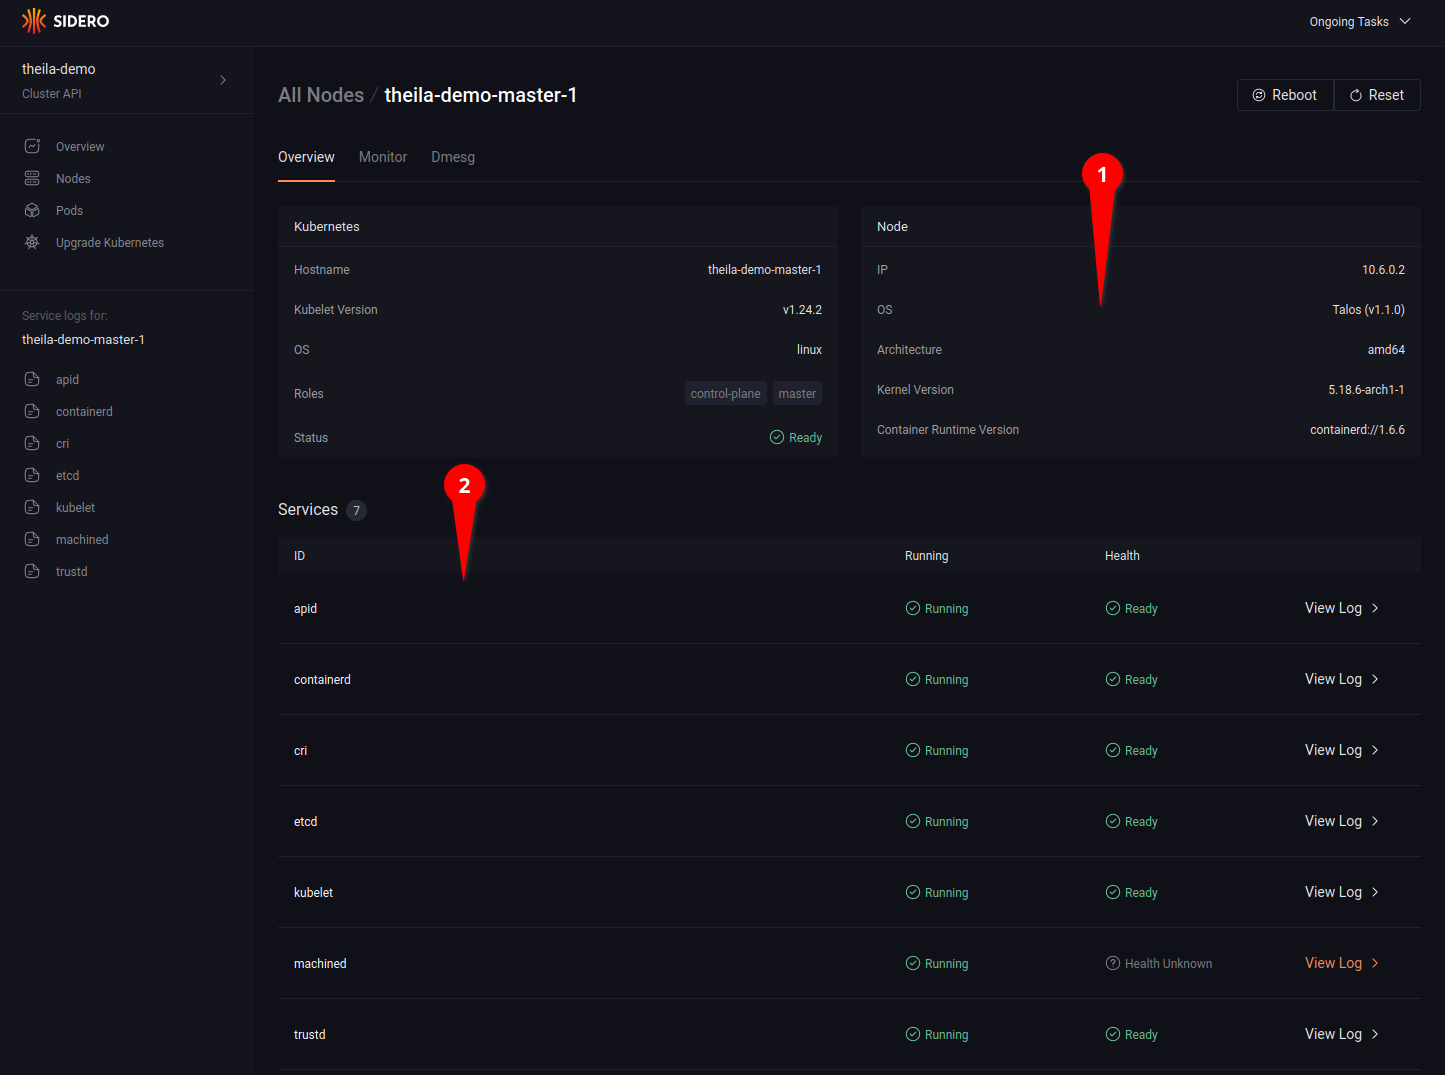
Clicking on a specific node name in the node list will open the node detail page for more information on each specific node (see 4.1), including running services and their logs (see 4.2).
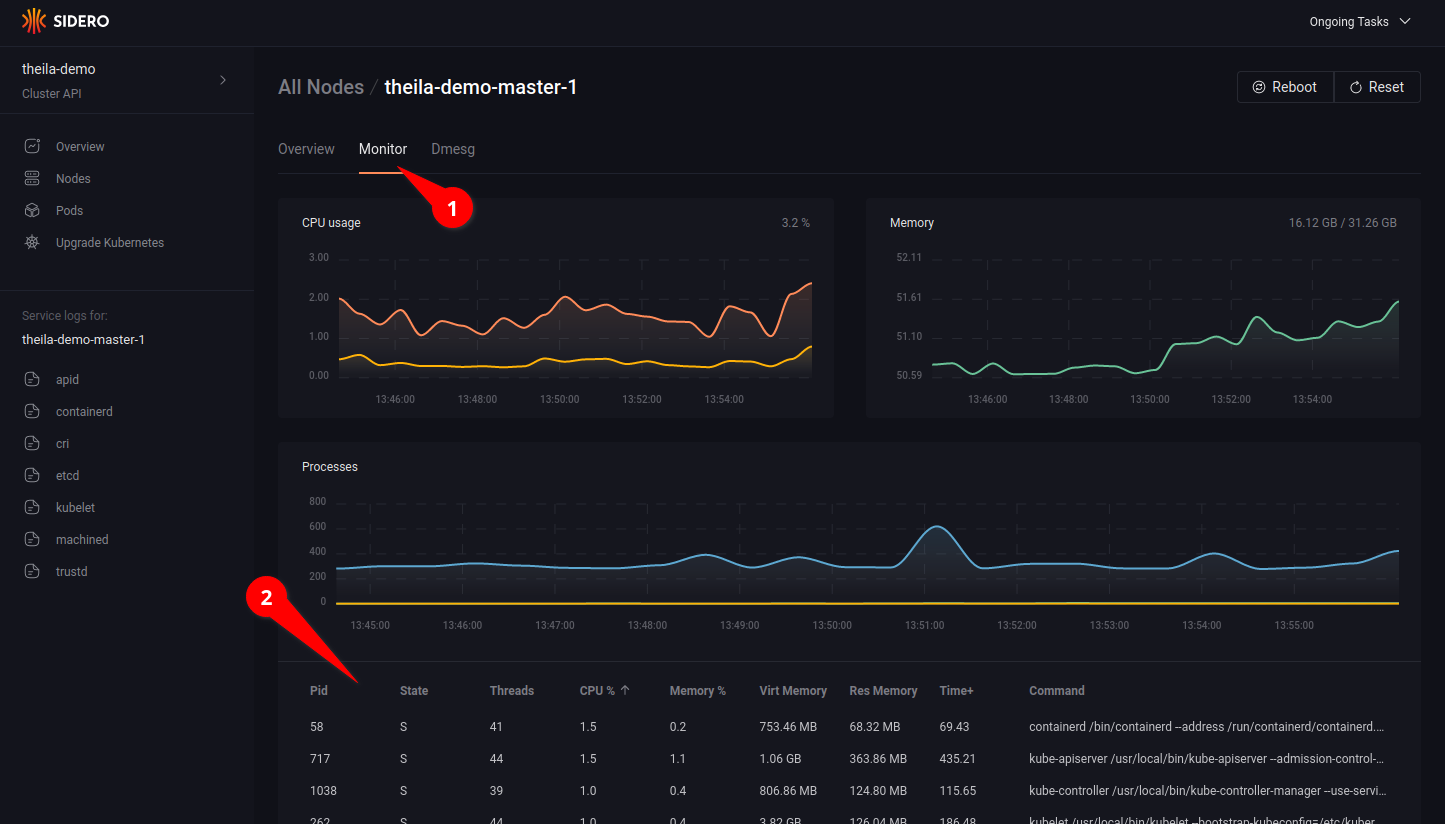
Clicking on the “Monitor” tab (see 5.1) allows you to watch resource use over time, with CPU and memory consumption graphs updated in real time, and a detailed list of running process each with their individual resource use (see 5.2).
Lastly, the “Dmesg” tab shows all kernel messages of the node since boot.
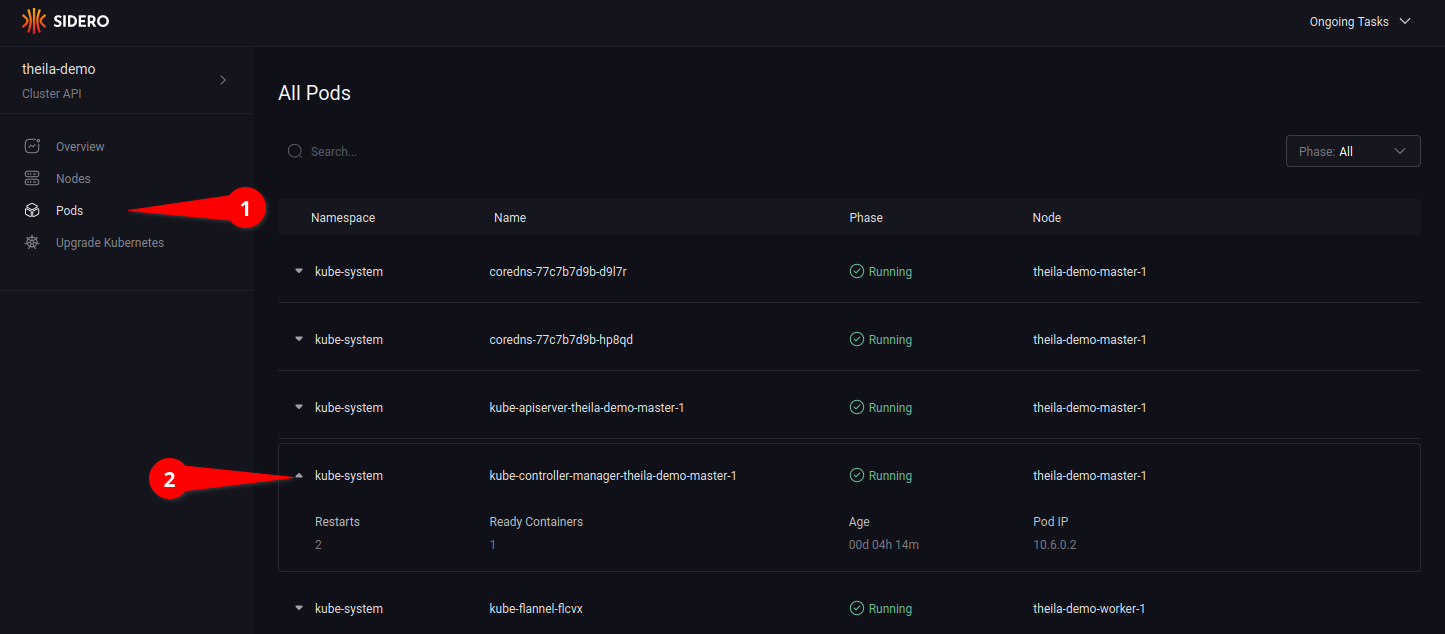
Pods
Using the “Pods” section on the menu (see 6.1) will list all pods in the cluster, across all namespaces.
Clicking on the drop-down arrow (see 6.2) will open up more detailed information of the specified pod.
1.5 - System Requirements
Hardware requirements for running Talos Linux.
Minimum Requirements
Role
Memory
Cores
Init/Control Plane
2GB
2
Worker
1GB
1
Recommended
Role
Memory
Cores
Init/Control Plane
4GB
4
Worker
2GB
2
These requirements are similar to that of kubernetes.
1.6 - What's New in Talos 1.0
List of new and shiny features in Talos Linux.
Announcements
GitHub Organization Change
Talos Linux and other repositories were migrated from the talos-systems GitHub organization
to the siderolabs organization (github.com/talos-systems -> github.com/siderolabs).
Existing Talos Linux container images (installer, talos, etc.) are mirrored across both organizations,
but all new images will only be available from ghcr.io/siderolabs going forward.
For example, when upgrading Talos use ghcr.io/siderolabs instead of ghcr.io/talos-systems:
System extensions allow changes to the Talos root filesystem, and can be used to enable different features, including custom
container runtimes, additional firmware, among others.
System extensions are only activated during Talos installation (or upgrade).
Even with system extensions installed, the Talos root filesystem is still immutable and read-only.
Talos now provides a way to extend the system services that Talos runs with extension services.
Extension services should be included in the Talos root filesystem (i.e. via system extensions).
Static Pods in the Machine Configuration
Talos now accepts static pod definitions in the .machine.pods key of the machine configuration.
Please note that static pod definitions are not validated by Talos, and can be updated without a node reboot.
Kubernetes
Kubelet
Kubelet configuration can now be overridden with the .machine.kubelet.extraConfig machine configuration field.
As most of the kubelet command line arguments are being deprecated, it is recommended to migrate to extraConfig
in place of using extraArgs.
A number of conformance tweaks have been made to the kubelet to allow it to run without
protectKernelDefaults.
This includes both kubelet configuration options and sysctls.
Of particular note is that Talos now sets the kernel.panic reboot interval to 10s instead of 1s.
If your kubelet fails to start after the upgrade, please check the kubelet logs to determine the problem.
Talos now performing a graceful kubelet shutdown by default on both node shutdown and reboot.
Default shutdown timeouts are 20s for regular priority pods and 10s for critical priority pods.
Timeouts can be overridden with the .machine.kubelet.extraConfig machine configuration keys:
shutdownGracePeriod and shutdownGracePeriodCriticalPods.
Admission Plugin Configuration
Talos now supports the Kubernetes API server admission plugin configuration via the .cluster.apiServer.admissionControl machine configuration field.
The Pod Security Policy Kubernetes feature is deprecated and is going to be removed in Kubernetes 1.25.
Talos by default skips setting up PSP with this release (see machine configuration .cluster.apiServer.disablePodSecurityPolicy).
Pinned Kubernetes Version
Command talosctl gen config now defaults to Kubernetes version pinning when generating machine configuration.
Previously the default was to omit an explicit Kubernetes version, so Talos picked up the default version it was built against.
Old behavior can be achieved by specifying empty flag value: --kubernetes-version=.
API Server Audit Logs
kube-apiserver is now configured to store its audit logs separately from the kube-apiserver standard logs and log directly to file.
The kube-apiserver will maintain the rotation and retirement of these logs, which are stored in /var/log/audit/.
Previously, the audit logs were sent to the kube-apiserverstdout (along with the rest of its logs) to be collected in the usual manner by Kubernetes.
Machine Configuration
Talos now preserves machine configuration byte-for-byte as it was submitted to the node.
This means that custom comments and overall machine configuration structure is now preserved.
This allows automation of machine configuration updates via an external mechanism without loss of information.
Patching Enhancements
talosctl commands which accept JSON patches (i.e. gen config, cluster create, patch machineconfig) now support multiple patches, loading patches
from files with @file.json syntax, as well as support loading patches with a YAML format.
Apply Config Enhancements
talosctl apply/patch/edit cli commands got revamped.
Separate flags --on-reboot, --immediate, --interactive were replaced
with a single --mode flag that can take the following values:
auto new mode that automatically applies the configuration in no-reboot/reboot mode based on the change.
no-reboot force apply immediately, if that is not possible then it fails.
reboot force reboot with applied config.
staged write new machine configuration to STATE, but don’t apply it (it will be applied after a reboot).
interactive starts interactive installer, only for apply.
Networking
Early Boot bond Configuration
Talos now supports setting a bond interface from the kernel cmdline using the bond= option
Platforms
Equinix Metal
talos.platform for Equinix Metal is renamed from packet to equinixMetal, the older name is still supported for backwards compatibility.
Platform network configuration was rewritten to avoid modifying Talos machine configuration.
Network configuration is performed independently of the machine configuration presence, so it works
even if Talos is booted into maintenance mode, and without machine configuration in the platform userdata.
Talos now has alpha support for NVIDIA GPU based workloads.
Check the NVIDA GPU support guide for details.
Miscellaneous
Sysfs Kernel Parameters
Talos now supports setting sysfs kernel parameters (/sys/...).
Use machine configuration field .machine.sysfs to set sysfs kernel parameters.
Wipe System Kernel Parameter
Talos added a new kernel parameter talos.experimental.wipe=system which can help resetting the system disk of the machine
and start over with a fresh installation.
See Resetting a Machine on how to use it.
1.7 - Support Matrix
Table of supported Talos Linux versions and respective platforms.
Tier 1: Automated tests, high-priority fixes.
Tier 2: Tested from time to time, medium-priority bugfixes.
Tier 3: Not tested by core Talos team, community tested.
Tier 1
Metal
AWS
GCP
Tier 2
Azure
Digital Ocean
OpenStack
VMWare
Tier 3
Hetzner
nocloud
Oracle Cloud
Scaleway
Vultr
Upcloud
2 - Talos Linux Guides
Documentation on how to manage Talos Linux
2.1 - Installation
How to install Talos Linux on various platforms
2.1.1 - Bare Metal Platforms
Installation of Talos Linux on various bare-metal platforms.
2.1.1.1 - Digital Rebar
In this guide we will create an Kubernetes cluster with 1 worker node, and 2 controlplane nodes using an existing digital rebar deployment.
In this guide we will create an Kubernetes cluster with 1 worker node, and 2 controlplane nodes.
We assume an existing digital rebar deployment, and some familiarity with iPXE.
We leave it up to the user to decide if they would like to use static networking, or DHCP.
The setup and configuration of DHCP will not be covered.
Create the Machine Configuration Files
Generating Base Configurations
Using the DNS name of the load balancer, generate the base configuration files for the Talos machines:
$ talosctl gen config talos-k8s-metal-tutorial https://<load balancer IP or DNS>:<port>
created controlplane.yaml
created worker.yaml
created talosconfig
The loadbalancer is used to distribute the load across multiple controlplane nodes.
This isn’t covered in detail, because we assume some loadbalancing knowledge before hand.
If you think this should be added to the docs, please create a issue.
At this point, you can modify the generated configs to your liking.
Optionally, you can specify --config-patch with RFC6902 jsonpatch which will be applied during the config generation.
Validate the Configuration Files
$ talosctl validate --config controlplane.yaml --mode metal
controlplane.yaml is valid for metal mode
$ talosctl validate --config worker.yaml --mode metal
worker.yaml is valid for metal mode
Publishing the Machine Configuration Files
Digital Rebar has a built-in fileserver, which means we can use this feature to expose the talos configuration files.
We will place controlplane.yaml, and worker.yaml into Digital Rebar file server by using the drpcli tools.
Copy the generated files from the step above into your Digital Rebar installation.
drpcli file upload <file>.yaml as <file>.yaml
Replacing <file> with controlplane or worker.
Download the boot files
Download a recent version of boot.tar.gz from github.
At this point we can retrieve the admin kubeconfig by running:
talosctl --talosconfig talosconfig kubeconfig .
2.1.1.2 - Equinix Metal
Creating Talos cluster using Equinix Metal.
Prerequisites
This guide assumes the user has a working API token, the Equinix Metal CLI installed, and some familiarity with the CLI.
Network Booting
To install Talos to a server a working TFTP and iPXE server are needed.
How this is done varies and is left as an exercise for the user.
In general this requires a Talos kernel vmlinuz and initramfs.
These assets can be downloaded from a given release.
Special Considerations
PXE Boot Kernel Parameters
The following is a list of kernel parameters required by Talos:
talos.platform: set this to equinixMetal
init_on_alloc=1: required by KSPP
slab_nomerge: required by KSPP
pti=on: required by KSPP
User Data
To configure a Talos you can use the metadata service provide by Equinix Metal.
It is required to add a shebang to the top of the configuration file.
The shebang is arbitrary in the case of Talos, and the convention we use is #!talos.
Creating a Cluster via the Equinix Metal CLI
Control Plane Endpoint
The strategy used for an HA cluster varies and is left as an exercise for the user.
Some of the known ways are:
DNS
Load Balancer
BGP
Create the Machine Configuration Files
Generating Base Configurations
Using the DNS name of the loadbalancer created earlier, generate the base configuration files for the Talos machines:
$ talosctl gen config talos-k8s-aws-tutorial https://<load balancer IP or DNS>:<port>
created controlplane.yaml
created worker.yaml
created talosconfig
Now add the required shebang (e.g. #!talos) at the top of controlplane.yaml, and worker.yaml
At this point, you can modify the generated configs to your liking.
Optionally, you can specify --config-patch with RFC6902 jsonpatch which will be applied during the config generation.
Validate the Configuration Files
talosctl validate --config controlplane.yaml --mode metal
talosctl validate --config worker.yaml --mode metal
Note: Validation of the install disk could potentially fail as the validation
is performed on you local machine and the specified disk may not exist.
At this point we can retrieve the admin kubeconfig by running:
talosctl --talosconfig talosconfig kubeconfig .
2.1.1.3 - Matchbox
In this guide we will create an HA Kubernetes cluster with 3 worker nodes using an existing load balancer and matchbox deployment.
Creating a Cluster
In this guide we will create an HA Kubernetes cluster with 3 worker nodes.
We assume an existing load balancer, matchbox deployment, and some familiarity with iPXE.
We leave it up to the user to decide if they would like to use static networking, or DHCP.
The setup and configuration of DHCP will not be covered.
Create the Machine Configuration Files
Generating Base Configurations
Using the DNS name of the load balancer, generate the base configuration files for the Talos machines:
$ talosctl gen config talos-k8s-metal-tutorial https://<load balancer IP or DNS>:<port>
created controlplane.yaml
created worker.yaml
created talosconfig
At this point, you can modify the generated configs to your liking.
Optionally, you can specify --config-patch with RFC6902 jsonpatch which will be applied during the config generation.
Validate the Configuration Files
$ talosctl validate --config controlplane.yaml --mode metal
controlplane.yaml is valid for metal mode
$ talosctl validate --config worker.yaml --mode metal
worker.yaml is valid for metal mode
Publishing the Machine Configuration Files
In bare-metal setups it is up to the user to provide the configuration files over HTTP(S).
A special kernel parameter (talos.config) must be used to inform Talos about where it should retreive its’ configuration file.
To keep things simple we will place controlplane.yaml, and worker.yaml into Matchbox’s assets directory.
This directory is automatically served by Matchbox.
Create the Matchbox Configuration Files
The profiles we will create will reference vmlinuz, and initramfs.xz.
Download these files from the release of your choice, and place them in /var/lib/matchbox/assets.
Now that we have our configuraton files in place, boot all the machines.
Talos will come up on each machine, grab its’ configuration file, and bootstrap itself.
At this point we can retrieve the admin kubeconfig by running:
talosctl --talosconfig talosconfig kubeconfig .
2.1.1.4 - Sidero
Sidero is a project created by the Talos team that has native support for Talos.
Sidero Metal is a project created by the Talos team that provides a bare metal installer for Cluster API, and that has native support for Talos Linux.
It can be easily installed using clusterctl.
The best way to get started with Sidero Metal is to visit the website.
2.1.2 - Virtualized Platforms
Installation of Talos Linux for virtualization platforms.
2.1.2.1 - Hyper-V
Creating a Talos Kubernetes cluster using Hyper-V.
Pre-requisities
Download the latest talos-amd64.iso ISO from github releases page
Create a New-TalosVM folder in any of your PS Module Path folders $env:PSModulePath -split ';' and save the New-TalosVM.psm1 there
Plan Overview
Here we will create a basic 3 node cluster with a single control-plane node and two worker nodes.
The only difference between control plane and worker node is the amount of RAM and an additional storage VHD.
This is personal preference and can be configured to your liking.
We are using a VMNamePrefix argument for a VM Name prefix and not the full hostname.
This command will find any existing VM with that prefix and “+1” the highest suffix it finds.
For example, if VMs talos-cp01 and talos-cp02 exist, this will create VMs starting from talos-cp03, depending on NumberOfVMs argument.
Setup a Control Plane Node
Use the following command to create a single control plane node:
This will create two VMs: talos-worker01 and talos-wworker02 and attach an additional VHD of 50GB for storage (which in my case will be passed to Mayastor).
Pushing Config to the Nodes
Now that our VMs are ready, find their IP addresses from console of VM.
With that information, push config to the control plane node with:
# set control plane IP variable$CONTROL_PLANE_IP='10.10.10.x'# Generate talos configtalosctl gen config talos-cluster https://$($CONTROL_PLANE_IP):6443 --output-dir .
# Apply config to control plane nodetalosctl apply-config --insecure --nodes $CONTROL_PLANE_IP --file .\controlplane.yaml
Now that our nodes are ready, we are ready to bootstrap the Kubernetes cluster.
# Use following command to set node and endpoint permanantly in config so you dont have to type it everytimetalosctl config endpoint $CONTROL_PLANE_IPtalosctl config node $CONTROL_PLANE_IP# Bootstrap clustertalosctl bootstrap
# Generate kubeconfigtalosctl kubeconfig .
This will generate the kubeconfig file, you can use to connect to the cluster.
2.1.2.2 - KVM
Talos is known to work on KVM.
We don’t yet have a documented guide specific to KVM; however, you can follow the General Getting Started Guide.
If you run into any issues, our community can probably help!
2.1.2.3 - Proxmox
Creating Talos Kubernetes cluster using Proxmox.
In this guide we will create a Kubernetes cluster using Proxmox.
Video Walkthrough
To see a live demo of this writeup, visit Youtube here:
Installation
How to Get Proxmox
It is assumed that you have already installed Proxmox onto the server you wish to create Talos VMs on.
Visit the Proxmox downloads page if necessary.
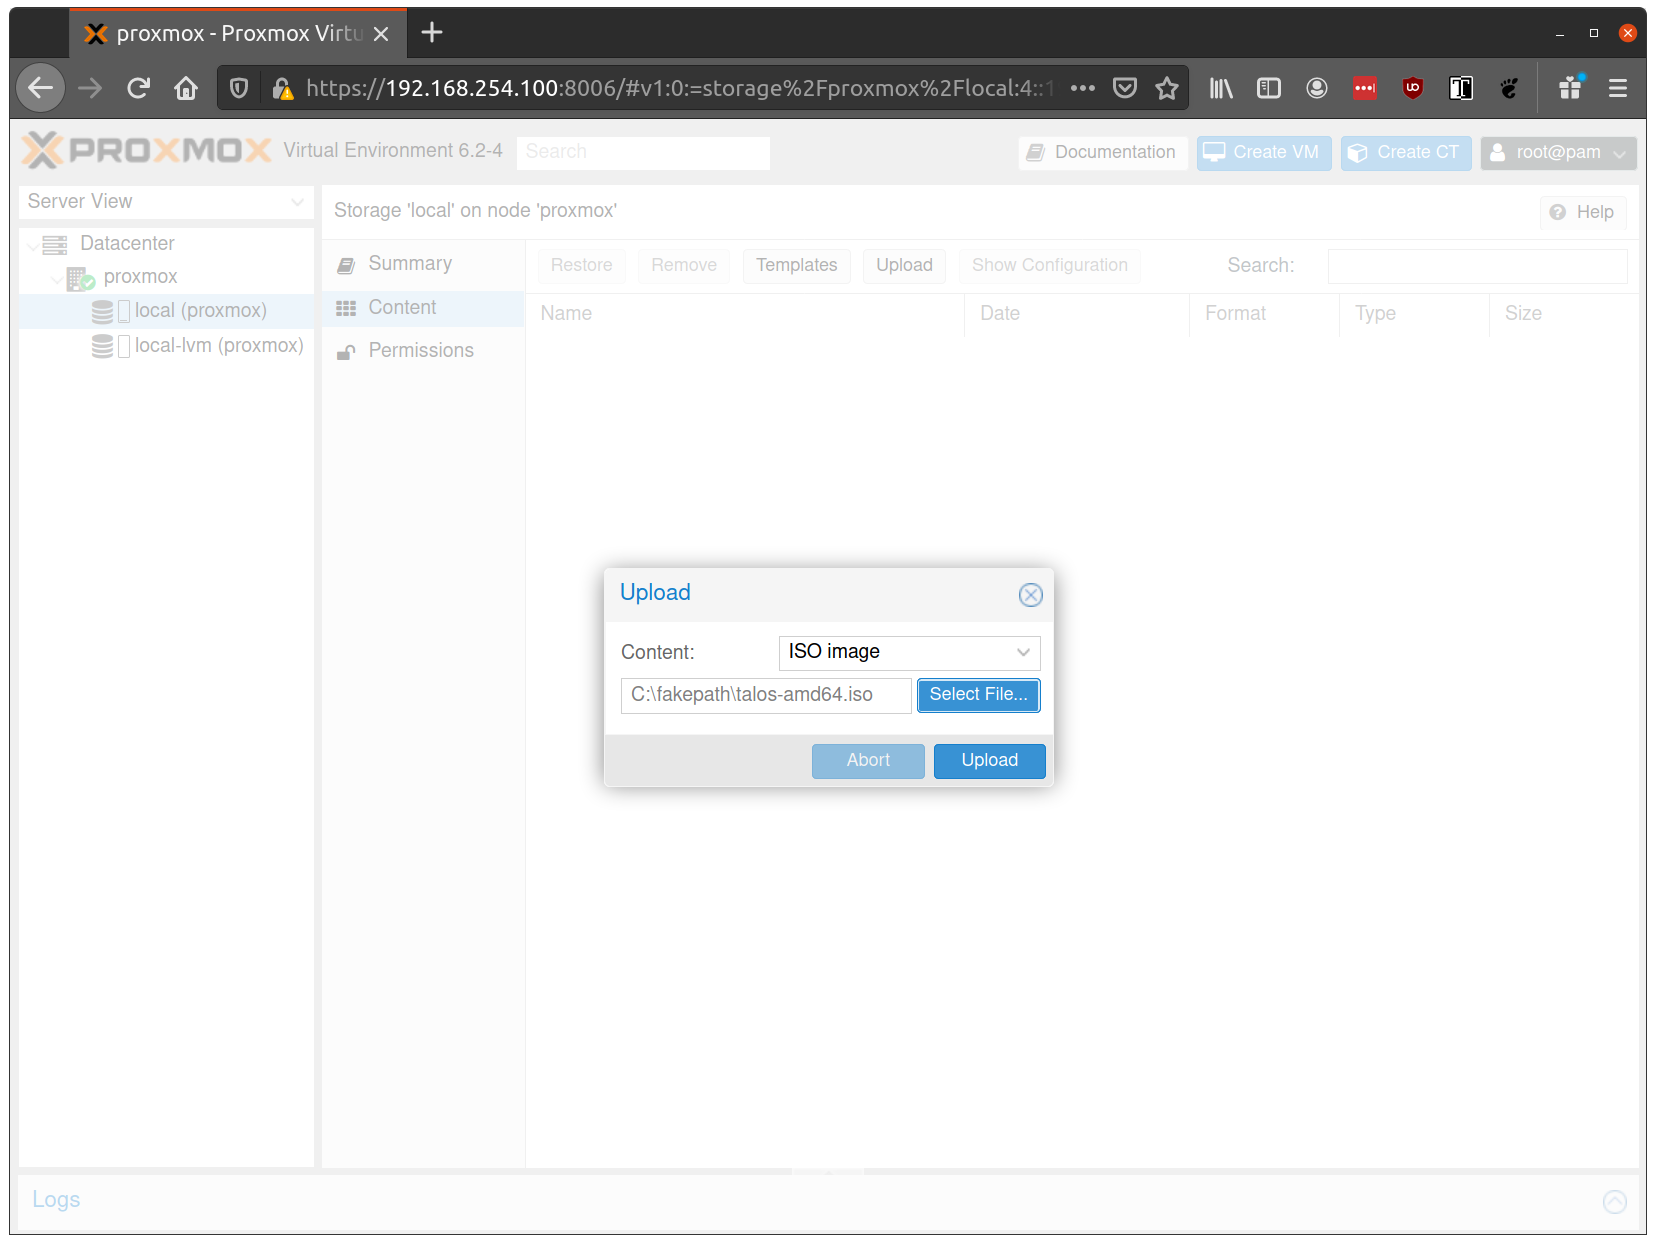
In order to install Talos in Proxmox, you will need the ISO image from the Talos release page.
You can download talos-amd64.iso via
github.com/siderolabs/talos/releases
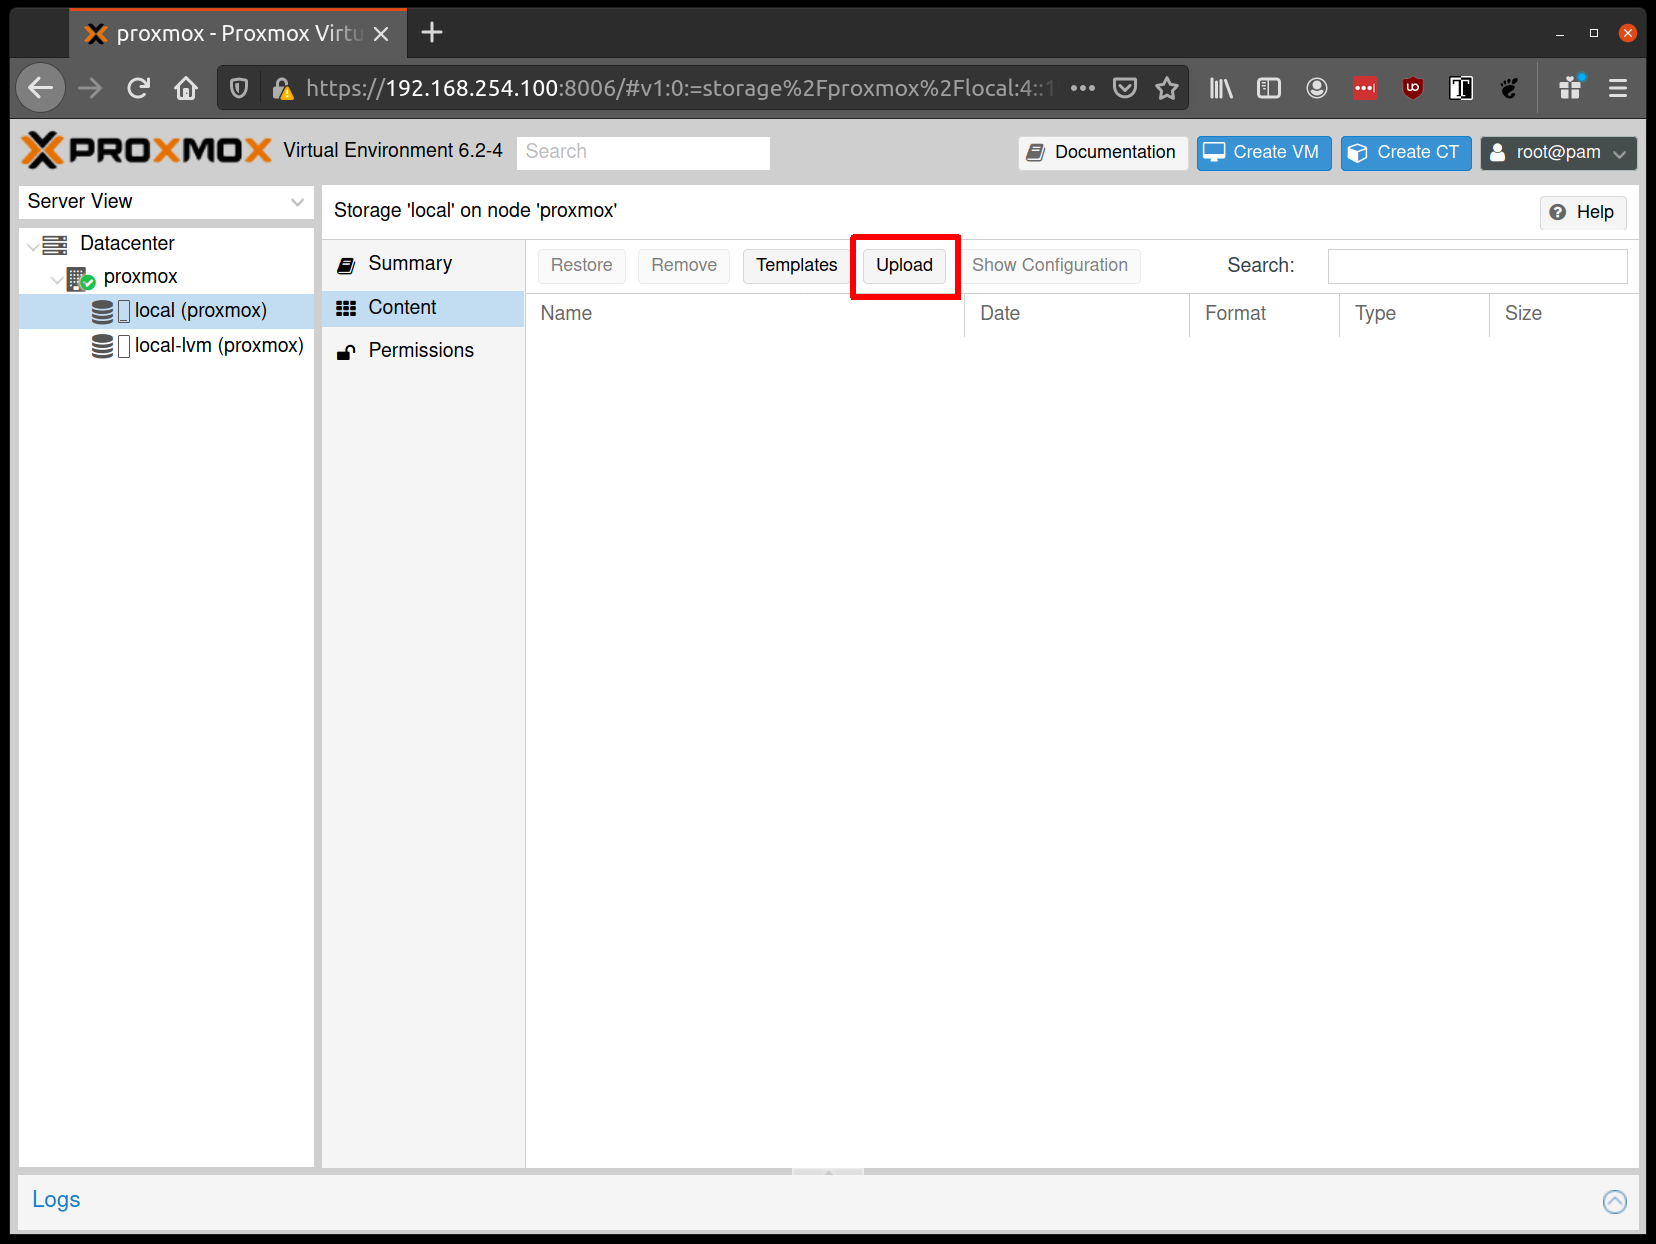
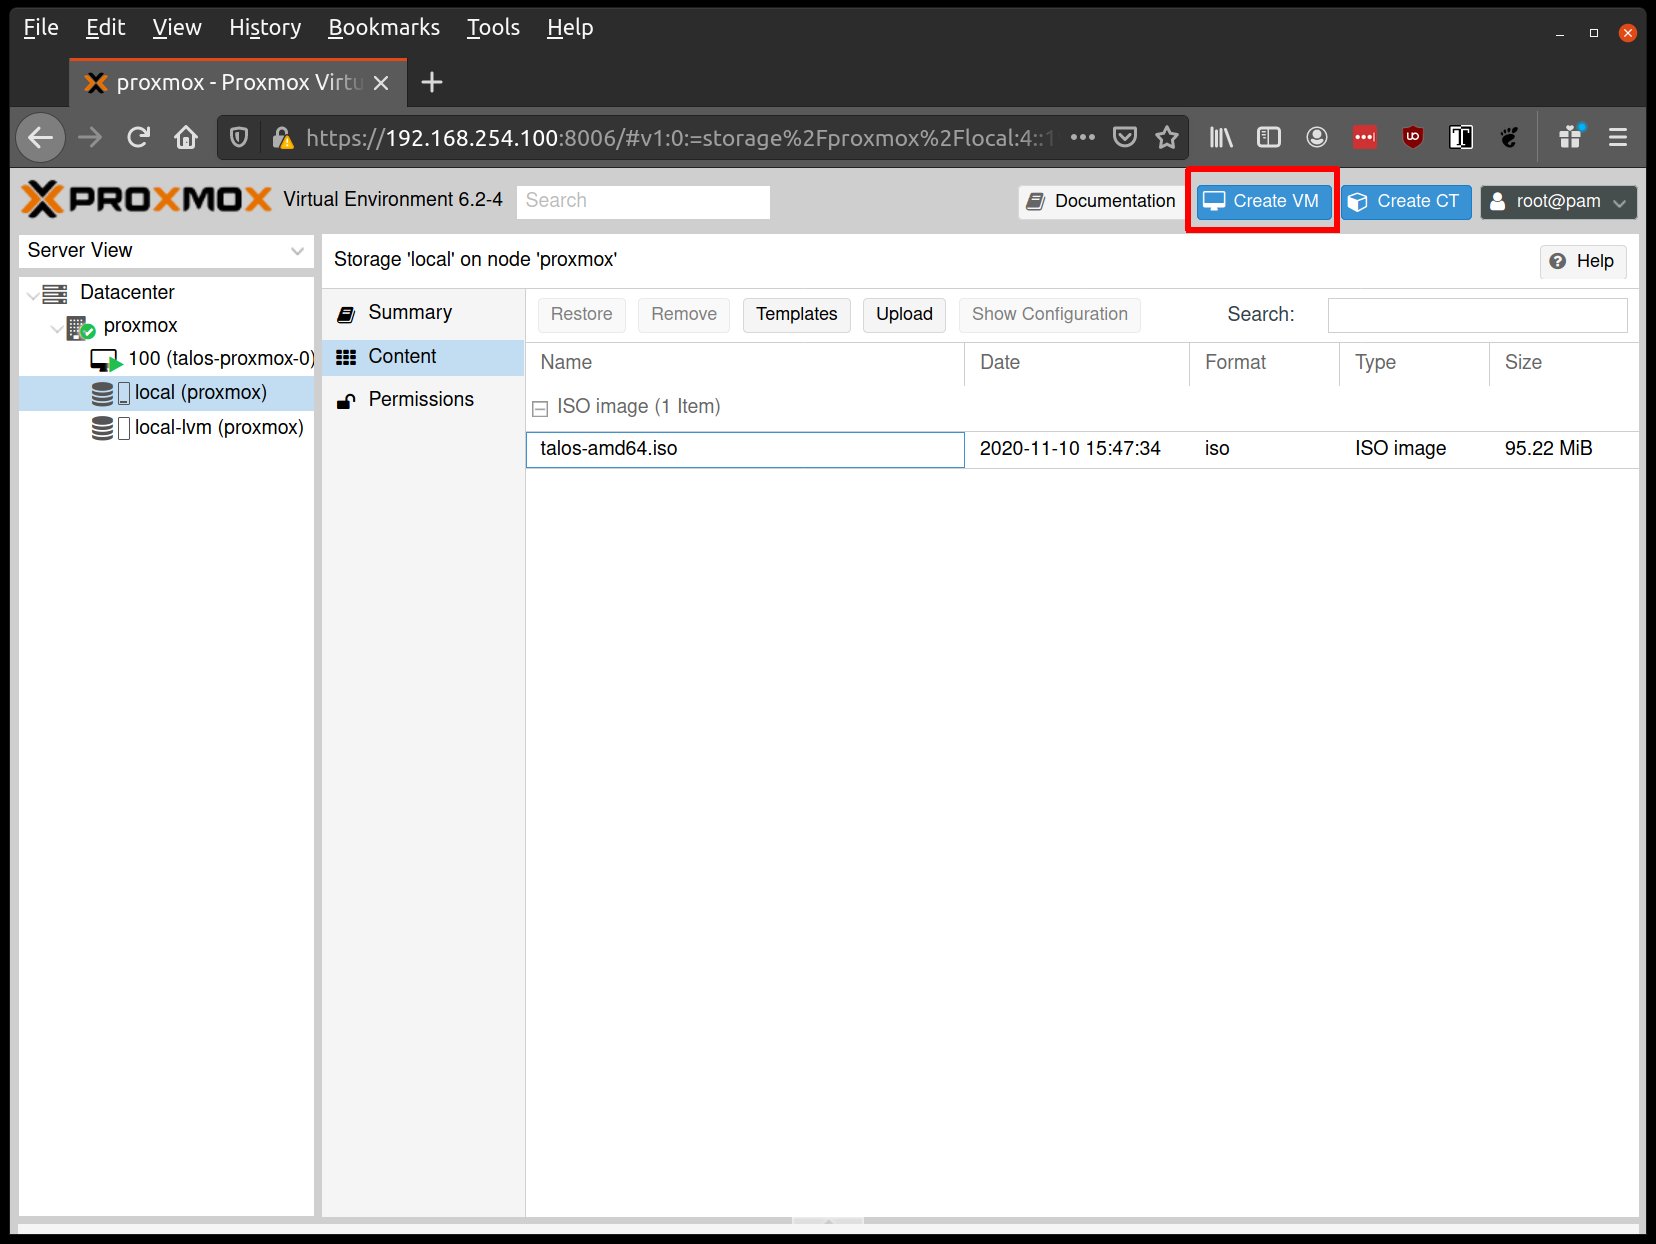
From the Proxmox UI, select the “local” storage and enter the “Content” section.
Click the “Upload” button:
Select the ISO you downloaded previously, then hit “Upload”
Create VMs
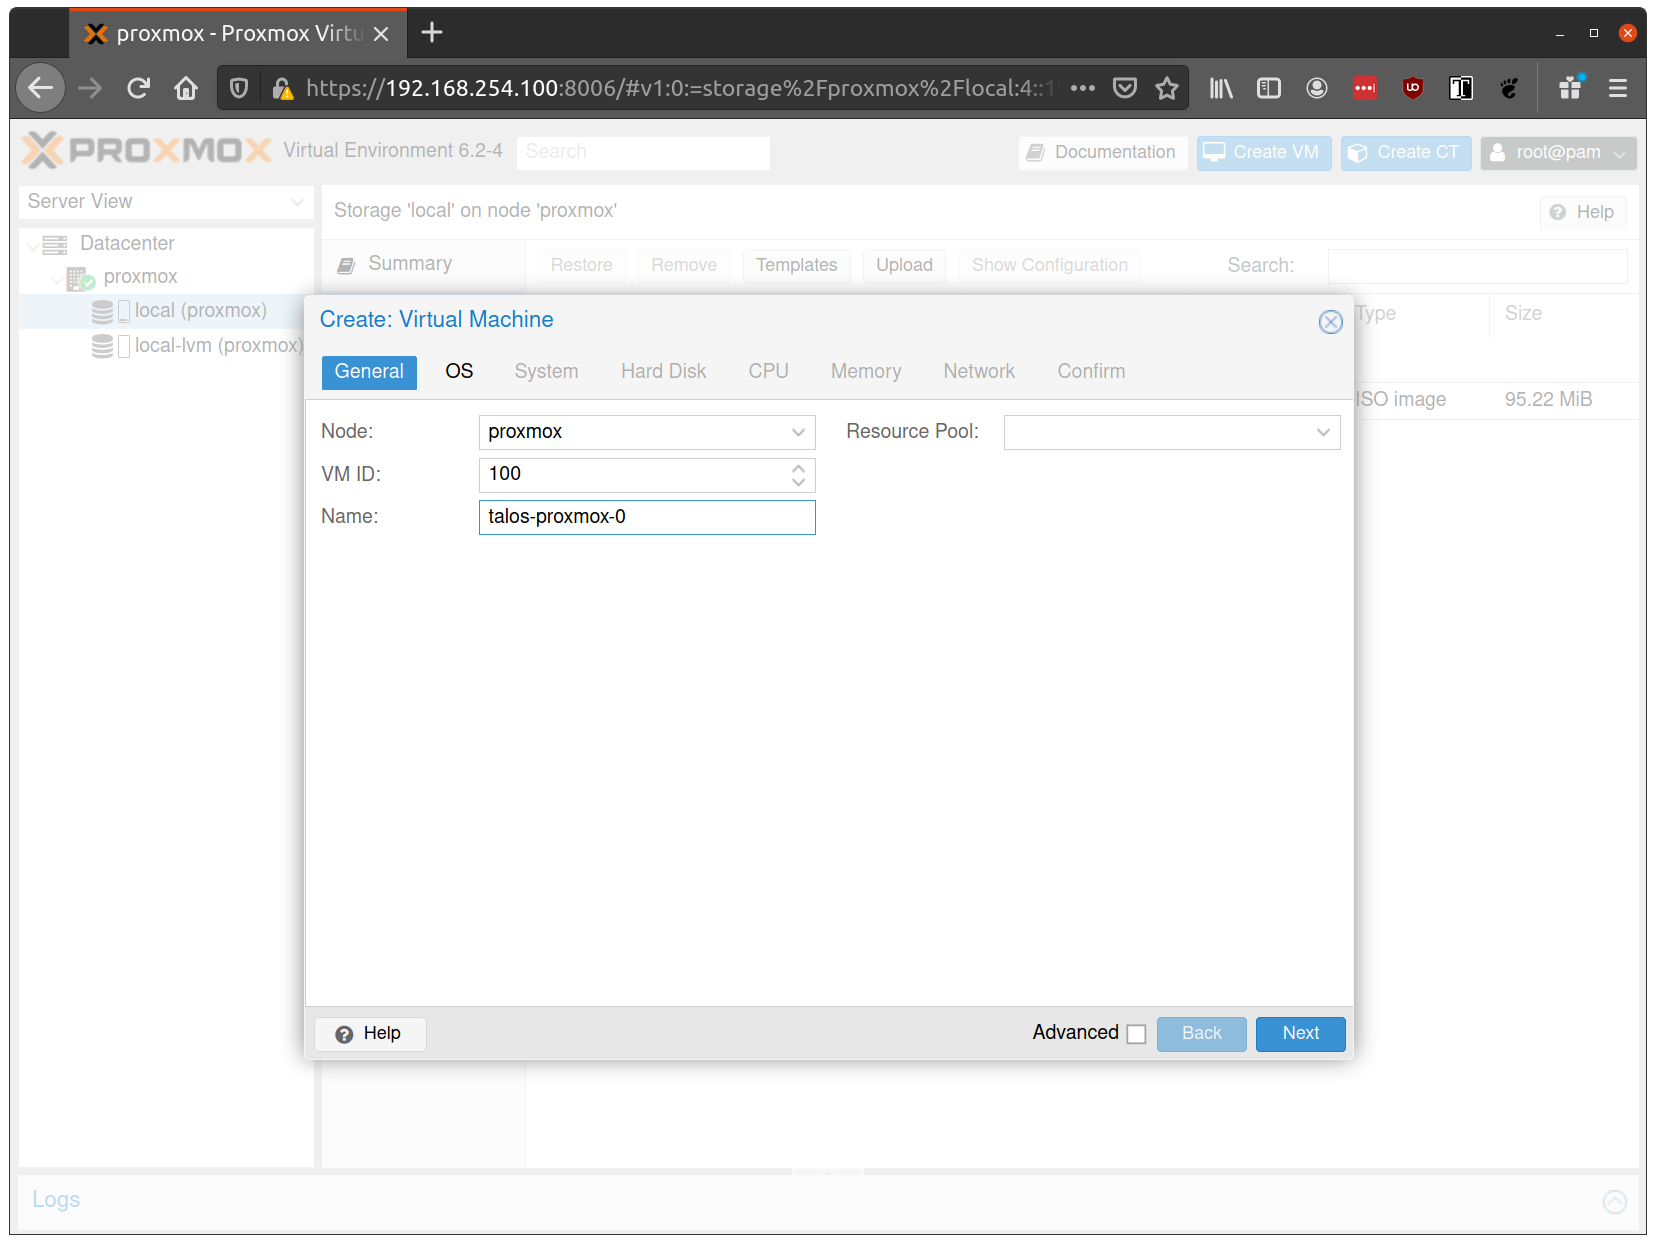
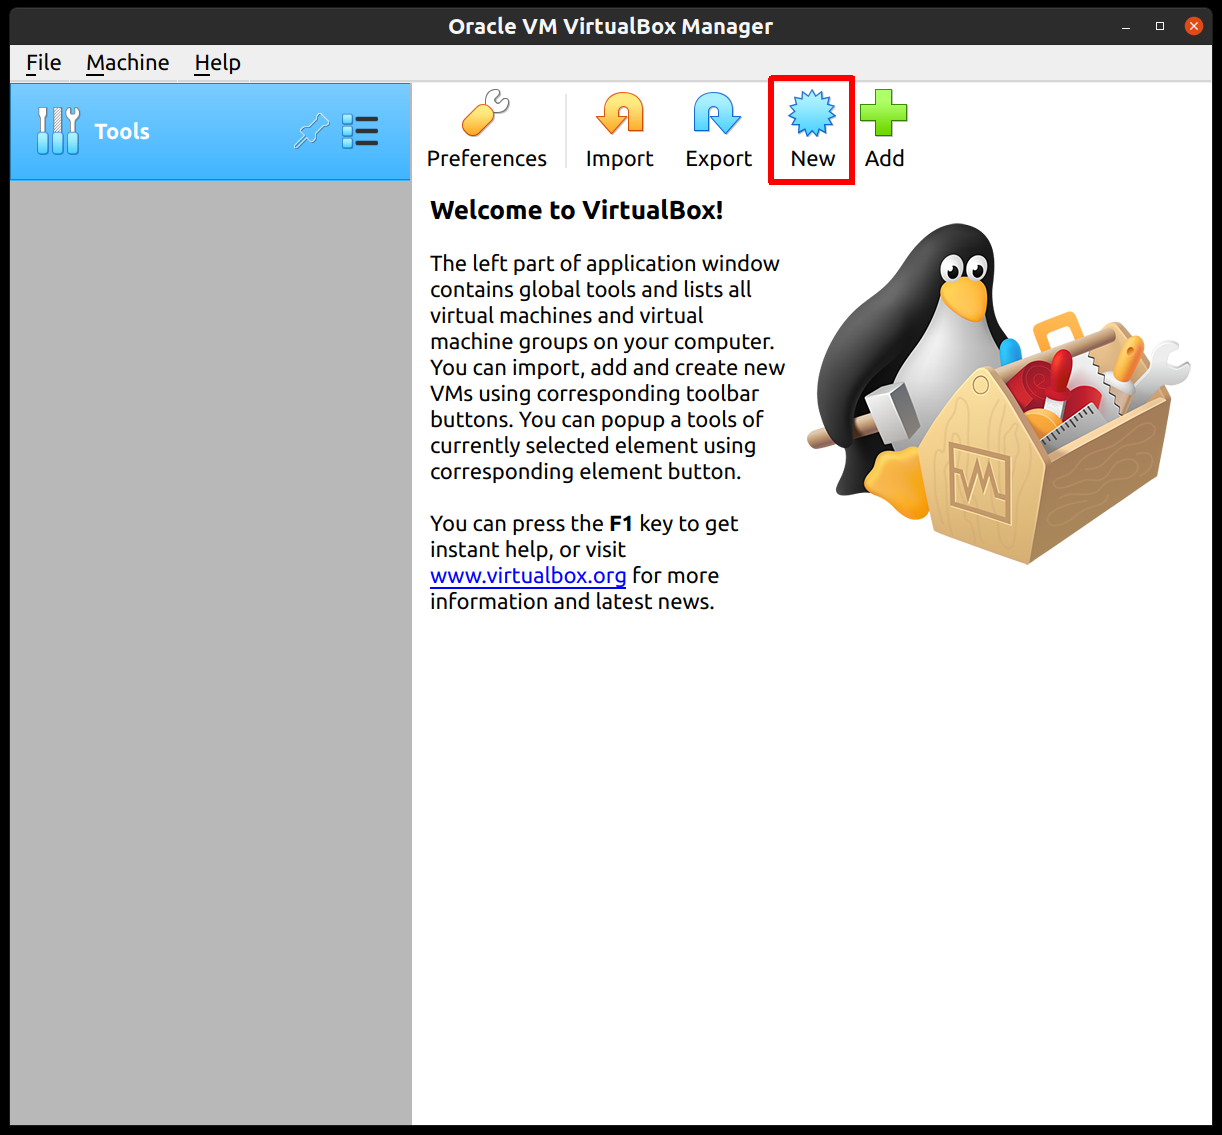
Start by creating a new VM by clicking the “Create VM” button in the Proxmox UI:
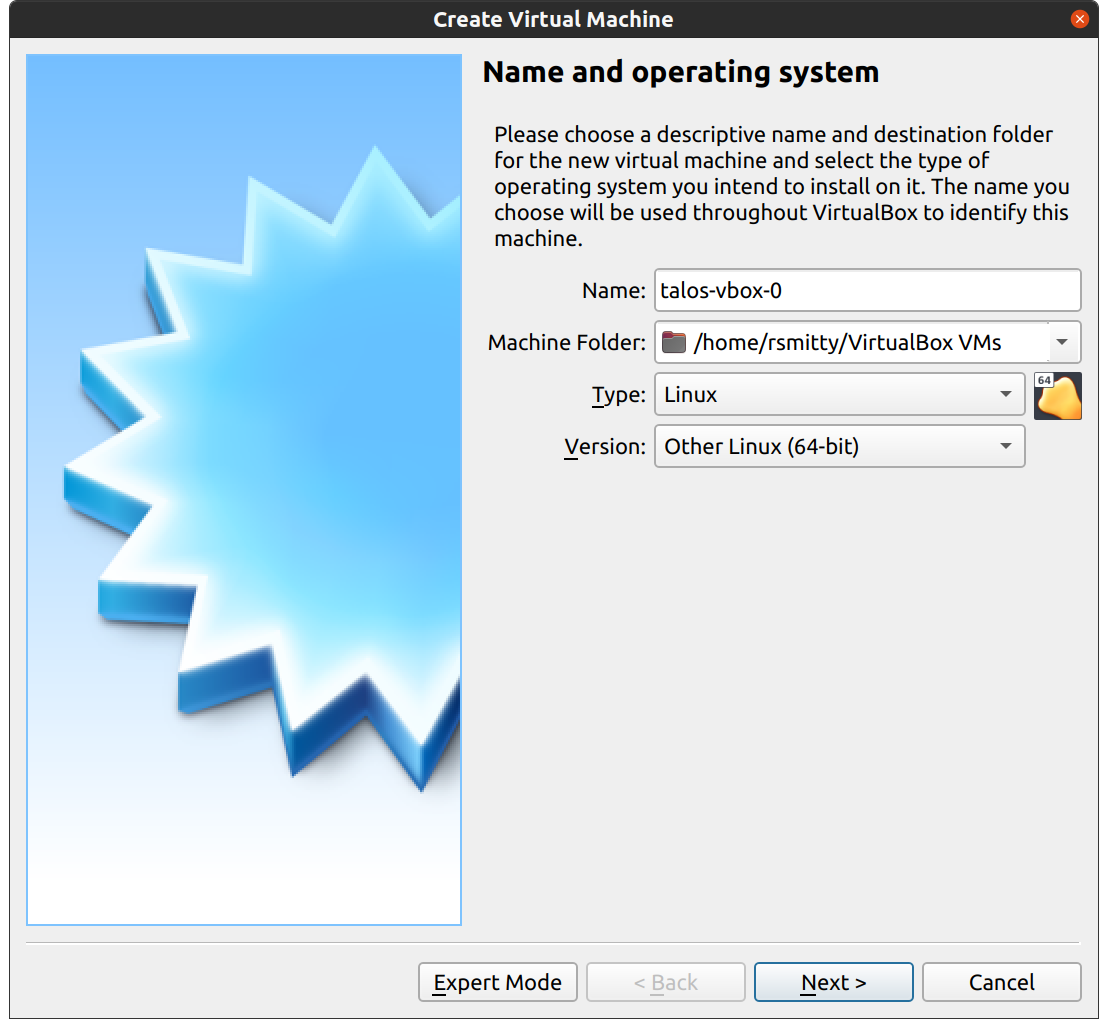
Fill out a name for the new VM:
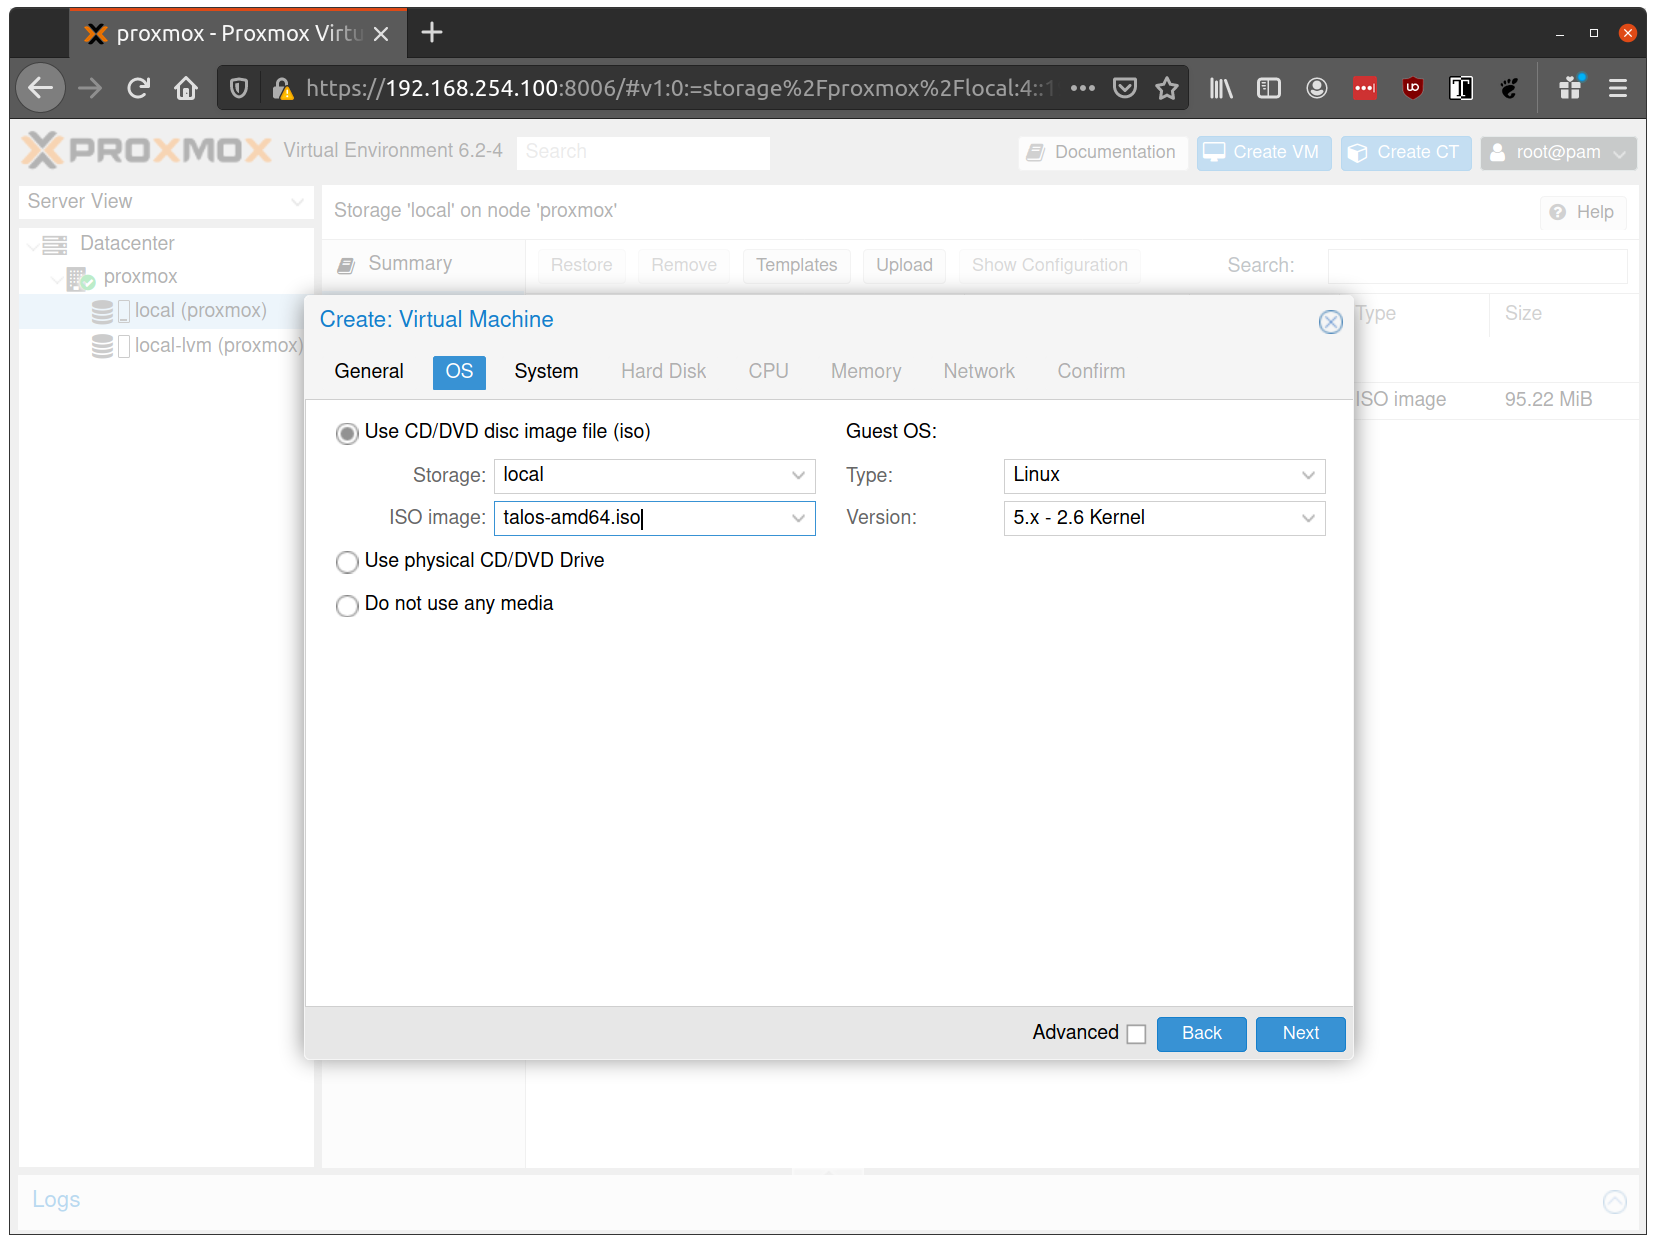
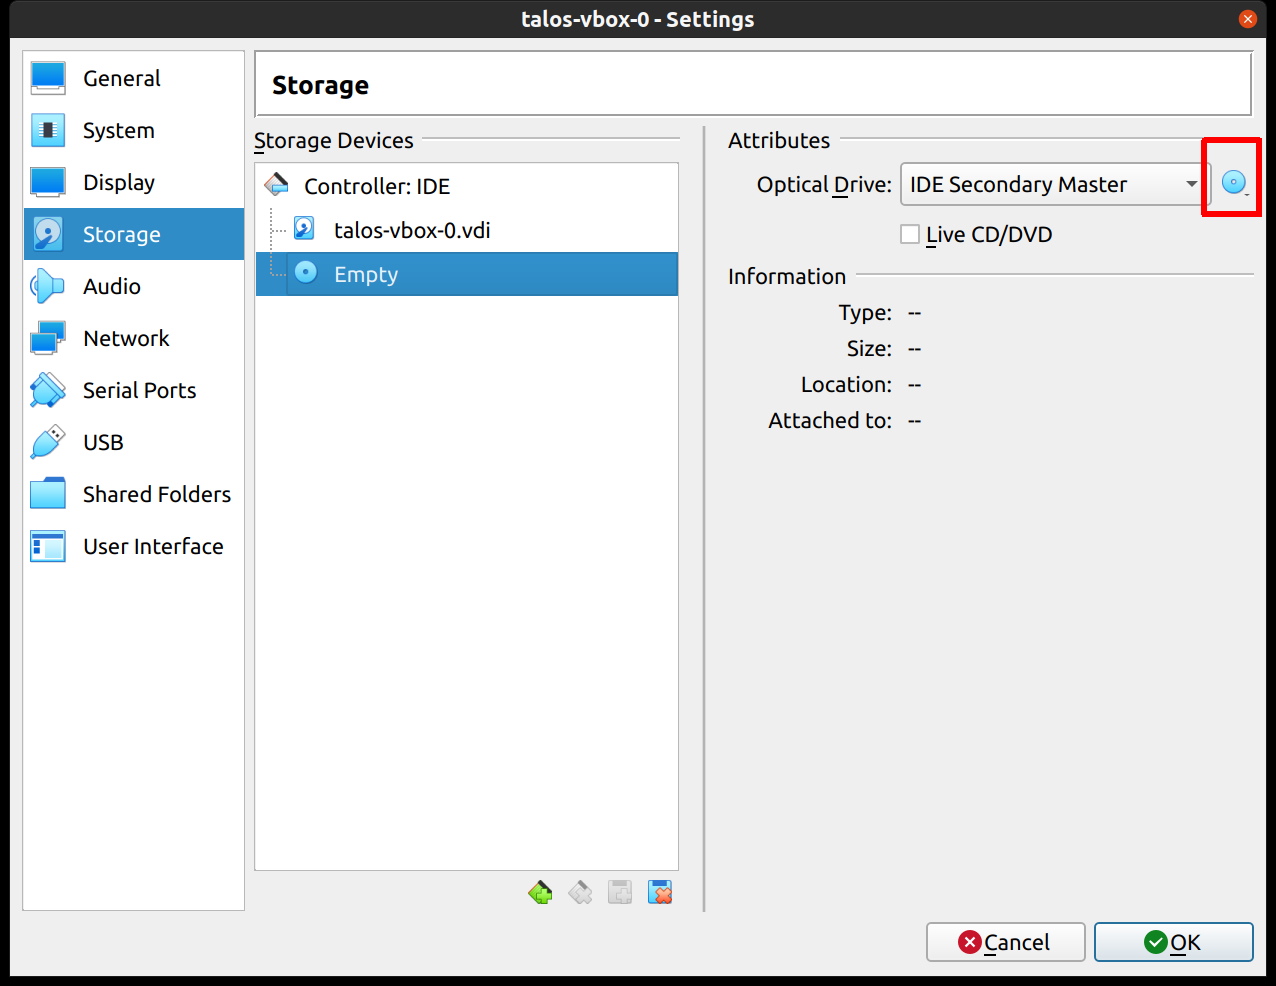
In the OS tab, select the ISO we uploaded earlier:
Keep the defaults set in the “System” tab.
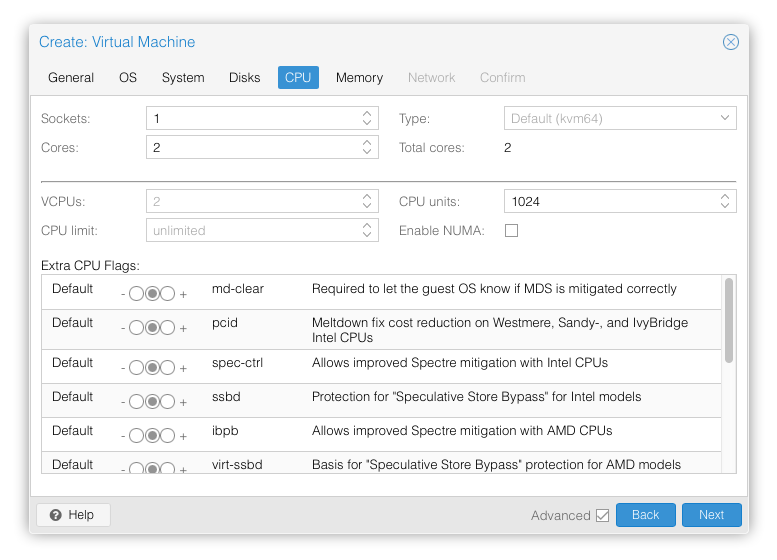
Keep the defaults in the “Hard Disk” tab as well, only changing the size if desired.
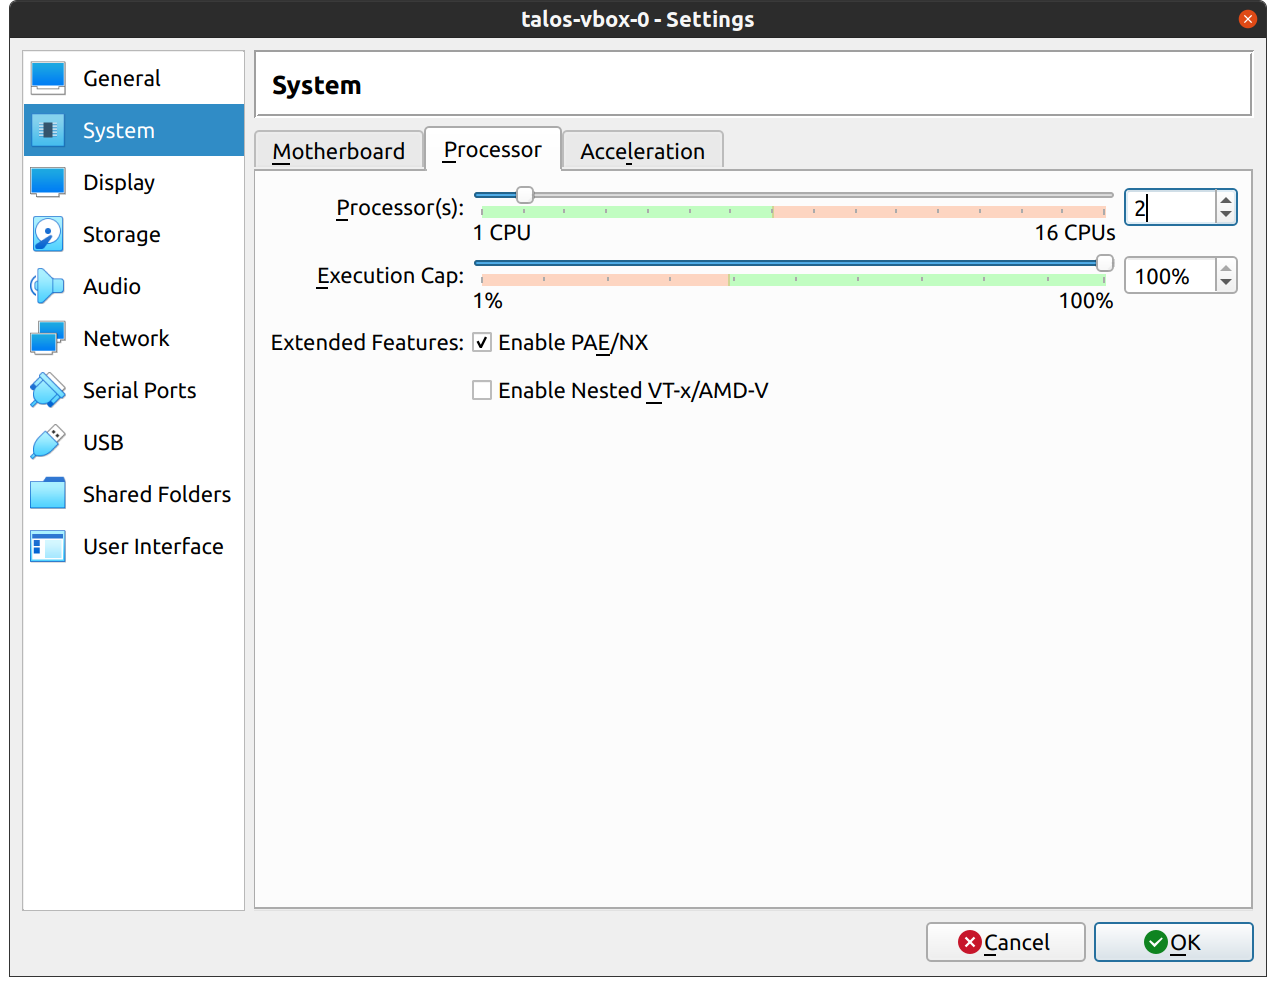
In the “CPU” section, give at least 2 cores to the VM:
Note: As of Talos v1.0 (which requires the x86-64-v2 microarchitecture), booting
with the default Processor Type kvm64 will not work.
You can enable the required
CPU features after creating the VM by adding the following line in the corresponding
/etc/pve/qemu-server/<vmid>.conf file:
Alternatively, you can set the Processor Type to host if your Proxmox host supports
these CPU features, this however prevents using live VM migration.
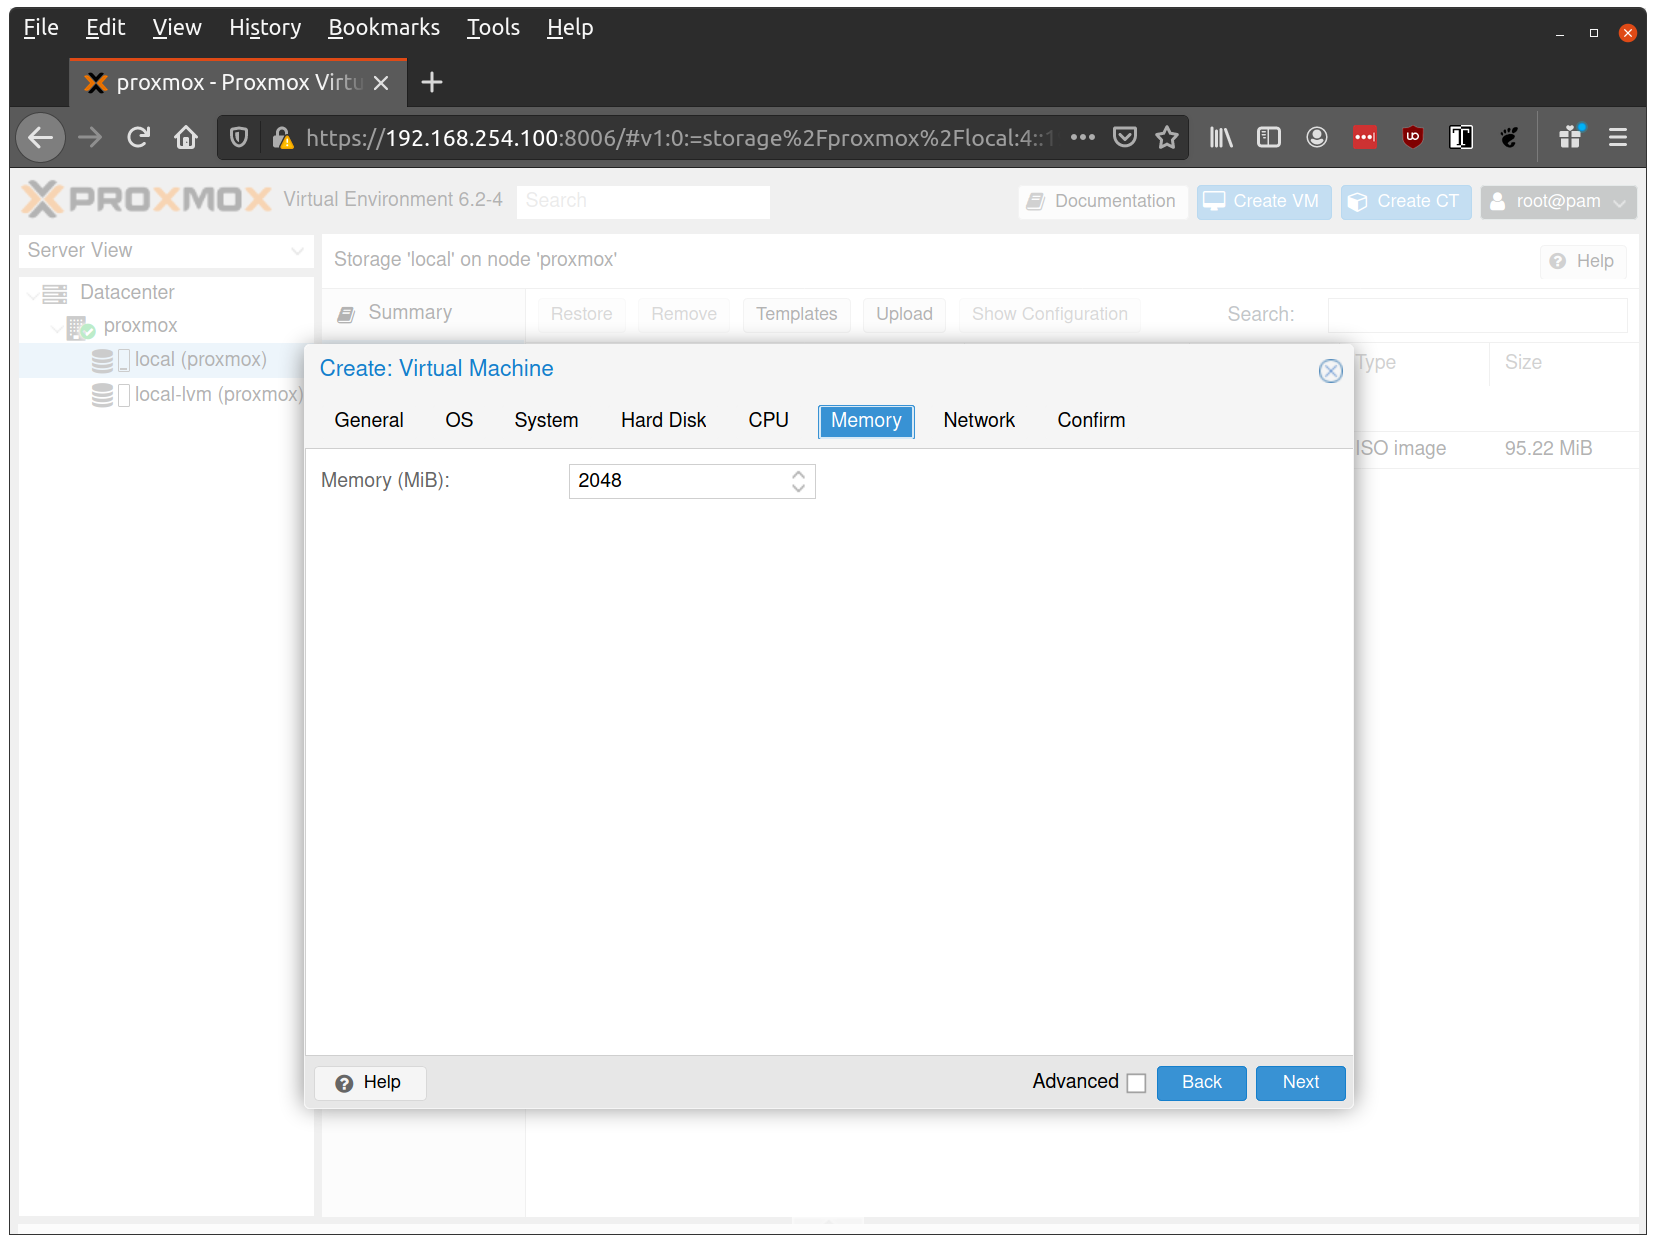
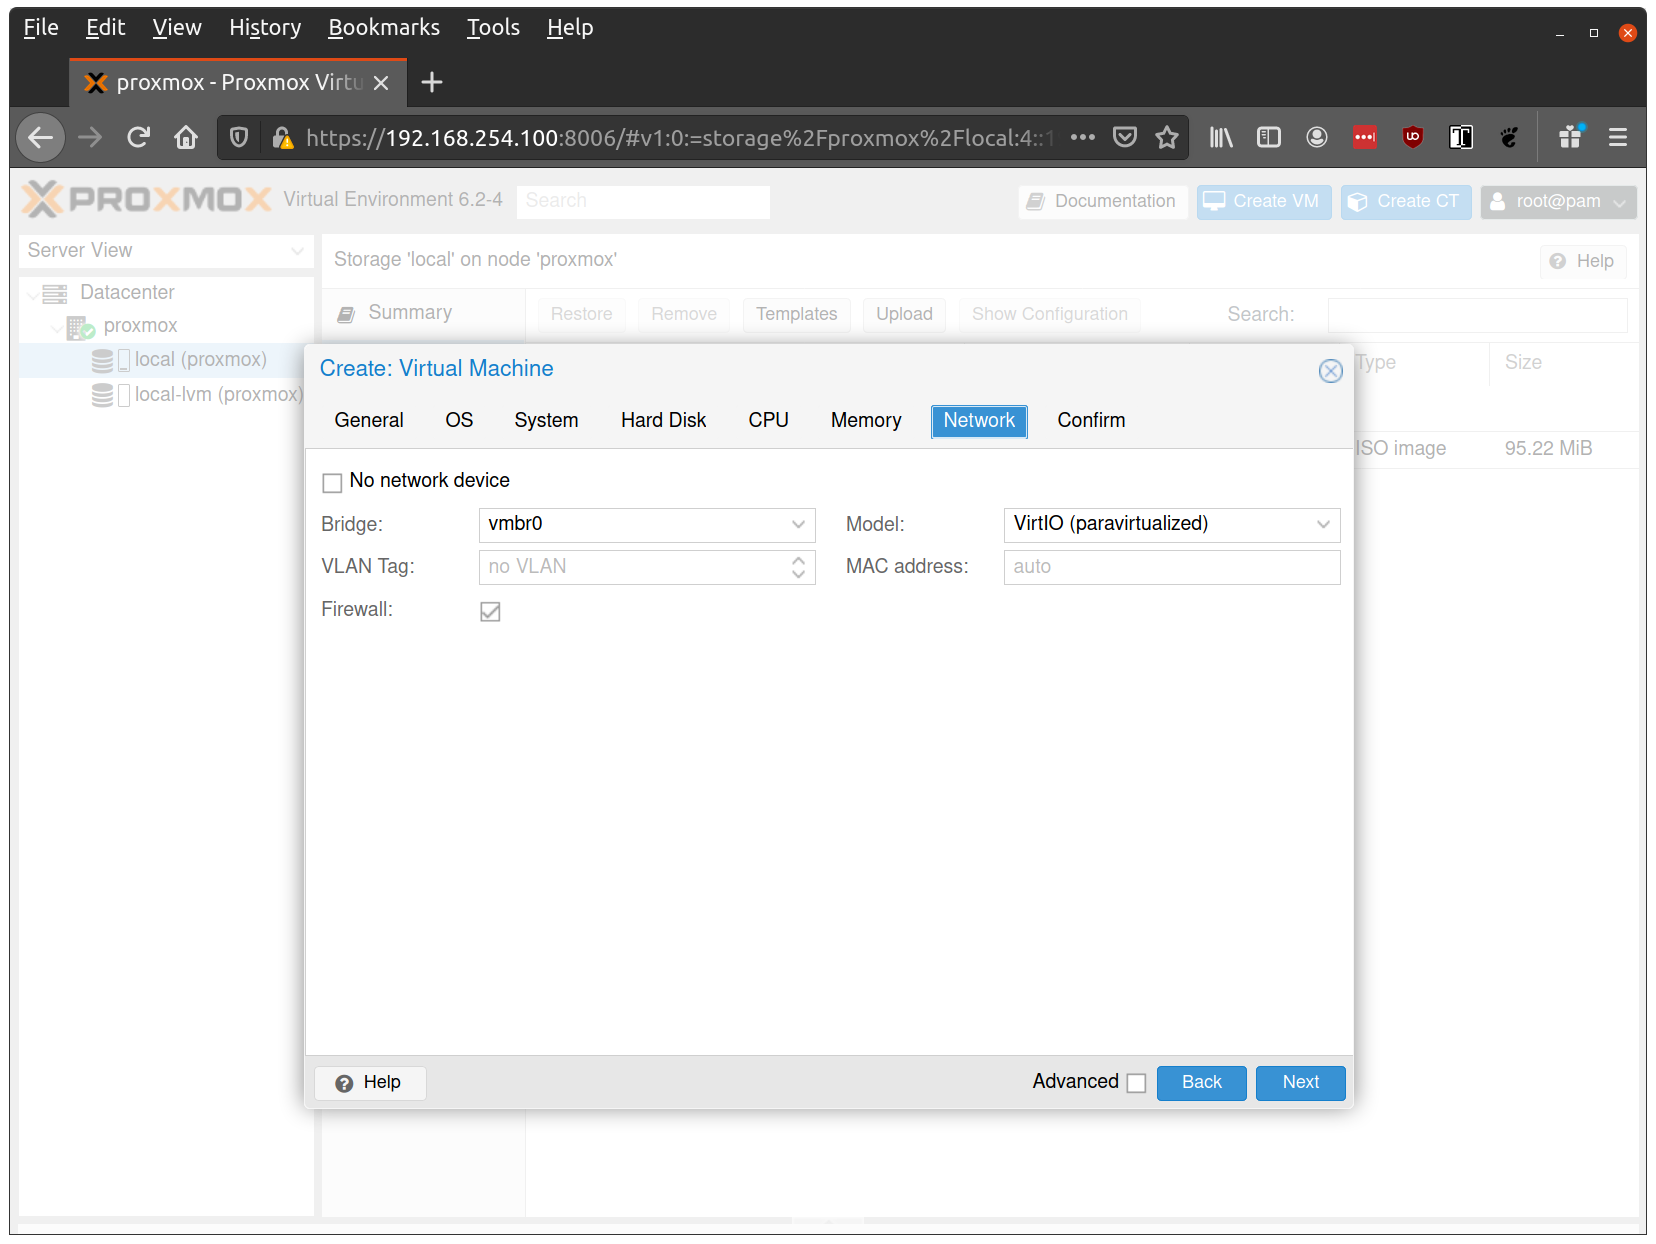
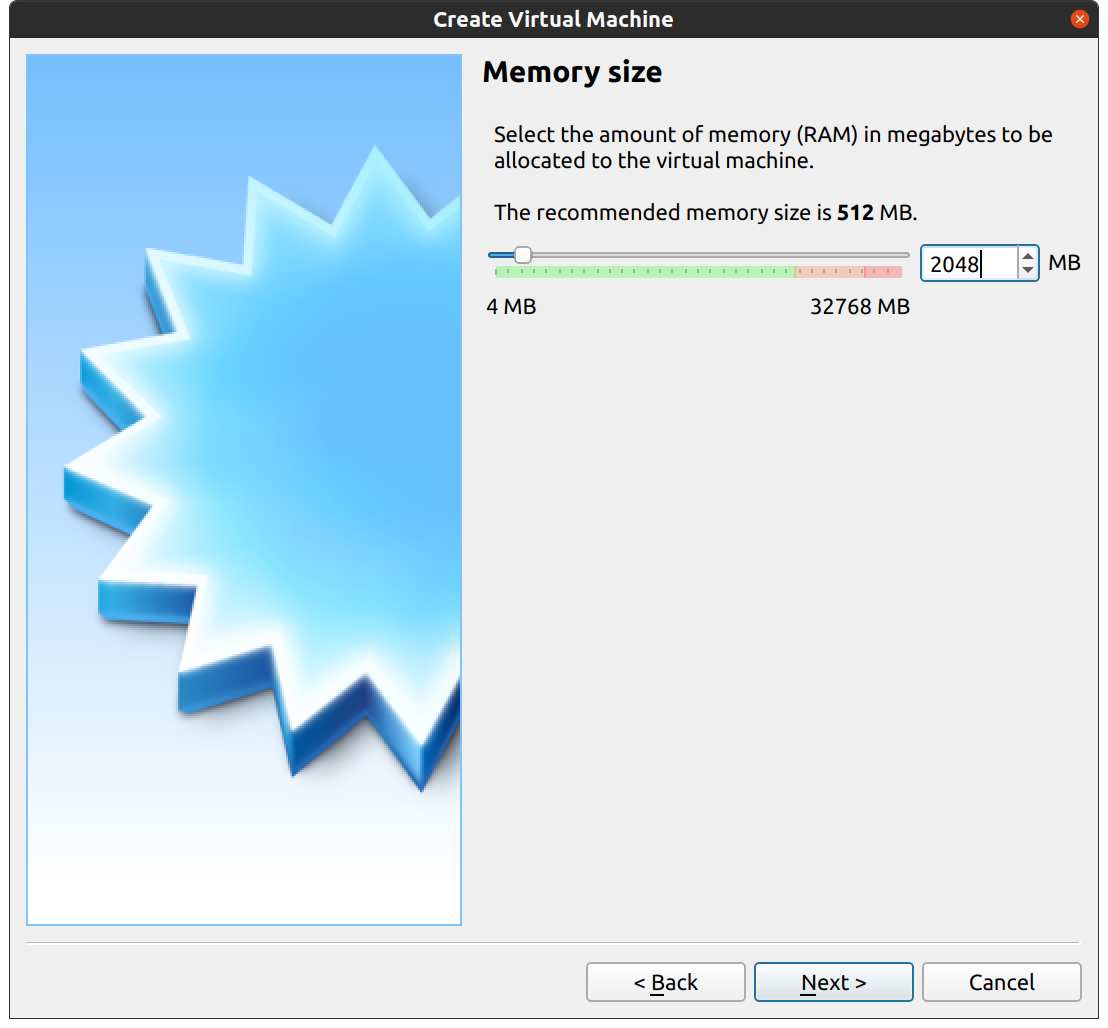
Verify that the RAM is set to at least 2GB:
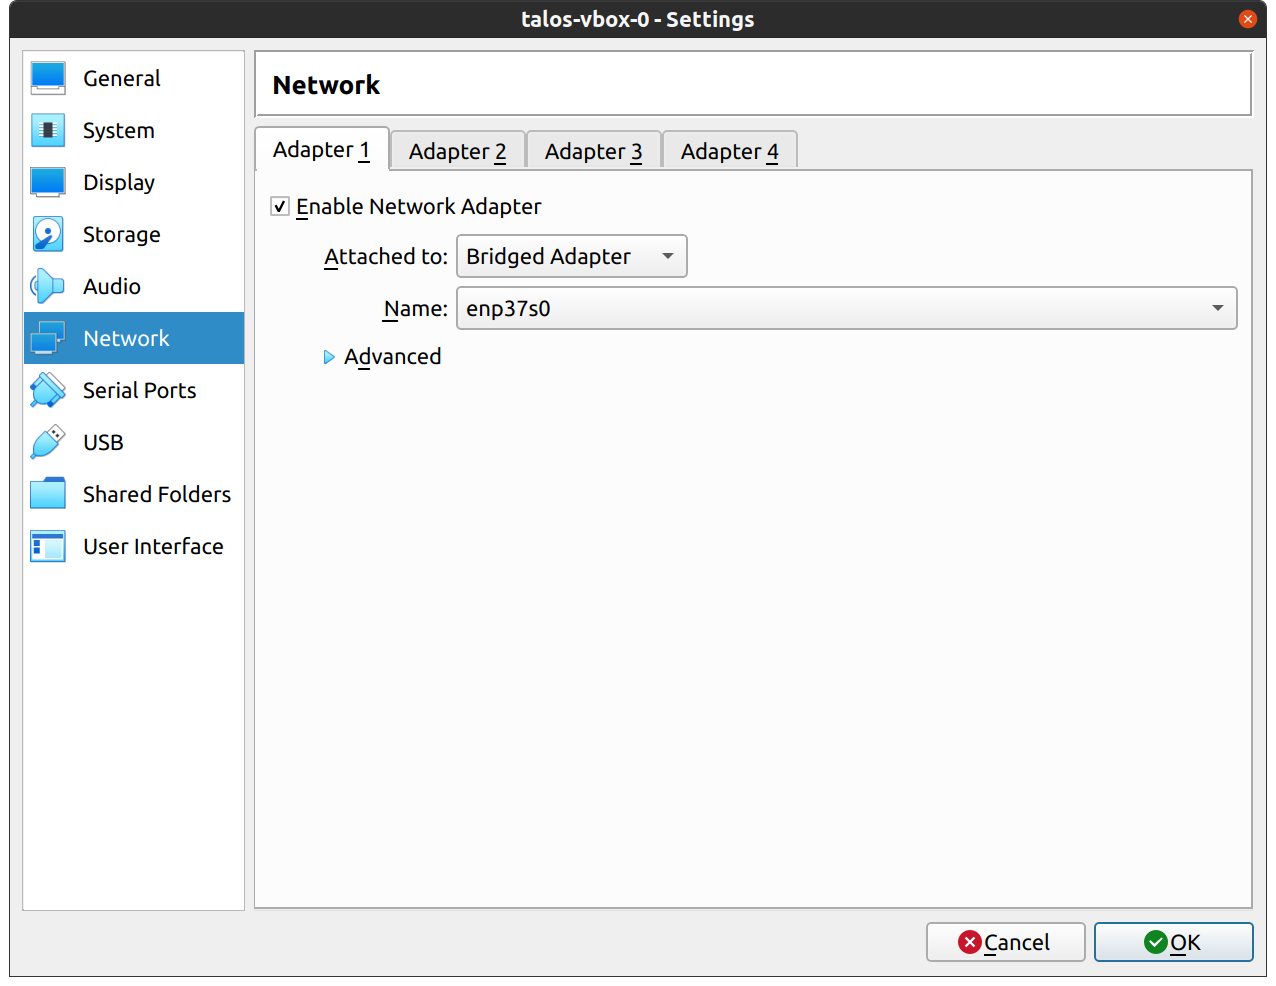
Keep the default values for networking, verifying that the VM is set to come up on the bridge interface:
Finish creating the VM by clicking through the “Confirm” tab and then “Finish”.
Repeat this process for a second VM to use as a worker node.
You can also repeat this for additional nodes desired.
Start Control Plane Node
Once the VMs have been created and updated, start the VM that will be the first control plane node.
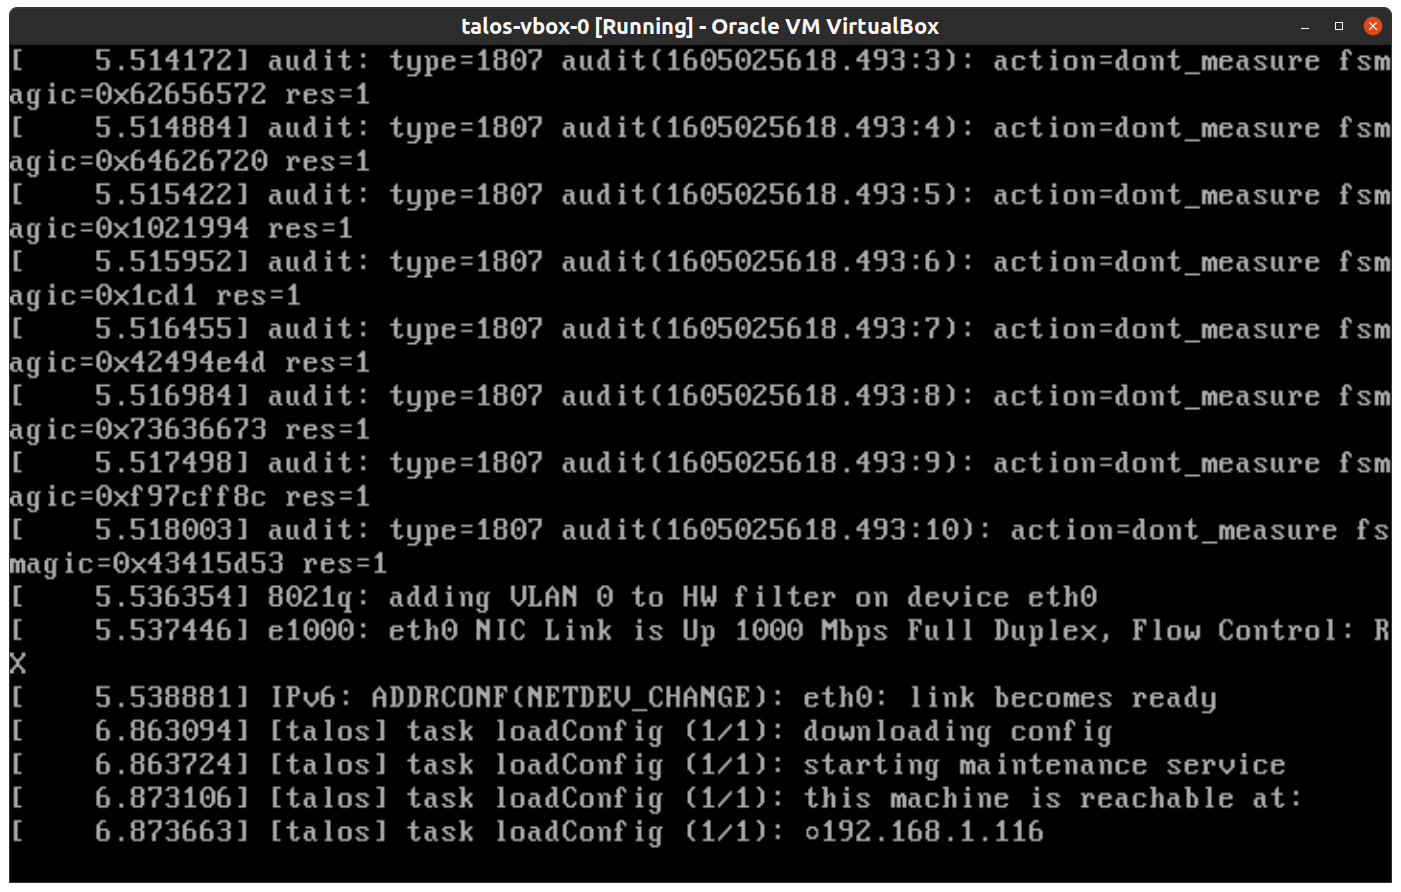
This VM will boot the ISO image specified earlier and enter “maintenance mode”.
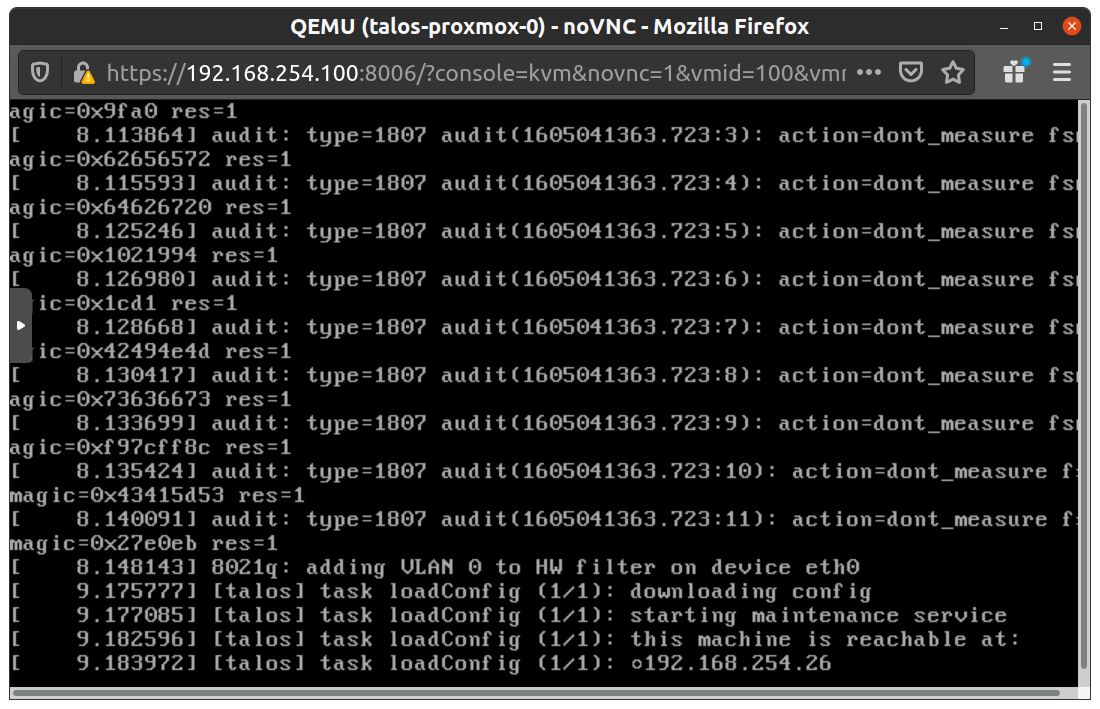
With DHCP server
Once the machine has entered maintenance mode, there will be a console log that details the IP address that the node received.
Take note of this IP address, which will be referred to as $CONTROL_PLANE_IP for the rest of this guide.
If you wish to export this IP as a bash variable, simply issue a command like export CONTROL_PLANE_IP=1.2.3.4.
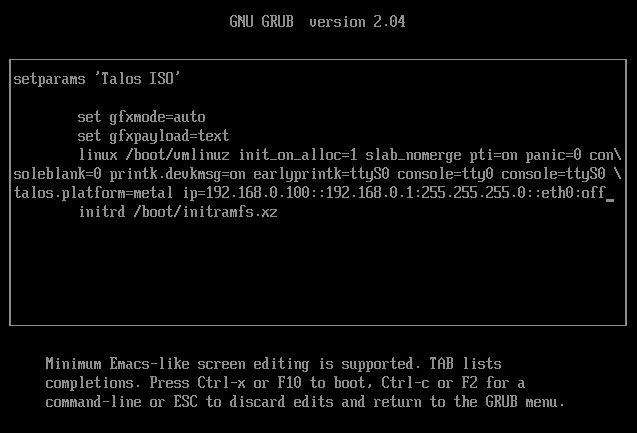
Without DHCP server
To apply the machine configurations in maintenance mode, VM has to have IP on the network.
So you can set it on boot time manually.
Press e on the boot time.
And set the IP parameters for the VM.
Format is:
With the IP address above, you can now generate the machine configurations to use for installing Talos and Kubernetes.
Issue the following command, updating the output directory, cluster name, and control plane IP as you see fit:
talosctl gen config talos-vbox-cluster https://$CONTROL_PLANE_IP:6443 --output-dir _out
This will create several files in the _out directory: controlplane.yaml, worker.yaml, and talosconfig.
Create Control Plane Node
Using the controlplane.yaml generated above, you can now apply this config using talosctl.
Issue:
You should now see some action in the Proxmox console for this VM.
Talos will be installed to disk, the VM will reboot, and then Talos will configure the Kubernetes control plane on this VM.
Note: This process can be repeated multiple times to create an HA control plane.
Create Worker Node
Create at least a single worker node using a process similar to the control plane creation above.
Start the worker node VM and wait for it to enter “maintenance mode”.
Take note of the worker node’s IP address, which will be referred to as $WORKER_IP
Note: This process can be repeated multiple times to add additional workers.
Using the Cluster
Once the cluster is available, you can make use of talosctl and kubectl to interact with the cluster.
For example, to view current running containers, run talosctl containers for a list of containers in the system namespace, or talosctl containers -k for the k8s.io namespace.
To view the logs of a container, use talosctl logs <container> or talosctl logs -k <container>.
First, configure talosctl to talk to your control plane node by issuing the following, updating paths and IPs as necessary:
To cleanup, simply stop and delete the virtual machines from the Proxmox UI.
2.1.2.4 - VMware
Creating Talos Kubernetes cluster using VMware.
Creating a Cluster via the govc CLI
In this guide we will create an HA Kubernetes cluster with 2 worker nodes.
We will use the govc cli which can be downloaded here.
Prereqs/Assumptions
This guide will use the virtual IP (“VIP”) functionality that is built into Talos in order to provide a stable, known IP for the Kubernetes control plane.
This simply means the user should pick an IP on their “VM Network” to designate for this purpose and keep it handy for future steps.
Create the Machine Configuration Files
Generating Base Configurations
Using the VIP chosen in the prereq steps, we will now generate the base configuration files for the Talos machines.
This can be done with the talosctl gen config ... command.
Take note that we will also use a JSON6902 patch when creating the configs so that the control plane nodes get some special information about the VIP we chose earlier, as well as a daemonset to install vmware tools on talos nodes.
First, download cp.patch.yaml to your local machine and edit the VIP to match your chosen IP.
You can do this by issuing: curl -fsSLO https://raw.githubusercontent.com/siderolabs/talos/master/website/content/v1.0/talos-guides/install/virtualized-platforms/vmware/cp.patch.yaml.
It’s contents should look like the following:
With the patch in hand, generate machine configs with:
$ talosctl gen config vmware-test https://<VIP>:<port> --config-patch-control-plane @cp.patch.yaml
created controlplane.yaml
created worker.yaml
created talosconfig
At this point, you can modify the generated configs to your liking if needed.
Optionally, you can specify additional patches by adding to the cp.patch.yaml file downloaded earlier, or create your own patch files.
Validate the Configuration Files
$ talosctl validate --config controlplane.yaml --mode cloud
controlplane.yaml is valid for cloud mode
$ talosctl validate --config worker.yaml --mode cloud
worker.yaml is valid for cloud mode
Set Environment Variables
govc makes use of the following environment variables
As part of this guide, we have a more automated install script that handles some of the complexity of importing OVAs and creating VMs.
If you wish to use this script, we will detail that next.
If you wish to carry out the manual approach, simply skip ahead to the “Manual Approach” section.
Scripted Install
Download the vmware.sh script to your local machine.
You can do this by issuing curl -fsSLO "https://raw.githubusercontent.com/siderolabs/talos/master/website/content/v1.0/talos-guides/install/virtualized-platforms/vmware/vmware.sh".
This script has default variables for things like Talos version and cluster name that may be interesting to tweak before deploying.
Import OVA
To create a content library and import the Talos OVA corresponding to the mentioned Talos version, simply issue:
./vmware.sh upload_ova
Create Cluster
With the OVA uploaded to the content library, you can create a 5 node (by default) cluster with 3 control plane and 2 worker nodes:
./vmware.sh create
This step will create a VM from the OVA, edit the settings based on the env variables used for VM size/specs, then power on the VMs.
You may now skip past the “Manual Approach” section down to “Bootstrap Cluster”.
Manual Approach
Import the OVA into vCenter
A talos.ova asset is published with each release.
We will refer to the version of the release as $TALOS_VERSION below.
It can be easily exported with export TALOS_VERSION="v0.3.0-alpha.10" or similar.
Talos makes use of the guestinfo facility of VMware to provide the machine/cluster configuration.
This can be set using the govc vm.change command.
To facilitate persistent storage using the vSphere cloud provider integration with Kubernetes, disk.enableUUID=1 is used.
In the vSphere UI, open a console to one of the control plane nodes.
You should see some output stating that etcd should be bootstrapped.
This text should look like:
"etcd is waiting to join the cluster, if this node is the first node in the cluster, please run `talosctl bootstrap` against one of the following IPs:
The talos-vmtoolsd application was deployed as a daemonset as part of the cluster creation; however, we must now provide a talos credentials file for it to use.
Once configured, you should now see these daemonset pods go into “Running” state and in vCenter, you will now see IPs and info from the Talos nodes present in the UI.
2.1.2.5 - Xen
Talos is known to work on Xen.
We don’t yet have a documented guide specific to Xen; however, you can follow the General Getting Started Guide.
If you run into any issues, our community can probably help!
2.1.3 - Cloud Platforms
Installation of Talos Linux on many cloud platforms.
2.1.3.1 - AWS
Creating a cluster via the AWS CLI.
Official AMI Images
Official AMI image ID can be found in the cloud-images.json file attached to the Talos release:
Replace us-east-1 and amd64 in the line above with the desired region and architecture.
Creating a Cluster via the AWS CLI
In this guide we will create an HA Kubernetes cluster with 3 worker nodes.
We assume an existing VPC, and some familiarity with AWS.
If you need more information on AWS specifics, please see the official AWS documentation.
Take note of the DNS name and ARN.
We will need these soon.
Create the Machine Configuration Files
Generating Base Configurations
Using the DNS name of the loadbalancer created earlier, generate the base configuration files for the Talos machines:
$ talosctl gen config talos-k8s-aws-tutorial https://<load balancer IP or DNS>:<port> --with-examples=false --with-docs=falsecreated controlplane.yaml
created worker.yaml
created talosconfig
Take note that the generated configs are too long for AWS userdata field if the --with-examples and --with-docs flags are not passed.
At this point, you can modify the generated configs to your liking.
Optionally, you can specify --config-patch with RFC6902 jsonpatch which will be applied during the config generation.
Validate the Configuration Files
$ talosctl validate --config controlplane.yaml --mode cloud
controlplane.yaml is valid for cloud mode
$ talosctl validate --config worker.yaml --mode cloud
worker.yaml is valid for cloud mode
Create the EC2 Instances
Note: There is a known issue that prevents Talos from running on T2 instance types.
Please use T3 if you need burstable instance types.
At this point we can retrieve the admin kubeconfig by running:
talosctl --talosconfig talosconfig kubeconfig .
2.1.3.2 - Azure
Creating a cluster via the CLI on Azure.
Creating a Cluster via the CLI
In this guide we will create an HA Kubernetes cluster with 1 worker node.
We assume existing Blob Storage, and some familiarity with Azure.
If you need more information on Azure specifics, please see the official Azure documentation.
Environment Setup
We’ll make use of the following environment variables throughout the setup.
Edit the variables below with your correct information.
# Storage account to useexportSTORAGE_ACCOUNT="StorageAccountName"# Storage container to upload toexportSTORAGE_CONTAINER="StorageContainerName"# Resource group nameexportGROUP="ResourceGroupName"# LocationexportLOCATION="centralus"# Get storage account connection string based on info aboveexportCONNECTION=$(az storage account show-connection-string \
-n $STORAGE_ACCOUNT\
-g $GROUP\
-o tsv)
Create the Image
First, download the Azure image from a Talos release.
Once downloaded, untar with tar -xvf /path/to/azure-amd64.tar.gz
Upload the VHD
Once you have pulled down the image, you can upload it to blob storage with:
Now that the image is present in our blob storage, we’ll register it.
az image create \
  --name talos \
  --source https://$STORAGE_ACCOUNT.blob.core.windows.net/$STORAGE_CONTAINER/talos-azure.vhd \
  --os-type linux \
  -g $GROUP
Network Infrastructure
Virtual Networks and Security Groups
Once the image is prepared, we’ll want to work through setting up the network.
Issue the following to create a network security group and add rules to it.
In Azure, we have to pre-create the NICs for our control plane so that they can be associated with our load balancer.
for i in $( seq 012); do# Create public IP for each nic az network public-ip create \
--resource-group $GROUP\
--name talos-controlplane-public-ip-$i\
--allocation-method static
# Create nic az network nic create \
--resource-group $GROUP\
--name talos-controlplane-nic-$i\
--vnet-name talos-vnet \
--subnet talos-subnet \
--network-security-group talos-sg \
--public-ip-address talos-controlplane-public-ip-$i\
--lb-name talos-lb \
--lb-address-pools talos-be-pool
done# NOTES:# Talos can detect PublicIPs automatically if PublicIP SKU is Basic.# Use `--sku Basic` to set SKU to Basic.
Cluster Configuration
With our networking bits setup, we’ll fetch the IP for our load balancer and create our configuration files.
LB_PUBLIC_IP=$(az network public-ip show \
--resource-group $GROUP\
--name talos-public-ip \
--query [ipAddress]\
--output tsv)talosctl gen config talos-k8s-azure-tutorial https://${LB_PUBLIC_IP}:6443
Compute Creation
We are now ready to create our azure nodes.
Azure allows you to pass Talos machine configuration to the virtual machine at bootstrap time via
user-data or custom-data methods.
Talos supports only custom-data method, machine configuration is available to the VM only on the first boot.
# Create availability setaz vm availability-set create \
--name talos-controlplane-av-set \
-g $GROUP# Create the controlplane nodesfor i in $( seq 012); do az vm create \
--name talos-controlplane-$i\
--image talos \
--custom-data ./controlplane.yaml \
-g $GROUP\
--admin-username talos \
--generate-ssh-keys \
--verbose \
--boot-diagnostics-storage $STORAGE_ACCOUNT\
--os-disk-size-gb 20\
--nics talos-controlplane-nic-$i\
--availability-set talos-controlplane-av-set \
--no-wait
done# Create worker node az vm create \
--name talos-worker-0 \
--image talos \
--vnet-name talos-vnet \
--subnet talos-subnet \
--custom-data ./worker.yaml \
-g $GROUP\
--admin-username talos \
--generate-ssh-keys \
--verbose \
--boot-diagnostics-storage $STORAGE_ACCOUNT\
--nsg talos-sg \
--os-disk-size-gb 20\
--no-wait
# NOTES:# `--admin-username` and `--generate-ssh-keys` are required by the az cli,# but are not actually used by talos# `--os-disk-size-gb` is the backing disk for Kubernetes and any workload containers# `--boot-diagnostics-storage` is to enable console output which may be necessary# for troubleshooting
Bootstrap Etcd
You should now be able to interact with your cluster with talosctl.
We will need to discover the public IP for our first control plane node first.
At this point we can retrieve the admin kubeconfig by running:
talosctl --talosconfig talosconfig kubeconfig .
2.1.3.3 - DigitalOcean
Creating a cluster via the CLI on DigitalOcean.
Creating a Cluster via the CLI
In this guide we will create an HA Kubernetes cluster with 1 worker node.
We assume an existing Space, and some familiarity with DigitalOcean.
If you need more information on DigitalOcean specifics, please see the official DigitalOcean documentation.
Create the Image
First, download the DigitalOcean image from a Talos release.
Extract the archive to get the disk.raw file, compress it using gzip to disk.raw.gz.
Using an upload method of your choice (doctl does not have Spaces support), upload the image to a space.
Now, create an image using the URL of the uploaded image:
We will need the IP of the load balancer.
Using the ID of the load balancer, run:
doctl compute load-balancer get --format IP <load balancer ID>
Save it, as we will need it in the next step.
Create the Machine Configuration Files
Generating Base Configurations
Using the DNS name of the loadbalancer created earlier, generate the base configuration files for the Talos machines:
$ talosctl gen config talos-k8s-digital-ocean-tutorial https://<load balancer IP or DNS>:<port>
created controlplane.yaml
created worker.yaml
created talosconfig
At this point, you can modify the generated configs to your liking.
Optionally, you can specify --config-patch with RFC6902 jsonpatch which will be applied during the config generation.
Validate the Configuration Files
$ talosctl validate --config controlplane.yaml --mode cloud
controlplane.yaml is valid for cloud mode
$ talosctl validate --config worker.yaml --mode cloud
worker.yaml is valid for cloud mode
Create the Droplets
Create the Control Plane Nodes
Run the following commands, to give ourselves three total control plane nodes:
Note: Although SSH is not used by Talos, DigitalOcean still requires that an SSH key be associated with the droplet.
Create a dummy key that can be used to satisfy this requirement.
At this point we can retrieve the admin kubeconfig by running:
talosctl --talosconfig talosconfig kubeconfig .
2.1.3.4 - GCP
Creating a cluster via the CLI on Google Cloud Platform.
Creating a Cluster via the CLI
In this guide, we will create an HA Kubernetes cluster in GCP with 1 worker node.
We will assume an existing Cloud Storage bucket, and some familiarity with Google Cloud.
If you need more information on Google Cloud specifics, please see the official Google documentation.
Once the image is prepared, we’ll want to work through setting up the network.
Issue the following to create a firewall, load balancer, and their required components.
Using GCP deployment manager automatically creates a Google Storage bucket and uploads the Talos image to it.
Once the deployment is complete the generated talosconfig and kubeconfig files are uploaded to the bucket.
By default this setup creates a three node control plane and a single worker in us-west1-b
First we need to create a folder to store our deployment manifests and perform all subsequent operations from that folder.
mkdir -p talos-gcp-deployment
cd talos-gcp-deployment
Getting the deployment manifests
We need to download two deployment manifests for the deployment from the Talos github repository.
curl -fsSLO "https://raw.githubusercontent.com/siderolabs/talos/master/website/content/v1.0/talos-guides/install/cloud-platforms/gcp/config.yaml"curl -fsSLO "https://raw.githubusercontent.com/siderolabs/talos/master/website/content/v1.0/talos-guides/install/cloud-platforms/gcp/talos-ha.jinja"# if using ccmcurl -fsSLO "https://raw.githubusercontent.com/siderolabs/talos/master/website/content/v1.0/talos-guides/install/cloud-platforms/gcp/gcp-ccm.yaml"
Updating the config
Now we need to update the local config.yaml file with any required changes such as changing the default zone, Talos version, machine sizes, nodes count etc.
Note: The externalCloudProvider property is set to false by default.
The manifest used for deploying the ccm (cloud controller manager) is currently using the GCP ccm provided by openshift since there are no public images for the ccm yet.
Since the routes controller is disabled while deploying the CCM, the CNI pods needs to be restarted after the CCM deployment is complete to remove the node.kubernetes.io/network-unavailable taint.
See Nodes network-unavailable taint not removed after installing ccm for more information
Use a custom built image for the ccm deployment if required.
Creating the deployment
Now we are ready to create the deployment.
Confirm with y for any prompts.
Run the following command to create the deployment:
# use a unique name for the deployment, resources are prefixed with the deployment nameexportDEPLOYMENT_NAME="<deployment name>"gcloud deployment-manager deployments create "${DEPLOYMENT_NAME}" --config config.yaml
Retrieving the outputs
First we need to get the deployment outputs.
# first get the outputsOUTPUTS=$(gcloud deployment-manager deployments describe "${DEPLOYMENT_NAME}" --format json | jq '.outputs[]')BUCKET_NAME=$(jq -r '. | select(.name == "bucketName").finalValue'<<<"${OUTPUTS}")# used when cloud controller is enabledSERVICE_ACCOUNT=$(jq -r '. | select(.name == "serviceAccount").finalValue'<<<"${OUTPUTS}")PROJECT=$(jq -r '. | select(.name == "project").finalValue'<<<"${OUTPUTS}")
Note: If cloud controller manager is enabled, the below command needs to be run to allow the controller custom role to access cloud resources
In addition to the talosconfig and kubeconfig files, the storage bucket contains the controlplane.yaml and worker.yaml files used to join additional nodes to the cluster.
kubectl \
--kubeconfig kubeconfig \
--namespace kube-system \
apply \
--filename gcp-ccm.yaml
# wait for the ccm to be upkubectl \
--kubeconfig kubeconfig \
--namespace kube-system \
rollout status \
daemonset cloud-controller-manager
If the cloud controller manager is enabled, we need to restart the CNI pods to remove the node.kubernetes.io/network-unavailable taint.
# restart the CNI pods, in this case flannelkubectl \
--kubeconfig kubeconfig \
--namespace kube-system \
rollout restart \
daemonset kube-flannel
# wait for the pods to be restartedkubectl \
--kubeconfig kubeconfig \
--namespace kube-system \
rollout status \
daemonset kube-flannel
Check cluster status
kubectl \
  --kubeconfig kubeconfig \
  get nodes
Cleanup deployment
Warning: This will delete the deployment and all resources associated with it.
# delete the objects in the bucket firstgsutil -m rm -r "gs://${BUCKET_NAME}"gcloud deployment-manager deployments delete "${DEPLOYMENT_NAME}" --quiet
2.1.3.5 - Hetzner
Creating a cluster via the CLI (hcloud) on Hetzner.
Upload image
Hetzner Cloud does not support uploading custom images.
You can email their support to get a Talos ISO uploaded by following issues:3599 or you can prepare image snapshot by yourself.
There are two options to upload your own.
Run an instance in rescue mode and replace the system OS with the Talos image
Create a new Server in the Hetzner console.
Enable the Hetzner Rescue System for this server and reboot.
Upon a reboot, the server will boot a special minimal Linux distribution designed for repair and reinstall.
Once running, login to the server using ssh to prepare the system disk by doing the following:
# Check that you in Rescue modedf
### Result is like:# udev 987432 0 987432 0% /dev# 213.133.99.101:/nfs 308577696 247015616 45817536 85% /root/.oldroot/nfs# overlay 995672 8340 987332 1% /# tmpfs 995672 0 995672 0% /dev/shm# tmpfs 398272 572 397700 1% /run# tmpfs 5120 0 5120 0% /run/lock# tmpfs 199132 0 199132 0% /run/user/0# Download the Talos imagecd /tmp
wget -O /tmp/talos.raw.xz https://github.com/siderolabs/talos/releases/download/v1.0.6/hcloud-amd64.raw.xz
# Replace systemxz -d -c /tmp/talos.raw.xz | dd of=/dev/sda && sync
# shutdown the instanceshutdown -h now
To make sure disk content is consistent, it is recommended to shut the server down before taking an image (snapshot).
Once shutdown, simply create an image (snapshot) from the console.
You can now use this snapshot to run Talos on the cloud.
Create a new image by issuing the commands shown below.
Note that to create a new API token for your Project, switch into the Hetzner Cloud Console choose a Project, go to Access → Security, and create a new token.
# First you need set API TokenexportHCLOUD_TOKEN=${TOKEN}# Upload imagepacker init .
packer build .
# Save the image IDexportIMAGE_ID=<image-id-in-packer-output>
After doing this, you can find the snapshot in the console interface.
Using the IP/DNS name of the loadbalancer created earlier, generate the base configuration files for the Talos machines by issuing:
$ talosctl gen config talos-k8s-hcloud-tutorial https://<load balancer IP or DNS>:6443
created controlplane.yaml
created worker.yaml
created talosconfig
At this point, you can modify the generated configs to your liking.
Optionally, you can specify --config-patch with RFC6902 jsonpatches which will be applied during the config generation.
Validate the Configuration Files
Validate any edited machine configs with:
$ talosctl validate --config controlplane.yaml --mode cloud
controlplane.yaml is valid for cloud mode
$ talosctl validate --config worker.yaml --mode cloud
worker.yaml is valid for cloud mode
Create the Servers
We can now create our servers.
Note that you can find IMAGE_ID in the snapshot section of the console: https://console.hetzner.cloud/projects/$PROJECT_ID/servers/snapshots.
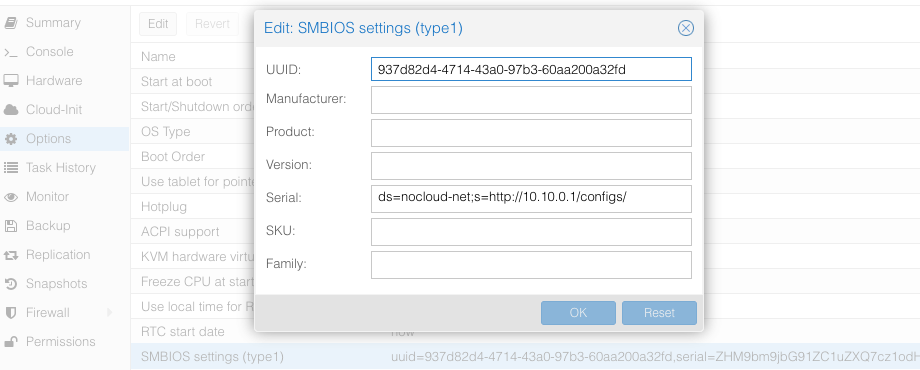
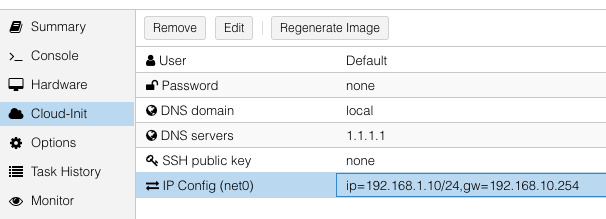
Proxmox can create cloud-init disk for you.
Edit the cloud-init config information in Proxmox as follows, substitute your own information as necessary:
and then update cicustom param at /etc/pve/qemu-server/$ID.conf.
cicustom: user=local:snippets/master-1.yml
ipconfig0: ip=192.168.1.10/24,gw=192.168.10.254
nameserver: 1.1.1.1
searchdomain: local
Note: snippets/master-1.yml is Talos machine config.
It is usually located at /var/lib/vz/snippets/master-1.yml.
This file must be placed to this path manually, as Proxmox does not support snippet uploading via API/GUI.
Click on Regenerate Image button after the above changes are made.
2.1.3.7 - OpenStack
Creating a cluster via the CLI on OpenStack.
Creating a Cluster via the CLI
In this guide, we will create an HA Kubernetes cluster in OpenStack with 1 worker node.
We will assume an existing some familiarity with OpenStack.
If you need more information on OpenStack specifics, please see the official OpenStack documentation.
Environment Setup
You should have an existing openrc file.
This file will provide environment variables necessary to talk to your OpenStack cloud.
See here for instructions on fetching this file.
Create the Image
First, download the OpenStack image from a Talos release.
These images are called openstack-$ARCH.tar.gz.
Untar this file with tar -xvf openstack-$ARCH.tar.gz.
The resulting file will be called disk.raw.
Upload the Image
Once you have the image, you can upload to OpenStack with:
openstack image create --public --disk-format raw --file disk.raw talos
Network Infrastructure
Load Balancer and Network Ports
Once the image is prepared, you will need to work through setting up the network.
Issue the following to create a load balancer, the necessary network ports for each control plane node, and associations between the two.
Creating loadbalancer:
# Create load balancer, updating vip-subnet-id if necessaryopenstack loadbalancer create --name talos-control-plane --vip-subnet-id public
# Create listeneropenstack loadbalancer listener create --name talos-control-plane-listener --protocol TCP --protocol-port 6443 talos-control-plane
# Pool and health monitoringopenstack loadbalancer pool create --name talos-control-plane-pool --lb-algorithm ROUND_ROBIN --listener talos-control-plane-listener --protocol TCP
openstack loadbalancer healthmonitor create --delay 5 --max-retries 4 --timeout 10 --type TCP talos-control-plane-pool
Creating ports:
# Create ports for control plane nodes, updating network name if necessaryopenstack port create --network shared talos-control-plane-1
openstack port create --network shared talos-control-plane-2
openstack port create --network shared talos-control-plane-3
# Create floating IPs for the ports, so that you will have talosctl connectivity to each control planeopenstack floating ip create --port talos-control-plane-1 public
openstack floating ip create --port talos-control-plane-2 public
openstack floating ip create --port talos-control-plane-3 public
Note: Take notice of the private and public IPs associated with each of these ports, as they will be used in the next step.
Additionally, take node of the port ID, as it will be used in server creation.
Associate port’s private IPs to loadbalancer:
# Create members for each port IP, updating subnet-id and address as necessary.openstack loadbalancer member create --subnet-id shared-subnet --address <PRIVATE IP OF talos-control-plane-1 PORT> --protocol-port 6443 talos-control-plane-pool
openstack loadbalancer member create --subnet-id shared-subnet --address <PRIVATE IP OF talos-control-plane-2 PORT> --protocol-port 6443 talos-control-plane-pool
openstack loadbalancer member create --subnet-id shared-subnet --address <PRIVATE IP OF talos-control-plane-3 PORT> --protocol-port 6443 talos-control-plane-pool
Security Groups
This example uses the default security group in OpenStack.
Ports have been opened to ensure that connectivity from both inside and outside the group is possible.
You will want to allow, at a minimum, ports 6443 (Kubernetes API server) and 50000 (Talos API) from external sources.
It is also recommended to allow communication over all ports from within the subnet.
Cluster Configuration
With our networking bits setup, we’ll fetch the IP for our load balancer and create our configuration files.
LB_PUBLIC_IP=$(openstack loadbalancer show talos-control-plane -f json | jq -r .vip_address)talosctl gen config talos-k8s-openstack-tutorial https://${LB_PUBLIC_IP}:6443
Additionally, you can specify --config-patch with RFC6902 jsonpatch which will be applied during the config generation.
Compute Creation
We are now ready to create our OpenStack nodes.
Create control plane:
# Create control planes 2 and 3, substituting the same info.for i in $( seq 13); do openstack server create talos-control-plane-$i --flavor m1.small --nic port-id=talos-control-plane-$i --image talos --user-data /path/to/controlplane.yaml
done
Create worker:
# Update network name as necessary.openstack server create talos-worker-1 --flavor m1.small --network shared --image talos --user-data /path/to/worker.yaml
Note: This step can be repeated to add more workers.
Bootstrap Etcd
You should now be able to interact with your cluster with talosctl.
We will use one of the floating IPs we allocated earlier.
It does not matter which one.
Using the IP/DNS name of the loadbalancer created earlier, generate the base configuration files for the Talos machines by issuing:
$ talosctl gen config talos-k8s-oracle-tutorial https://<load balancer IP or DNS>:6443 --additional-sans <load balancer IP or DNS>
created controlplane.yaml
created worker.yaml
created talosconfig
At this point, you can modify the generated configs to your liking.
Optionally, you can specify --config-patch with RFC6902 jsonpatches which will be applied during the config generation.
Validate the Configuration Files
Validate any edited machine configs with:
$ talosctl validate --config controlplane.yaml --mode cloud
controlplane.yaml is valid for cloud mode
$ talosctl validate --config worker.yaml --mode cloud
worker.yaml is valid for cloud mode
Set the endpoints and nodes for your talosconfig with:
talosctl --talosconfig talosconfig config endpoint <load balancer IP or DNS>
talosctl --talosconfig talosconfig config node <control-plane-1-IP>
Bootstrap etcd on the first control plane node with:
talosctl --talosconfig talosconfig bootstrap
Retrieve the kubeconfig
At this point we can retrieve the admin kubeconfig by running:
talosctl --talosconfig talosconfig kubeconfig .
2.1.3.9 - Scaleway
Creating a cluster via the CLI (scw) on scaleway.com.
Talos is known to work on scaleway.com; however, it is currently undocumented.
2.1.3.10 - UpCloud
Creating a cluster via the CLI (upctl) on UpCloud.com.
In this guide we will create an HA Kubernetes cluster 3 control plane nodes and 1 worker node.
We assume some familiarity with UpCloud.
If you need more information on UpCloud specifics, please see the official UpCloud documentation.
Create the Image
The best way to create an image for UpCloud, is to build one using
Hashicorp packer, with the
upcloud-amd64.raw.xz image found on the Talos Releases.
Using the general ISO is also possible, but the UpCloud image has some UpCloud
specific features implemented, such as the fetching of metadata and user data to configure the nodes.
To create the cluster, you need a few things locally installed:
NOTE: Make sure your account allows API connections.
To do so, log into
UpCloud control panel and go to People
-> Account -> Permissions -> Allow API connections checkbox.
It is recommended
to create a separate subaccount for your API access and only set the API permission.
To use the UpCloud CLI, you need to create a config in $HOME/.config/upctl.yaml
To use the UpCloud packer plugin, you need to also export these credentials to your
environment variables, by e.g. putting the following in your .bashrc or .zshrc
Now create a new image by issuing the commands shown below.
packer init .
packer build .
After doing this, you can find the custom image in the console interface under storage.
Creating a Cluster via the CLI
Create an Endpoint
To communicate with the Talos cluster you will need a single endpoint that is used
to access the cluster.
This can either be a loadbalancer that will sit in front of
all your control plane nodes, a DNS name with one or more A or AAAA records pointing
to the control plane nodes, or directly the IP of a control plane node.
Which option is best for you will depend on your needs.
Endpoint selection has been further documented here.
After you decide on which endpoint to use, note down the domain name or IP, as
we will need it in the next step.
Create the Machine Configuration Files
Generating Base Configurations
Using the DNS name of the endpoint created earlier, generate the base
configuration files for the Talos machines:
$ talosctl gen config talos-upcloud-tutorial https://<load balancer IP or DNS>:<port> --install-disk /dev/vda
created controlplane.yaml
created worker.yaml
created talosconfig
At this point, you can modify the generated configs to your liking.
Depending on the Kubernetes version you want to run, you might need to select a different Talos version, as not all versions are compatible.
You can find the support matrix here.
Optionally, you can specify --config-patch with RFC6902 jsonpatch or yamlpatch
which will be applied during the config generation.
Validate the Configuration Files
$ talosctl validate --config controlplane.yaml --mode cloud
controlplane.yaml is valid for cloud mode
$ talosctl validate --config worker.yaml --mode cloud
worker.yaml is valid for cloud mode
Create the Servers
Create the Control Plane Nodes
Run the following to create three total control plane nodes:
for ID in $(seq 3); do upctl server create \
--zone us-nyc1 \
--title talos-us-nyc1-master-$ID\
--hostname talos-us-nyc1-master-$ID\
--plan 2xCPU-4GB \
--os "Talos (v1.0.6)"\
--user-data "$(cat controlplane.yaml)"\
--enable-metada
done
Note: modify the zone and OS depending on your preferences.
The OS should match the template name generated with packer in the previous step.
Note the IP address of the first control plane node, as we will need it later.
To configure talosctl we will need the first control plane node’s IP, as noted earlier.
We only add one node IP, as that is the entry into our cluster against which our commands will be run.
All requests to other nodes are proxied through the endpoint, and therefore not
all nodes need to be manually added to the config.
You don’t want to run your commands against all nodes, as this can destroy your
cluster if you are not careful (further documentation).
At this point we can retrieve the admin kubeconfig by running:
talosctl --talosconfig talosconfig kubeconfig
It will take a few minutes before Kubernetes has been fully bootstrapped, and is accessible.
You can check if the nodes are registered in Talos by running
talosctl --talosconfig talosconfig get members
To check if your nodes are ready, run
kubectl get nodes
2.1.3.11 - Vultr
Creating a cluster via the CLI (vultr-cli) on Vultr.com.
Creating a Cluster using the Vultr CLI
This guide will demonstrate how to create a highly-available Kubernetes cluster with one worker using the Vultr cloud provider.
Vultr have a very well documented REST API, and an open-source CLI tool to interact with the API which will be used in this guide.
Make sure to follow installation and authentication instructions for the vultr-cli tool.
Upload image
First step is to make the Talos ISO available to Vultr by uploading the latest release of the ISO to the Vultr ISO server.
vultr-cli iso create --url https://github.com/siderolabs/talos/releases/download/v1.0.6/talos-amd64.iso
Make a note of the ID in the output, it will be needed later when creating the instances.
Create a Load Balancer
A load balancer is needed to serve as the Kubernetes endpoint for the cluster.
Make a note of the ID of the load balancer from the output of the above command, it will be needed after the control plane instances are created.
vultr-cli load-balancer get $LOAD_BALANCER_ID | grep ^IP
Make a note of the IP address, it will be needed later when generating the configuration.
Create the Machine Configuration
Generate Base Configuration
Using the IP address (or DNS name if one was created) of the load balancer created above, generate the machine configuration files for the new cluster.
talosctl gen config talos-kubernetes-vultr https://$LOAD_BALANCER_ADDRESS
Once generated, the machine configuration can be modified as necessary for the new cluster, for instance updating disk installation, or adding SANs for the certificates.
First a control plane needs to be created, with the example below creating 3 instances in a loop.
The instance type (noted by the --plan vc2-2c-4gb argument) in the example is for a minimum-spec control plane node, and should be updated to suit the cluster being created.
for id in $(seq 3); do vultr-cli instance create \
--plan vc2-2c-4gb \
--region $REGION\
--iso $TALOS_ISO_ID\
--host talos-k8s-cp${id}\
--label "Talos Kubernetes Control Plane"\
--tags talos,kubernetes,control-plane
done
Make a note of the instance IDs, as they are needed to attach to the load balancer created earlier.
Now worker nodes can be created and configured in a similar way to the control plane nodes, the difference being mainly in the machine configuration file.
Note that like with the control plane nodes, the instance type (here set by --plan vc2-1-1gb) should be changed for the actual cluster requirements.
for id in $(seq 1); do vultr-cli instance create \
--plan vc2-1c-1gb \
--region $REGION\
--iso $TALOS_ISO_ID\
--host talos-k8s-worker${id}\
--label "Talos Kubernetes Worker"\
--tags talos,kubernetes,worker
done
Once the worker is booted and in maintenance mode, the machine configuration can be applied in the following manner.
Once all the cluster nodes are correctly configured, the cluster can be bootstrapped to become functional.
It is important that the talosctl bootstrap command be executed only once and against only a single control plane node.
Finally, with the cluster fully running, the administrative kubeconfig can be retrieved from the Talos API to be saved locally.
talosctl --talosconfig talosconfig kubeconfig .
Now the kubeconfig can be used by any of the usual Kubernetes tools to interact with the Talos-based Kubernetes cluster as normal.
2.1.4 - Local Platforms
Installation of Talos Linux on local platforms, helpful for testing and developing.
2.1.4.1 - Docker
Creating Talos Kubernetes cluster using Docker.
In this guide we will create a Kubernetes cluster in Docker, using a containerized version of Talos.
Running Talos in Docker is intended to be used in CI pipelines, and local testing when you need a quick and easy cluster.
Furthermore, if you are running Talos in production, it provides an excellent way for developers to develop against the same version of Talos.
Requirements
The follow are requirements for running Talos in Docker:
Due to the fact that Talos will be running in a container, certain APIs are not available.
For example upgrade, reset, and similar APIs don’t apply in container mode.
Further, when running on a Mac in docker, due to networking limitations, VIPs are not supported.
Create the Cluster
Creating a local cluster is as simple as:
talosctl cluster create --wait
Once the above finishes successfully, your talosconfig(~/.talos/config) will be configured to point to the new cluster.
Note: Startup times can take up to a minute or more before the cluster is available.
Finally, we just need to specify which nodes you want to communicate with using talosctl.
Talosctl can operate on one or all the nodes in the cluster – this makes cluster wide commands much easier.
talosctl config nodes 10.5.0.2 10.5.0.3
Using the Cluster
Once the cluster is available, you can make use of talosctl and kubectl to interact with the cluster.
For example, to view current running containers, run talosctl containers for a list of containers in the system namespace, or talosctl containers -k for the k8s.io namespace.
To view the logs of a container, use talosctl logs <container> or talosctl logs -k <container>.
Cleaning Up
To cleanup, run:
talosctl cluster destroy
2.1.4.2 - QEMU
Creating Talos Kubernetes cluster using QEMU VMs.
In this guide we will create a Kubernetes cluster using QEMU.
Video Walkthrough
To see a live demo of this writeup, see the video below:
Requirements
Linux
a kernel with
KVM enabled (/dev/kvm must exist)
CONFIG_NET_SCH_NETEM enabled
CONFIG_NET_SCH_INGRESS enabled
at least CAP_SYS_ADMIN and CAP_NET_ADMIN capabilities
QEMU
bridge, static and firewall CNI plugins from the standard CNI plugins, and tc-redirect-tap CNI plugin from the awslabs tc-redirect-tap installed to /opt/cni/bin (installed automatically by talosctl)
iptables
/var/run/netns directory should exist
Installation
How to get QEMU
Install QEMU with your operating system package manager.
For example, on Ubuntu for x86:
Before the first cluster is created, talosctl will download the CNI bundle for the VM provisioning and install it to ~/.talos/cni directory.
Once the above finishes successfully, your talosconfig (~/.talos/config) will be configured to point to the new cluster, and kubeconfig will be
downloaded and merged into default kubectl config location (~/.kube/config).
Once the cluster is available, you can make use of talosctl and kubectl to interact with the cluster.
For example, to view current running containers, run talosctl -n 10.5.0.2 containers for a list of containers in the system namespace, or talosctl -n 10.5.0.2 containers -k for the k8s.io namespace.
To view the logs of a container, use talosctl -n 10.5.0.2 logs <container> or talosctl -n 10.5.0.2 logs -k <container>.
A bridge interface will be created, and assigned the default IP 10.5.0.1.
Each node will be directly accessible on the subnet specified at cluster creation time.
A loadbalancer runs on 10.5.0.1 by default, which handles loadbalancing for the Kubernetes APIs.
You can see a summary of the cluster state by running:
$ talosctl cluster show --provisioner qemu
PROVISIONER qemu
NAME talos-default
NETWORK NAME talos-default
NETWORK CIDR 10.5.0.0/24
NETWORK GATEWAY 10.5.0.1
NETWORK MTU 1500NODES:
NAME TYPE IP CPU RAM DISK
talos-default-master-1 Init 10.5.0.2 1.00 1.6 GB 4.3 GB
talos-default-master-2 ControlPlane 10.5.0.3 1.00 1.6 GB 4.3 GB
talos-default-master-3 ControlPlane 10.5.0.4 1.00 1.6 GB 4.3 GB
talos-default-worker-1 Worker 10.5.0.5 1.00 1.6 GB 4.3 GB
Note: In that case that the host machine is rebooted before destroying the cluster, you may need to manually remove ~/.talos/clusters/talos-default.
Manual Clean Up
The talosctl cluster destroy command depends heavily on the clusters state directory.
It contains all related information of the cluster.
The PIDs and network associated with the cluster nodes.
If you happened to have deleted the state folder by mistake or you would like to cleanup
the environment, here are the steps how to do it manually:
Remove VM Launchers
Find the process of talosctl qemu-launch:
ps -elf | grep 'talosctl qemu-launch'
To remove the VMs manually, execute:
sudo kill -s SIGTERM <PID>
Example output, where VMs are running with PIDs 157615 and 157617
This is more tricky part as if you have already deleted the state folder.
If you didn’t then it is written in the state.yaml in the
~/.talos/clusters/<cluster-name> directory.
In order to install Talos in VirtualBox, you will need the ISO image from the Talos release page.
You can download talos-amd64.iso via
github.com/siderolabs/talos/releases
Start by creating a new VM by clicking the “New” button in the VirtualBox UI:
Supply a name for this VM, and specify the Type and Version:
Edit the memory to supply at least 2GB of RAM for the VM:
Proceed through the disk settings, keeping the defaults.
You can increase the disk space if desired.
Once created, select the VM and hit “Settings”:
In the “System” section, supply at least 2 CPUs:
In the “Network” section, switch the network “Attached To” section to “Bridged Adapter”:
Finally, in the “Storage” section, select the optical drive and, on the right, select the ISO by browsing your filesystem:
Repeat this process for a second VM to use as a worker node.
You can also repeat this for additional nodes desired.
Start Control Plane Node
Once the VMs have been created and updated, start the VM that will be the first control plane node.
This VM will boot the ISO image specified earlier and enter “maintenance mode”.
Once the machine has entered maintenance mode, there will be a console log that details the IP address that the node received.
Take note of this IP address, which will be referred to as $CONTROL_PLANE_IP for the rest of this guide.
If you wish to export this IP as a bash variable, simply issue a command like export CONTROL_PLANE_IP=1.2.3.4.
Generate Machine Configurations
With the IP address above, you can now generate the machine configurations to use for installing Talos and Kubernetes.
Issue the following command, updating the output directory, cluster name, and control plane IP as you see fit:
talosctl gen config talos-vbox-cluster https://$CONTROL_PLANE_IP:6443 --output-dir _out
This will create several files in the _out directory: controlplane.yaml, worker.yaml, and talosconfig.
Create Control Plane Node
Using the controlplane.yaml generated above, you can now apply this config using talosctl.
Issue:
You should now see some action in the VirtualBox console for this VM.
Talos will be installed to disk, the VM will reboot, and then Talos will configure the Kubernetes control plane on this VM.
Note: This process can be repeated multiple times to create an HA control plane.
Create Worker Node
Create at least a single worker node using a process similar to the control plane creation above.
Start the worker node VM and wait for it to enter “maintenance mode”.
Take note of the worker node’s IP address, which will be referred to as $WORKER_IP
Note: This process can be repeated multiple times to add additional workers.
Using the Cluster
Once the cluster is available, you can make use of talosctl and kubectl to interact with the cluster.
For example, to view current running containers, run talosctl containers for a list of containers in the system namespace, or talosctl containers -k for the k8s.io namespace.
To view the logs of a container, use talosctl logs <container> or talosctl logs -k <container>.
First, configure talosctl to talk to your control plane node by issuing the following, updating paths and IPs as necessary:
Insert the SD card to your board, turn it on and wait for the console to show you the instructions for bootstrapping the node.
Following the instructions in the console output to connect to the interactive installer:
talosctl apply-config --insecure --mode=interactive --nodes <node IP or DNS name>
Once the interactive installation is applied, the cluster will form and you can then use kubectl.
Retrieve the kubeconfig
Retrieve the admin kubeconfig by running:
talosctl kubeconfig
2.1.5.2 - Jetson Nano
Installing Talos on Jetson Nano SBC using raw disk image.
We will use the 32.7.2 release for the Jetson Nano.
Most of the instructions is similar to this doc except that we’d be using a upstream version of u-boot with patches from NVIDIA u-boot so that USB boot also works.
Before flashing we need the following:
A USB-A to micro USB cable
A jumper wire to enable recovery mode
A HDMI monitor to view the logs if the USB serial adapter is not available
A USB to Serial adapter with 3.3V TTL (optional)
A 5V DC barrel jack
If you’re planning to use the serial console follow the documentation here
First start by downloading the Jetson Nano L4T release.
Next we will extract the L4T release and replace the u-boot binary with the patched version.
tar xf jetson-210_linux_r32.6.1_aarch64.tbz2
cd Linux_for_Tegra
crane --platform=linux/arm64 export ghcr.io/siderolabs/u-boot:v1.1.0-alpha.0-42-gcd05ae8 - | tar xf - --strip-components=1 -C bootloader/t210ref/p3450-0000/ jetson_nano/u-boot.bin
Next we will flash the firmware to the Jetson Nano SPI flash.
In order to do that we need to put the Jetson Nano into Force Recovery Mode (FRC).
We will use the instructions from here
Ensure that the Jetson Nano is powered off.
There is no need for the SD card/USB storage/network cable to be connected
Connect the micro USB cable to the micro USB port on the Jetson Nano, don’t plug the other end to the PC yet
Enable Force Recovery Mode (FRC) by placing a jumper across the FRC pins on the Jetson Nano
For board revision A02, these are pins 3 and 4 of header J40
For board revision B01, these are pins 9 and 10 of header J50
Place another jumper across J48 to enable power from the DC jack and connect the Jetson Nano to the DC jack J25
Now connect the other end of the micro USB cable to the PC and remove the jumper wire from the FRC pins
Now the Jetson Nano is in Force Recovery Mode (FRC) and can be confirmed by running the following command
lsusb | grep -i "nvidia"
Now we can move on the flashing the firmware.
sudo ./flash p3448-0000-max-spi external
This will flash the firmware to the Jetson Nano SPI flash and you’ll see a lot of output.
If you’ve connected the serial console you’ll also see the progress there.
Once the flashing is done you can disconnect the USB cable and power off the Jetson Nano.
| Replace /dev/mmcblk0 with the name of your SD card/USB storage.
Bootstrapping the Node
Insert the SD card/USB storage to your board, turn it on and wait for the console to show you the instructions for bootstrapping the node.
Following the instructions in the console output to connect to the interactive installer:
talosctl apply-config --insecure --mode=interactive --nodes <node IP or DNS name>
Once the interactive installation is applied, the cluster will form and you can then use kubectl.
Retrieve the kubeconfig
Retrieve the admin kubeconfig by running:
talosctl kubeconfig
2.1.5.3 - Libre Computer Board ALL-H3-CC
Installing Talos on Libre Computer Board ALL-H3-CC SBC using raw disk image.
Insert the SD card to your board, turn it on and wait for the console to show you the instructions for bootstrapping the node.
Following the instructions in the console output to connect to the interactive installer:
talosctl apply-config --insecure --mode=interactive --nodes <node IP or DNS name>
Once the interactive installation is applied, the cluster will form and you can then use kubectl.
Retrieve the kubeconfig
Retrieve the admin kubeconfig by running:
talosctl kubeconfig
2.1.5.4 - Pine64
Installing Talos on a Pine64 SBC using raw disk image.
Insert the SD card to your board, turn it on and wait for the console to show you the instructions for bootstrapping the node.
Following the instructions in the console output to connect to the interactive installer:
talosctl apply-config --insecure --mode=interactive --nodes <node IP or DNS name>
Once the interactive installation is applied, the cluster will form and you can then use kubectl.
Retrieve the kubeconfig
Retrieve the admin kubeconfig by running:
talosctl kubeconfig
2.1.5.5 - Pine64 Rock64
Installing Talos on Pine64 Rock64 SBC using raw disk image.
Insert the SD card to your board, turn it on and wait for the console to show you the instructions for bootstrapping the node.
Following the instructions in the console output to connect to the interactive installer:
talosctl apply-config --insecure --mode=interactive --nodes <node IP or DNS name>
Once the interactive installation is applied, the cluster will form and you can then use kubectl.
Retrieve the kubeconfig
Retrieve the admin kubeconfig by running:
talosctl kubeconfig
2.1.5.6 - Radxa ROCK PI 4c
Installing Talos on Radxa ROCK PI 4c SBC using raw disk image.
Insert the SD card to your board, turn it on and wait for the console to show you the instructions for bootstrapping the node.
Following the instructions in the console output to connect to the interactive installer:
talosctl apply-config --insecure --mode=interactive --nodes <node IP or DNS name>
Once the interactive installation is applied, the cluster will form and you can then use kubectl.
Retrieve the kubeconfig
Retrieve the admin kubeconfig by running:
talosctl kubeconfig
Boot Talos from an eMMC or SSD Drive
Note: this is only tested on Rock PI 4c
It is possible to run Talos without any SD cards right from either an eMMC or SSD disk.
The pre-installed SPI loader won’t be able to chain Talos u-boot on the device because it’s too outdated.
Instead, it is necessary to update u-boot to a more recent version for this process to work.
The Armbian u-boot build for Rock PI 4c has been proved to work: https://users.armbian.com/piter75/.
Steps
Flash the Rock PI 4c variant of Debian to the SD card.
Check that /dev/mtdblock0 exists otherwise the command will silently fail; e.g. lsblk.
At least version v2020.09.03-138a1 of the bootloader (rpi-eeprom) is required.
To update the bootloader we will need an SD card.
Insert the SD card into your computer and use Raspberry Pi Imager
to install the bootloader on it (select Operating System > Misc utility images > Bootloader > SD Card Boot).
Alternatively, you can use the console on Linux or macOS.
The path to your SD card can be found using fdisk on Linux or diskutil on macOS.
In this example, we will assume /dev/mmcblk0.
Remove the SD card from your local machine and insert it into the Raspberry Pi.
Power the Raspberry Pi on, and wait at least 10 seconds.
If successful, the green LED light will blink rapidly (forever), otherwise an error pattern will be displayed.
If an HDMI display is attached to the port closest to the power/USB-C port,
the screen will display green for success or red if a failure occurs.
Power off the Raspberry Pi and remove the SD card from it.
Note: Updating the bootloader only needs to be done once.
Insert the SD card to your board, turn it on and wait for the console to show you the instructions for bootstrapping the node.
Following the instructions in the console output to connect to the interactive installer:
talosctl apply-config --insecure --mode=interactive --nodes <node IP or DNS name>
Once the interactive installation is applied, the cluster will form and you can then use kubectl.
Note: if you have an HDMI display attached and it shows only a rainbow splash,
please use the other HDMI port, the one closest to the power/USB-C port.
Retrieve the kubeconfig
Retrieve the admin kubeconfig by running:
talosctl kubeconfig
Troubleshooting
The following table can be used to troubleshoot booting issues:
Long Flashes
Short Flashes
Status
0
3
Generic failure to boot
0
4
start*.elf not found
0
7
Kernel image not found
0
8
SDRAM failure
0
9
Insufficient SDRAM
0
10
In HALT state
2
1
Partition not FAT
2
2
Failed to read from partition
2
3
Extended partition not FAT
2
4
File signature/hash mismatch - Pi 4
4
4
Unsupported board type
4
5
Fatal firmware error
4
6
Power failure type A
4
7
Power failure type B
2.2 - Configuration
Guides on how to configure Talos Linux machines
2.2.1 - Containerd
Customize Containerd Settings
The base containerd configuration expects to merge in any additional configs present in /var/cri/conf.d/*.toml.
Create cluster like normal and see that metrics are now present on this port:
$ curl 127.0.0.1:11234/v1/metrics
# HELP container_blkio_io_service_bytes_recursive_bytes The blkio io service bytes recursive# TYPE container_blkio_io_service_bytes_recursive_bytes gaugecontainer_blkio_io_service_bytes_recursive_bytes{container_id="0677d73196f5f4be1d408aab1c4125cf9e6c458a4bea39e590ac779709ffbe14",device="/dev/dm-0",major="253",minor="0",namespace="k8s.io",op="Async"}0container_blkio_io_service_bytes_recursive_bytes{container_id="0677d73196f5f4be1d408aab1c4125cf9e6c458a4bea39e590ac779709ffbe14",device="/dev/dm-0",major="253",minor="0",namespace="k8s.io",op="Discard"}0...
...
2.2.2 - Custom Certificate Authorities
How to supply custom certificate authorities
Appending the Certificate Authority
Put into each machine the PEM encoded certificate:
It is possible to enable encryption for system disks at the OS level.
As of this writing, only STATE and EPHEMERAL partitions can be encrypted.
STATE contains the most sensitive node data: secrets and certs.
EPHEMERAL partition may contain some sensitive workload data.
Data is encrypted using LUKS2, which is provided by the Linux kernel modules and cryptsetup utility.
The operating system will run additional setup steps when encryption is enabled.
If the disk encryption is enabled for the STATE partition, the system will:
Save STATE encryption config as JSON in the META partition.
Before mounting the STATE partition, load encryption configs either from the machine config or from the META partition.
Note that the machine config is always preferred over the META one.
Before mounting the STATE partition, format and encrypt it.
This occurs only if the STATE partition is empty and has no filesystem.
If the disk encryption is enabled for the EPHEMERAL partition, the system will:
Get the encryption config from the machine config.
Before mounting the EPHEMERAL partition, encrypt and format it.
This occurs only if the EPHEMERAL partition is empty and has no filesystem.
Configuration
Right now this encryption is disabled by default.
To enable disk encryption you should modify the machine configuration with the following options:
Note: What the LUKS2 docs call “keys” are, in reality, a passphrase.
When this passphrase is added, LUKS2 runs argon2 to create an actual key from that passphrase.
LUKS2 supports up to 32 encryption keys and it is possible to specify all of them in the machine configuration.
Talos always tries to sync the keys list defined in the machine config with the actual keys defined for the LUKS2 partition.
So if you update the keys list you should have at least one key that is not changed to be used for keys management.
When you define a key you should specify the key kind and the slot:
Take a note that key order does not play any role on which key slot is used.
Every key must always have a slot defined.
Encryption Key Kinds
Talos supports two kinds of keys:
nodeID which is generated using the node UUID and the partition label (note that if the node UUID is not really random it will fail the entropy check).
static which you define right in the configuration.
Note: Use static keys only if your STATE partition is encrypted and only for the EPHEMERAL partition.
For the STATE partition it will be stored in the META partition, which is not encrypted.
Key Rotation
It is necessary to do talosctl apply-config a couple of times to rotate keys, since there is a need to always maintain a single working key while changing the other keys around it.
That’s it!
After you run the last command, the partition will be wiped and the node will reboot.
During the next boot the system will encrypt the partition.
State Partition
Calling wipe against the STATE partition will make the node lose the config, so the previous flow is not going to work.
The flow should be to first wipe the STATE partition:
talosctl reset --system-labels-to-wipe STATE -n <node ip> --reboot=true
Node will enter into maintenance mode, then run apply-config with --insecure flag:
After installation is complete the node should encrypt the STATE partition.
2.2.4 - Editing Machine Configuration
How to edit and patch Talos machine configuration, with reboot, immediately, or stage update on reboot.
Talos node state is fully defined by machine configuration.
Initial configuration is delivered to the node at bootstrap time, but configuration can be updated while the node is running.
Note: Be sure that config is persisted so that configuration updates are not overwritten on reboots.
Configuration persistence was enabled by default since Talos 0.5 (persist: true in machine configuration).
There are three talosctl commands which facilitate machine configuration updates:
talosctl apply-config to apply configuration from the file
talosctl edit machineconfig to launch an editor with existing node configuration, make changes and apply configuration back
talosctl patch machineconfig to apply automated machine configuration via JSON patch
Each of these commands can operate in one of four modes:
apply change in automatic mode(default): reboot if the change can’t be applied without a reboot, otherwise apply the change immediately
apply change with a reboot (--mode=reboot): update configuration, reboot Talos node to apply configuration change
apply change immediately (--mode=no-reboot flag): change is applied immediately without a reboot, fails if the change contains any fields that can not be updated without a reboot
apply change on next reboot (--mode=staged): change is staged to be applied after a reboot, but node is not rebooted
apply change in the interactive mode (--mode=interactive; only for talosctl apply-config): launches TUI based interactive installer
Note: applying change on next reboot (--mode=staged) doesn’t modify current node configuration, so next call to
talosctl edit machineconfig --mode=staged will not see changes
Additionally, there is also talosctl get machineconfig, which retrieves the current node configuration API resource and contains the machine configuration in the .spec field.
It can be used to modify the configuration locally before being applied to the node.
The list of config changes allowed to be applied immediately in Talos v1.0.6:
.debug
.cluster
.machine.time
.machine.certCANs
.machine.install (configuration is only applied during install/upgrade)
.machine.network
.machine.sysfs
.machine.sysctls
.machine.logging
.machine.controlplane
.machine.kubelet
.machine.pods
.machine.kernel
.machine.registries (CRI containerd plugin will not pick up the registry authentication settings without a reboot)
talosctl apply-config
This command is mostly used to submit initial machine configuration to the node (generated by talosctl gen config).
It can be used to apply new configuration from the file to the running node as well, but most of the time it’s not convenient, as it doesn’t operate on the current node machine configuration.
Example:
talosctl -n <IP> apply-config -f config.yaml
Command apply-config can also be invoked as apply machineconfig:
Applying machine configuration immediately (without a reboot):
talosctl -n IP apply machineconfig -f config.yaml --mode=no-reboot
Starting the interactive installer:
talosctl -n IP apply machineconfig --mode=interactive
Note: when a Talos node is running in the maintenance mode it’s necessary to provide --insecure (-i) flag to connect to the API and apply the config.
taloctl edit machineconfig
Command talosctl edit loads current machine configuration from the node and launches configured editor to modify the config.
If config hasn’t been changed in the editor (or if updated config is empty), update is not applied.
Note: Talos uses environment variables TALOS_EDITOR, EDITOR to pick up the editor preference.
If environment variables are missing, vi editor is used by default.
Example:
talosctl -n <IP> edit machineconfig
Configuration can be edited for multiple nodes if multiple IP addresses are specified:
talosctl -n <IP1>,<IP2>,... edit machineconfig
Applying machine configuration change immediately (without a reboot):
Command talosctl patch works similar to talosctl edit command - it loads current machine configuration, but instead of launching configured editor it applies a set of JSON patches to the configuration and writes the result back to the node.
Example, updating kubelet version (in auto mode):
$ talosctl -n <IP> patch machineconfig -p '[{"op": "replace", "path": "/machine/kubelet/image", "value": "ghcr.io/siderolabs/kubelet:v1.23.5"}]'patched mc at the node <IP>
Updating kube-apiserver version in immediate mode (without a reboot):
$ talosctl -n <IP> patch machineconfig --mode=no-reboot -p '[{"op": "replace", "path": "/cluster/apiServer/image", "value": "k8s.gcr.io/kube-apiserver:v1.23.5"}]'patched mc at the node <IP>
A patch might be applied to multiple nodes when multiple IPs are specified:
If a Talos node fails to boot because of wrong configuration (for example, control plane endpoint is incorrect), configuration can be updated to fix the issue.
2.2.5 - Logging
Dealing with Talos Linux logs.
Viewing logs
Kernel messages can be retrieved with talosctl dmesg command:
Service logs can be retrieved with talosctl logs command:
$ talosctl -n 172.20.1.2 services
NODE SERVICE STATE HEALTH LAST CHANGE LAST EVENT
172.20.1.2 apid Running OK 19m27s ago Health check successful
172.20.1.2 containerd Running OK 19m29s ago Health check successful
172.20.1.2 cri Running OK 19m27s ago Health check successful
172.20.1.2 etcd Running OK 19m22s ago Health check successful
172.20.1.2 kubelet Running OK 19m20s ago Health check successful
172.20.1.2 machined Running ? 19m30s ago Service started as goroutine
172.20.1.2 trustd Running OK 19m27s ago Health check successful
172.20.1.2 udevd Running OK 19m28s ago Health check successful
$ talosctl -n 172.20.1.2 logs machined
172.20.1.2: [talos] task setupLogger (1/1): done, 106.109µs
172.20.1.2: [talos] phase logger (1/7): done, 564.476µs
[...]
Container logs for Kubernetes pods can be retrieved with talosctl logs -k command:
Messages are newline-separated when sent over TCP.
Over UDP messages are sent with one message per packet.
msg, talos-level, talos-service, and talos-time fields are always present; there may be additional fields.
Kernel logs
Kernel log delivery can be enabled with the talos.logging.kernel kernel command line argument, which can be specified
in the .machine.installer.extraKernelArgs:
Kernel log destination is specified in the same way as service log endpoint.
The only supported format is json_lines.
Sample message:
{
"clock":6252819, // time relative to the kernel boot time
"facility":"user",
"msg":"[talos] task startAllServices (1/1): waiting for 6 services\n",
"priority":"warning",
"seq":711,
"talos-level":"warn", // Talos-translated `priority` into common logging level
"talos-time":"2021-11-26T16:53:21.3258698Z"// Talos-translated `clock` using current time
}
extraKernelArgs in the machine configuration are only applied on Talos upgrades, not just by applying the config.
(Upgrading to the same version is fine).
Filebeat example
To forward logs to other Log collection services, one way to do this is sending
them to a Filebeat running in the
cluster itself (in the host network), which takes care of forwarding it to
other endpoints (and the necessary transformations).
If Elastic Cloud on Kubernetes
is being used, the following Beat (custom resource) configuration might be
helpful:
The input configuration ensures that messages and timestamps are extracted properly.
Refer to the Filebeat documentation on how to forward logs to other outputs.
Also note the hostNetwork: true in the daemonSet configuration.
This ensures filebeat uses the host network, and listens on 127.0.0.1:12345
(UDP) on every machine, which can then be specified as a logging endpoint in
the machine configuration.
Fluent-bit example
First, we’ll create a value file for the fluentd-bit Helm chart.
# fluentd-bit.yamlpodAnnotations:
fluentbit.io/exclude: 'true'extraPorts:
- port: 12345containerPort: 12345protocol: TCP
name: talos
config:
service: | [SERVICE]
Flush 5
Daemon Off
Log_Level warn
Parsers_File custom_parsers.confinputs: | [INPUT]
Name tcp
Listen 0.0.0.0
Port 12345
Format json
Tag talos.*
[INPUT]
Name tail
Alias kubernetes
Path /var/log/containers/*.log
Parser containerd
Tag kubernetes.*
[INPUT]
Name tail
Alias audit
Path /var/log/audit/kube/*.log
Parser audit
Tag audit.*filters: | [FILTER]
Name kubernetes
Alias kubernetes
Match kubernetes.*
Kube_Tag_Prefix kubernetes.var.log.containers.
Use_Kubelet Off
Merge_Log On
Merge_Log_Trim On
Keep_Log Off
K8S-Logging.Parser Off
K8S-Logging.Exclude On
Annotations Off
Labels On
[FILTER]
Name modify
Match kubernetes.*
Add source kubernetes
Remove logtagcustomParsers: | [PARSER]
Name audit
Format json
Time_Key requestReceivedTimestamp
Time_Format %Y-%m-%dT%H:%M:%S.%L%z
[PARSER]
Name containerd
Format regex
Regex ^(?<time>[^ ]+) (?<stream>stdout|stderr) (?<logtag>[^ ]*) (?<log>.*)$
Time_Key time
Time_Format %Y-%m-%dT%H:%M:%S.%L%zoutputs: | [OUTPUT]
Name stdout
Alias stdout
Match *
Format json_lines# If you wish to ship directly to Loki from Fluentbit,# Uncomment the following output, updating the Host with your Loki DNS/IP info as necessary.# [OUTPUT]# Name loki# Match *# Host loki.loki.svc# Port 3100# Labels job=fluentbit# Auto_Kubernetes_Labels ondaemonSetVolumes:
- name: varlog
hostPath:
path: /var/log
daemonSetVolumeMounts:
- name: varlog
mountPath: /var/log
tolerations:
- operator: Exists
effect: NoSchedule
Next, we will add the helm repo for FluentBit, and deploy it to the cluster.
$ kubectl -n kube-system get svc -l app.kubernetes.io/name=fluent-bit
NAME TYPE CLUSTER-IP EXTERNAL-IP PORT(S) AGE
fluent-bit ClusterIP 10.200.0.138 <none> 2020/TCP,5170/TCP 108m
Finally, we will change talos log destination with the command talosctl edit mc.
This example configuration was well tested with Cilium CNI, and it should work with iptables/ipvs based CNI plugins too.
Vector example
Vector is a lightweight observability pipeline ideal for a Kubernetes environment.
It can ingest (source) logs from multiple sources, perform remapping on the logs (transform), and forward the resulting pipeline to multiple destinations (sinks).
As it is an end to end platform, it can be run as a single-deployment ‘aggregator’ as well as a replicaSet of ‘Agents’ that run on each node.
As Talos can be set as above to send logs to a destination, we can run Vector as an Aggregator, and forward both kernel and service to a UDP socket in-cluster.
Below is an excerpt of a source/sink setup for Talos, with a ‘sink’ destination of an in-cluster Grafana Loki log aggregation service.
As Loki can create labels from the log input, we have set up the Loki sink to create labels based on the host IP, service and facility of the inbound logs.
Note that a method of exposing the Vector service will be required which may vary depending on your setup - a LoadBalancer is a good option.
In order to create a key pair, you will need the root CA.
Save the CA public key, and CA private key as ca.crt, and ca.key respectively.
Now, run the following commands to generate a certificate:
talosctl gen key --name admin
talosctl gen csr --key admin.key --ip 127.0.0.1
talosctl gen crt --ca ca --csr admin.csr --name admin
Now, base64 encode admin.crt, and admin.key:
cat admin.crt | base64
cat admin.key | base64
You can now set the crt and key fields in the talosconfig to the base64 encoded strings.
Renewing an Expired Administrator Certificate
In order to renew the certificate, you will need the root CA, and the admin private key.
The base64 encoded key can be found in any one of the control plane node’s configuration file.
Where it is exactly will depend on the specific version of the configuration file you are using.
Save the CA public key, CA private key, and admin private key as ca.crt, ca.key, and admin.key respectively.
Now, run the following commands to generate a certificate:
talosctl gen csr --key admin.key --ip 127.0.0.1
talosctl gen crt --ca ca --csr admin.csr --name admin
You should see admin.crt in your current directory.
Now, base64 encode admin.crt:
cat admin.crt | base64
You can now set the certificate in the talosconfig to the base64 encoded string.
2.2.7 - NVIDIA GPU
In this guide we’ll follow the procedure to support NVIDIA GPU on Talos.
Enabling NVIDIA GPU support on Talos is bound by NVIDIA EULA
Talos GPU support is an alpha feature.
These are the steps to enabling NVIDIA support in Talos.
Talos pre-installed on a node with NVIDIA GPU installed.
Building a custom Talos installer image with NVIDIA modules
Building NVIDIA container toolkit system extension which allows to register a custom runtime with containerd
Upgrading Talos with the custom installer and enabling NVIDIA modules and the system extension
Both these components require that the user build and maintain their own Talos installer image and the NVIDIA container toolkit Talos System Extension.
Prerequisites
This guide assumes the user has access to a container registry with push permissions, docker installed on the build machine and the Talos host has pull access to the container registry.
Set the local registry and username environment variables:
Now run the following command to build and push custom Talos kernel image and the NVIDIA image with the NVIDIA kernel modules signed by the kernel built along with it.
make kernel nonfree-kmod-nvidia PLATFORM=linux/amd64 PUSH=true
Replace the platform with linux/arm64 if building for ARM64
Now we need to create a custom Talos installer image.
Start by creating a Dockerfile with the following content:
FROM scratch as customizationCOPY --from=ghcr.io/talos-user/nonfree-kmod-nvidia:v1.0.6-nvidia /lib/modules /lib/modules
FROM ghcr.io/siderolabs/installer:v1.0.6COPY --from=ghcr.io/talos-user/kernel:v1.0.6-nvidia /boot/vmlinuz /usr/install/${TARGETARCH}/vmlinuz
Once the node reboots, the NVIDIA modules should be loaded and the system extension should be installed.
This can be confirmed by running:
talosctl read /proc/modules
which should produce an output similar to below:
nvidia_uvm 1146880 - - Live 0xffffffffc2733000 (PO)
nvidia_drm 69632 - - Live 0xffffffffc2721000 (PO)
nvidia_modeset 1142784 - - Live 0xffffffffc25ea000 (PO)
nvidia 39047168 - - Live 0xffffffffc00ac000 (PO)
talosctl get extensions
which should produce an output similar to below:
NODE NAMESPACE TYPE ID VERSION NAME VERSION
172.31.41.27 runtime ExtensionStatus 000.ghcr.io-frezbo-nvidia-container-toolkit-510.60.02-v1.9.0 1 nvidia-container-toolkit 510.60.02-v1.9.0
talosctl read /proc/driver/nvidia/version
which should produce an output similar to below:
NVRM version: NVIDIA UNIX x86_64 Kernel Module 510.60.02 Wed Mar 16 11:24:05 UTC 2022
GCC version: gcc version 11.2.0 (GCC)
Deploying NVIDIA device plugin
First we need to create the RuntimeClass
Apply the following manifest to create a runtime class that uses the extension:
NAME READY STATUS RESTARTS AGE
gpu-operator-test 0/1 Completed 0 13s
kubectl logs gpu-operator-test
which should produce an output similar to below:
[Vector addition of 50000 elements]
Copy input data from the host memory to the CUDA device
CUDA kernel launch with 196 blocks of 256 threads
Copy output data from the CUDA device to the host memory
Test PASSED
Done
2.2.8 - Pull Through Image Cache
How to set up local transparent container images caches.
In this guide we will create a set of local caching Docker registry proxies to minimize local cluster startup time.
When running Talos locally, pulling images from Docker registries might take a significant amount of time.
We spin up local caching pass-through registries to cache images and configure a local Talos cluster to use those proxies.
A similar approach might be used to run Talos in production in air-gapped environments.
It can be also used to verify that all the images are available in local registries.
Video Walkthrough
To see a live demo of this writeup, see the video below:
Requirements
The follow are requirements for creating the set of caching proxies:
Docker 18.03 or greater
Local cluster requirements for either docker or QEMU.
Launch the Caching Docker Registry Proxies
Talos pulls from docker.io, k8s.gcr.io, quay.io, gcr.io, and ghcr.io by default.
If your configuration is different, you might need to modify the commands below:
Note: Proxies are started as docker containers, and they’re automatically configured to start with Docker daemon.
Please note that quay.io proxy doesn’t support recent Docker image schema, so we run older registry image version (2.5).
As a registry container can only handle a single upstream Docker registry, we launch a container per upstream, each on its own
host port (5000, 5001, 5002, 5003 and 5004).
Using Caching Registries with QEMU Local Cluster
With a QEMU local cluster, a bridge interface is created on the host.
As registry containers expose their ports on the host, we can use bridge IP to direct proxy requests.
The Talos local cluster should now start pulling via caching registries.
This can be verified via registry logs, e.g. docker logs -f registry-docker.io.
The first time cluster boots, images are pulled and cached, so next cluster boot should be much faster.
Note: 10.5.0.1 is a bridge IP with default network (10.5.0.0/24), if using custom --cidr, value should be adjusted accordingly.
Using Caching Registries with docker Local Cluster
With a docker local cluster we can use docker bridge IP, default value for that IP is 172.17.0.1.
On Linux, the docker bridge address can be inspected with ip addr show docker0.
Note: Removing docker registry containers also removes the image cache.
So if you plan to use caching registries, keep the containers running.
2.2.9 - Role-based access control (RBAC)
Set up RBAC on the Talos Linux API.
Talos v0.11 introduced initial support for role-based access control (RBAC).
This guide will explain what that is and how to enable it without losing access to the cluster.
RBAC in Talos
Talos uses certificates to authorize users.
The certificate subject’s organization field is used to encode user roles.
There is a set of predefined roles that allow access to different API methods:
os:admin grants access to all methods;
os:reader grants access to “safe” methods (for example, that includes the ability to list files, but does not include the ability to read files content);
Roles in the current talosconfig can be checked with the following command:
$ talosctl config info
[...]Roles: os:admin
[...]
RBAC is enabled by default in new clusters created with talosctl v0.11+ and disabled otherwise.
Enabling RBAC
First, both the Talos cluster and talosctl tool should be upgraded.
Then the talosctl config new command should be used to generate a new client configuration with the os:admin role.
Additional configurations and certificates for different roles can be generated by passing --roles flag:
talosctl config new --roles=os:reader reader
That command will create a new client configuration file reader with a new certificate with os:reader role.
After that, RBAC should be enabled in the machine configuration:
machine:
features:
rbac: true
2.2.10 - System Extensions
Customizing the Talos Linux immutable root file system.
System extensions allow extending the Talos root filesystem, which enables a variety of features, such as including custom
container runtimes, loading additional firmware, etc.
System extensions are only activated during the installation or upgrade of Talos Linux.
With system extensions installed, the Talos root filesystem is still immutable and read-only.
Configuration
System extensions are configured in the .machine.install section:
During the initial install (e.g. when PXE booting or booting from an ISO), Talos will pull down container images for system extensions,
validate them, and include them into the Talos initramfs image.
System extensions will be activated on boot and overlaid on top of the Talos root filesystem.
In order to update the system extensions for a running instance, update .machine.install.extensions and upgrade Talos.
(Note: upgrading to the same version of Talos is fine).
Note: in the next releases of Talos there will be a way to build a Talos image with system extensions included.
Creating System Extensions
A Talos system extension is a container image with the specific folder structure.
System extensions can be built and managed using any tool that produces container images, e.g. docker build.
Use talosctl get extensions to get a list of system extensions:
$ talosctl get extensions
NODE NAMESPACE TYPE ID VERSION NAME VERSION
172.20.0.2 runtime ExtensionStatus 000.ghcr.io-talos-systems-gvisor-54b831d 1 gvisor 20220117.0-v1.0.0
172.20.0.2 runtime ExtensionStatus 001.ghcr.io-talos-systems-intel-ucode-54b831d 1 intel-ucode microcode-20210608-v1.0.0
Use YAML or JSON format to see additional details about the extension:
Using Talos Linux to set up a floating virtual IP address for cluster access.
One of the biggest pain points when building a high-availability controlplane
is giving clients a single IP or URL at which they can reach any of the controlplane nodes.
The most common approaches all require external resources: reverse proxy, load
balancer, BGP, and DNS.
Using a “Virtual” IP address, on the other hand, provides high availability
without external coordination or resources, so long as the controlplane members
share a layer 2 network.
In practical terms, this means that they are all connected via a switch, with no
router in between them.
The term “virtual” is misleading here.
The IP address is real, and it is assigned to an interface.
Instead, what actually happens is that the controlplane machines vie for
control of the shared IP address using etcd elections.
There can be only one owner of the IP address at any given time, but if that
owner disappears or becomes non-responsive, another owner will be chosen,
and it will take up the mantle: the IP address.
Talos has (as of version 0.9) built-in support for this form of shared IP address,
and it can utilize this for both the Kubernetes API server and the Talos endpoint set.
Talos uses etcd for elections and leadership (control) of the IP address.
It is not reccomended to use a virtual IP to access the API of Talos itself, since the
node using the shared IP is not deterministic and could change.
Video Walkthrough
To see a live demo of this writeup, see the video below:
Choose your Shared IP
To begin with, you should choose your shared IP address.
It should generally be a reserved, unused IP address in the same subnet as
your controlplane nodes.
It should not be assigned or assignable by your DHCP server.
For our example, we will assume that the controlplane nodes have the following
IP addresses:
192.168.0.10
192.168.0.11
192.168.0.12
We then choose our shared IP to be:
192.168.0.15
Configure your Talos Machines
The shared IP setting is only valid for controlplane nodes.
For the example above, each of the controlplane nodes should have the following
Machine Config snippet:
Obviously, for your own environment, the interface and the DHCP setting may
differ.
You are free to use static addressing (cidr) instead of DHCP.
Caveats
In general, the shared IP should just work.
However, since it relies on etcd for elections, the shared IP will not be
available until after you have bootstrapped Kubernetes.
In general, this is not a problem, but it does mean that you cannot use the
shared IP when issuing the talosctl bootstrap command.
Instead, that command will need to target one of the controlplane nodes
directly.
2.3.3 - Wireguard Network
A guide on how to set up Wireguard network using Kernel module.
Configuring Wireguard Network
Quick Start
The quickest way to try out Wireguard is to use talosctl cluster create command:
It will automatically generate Wireguard network configuration for each node with the following network topology:
Where all controlplane nodes will be used as Wireguard servers which listen on port 51111.
All controlplanes and workers will connect to all controlplanes.
It also sets PersistentKeepalive to 5 seconds to establish controlplanes to workers connection.
After the cluster is deployed it should be possible to verify Wireguard network connectivity.
It is possible to deploy a container with hostNetwork enabled, then do kubectl exec <container> /bin/bash and either do:
ping 10.1.0.2
Or install wireguard-tools package and run:
wg show
Wireguard show should output something like this:
interface: wg0
public key: OMhgEvNIaEN7zeCLijRh4c+0Hwh3erjknzdyvVlrkGM= private key: (hidden) listening port: 47946peer: 1EsxUygZo8/URWs18tqB5FW2cLVlaTA+lUisKIf8nh4= endpoint: 10.5.0.2:51111
allowed ips: 10.1.0.0/24
latest handshake: 1 minute, 55 seconds ago
transfer: 3.17 KiB received, 3.55 KiB sent
persistent keepalive: every 5 seconds
It is also possible to use generated configuration as a reference by pulling generated config files using:
All Wireguard configuration can be done by changing Talos machine config files.
As an example we will use this official Wireguard quick start tutorial.
Key Generation
This part is exactly the same:
wg genkey | tee privatekey | wg pubkey > publickey
Setting up Device
Inline comments show relations between configs and wg quickstart tutorial commands:
...
network:
interfaces:
...
# ip link add dev wg0 type wireguard - interface: wg0
mtu: 1500# ip address add dev wg0 192.168.2.1/24addresses:
- 192.168.2.1/24
# wg set wg0 listen-port 51820 private-key /path/to/private-key peer ABCDEF... allowed-ips 192.168.88.0/24 endpoint 209.202.254.14:8172wireguard:
privateKey: <privatekey file contents>
listenPort: 51820peers:
allowedIPs:
- 192.168.88.0/24
endpoint: 209.202.254.14.8172publicKey: ABCDEF...
...
When networkd gets this configuration it will create the device, configure it and will bring it up (equivalent to ip link set up dev wg0).
Steps on how to reset a Talos Linux machine to a clean state.
From time to time, it may be beneficial to reset a Talos machine to its “original” state.
Bear in mind that this is a destructive action for the given machine.
Doing this means removing the machine from Kubernetes, Etcd (if applicable), and clears any data on the machine that would normally persist a reboot.
CLI
WARNING: Running a talosctl reset on cloud VM’s might result in the VM being unable to boot as this wipes the entire disk.
It might be more useful to just wipe the STATE and EPHEMERAL partitions on a cloud VM if not booting via iPXE.
talosctl reset --system-labels-to-wipe STATE --system-labels-to-wipe EPHEMERAL
The API command for doing this is talosctl reset.
There are a couple of flags as part of this command:
Flags:
--graceful if true, attempt to cordon/drain node and leave etcd (if applicable)(default true) --reboot if true, reboot the node after resetting instead of shutting down
--system-labels-to-wipe strings if set, just wipe selected system disk partitions by label but keep other partitions intact keep other partitions intact
The graceful flag is especially important when considering HA vs. non-HA Talos clusters.
If the machine is part of an HA cluster, a normal, graceful reset should work just fine right out of the box as long as the cluster is in a good state.
However, if this is a single node cluster being used for testing purposes, a graceful reset is not an option since Etcd cannot be “left” if there is only a single member.
In this case, reset should be used with --graceful=false to skip performing checks that would normally block the reset.
Kernel Parameter
Another way to reset a machine is to specify talos.experimental.wipe=system kernel parameter.
If the machine got stuck in the boot loop and you access to the console you can use GRUB to specify this kernel argument.
Then when Talos boots for the next time it will reset system disk and reboot.
Next steps can be to install Talos either using PXE boot or by mounting an ISO.
2.5 - Upgrading Talos Linux
Guide on upgrading a Talos Linux machine.
OS upgrades, like other operations on Talos Linux, are effected by an API call, which can be sent via the talosctl CLI utility.
Because Talos Linux is image based, an upgrade is almost the same as installing Talos, with the difference that the system has already been initialized with a configuration.
The upgrade API call passes a node the installer image to use to perform the upgrade.
Each Talos version has a corresponding installer.
Upgrades use an A-B image scheme in order to facilitate rollbacks.
This scheme retains the previous Talos kernel and OS image following each upgrade.
If an upgrade fails to boot, Talos will roll back to the previous version.
Likewise, Talos may be manually rolled back via API (or talosctl rollback).
This will simply update the boot reference and reboot.
Unless explicitly told to preserve data, an upgrade will cause the node to wipe the EPHEMERAL partition, remove itself from the etcd cluster (if it is a control node), and generally make itself as pristine as is possible.
(This is generally the desired behavior, except in specialised use cases such as single-node clusters.)
Note that the default since Talos version 1.0 is to specify the Kubernetes version in the machine config.
This means an upgrade of the Talos Linux OS will not apply an upgrade of the Kubernetes version by default.
Kubernetes upgrades should be managed separately per upgrading kubernetes.
Each release of Talos Linux includes the latest stable Kubernetes version by default.
Video Walkthrough
To see a live demo of an upgrade of Talos Linux, see the video below:
After Upgrade to v1.0.6
There are no specific actions to be taken after an upgrade.
talosctl upgrade
To upgrade a Talos node, specify the node’s IP address and the
installer container image for the version of Talos to upgrade to.
For instance, if your Talos node has the IP address 10.20.30.40 and you want
to install the official version v1.0.0, you would enter a command such
as:
There is an option to this command: --preserve, which will explicitly tell Talos to keep ephemeral data intact.
In most cases, it is correct to let Talos perform its default action of erasing the ephemeral data.
However, if you are running a single-node control-plane, you will want to make sure that --preserve=true.
Rarely, a upgrade command will fail to run due to a process holding a file open on disk, or you may wish to set a node to upgrade, but delay the actual reboot as long as possible.
In these cases, you can use the --stage flag.
This puts the upgrade artifacts on disk, and adds some metadata to a disk partition that gets checked very early in the boot process.
The node is not rebooted by the upgrade --stage process.
However, whenever the system does next reboot, Talos sees that it needs to apply an upgrade, and will do so immediately.
Because this occurs in a just rebooted system, there will be no conflict with any files being held open.
After the upgrade is applied, the node will reboot again, in order to boot into the new version.
Note that because Talos Linux now reboots via the kexec syscall, the extra reboot adds very little time.
Machine Configuration Changes
There are new machine configuration features which can be used after an upgrade:
.machine.sysfs to set sysfs (/sys) kernel parameters
.machine.kernel to load the kernel modules (Talos doesn’t ship with kernel modules, only for custom builds)
.machine.kubelet.extraConfig to override kubelet configuration
.machine.install.extensions to specify system extensions to be installed
.cluster.apiServer.env, .cluster.controllerManager.env and cluster.scheduler.env to set the environment variables for the control plane components
.cluster.apiServer.admissionControl to specify admission plugin configuration
Upgrade Sequence
When a Talos node receives the upgrade command, it cordons
itself in Kubernetes, to avoid receiving any new workload.
It then starts to drain its existing workload.
NOTE: If any of your workloads are sensitive to being shut down ungracefully, be sure to use the lifecycle.preStop Pod spec.
Once all of the workload Pods are drained, Talos will start shutting down its
internal processes.
If it is a control node, this will include etcd.
If preserve is not enabled, Talos will leave etcd membership.
(Talos ensures the etcd cluster is healthy and will remain healthy after our node leaves the etcd cluster, before allowing a control plane node to be upgraded.)
Once all the processes are stopped and the services are shut down, the filesystems will be unmounted.
This allows Talos to produce a very clean upgrade, as close as possible to a pristine system.
We verify the disk and then perform the actual image upgrade.
We set the bootloader to boot once with the new kernel and OS image, then we reboot.
After the node comes back up and Talos verifies itself, it will make
the bootloader change permanent, rejoin the cluster, and finally uncordon itself to receive new workloads.
FAQs
Q. What happens if an upgrade fails?
A. Talos Linux attempts to safely handle upgrade failures.
The most common failure is an invalid installer image reference.
In this case, Talos will fail to download the upgraded image and will abort the upgrade.
Sometimes, Talos is unable to successfully kill off all of the disk access points, in which case it cannot safely unmount all filesystems to effect the upgrade.
In this case, it will abort the upgrade and reboot.
(upgrade --stage can ensure that upgrades can occur even when the filesytems cannot be unmounted.)
It is possible (especially with test builds) that the upgraded Talos system will fail to start.
In this case, the node will be rebooted, and the bootloader will automatically use the previous Talos kernel and image, thus effectively rolling back the upgrade.
Lastly, it is possible that Talos itself will upgrade successfully, start up, and rejoin the cluster but your workload will fail to run on it, for whatever reason.
This is when you would use the talosctl rollback command to revert back to the previous Talos version.
Q. Can upgrades be scheduled?
A. Because the upgrade sequence is API-driven, you can easily tie it in to your own business logic to schedule and coordinate your upgrades.
Q. Can the upgrade process be observed?
A. Yes, using the talosctl dmesg -f command.
Q. Are worker node upgrades handled differently from control plane node upgrades?
A. Short answer: no.
Long answer: Both node types follow the same set procedure.
From the user’s standpoint, however, the processes are identical.
However, since control plane nodes run additional services, such as etcd, there are some extra steps and checks performed on them.
For instance, Talos will refuse to upgrade a control plane node if that upgrade would cause a loss of quorum for etcd.
If multiple control plane nodes are asked to upgrade at the same time, Talos will protect the Kubernetes cluster by ensuring only one control plane node actively upgrades at any time, via checking etcd quorum.
If running a single-node cluster, and you want to force an upgrade despite the loss of quorum, you can set preserve to true.
Q. Can I break my cluster by upgrading everything at once?
A. Maybe - it’s not recommended.
Nothing prevents the user from sending near-simultaneous upgrades to each node of the cluster - and while Talos Linux and Kubernetes can generally deal with this situation, other components of the cluster may not be able to recover from more than one node rebooting at a time.
(e.g. any software that maintains a quorum or state across nodes, such as Rook/Ceph)
3 - Kubernetes Guides
Management of a Kubernetes Cluster hosted by Talos Linux
3.1 - Configuration
How to configure components of the Kubernetes cluster itself.
3.1.1 - Ceph Storage cluster with Rook
Guide on how to create a simple Ceph storage cluster with Rook for Kubernetes
Preparation
Talos Linux reserves an entire disk for the OS installation, so machines with multiple available disks are needed for a reliable Ceph cluster with Rook and Talos Linux.
Rook requires that the block devices or partitions used by Ceph have no partitions or formatted filesystems before use.
Rook also requires a minimum Kubernetes version of v1.16 and Helm v3.0 for installation of charts.
It is highly recommended that the Rook Ceph overview is read and understood before deploying a Ceph cluster with Rook.
Installation
Creating a Ceph cluster with Rook requires two steps; first the Rook Operator needs to be installed which can be done with a Helm Chart.
The example below installs the Rook Operator into the rook-ceph namespace, which is the default for a Ceph cluster with Rook.
$ helm repo add rook-release https://charts.rook.io/release
"rook-release" has been added to your repositories
$ helm install --create-namespace --namespace rook-ceph rook-ceph rook-release/rook-ceph
W0327 17:52:44.277830 54987 warnings.go:70] policy/v1beta1 PodSecurityPolicy is deprecated in v1.21+, unavailable in v1.25+
W0327 17:52:44.612243 54987 warnings.go:70] policy/v1beta1 PodSecurityPolicy is deprecated in v1.21+, unavailable in v1.25+
NAME: rook-ceph
LAST DEPLOYED: Sun Mar 27 17:52:42 2022NAMESPACE: rook-ceph
STATUS: deployed
REVISION: 1TEST SUITE: None
NOTES:
The Rook Operator has been installed. Check its status by running:
kubectl --namespace rook-ceph get pods -l "app=rook-ceph-operator"Visit https://rook.io/docs/rook/latest for instructions on how to create and configure Rook clusters
Important Notes:
- You must customize the 'CephCluster' resource in the sample manifests for your cluster.
- Each CephCluster must be deployed to its own namespace, the samples use `rook-ceph`for the namespace.
- The sample manifests assume you also installed the rook-ceph operator in the `rook-ceph` namespace.
- The helm chart includes all the RBAC required to create a CephCluster CRD in the same namespace.
- Any disk devices you add to the cluster in the 'CephCluster' must be empty (no filesystem and no partitions).
Once that is complete, the Ceph cluster can be installed with the official Helm Chart.
The Chart can be installed with default values, which will attempt to use all nodes in the Kubernetes cluster, and all unused disks on each node for Ceph storage, and make available block storage, object storage, as well as a shared filesystem.
Generally more specific node/device/cluster configuration is used, and the Rook documentation explains all the available options in detail.
For this example the defaults will be adequate.
$ helm install --create-namespace --namespace rook-ceph rook-ceph-cluster --set operatorNamespace=rook-ceph rook-release/rook-ceph-cluster
NAME: rook-ceph-cluster
LAST DEPLOYED: Sun Mar 27 18:12:46 2022NAMESPACE: rook-ceph
STATUS: deployed
REVISION: 1TEST SUITE: None
NOTES:
The Ceph Cluster has been installed. Check its status by running:
kubectl --namespace rook-ceph get cephcluster
Visit https://rook.github.io/docs/rook/latest/ceph-cluster-crd.html for more information about the Ceph CRD.
Important Notes:
- You can only deploy a single cluster per namespace
- If you wish to delete this cluster and start fresh, you will also have to wipe the OSD disks using `sfdisk`
Now the Ceph cluster configuration has been created, the Rook operator needs time to install the Ceph cluster and bring all the components online.
The progression of the Ceph cluster state can be followed with the following command.
$ watch kubectl --namespace rook-ceph get cephcluster rook-ceph
Every 2.0s: kubectl --namespace rook-ceph get cephcluster rook-ceph
NAME DATADIRHOSTPATH MONCOUNT AGE PHASE MESSAGE HEALTH EXTERNAL
rook-ceph /var/lib/rook 3 57s Progressing Configuring Ceph Mons
Depending on the size of the Ceph cluster and the availability of resources the Ceph cluster should become available, and with it the storage classes that can be used with Kubernetes Physical Volumes.
$ kubectl --namespace rook-ceph get cephcluster rook-ceph
NAME DATADIRHOSTPATH MONCOUNT AGE PHASE MESSAGE HEALTH EXTERNAL
rook-ceph /var/lib/rook 3 40m Ready Cluster created successfully HEALTH_OK
$ kubectl get storageclass
NAME PROVISIONER RECLAIMPOLICY VOLUMEBINDINGMODE ALLOWVOLUMEEXPANSION AGE
ceph-block (default) rook-ceph.rbd.csi.ceph.com Delete Immediate true 77m
ceph-bucket rook-ceph.ceph.rook.io/bucket Delete Immediate false 77m
ceph-filesystem rook-ceph.cephfs.csi.ceph.com Delete Immediate true 77m
Talos Linux Considerations
It is important to note that a Rook Ceph cluster saves cluster information directly onto the node (by default dataDirHostPath is set to /var/lib/rook).
If running only a single mon instance, cluster management is little bit more involved, as any time a Talos Linux node is reconfigured or upgraded, the partition that stores the /varfile system is wiped, but the --preserve option of talosctl upgrade will ensure that doesn’t happen.
By default, Rook configues Ceph to have 3 mon instances, in which case the data stored in dataDirHostPath can be regenerated from the other mon instances.
So when performing maintenance on a Talos Linux node with a Rook Ceph cluster (e.g. upgrading the Talos Linux version), it is imperative that care be taken to maintain the health of the Ceph cluster.
Before upgrading, you should always check the health status of the Ceph cluster to ensure that it is healthy.
$ kubectl --namespace rook-ceph get cephclusters.ceph.rook.io rook-ceph
NAME DATADIRHOSTPATH MONCOUNT AGE PHASE MESSAGE HEALTH EXTERNAL
rook-ceph /var/lib/rook 3 98m Ready Cluster created successfully HEALTH_OK
If it is, you can begin the upgrade process for the Talos Linux node, during which time the Ceph cluster will become unhealthy as the node is reconfigured.
Before performing any other action on the Talos Linux nodes, the Ceph cluster must return to a healthy status.
$ talosctl upgrade --nodes 172.20.15.5 --image ghcr.io/talos-systems/installer:v0.14.3
NODE ACK STARTED
172.20.15.5 Upgrade request received 2022-03-27 20:29:55.292432887 +0200 CEST m=+10.050399758
$ kubectl --namespace rook-ceph get cephclusters.ceph.rook.io
NAME DATADIRHOSTPATH MONCOUNT AGE PHASE MESSAGE HEALTH EXTERNAL
rook-ceph /var/lib/rook 3 99m Progressing Configuring Ceph Mgr(s) HEALTH_WARN
$ kubectl --namespace rook-ceph wait --timeout=1800s --for=jsonpath='{.status.ceph.health}=HEALTH_OK' rook-ceph
cephcluster.ceph.rook.io/rook-ceph condition met
The above steps need to be performed for each Talos Linux node undergoing maintenance, one at a time.
Cleaning Up
Rook Ceph Cluster Removal
Removing a Rook Ceph cluster requires a few steps, starting with signalling to Rook that the Ceph cluster is really being destroyed.
Then all Persistent Volumes (and Claims) backed by the Ceph cluster must be deleted, followed by the Storage Classes and the Ceph storage types.
If the Rook Operator is cleanly removed following the above process, the node metadata and disks should be clean and ready to be re-used.
In the case of an unclean cluster removal, there may be still a few instances of metadata stored on the system disk, as well as the partition information on the storage disks.
First the node metadata needs to be removed, make sure to update the nodeName with the actual name of a storage node that needs cleaning, and path with the Rook configuration dataDirHostPath set when installing the chart.
The following will need to be repeated for each node used in the Rook Ceph cluster.
$ cat <<EOF | kubectl apply -f -
apiVersion: v1
kind: Pod
metadata:
name: disk-clean
spec:
restartPolicy: Never
nodeName: <storage-node-name>
volumes:
- name: rook-data-dir
hostPath:
path: <dataDirHostPath>
containers:
- name: disk-clean
image: busybox
securityContext:
privileged: true
volumeMounts:
- name: rook-data-dir
mountPath: /node/rook-data
command: ["/bin/sh", "-c", "rm -rf /node/rook-data/*"]
EOFpod/disk-clean created
$ kubectl wait --timeout=900s --for=jsonpath='{.status.phase}=Succeeded' pod disk-clean
pod/disk-clean condition met
$ kubectl delete pod disk-clean
pod "disk-clean" deleted
Lastly, the disks themselves need the partition and filesystem data wiped before they can be reused.
Again, the following as to be repeated for each node and disk used in the Rook Ceph cluster, updating nodeName and of= in the command as needed.
$ cat <<EOF | kubectl apply -f -
apiVersion: v1
kind: Pod
metadata:
name: disk-wipe
spec:
restartPolicy: Never
nodeName: <storage-node-name>
containers:
- name: disk-wipe
image: busybox
securityContext:
privileged: true
command: ["/bin/sh", "-c", "dd if=/dev/zero bs=1M count=100 oflag=direct of=<device>"]
EOFpod/disk-wipe created
$ kubectl wait --timeout=900s --for=jsonpath='{.status.phase}=Succeeded' pod disk-wipe
pod/disk-wipe condition met
$ kubectl delete pod disk-clean
pod "disk-wipe" deleted
3.1.2 - Cluster Endpoint
How to explicitly set up an endpoint for the cluster API
In this section, we will step through the configuration of a Talos based Kubernetes cluster.
There are three major components we will configure:
apid and talosctl
the master nodes
the worker nodes
Talos enforces a high level of security by using mutual TLS for authentication and authorization.
We recommend that the configuration of Talos be performed by a cluster owner.
A cluster owner should be a person of authority within an organization, perhaps a director, manager, or senior member of a team.
They are responsible for storing the root CA, and distributing the PKI for authorized cluster administrators.
Recommended settings
Talos runs great out of the box, but if you tweak some minor settings it will make your life
a lot easier in the future.
This is not a requirement, but rather a document to explain some key settings.
Endpoint
To configure the talosctl endpoint, it is recommended you use a resolvable DNS name.
This way, if you decide to upgrade to a multi-controlplane cluster you only have to add the ip address to the hostname configuration.
The configuration can either be done on a Loadbalancer, or simply trough DNS.
For example:
This is in the config file for the cluster e.g. controlplane.yaml and worker.yaml.
for more details, please see: v1alpha1 endpoint configuration
If you have a DNS name as the endpoint, you can upgrade your talos cluster with multiple controlplanes in the future (if you don’t have a multi-controlplane setup from the start)
Using a DNS name generates the corresponding Certificates (Kubernetes and Talos) for the correct hostname.
3.1.3 - Deploying Metrics Server
In this guide you will learn how to set up metrics-server.
Metrics Server enables use of the Horizontal Pod Autoscaler and Vertical Pod Autoscaler.
It does this by gathering metrics data from the kubelets in a cluster.
By default, the certificates in use by the kubelets will not be recognized by metrics-server.
This can be solved by either configuring metrics-server to do no validation of the TLS certificates, or by modifying the kubelet configuration to rotate its certificates and use ones that will be recognized by metrics-server.
Node Configuration
To enable kubelet certificate rotation, all nodes should have the following Machine Config snippet:
We will want to ensure that new certificates for the kubelets are approved automatically.
This can easily be done with the Kubelet Serving Certificate Approver, which will automatically approve the Certificate Signing Requests generated by the kubelets.
We can have Kubelet Serving Certificate Approver and metrics-server installed on the cluster automatically during bootstrap by adding the following snippet to the Cluster Config of the node that will be handling the bootstrap process:
If you choose not to use extraManifests to install Kubelet Serving Certificate Approver and metrics-server during bootstrap, you can install them once the cluster is online using kubectl:
To see a live demo of Cluster Discovery, see the video below:
Registries
Peers are aggregated from a number of optional registries.
By default, Talos will use the kubernetes and service registries.
Either one can be disabled.
To disable a registry, set disabled to true (this option is the same for all registries):
For example, to disable the service registry:
Service registry uses external Discovery Service to exchange encrypted information about cluster members.
Resource Definitions
Talos provides seven resources that can be used to introspect the new discovery and KubeSpan features.
Discovery
Identities
The node’s unique identity (base62 encoded random 32 bytes) can be obtained with:
Note: Using base62 allows the ID to be URL encoded without having to use the ambiguous URL-encoding version of base64.
$ talosctl get identities -o yaml
...
spec:
nodeId: Utoh3O0ZneV0kT2IUBrh7TgdouRcUW2yzaaMl4VXnCd
Node identity is used as the unique Affiliate identifier.
Node identity resource is preserved in the STATE partition in node-identity.yaml file.
Node identity is preserved across reboots and upgrades, but it is regenerated if the node is reset (wiped).
Affiliates
An affiliate is a proposed member attributed to the fact that the node has the same cluster ID and secret.
$ talosctl get affiliates
ID VERSION HOSTNAME MACHINE TYPE ADDRESSES
2VfX3nu67ZtZPl57IdJrU87BMjVWkSBJiL9ulP9TCnF 2 talos-default-master-2 controlplane ["172.20.0.3","fd83:b1f7:fcb5:2802:986b:7eff:fec5:889d"]6EVq8RHIne03LeZiJ60WsJcoQOtttw1ejvTS6SOBzhUA 2 talos-default-worker-1 worker ["172.20.0.5","fd83:b1f7:fcb5:2802:cc80:3dff:fece:d89d"]NVtfu1bT1QjhNq5xJFUZl8f8I8LOCnnpGrZfPpdN9WlB 2 talos-default-worker-2 worker ["172.20.0.6","fd83:b1f7:fcb5:2802:2805:fbff:fe80:5ed2"]Utoh3O0ZneV0kT2IUBrh7TgdouRcUW2yzaaMl4VXnCd 4 talos-default-master-1 controlplane ["172.20.0.2","fd83:b1f7:fcb5:2802:8c13:71ff:feaf:7c94"]b3DebkPaCRLTLLWaeRF1ejGaR0lK3m79jRJcPn0mfA6C 2 talos-default-master-3 controlplane ["172.20.0.4","fd83:b1f7:fcb5:2802:248f:1fff:fe5c:c3f"]
One of the Affiliates with the ID matching node identity is populated from the node data, other Affiliates are pulled from the registries.
Enabled discovery registries run in parallel and discovered data is merged to build the list presented above.
Details about data coming from each registry can be queried from the cluster-raw namespace:
Each Affiliate ID is prefixed with k8s/ for data coming from the Kubernetes registry and with service/ for data coming from the discovery service.
Members
A member is an affiliate that has been approved to join the cluster.
The members of the cluster can be obtained with:
$ talosctl get members
ID VERSION HOSTNAME MACHINE TYPE OS ADDRESSES
talos-default-master-1 2 talos-default-master-1 controlplane Talos (v1.0.6)["172.20.0.2","fd83:b1f7:fcb5:2802:8c13:71ff:feaf:7c94"]talos-default-master-2 1 talos-default-master-2 controlplane Talos (v1.0.6)["172.20.0.3","fd83:b1f7:fcb5:2802:986b:7eff:fec5:889d"]talos-default-master-3 1 talos-default-master-3 controlplane Talos (v1.0.6)["172.20.0.4","fd83:b1f7:fcb5:2802:248f:1fff:fe5c:c3f"]talos-default-worker-1 1 talos-default-worker-1 worker Talos (v1.0.6)["172.20.0.5","fd83:b1f7:fcb5:2802:cc80:3dff:fece:d89d"]talos-default-worker-2 1 talos-default-worker-2 worker Talos (v1.0.6)["172.20.0.6","fd83:b1f7:fcb5:2802:2805:fbff:fe80:5ed2"]
3.1.5 - Pod Security
Enabling Pod Security Admission plugin to configure Pod Security Standards.
Kubernetes deprecated Pod Security Policy as of v1.21, and it is
going to be removed in v1.25.
Pod Security Policy was replaced with Pod Security Admission.
Pod Security Admission is alpha in v1.22 (requires a feature gate) and beta in v1.23 (enabled by default).
In this guide we are going to enable and configure Pod Security Admission in Talos.
Configuration
Prepare the following machine configuration patch and store it in the pod-security-patch.yaml:
Create a deployment that satisfies the baseline policy but gives warnings on restricted policy:
$ kubectl create deployment nginx --image=nginx
Warning: would violate PodSecurity "restricted:latest": allowPrivilegeEscalation !=false(container "nginx" must set securityContext.allowPrivilegeEscalation=false), unrestricted capabilities (container "nginx" must set securityContext.capabilities.drop=["ALL"]), runAsNonRoot !=true(pod or container "nginx" must set securityContext.runAsNonRoot=true), seccompProfile (pod or container "nginx" must set securityContext.seccompProfile.type to "RuntimeDefault" or "Localhost")deployment.apps/nginx created
$ kubectl get pods
NAME READY STATUS RESTARTS AGE
nginx-85b98978db-j68l8 1/1 Running 0 2m3s
Create a daemonset which fails to meet requirements of the baseline policy:
$ kubectl apply -f debug.yaml
Warning: would violate PodSecurity "restricted:latest": host namespaces (hostNetwork=true, hostPID=true, hostIPC=true), privileged (container "debug-container" must not set securityContext.privileged=true), allowPrivilegeEscalation !=false(container "debug-container" must set securityContext.allowPrivilegeEscalation=false), unrestricted capabilities (container "debug-container" must set securityContext.capabilities.drop=["ALL"]), runAsNonRoot !=true(pod or container "debug-container" must set securityContext.runAsNonRoot=true), seccompProfile (pod or container "debug-container" must set securityContext.seccompProfile.type to "RuntimeDefault" or "Localhost")daemonset.apps/debug-container created
Daemonset debug-container gets created, but no pods are scheduled:
$ kubectl get ds
NAME DESIRED CURRENT READY UP-TO-DATE AVAILABLE NODE SELECTOR AGE
debug-container 00000 <none> 34s
Pod Security Admission plugin errors are in the daemonset events:
$ kubectl describe ds debug-container
...
Warning FailedCreate 92s daemonset-controller Error creating: pods "debug-container-kwzdj" is forbidden: violates PodSecurity "baseline:latest": host namespaces (hostNetwork=true, hostPID=true, hostIPC=true), privileged (container "debug-container" must not set securityContext.privileged=true)
Pod Security Admission configuration can also be overridden on a namespace level:
$ kubectl label ns default pod-security.kubernetes.io/enforce=privileged
namespace/default labeled
$ kubectl get ds
NAME DESIRED CURRENT READY UP-TO-DATE AVAILABLE NODE SELECTOR AGE
debug-container 22020 <none> 4s
As enforce policy was updated to the privileged for the default namespace, debug-container is now successfully running.
3.1.6 - Storage
Setting up storage for a Kubernetes cluster
In Kubernetes, using storage in the right way is well-facilitated by the API. However, unless you are running in a major public cloud, that API may not be hooked up to anything.
This frequently sends users down a rabbit hole of researching all the various options for storage backends for their platform, for Kubernetes, and for their workloads.
There are a lot of options out there, and it can be fairly bewildering.
For Talos, we try to limit the options somewhat to make the decision-making easier.
Public Cloud
If you are running on a major public cloud, use their block storage.
It is easy and automatic.
Storage Clusters
Sidero Labs recommends having separate disks (apart from the Talos install disk) to be used for storage.
Redundancy, scaling capabilities, reliability, speed, maintenance load, and ease of use are all factors you must consider when managing your own storage.
Running a storage cluster can be a very good choice when managing your own storage, and there are two projects we recommend, depending on your situation.
If you need vast amounts of storage composed of more than a dozen or so disks, we recommend you use Rook to manage Ceph.
Also, if you need both mount-once and mount-many capabilities, Ceph is your answer.
Ceph also bundles in an S3-compatible object store.
The down side of Ceph is that there are a lot of moving parts.
Please note that most people should never use mount-many semantics.
NFS is pervasive because it is old and easy, not because it is a good idea.
While it may seem like a convenience at first, there are all manner of locking, performance, change control, and reliability concerns inherent in any mount-many situation, so we strongly recommend you avoid this method.
If your storage needs are small enough to not need Ceph, use Mayastor.
Rook/Ceph
Ceph is the grandfather of open source storage clusters.
It is big, has a lot of pieces, and will do just about anything.
It scales better than almost any other system out there, open source or proprietary, being able to easily add and remove storage over time with no downtime, safely and easily.
It comes bundled with RadosGW, an S3-compatible object store; CephFS, a NFS-like clustered filesystem; and RBD, a block storage system.
With the help of Rook, the vast majority of the complexity of Ceph is hidden away by a very robust operator, allowing you to control almost everything about your Ceph cluster from fairly simple Kubernetes CRDs.
So if Ceph is so great, why not use it for everything?
Ceph can be rather slow for small clusters.
It relies heavily on CPUs and massive parallelisation to provide good cluster performance, so if you don’t have much of those dedicated to Ceph, it is not going to be well-optimised for you.
Also, if your cluster is small, just running Ceph may eat up a significant amount of the resources you have available.
Troubleshooting Ceph can be difficult if you do not understand its architecture.
There are lots of acronyms and the documentation assumes a fair level of knowledge.
There are very good tools for inspection and debugging, but this is still frequently seen as a concern.
Mayastor
Mayastor is an OpenEBS project built in Rust utilising the modern NVMEoF system.
(Despite the name, Mayastor does not require you to have NVME drives.)
It is fast and lean but still cluster-oriented and cloud native.
Unlike most of the other OpenEBS project, it is not built on the ancient iSCSI system.
Unlike Ceph, Mayastor is just a block store.
It focuses on block storage and does it well.
It is much less complicated to set up than Ceph, but you probably wouldn’t want to use it for more than a few dozen disks.
Mayastor is new, maybe too new.
If you’re looking for something well-tested and battle-hardened, this is not it.
However, if you’re looking for something lean, future-oriented, and simpler than Ceph, it might be a great choice.
Video Walkthrough
To see a live demo of this section, see the video below:
Prep Nodes
Either during initial cluster creation or on running worker nodes, several machine config values should be edited.
(This information is gathered from the Mayastor documentation.)
We need to set the vm.nr_hugepages sysctl and add openebs.io/engine=mayastor labels to the nodes which are meant to be storage nodes.
This can be done with talosctl patch machineconfig or via config patches during talosctl gen config.
Note: If you are adding/updating the vm.nr_hugepages on a node which already had the openebs.io/engine=mayastor label set, you’d need to restart kubelet so that it picks up the new value, by issuing the following command
talosctl -n <node ip> service kubelet restart
Deploy Mayastor
Continue setting up Mayastor using the official documentation.
NFS
NFS is an old pack animal long past its prime.
NFS is slow, has all kinds of bottlenecks involving contention, distributed locking, single points of service, and more.
However, it is supported by a wide variety of systems.
You don’t want to use it unless you have to, but unfortunately, that “have to” is too frequent.
The NFS client is part of the kubelet image maintained by the Talos team.
This means that the version installed in your running kubelet is the version of NFS supported by Talos.
You can reduce some of the contention problems by parceling Persistent Volumes from separate underlying directories.
Object storage
Ceph comes with an S3-compatible object store, but there are other options, as
well.
These can often be built on top of other storage backends.
For instance, you may have your block storage running with Mayastor but assign a
Pod a large Persistent Volume to serve your object store.
One of the most popular open source add-on object stores is MinIO.
Others (iSCSI)
The most common remaining systems involve iSCSI in one form or another.
These include the original OpenEBS, Rancher’s Longhorn, and many proprietary systems.
Unfortunately, Talos does not support iSCSI-based systems.
iSCSI in Linux is facilitated by open-iscsi.
This system was designed long before containers caught on, and it is not well
suited to the task, especially when coupled with a read-only host operating
system.
One day, we hope to work out a solution for facilitating iSCSI-based systems, but this is not yet available.
3.2 - Network
Managing the Kubernetes cluster networking
3.2.1 - Deploying Cilium CNI
In this guide you will learn how to set up Cilium CNI on Talos.
From v1.9 onwards Cilium does no longer provide a one-liner install manifest that can be used to install Cilium on a node via kubectl apply -f or passing it in as an extra url in the urls part in the Talos machine configuration.
Installing Cilium the new way via the cilium cli is broken, so we’ll be using helm to install Cilium.
For more information: Install with CLI fails, works with Helm
This documentation will outline installing Cilium CNI v1.11.2 on Talos in four different ways.
Adhering to Talos principles we’ll deploy Cilium with IPAM mode set to Kubernetes.
Each method can either install Cilium using kube proxy (default) or without: Kubernetes Without kube-proxy
Machine config preparation
When generating the machine config for a node set the CNI to none.
For example using a config patch:
After applying the machine config and bootstrapping Talos will appear to hang on phase 18/19 with the message: retrying error: node not ready.
This happens because nodes in Kubernetes are only marked as ready once the CNI is up.
As there is no CNI defined, the boot process is pending and will reboot the node to retry after 10 minutes, this is expected behavior.
During this window you can install Cilium manually by running the following:
After generating cilium.yaml using helm template, instead of applying this manifest directly during the Talos boot window (before the reboot timeout).
You can also host this file somewhere and patch the machine config to apply this manifest automatically during bootstrap.
To do this patch your machine configuration to include this config instead of the above:
name: custom # Name of CNI to use.# URLs containing manifests to apply for the CNI.urls:
- https://server.yourdomain.tld/some/path/cilium.yaml
However, beware of the fact that the helm generated Cilium manifest contains sensitive key material.
As such you should definitely not host this somewhere publicly accessible.
Method 4: Helm manifests inline install
A more secure option would be to include the helm template output manifest inside the machine configuration.
The machine config should be generated with CNI set to none
This will install the Cilium manifests at just the right time during bootstrap.
Beware though:
Changing the namespace when templating with Helm does not generate a manifest containing the yaml to create that namespace.
As the inline manifest is processed from top to bottom make sure to manually put the namespace yaml at the start of the inline manifest.
Only add the Cilium inline manifest to the control plane nodes machine configuration.
Make sure all control plane nodes have an identical configuration.
If you delete any of the generated resources they will be restored whenever a control plane node reboots.
As a safety measure, Talos only creates missing resources from inline manifests, it never deletes or updates anything.
If you need to update a manifest make sure to first edit all control plane machine configurations and then run talosctl upgrade-k8s as it will take care of updating inline manifests.
Known issues
Currently there is an interaction between a Kubespan enabled Talos cluster and Cilium that results in the cluster going down during bootstrap after applying the Cilium manifests.
For more details: Kubespan and Cilium compatiblity: etcd is failing
Some kernel values changed by kube-proxy are not set to good defaults when running the cilium kernel-proxy alternative.
For more details: Kernel default values (sysctl)
Other things to know
Talos has full kernel module support for eBPF, See:
This allows you to set --set enableXTSocketFallback=false on the helm install/template command preventing Cilium from disabling the ip_early_demux kernel feature.
This will win back some performance.
3.2.2 - KubeSpan
Learn to use KubeSpan to connect Talos Linux machines securely across networks.
KubeSpan is a feature of Talos that automates the setup and maintenance of a full mesh WireGuard network for your cluster, giving you the ability to operate hybrid Kubernetes clusters that can span the edge, datacenter, and cloud.
Management of keys and discovery of peers can be completely automated for a zero-touch experience that makes it simple and easy to create hybrid clusters.
KubeSpan consists of client code in Talos Linux, as well as a discovery service that enables clients to securely find each other.
Sidero Labs operates a free Discovery Service, but the discovery service may be operated by your organization and can be downloaded here.
Video Walkthrough
To learn more about KubeSpan, see the video below:
To see a live demo of KubeSpan, see one the videos below:
Enabling
Creating a New Cluster
To generate configuration files for a new cluster, we can use the --with-kubespan flag in talosctl gen config.
This will enable peer discovery and KubeSpan.
...
# Provides machine specific network configuration options.network:
# Configures KubeSpan feature.kubespan:
enabled: true# Enable the KubeSpan feature....
# Configures cluster member discovery.discovery:
enabled: true# Enable the cluster membership discovery feature.# Configure registries used for cluster member discovery.registries:
# Kubernetes registry uses Kubernetes API server to discover cluster members and stores additional informationkubernetes: {}
# Service registry is using an external service to push and pull information about cluster members.service: {}
...
# Provides cluster specific configuration options.cluster:
id: yui150Ogam0pdQoNZS2lZR-ihi8EWxNM17bZPktJKKE= # Globally unique identifier for this cluster.secret: dAmFcyNmDXusqnTSkPJrsgLJ38W8oEEXGZKM0x6Orpc= # Shared secret of cluster.
The default discovery service is an external service hosted for free by Sidero Labs.
The default value is https://discovery.talos.dev/.
Contact Sidero Labs if you need to run this service privately.
Upgrading an Existing Cluster
In order to enable KubeSpan for an existing cluster, upgrade to the latest version of Talos (v1.0.6).
Once your cluster is upgraded, the configuration of each node must contain the globally unique identifier, the shared secret for the cluster, and have KubeSpan and discovery enabled.
Note: Discovery can be used without KubeSpan, but KubeSpan requires at least one discovery registry.
Talos v0.11 or Less
If you are migrating from Talos v0.11 or less, we need to generate a cluster ID and secret.
Now, update the configuration of each node with the cluster with the generated id and secret.
You should end up with the addition of something like this (your id and secret should be different):
Talos automatically configures unique IPv6 address for each node in the cluster-specific IPv6 ULA prefix.
Wireguard private key is generated for the node, private key never leaves the node while public key is published through the cluster discovery.
KubeSpanIdentity is persisted across reboots and upgrades in STATE partition in the file kubespan-identity.yaml.
KubeSpanPeerSpecs
A node’s WireGuard peers can be obtained with:
$ talosctl get kubespanpeerspecs
ID VERSION LABEL ENDPOINTS
06D9QQOydzKrOL7oeLiqHy9OWE8KtmJzZII2A5/FLFI=2 talos-default-master-2 ["172.20.0.3:51820"]THtfKtfNnzJs1nMQKs5IXqK0DFXmM//0WMY+NnaZrhU=2 talos-default-master-3 ["172.20.0.4:51820"]nVHu7l13uZyk0AaI1WuzL2/48iG8af4WRv+LWmAax1M=2 talos-default-worker-2 ["172.20.0.6:51820"]zXP0QeqRo+CBgDH1uOBiQ8tA+AKEQP9hWkqmkE/oDlc=2 talos-default-worker-1 ["172.20.0.5:51820"]
The peer ID is the Wireguard public key.
KubeSpanPeerSpecs are built from the cluster discovery data.
KubeSpanPeerStatuses
The status of a node’s WireGuard peers can be obtained with:
$ talosctl get kubespanpeerstatuses
ID VERSION LABEL ENDPOINT STATE RX TX
06D9QQOydzKrOL7oeLiqHy9OWE8KtmJzZII2A5/FLFI=63 talos-default-master-2 172.20.0.3:51820 up 1504322017869488THtfKtfNnzJs1nMQKs5IXqK0DFXmM//0WMY+NnaZrhU=62 talos-default-master-3 172.20.0.4:51820 up 1457320818157680nVHu7l13uZyk0AaI1WuzL2/48iG8af4WRv+LWmAax1M=60 talos-default-worker-2 172.20.0.6:51820 up 13007246888zXP0QeqRo+CBgDH1uOBiQ8tA+AKEQP9hWkqmkE/oDlc=60 talos-default-worker-1 172.20.0.5:51820 up 13004446556
KubeSpan peer status includes following information:
the actual endpoint used for peer communication
link state:
unknown: the endpoint was just changed, link state is not known yet
up: there is a recent handshake from the peer
down: there is no handshake from the peer
number of bytes sent/received over the Wireguard link with the peer
If the connection state goes down, Talos will be cycling through the available endpoints until it finds the one which works.
Peer status information is updated every 30 seconds.
KubeSpanEndpoints
A node’s WireGuard endpoints (peer addresses) can be obtained with:
$ talosctl get kubespanendpoints
ID VERSION ENDPOINT AFFILIATE ID
06D9QQOydzKrOL7oeLiqHy9OWE8KtmJzZII2A5/FLFI=1 172.20.0.3:51820 2VfX3nu67ZtZPl57IdJrU87BMjVWkSBJiL9ulP9TCnF
THtfKtfNnzJs1nMQKs5IXqK0DFXmM//0WMY+NnaZrhU=1 172.20.0.4:51820 b3DebkPaCRLTLLWaeRF1ejGaR0lK3m79jRJcPn0mfA6C
nVHu7l13uZyk0AaI1WuzL2/48iG8af4WRv+LWmAax1M=1 172.20.0.6:51820 NVtfu1bT1QjhNq5xJFUZl8f8I8LOCnnpGrZfPpdN9WlB
zXP0QeqRo+CBgDH1uOBiQ8tA+AKEQP9hWkqmkE/oDlc=1 172.20.0.5:51820 6EVq8RHIne03LeZiJ60WsJcoQOtttw1ejvTS6SOBzhUA
The endpoint ID is the base64 encoded WireGuard public key.
The observed endpoints are submitted back to the discovery service (if enabled) so that other peers can try additional endpoints to establish the connection.
3.3 - Upgrading Kubernetes
Guide on how to upgrade the Kubernetes cluster from Talos Linux.
This guide covers upgrading Kubernetes on Talos Linux clusters.
For upgrading the Talos Linux operating system, see Upgrading Talos
Video Walkthrough
To see a demo of this process, watch this video:
Automated Kubernetes Upgrade
The recommended method to upgrade Kubernetes is to use the talosctl upgrade-k8s command.
This will automatically update the components needed to upgrade Kubernetes safely.
Upgrading Kubernetes is non-disruptive to the cluster workloads.
To trigger a Kubernetes upgrade, issue a command specifiying the version of Kubernetes to ugprade to, such as:
Note that the --nodes parameter specifies the control plane node to send the API call to, but all members of the cluster will be upgraded.
To check what will be upgraded you can run talosctl upgrade-k8s with the --dry-run flag:
$ talosctl --nodes <master node> upgrade-k8s --to 1.23.5 --dry-run
WARNING: found resources which are going to be deprecated/migrated in the version 1.23.5
RESOURCE COUNT
validatingwebhookconfigurations.v1beta1.admissionregistration.k8s.io 4mutatingwebhookconfigurations.v1beta1.admissionregistration.k8s.io 3customresourcedefinitions.v1beta1.apiextensions.k8s.io 25apiservices.v1beta1.apiregistration.k8s.io 54leases.v1beta1.coordination.k8s.io 4automatically detected the lowest Kubernetes version 1.23.1
checking for resource APIs to be deprecated in version 1.23.5
discovered master nodes ["172.20.0.2""172.20.0.3""172.20.0.4"]discovered worker nodes ["172.20.0.5""172.20.0.6"]updating "kube-apiserver" to version "1.23.5" > "172.20.0.2": starting update
> update kube-apiserver: v1.23.1 -> 1.23.5
> skipped in dry-run
> "172.20.0.3": starting update
> update kube-apiserver: v1.23.1 -> 1.23.5
> skipped in dry-run
> "172.20.0.4": starting update
> update kube-apiserver: v1.23.1 -> 1.23.5
> skipped in dry-run
updating "kube-controller-manager" to version "1.23.5" > "172.20.0.2": starting update
> update kube-controller-manager: v1.23.1 -> 1.23.5
> skipped in dry-run
> "172.20.0.3": starting update
<snip>
updating manifests
> apply manifest Secret bootstrap-token-3lb63t
> apply skipped in dry run
> apply manifest ClusterRoleBinding system-bootstrap-approve-node-client-csr
> apply skipped in dry run
<snip>
To upgrade Kubernetes from v1.23.1 to v1.23.5 run:
$ talosctl --nodes <master node> upgrade-k8s --to 1.23.5
automatically detected the lowest Kubernetes version 1.23.1
checking for resource APIs to be deprecated in version 1.23.5
discovered master nodes ["172.20.0.2""172.20.0.3""172.20.0.4"]discovered worker nodes ["172.20.0.5""172.20.0.6"]updating "kube-apiserver" to version "1.23.5" > "172.20.0.2": starting update
> update kube-apiserver: v1.23.1 -> 1.23.5
> "172.20.0.2": machine configuration patched
> "172.20.0.2": waiting for API server state pod update
< "172.20.0.2": successfully updated
> "172.20.0.3": starting update
> update kube-apiserver: v1.23.1 -> 1.23.5
<snip>
This command runs in several phases:
Every control plane node machine configuration is patched with the new image version for each control plane component.
Talos renders new static pod definitions on the configuration update which is picked up by the kubelet.
The command waits for the change to propagate to the API server state.
The command updates the kube-proxy daemonset with the new image version.
On every node in the cluster, the kubelet version is updated.
The command then waits for the kubelet service to be restarted and become healthy.
The update is verified by checking the Node resource state.
Kubernetes bootstrap manifests are re-applied to the cluster.
Updated bootstrap manifests might come with a new Talos version (e.g. CoreDNS version update), or might be the result of machine configuration change.
Note: The upgrade-k8s command never deletes any resources from the cluster: they should be deleted manually.
If the command fails for any reason, it can be safely restarted to continue the upgrade process from the moment of the failure.
Manual Kubernetes Upgrade
Kubernetes can be upgraded manually by following the steps outlined below.
They are equivalent to the steps performed by the talosctl upgrade-k8s command.
Kubeconfig
In order to edit the control plane, you need a working kubectl config.
If you don’t already have one, you can get one by running:
talosctl --nodes <master node> kubeconfig
API Server
Patch machine configuration using talosctl patch command:
$ talosctl -n <CONTROL_PLANE_IP_1> patch mc --mode=no-reboot -p '[{"op": "replace", "path": "/cluster/apiServer/image", "value": "k8s.gcr.io/kube-apiserver:v1.23.5"}]'patched mc at the node 172.20.0.2
The JSON patch might need to be adjusted if current machine configuration is missing .cluster.apiServer.image key.
Also the machine configuration can be edited manually with talosctl -n <IP> edit mc --mode=no-reboot.
Capture the new version of kube-apiserver config with:
In this example, the new version is 5.
Wait for the new pod definition to propagate to the API server state (replace talos-default-master-1 with the node name):
$ kubectl get pod -n kube-system -l k8s-app=kube-apiserver --field-selector spec.nodeName=talos-default-master-1 -o jsonpath='{.items[0].metadata.annotations.talos\.dev/config\-version}'5
Check that the pod is running:
$ kubectl get pod -n kube-system -l k8s-app=kube-apiserver --field-selector spec.nodeName=talos-default-master-1
NAME READY STATUS RESTARTS AGE
kube-apiserver-talos-default-master-1 1/1 Running 0 16m
Repeat this process for every control plane node, verifying that state got propagated successfully between each node update.
Controller Manager
Patch machine configuration using talosctl patch command:
$ talosctl -n <CONTROL_PLANE_IP_1> patch mc --mode=no-reboot -p '[{"op": "replace", "path": "/cluster/controllerManager/image", "value": "k8s.gcr.io/kube-controller-manager:v1.23.5"}]'patched mc at the node 172.20.0.2
The JSON patch might need be adjusted if current machine configuration is missing .cluster.controllerManager.image key.
Capture new version of kube-controller-manager config with:
In this example, new version is 3.
Wait for the new pod definition to propagate to the API server state (replace talos-default-master-1 with the node name):
$ kubectl get pod -n kube-system -l k8s-app=kube-controller-manager --field-selector spec.nodeName=talos-default-master-1 -o jsonpath='{.items[0].metadata.annotations.talos\.dev/config\-version}'3
Check that the pod is running:
$ kubectl get pod -n kube-system -l k8s-app=kube-controller-manager --field-selector spec.nodeName=talos-default-master-1
NAME READY STATUS RESTARTS AGE
kube-controller-manager-talos-default-master-1 1/1 Running 0 35m
Repeat this process for every control plane node, verifying that state propagated successfully between each node update.
Scheduler
Patch machine configuration using talosctl patch command:
$ talosctl -n <CONTROL_PLANE_IP_1> patch mc --mode=no-reboot -p '[{"op": "replace", "path": "/cluster/scheduler/image", "value": "k8s.gcr.io/kube-scheduler:v1.23.5"}]'patched mc at the node 172.20.0.2
JSON patch might need be adjusted if current machine configuration is missing .cluster.scheduler.image key.
Capture new version of kube-scheduler config with:
In this example, new version is 3.
Wait for the new pod definition to propagate to the API server state (replace talos-default-master-1 with the node name):
$ kubectl get pod -n kube-system -l k8s-app=kube-scheduler --field-selector spec.nodeName=talos-default-master-1 -o jsonpath='{.items[0].metadata.annotations.talos\.dev/config\-version}'3
Check that the pod is running:
$ kubectl get pod -n kube-system -l k8s-app=kube-scheduler --field-selector spec.nodeName=talos-default-master-1
NAME READY STATUS RESTARTS AGE
kube-scheduler-talos-default-master-1 1/1 Running 0 39m
Repeat this process for every control plane node, verifying that state got propagated successfully between each node update.
Note: if some boostrap resources were removed, they have to be removed from the cluster manually.
kubelet
For every node, patch machine configuration with new kubelet version, wait for the kubelet to restart with new version:
$ talosctl -n <IP> patch mc --mode=no-reboot -p '[{"op": "replace", "path": "/machine/kubelet/image", "value": "ghcr.io/siderolabs/kubelet:v1.23.5"}]'patched mc at the node 172.20.0.2
Once kubelet restarts with the new configuration, confirm upgrade with kubectl get nodes <name>:
$ kubectl get nodes talos-default-master-1
NAME STATUS ROLES AGE VERSION
talos-default-master-1 Ready control-plane,master 123m v1.23.5
4 - Advanced Guides
4.1 - Advanced Networking
How to configure advanced networking options on Talos Linux.
Static Addressing
Static addressing is comprised of specifying addresses, routes ( remember to add your default gateway ), and interface.
Most likely you’ll also want to define the nameservers so you have properly functioning DNS.
In some environments you may need to set additional addresses on an interface.
In the following example, we set two additional addresses on the loopback interface.
Setting up Talos Linux to work in environments with no internet access.
In this guide we will create a Talos cluster running in an air-gapped environment with all the required images being pulled from an internal registry.
We will use the QEMU provisioner available in talosctl to create a local cluster, but the same approach could be used to deploy Talos in bigger air-gapped networks.
In air-gapped environments, access to the public Internet is restricted, so Talos can’t pull images from public Docker registries (docker.io, ghcr.io, etc.)
We need to identify the images required to install and run Talos.
The same strategy can be used for images required by custom workloads running on the cluster.
The talosctl images command provides a list of default images used by the Talos cluster (with default configuration
settings).
To print the list of images, run:
talosctl images
This list contains images required by a default deployment of Talos.
There might be additional images required for the workloads running on this cluster, and those should be added to this list.
Preparing the Internal Registry
As access to the public registries is restricted, we have to run an internal Docker registry.
In this guide, we will launch the registry on the same machine using Docker:
This registry will be accepting connections on port 6000 on the host IPs.
The registry is empty by default, so we have fill it with the images required by Talos.
First, we pull all the images to our local Docker daemon:
$ for image in `talosctl images`; do docker pull $image; donev0.15.1: Pulling from coreos/flannel
Digest: sha256:9a296fbb67790659adc3701e287adde3c59803b7fcefe354f1fc482840cdb3d9
...
All images are now stored in the Docker daemon store:
$ docker images
REPOSITORY TAG IMAGE ID CREATED SIZE
gcr.io/etcd-development/etcd v3.5.3 604d4f022632 6 days ago 181MB
ghcr.io/siderolabs/install-cni v1.0.0-2-gc5d3ab0 4729e54f794d 6 days ago 76MB
...
Now we need to re-tag them so that we can push them to our local registry.
We are going to replace the first component of the image name (before the first slash) with our registry endpoint 127.0.0.1:6000:
$ for image in `talosctl images`; do\
docker tag $image`echo$image | sed -E 's#^[^/]+/#127.0.0.1:6000/#'`; \
done
As the next step, we push images to the internal registry:
$ for image in `talosctl images`; do\
docker push `echo$image | sed -E 's#^[^/]+/#127.0.0.1:6000/#'`; \
done
We can now verify that the images are pushed to the registry:
Note: images in the registry don’t have the registry endpoint prefix anymore.
Launching Talos in an Air-gapped Environment
For Talos to use the internal registry, we use the registry mirror feature to redirect all image pull requests to the internal registry.
This means that the registry endpoint (as the first component of the image reference) gets ignored, and all pull requests are sent directly to the specified endpoint.
We are going to use a QEMU-based Talos cluster for this guide, but the same approach works with Docker-based clusters as well.
As QEMU-based clusters go through the Talos install process, they can be used better to model a real air-gapped environment.
Identify all registry prefixes from talosctl images, for example:
docker.io
gcr.io
ghcr.io
k8s.gcr.io
quay.io
The talosctl cluster create command provides conveniences for common configuration options.
The only required flag for this guide is --registry-mirror <endpoint>=http://10.5.0.1:6000 which redirects every pull request to the internal registry, this flag
needs to be repeated for each of the identified registry prefixes above.
The endpoint being used is 10.5.0.1, as this is the default bridge interface address which will be routable from the QEMU VMs (127.0.0.1 IP will be pointing to the VM itself).
$ sudo --preserve-env=HOME talosctl cluster create --provisioner=qemu --install-image=ghcr.io/siderolabs/installer:v1.0.6 \
--registry-mirror docker.io=http://10.5.0.1:6000 \
--registry-mirror gcr.io=http://10.5.0.1:6000 \
--registry-mirror ghcr.io=http://10.5.0.1:6000 \
--registry-mirror k8s.gcr.io=http://10.5.0.1:6000 \
--registry-mirror quay.io=http://10.5.0.1:6000
validating CIDR and reserving IPs
generating PKI and tokens
creating state directory in "/home/user/.talos/clusters/talos-default"creating network talos-default
creating load balancer
creating dhcpd
creating master nodes
creating worker nodes
waiting for API
...
Note: --install-image should match the image which was copied into the internal registry in the previous step.
You can be verify that the cluster is air-gapped by inspecting the registry logs: docker logs -f registry-airgapped.
Closing Notes
Running in an air-gapped environment might require additional configuration changes, for example using custom settings for DNS and NTP servers.
When scaling this guide to the bare-metal environment, following Talos config snippet could be used as an equivalent of the --registry-mirror flag above:
Other implementations of Docker registry can be used in place of the Docker registry image used above to run the registry.
If required, auth can be configured for the internal registry (and custom TLS certificates if needed).
4.3 - Customizing the Kernel
Guide on how to customize the kernel used by Talos Linux.
The installer image contains ONBUILD instructions that handle the following:
the decompression, and unpacking of the initramfs.xz
the unsquashing of the rootfs
the copying of new rootfs files
the squashing of the new rootfs
and the packing, and compression of the new initramfs.xz
When used as a base image, the installer will perform the above steps automatically with the requirement that a customization stage be defined in the Dockerfile.
Build and push your own kernel:
git clone https://github.com/talos-systems/pkgs.git
cd pkgs
make kernel-menuconfig USERNAME=_your_github_user_name_
docker login ghcr.io --username _your_github_user_name_
make kernel USERNAME=_your_github_user_name_ PUSH=true
Using a multi-stage Dockerfile we can define the customization stage and build FROM the installer image:
FROM scratch AS customizationCOPY --from=<custom kernel image> /lib/modules /lib/modules
FROM ghcr.io/siderolabs/installer:latestCOPY --from=<custom kernel image> /boot/vmlinuz /usr/install/${TARGETARCH}/vmlinuz
When building the image, the customization stage will automatically be copied into the rootfs.
The customization stage is not limited to a single COPY instruction.
In fact, you can do whatever you would like in this stage, but keep in mind that everything in / will be copied into the rootfs.
Note: buildkit has a bug #816, to disable it use DOCKER_BUILDKIT=0
Now that we have a custom installer we can build Talos for the specific platform we wish to deploy to.
4.4 - Customizing the Root Filesystem
How to add your own content to the immutable root file system of Talos Linux.
The installer image contains ONBUILD instructions that handle the following:
the decompression, and unpacking of the initramfs.xz
the unsquashing of the rootfs
the copying of new rootfs files
the squashing of the new rootfs
and the packing, and compression of the new initramfs.xz
When used as a base image, the installer will perform the above steps automatically with the requirement that a customization stage be defined in the Dockerfile.
For example, say we have an image that contains the contents of a library we wish to add to the Talos rootfs.
We need to define a stage with the name customization:
FROM scratch AS customizationCOPY --from=<name|index> <src> <dest>
Using a multi-stage Dockerfile we can define the customization stage and build FROM the installer image:
FROM scratch AS customizationCOPY --from=<name|index> <src> <dest>
FROM ghcr.io/siderolabs/installer:latest
When building the image, the customization stage will automatically be copied into the rootfs.
The customization stage is not limited to a single COPY instruction.
In fact, you can do whatever you would like in this stage, but keep in mind that everything in / will be copied into the rootfs.
Note: <dest> is the path relative to the rootfs that you wish to place the contents of <src>.
This will perform a rm -rf on the specified paths relative to the rootfs.
Note: RM must be a whitespace delimited list.
The resulting image can be used to:
generate an image for any of the supported providers
perform bare-metall installs
perform upgrades
We will step through common customizations in the remainder of this section.
4.5 - Developing Talos
Learn how to set up a development environment for local testing and hacking on Talos itself!
This guide outlines steps and tricks to develop Talos operating systems and related components.
The guide assumes Linux operating system on the development host.
Some steps might work under Mac OS X, but using Linux is highly advised.
Note: network=host allows buildx builder to access host network, so that it can push to a local container registry (see below).
Make sure the following steps work:
make talosctl
make initramfs kernel
Set up a local docker registry:
docker run -d -p 5005:5000 \
--restart always \
--name local registry:2
Try to build and push to local registry an installer image:
make installer IMAGE_REGISTRY=127.0.0.1:5005 PUSH=true
Record the image name output in the step above.
Note: it is also possible to force a stable image tag by using TAG variable: make installer IMAGE_REGISTRY=127.0.0.1:5005 TAG=v1.0.0-alpha.1 PUSH=true.
Running Talos cluster
Set up local caching docker registries (this speeds up Talos cluster boot a lot), script is in the Talos repo:
custom --cidr to make QEMU cluster use different network than default Docker setup (optional)
--registry-mirror uses the caching proxies set up above to speed up boot time a lot, last one adds your local registry (installer image was pushed to it)
--install-image is the image you built with make installer above
--masters & --workers configure cluster size, choose to match your resources; 3 masters give you HA control plane; 1 master is enough, never do 2 masters
--with-bootloader=false disables boot from disk (Talos will always boot from _out/vmlinuz-amd64 and _out/initramfs-amd64.xz).
This speeds up development cycle a lot - no need to rebuild installer and perform install, rebooting is enough to get new code.
Note: as boot loader is not used, it’s not necessary to rebuild installer each time (old image is fine), but sometimes it’s needed (when configuration changes are done and old installer doesn’t validate the config).
talosctl cluster create derives Talos machine configuration version from the install image tag, so sometimes early in the development cycle (when new minor tag is not released yet), machine config version can be overridden with --talos-version=v1.0.
If the --with-bootloader=false flag is not enabled, for Talos cluster to pick up new changes to the code (in initramfs), it will require a Talos upgrade (so new installer should be built).
With --with-bootloader=false flag, Talos always boots from initramfs in _out/ directory, so simple reboot is enough to pick up new code changes.
If the installation flow needs to be tested, --with-bootloader=false shouldn’t be used.
Once talosctl cluster create finishes successfully, talosconfig and kubeconfig will be set up automatically to point to your cluster.
Start playing with talosctl:
talosctl -n 172.20.0.2 version
talosctl -n 172.20.0.3,172.20.0.4 dashboard
talosctl -n 172.20.0.4 get members
Same with kubectl:
kubectl get nodes -o wide
You can deploy some Kubernetes workloads to the cluster.
You can edit machine config on the fly with talosctl edit mc --immediate, config patches can be applied via --config-patch flags, also many features have specific flags in talosctl cluster create.
Quick Reboot
To reboot whole cluster quickly (e.g. to pick up a change made in the code):
for socket in ~/.talos/clusters/talos-default/talos-default-*.monitor; doecho"q" | sudo socat - unix-connect:$socket; done
Sending q to a single socket allows to reboot a single node.
Note: This command performs immediate reboot (as if the machine was powered down and immediately powered back up), for normal Talos reboot use talosctl reboot.
Development Cycle
Fast development cycle:
bring up a cluster
make code changes
rebuild initramfs with make initramfs
reboot a node to pick new initramfs
verify code changes
more code changes…
Some aspects of Talos development require to enable bootloader (when working on installer itself), in that case quick development cycle is no longer possible, and cluster should be destroyed and recreated each time.
Running Integration Tests
If integration tests were changed (or when running them for the first time), first rebuild the integration test binary:
rm -f _out/integration-test-linux-amd64; make _out/integration-test-linux-amd64
Running short tests against QEMU provisioned cluster:
This command stops QEMU and helper processes, tears down bridged network on the host, and cleans up
cluster state in ~/.talos/clusters.
Note: if the host machine is rebooted, QEMU instances and helpers processes won’t be started back.
In that case it’s required to clean up files in ~/.talos/clusters/<cluster-name> directory manually.
Optional
Set up cross-build environment with:
docker run --rm --privileged multiarch/qemu-user-static --reset -p yes
Note: the static qemu binaries which come with Ubuntu 21.10 seem to be broken.
Unit tests
Unit tests can be run in buildx with make unit-tests, on Ubuntu systems some tests using loop devices will fail because Ubuntu uses low-index loop devices for snaps.
Most of the unit-tests can be run standalone as well, with regular go test, or using IDE integration:
go test -v ./internal/pkg/circular/
This provides much faster feedback loop, but some tests require either elevated privileges (running as root) or additional binaries available only in Talos rootfs (containerd tests).
Running tests as root can be done with -exec flag to go test, but this is risky, as test code has root access and can potentially make undesired changes:
go test -exec sudo -v ./internal/app/machined/pkg/controllers/network/...
Go Profiling
Build initramfs with debug enabled: make initramfs WITH_DEBUG=1.
Launch Talos cluster with bootloader disabled, and use go tool pprof to capture the profile and show the output in your browser:
go tool pprof http://172.20.0.2:9982/debug/pprof/heap
The IP address 172.20.0.2 is the address of the Talos node, and port :9982 depends on the Go application to profile:
9981: apid
9982: machined
9983: trustd
4.6 - Disaster Recovery
Procedure for snapshotting etcd database and recovering from catastrophic control plane failure.
etcd database backs Kubernetes control plane state, so if the etcd service is unavailable
Kubernetes control plane goes down, and the cluster is not recoverable until etcd is recovered with contents.
The etcd consistency model builds around the consensus protocol Raft, so for highly-available control plane clusters,
loss of one control plane node doesn’t impact cluster health.
In general, etcd stays up as long as a sufficient number of nodes to maintain quorum are up.
For a three control plane node Talos cluster, this means that the cluster tolerates a failure of any single node,
but losing more than one node at the same time leads to complete loss of service.
Because of that, it is important to take routine backups of etcd state to have a snapshot to recover cluster from
in case of catastrophic failure.
Backup
Snapshotting etcd Database
Create a consistent snapshot of etcd database with talosctl etcd snapshot command:
$ talosctl -n <IP> etcd snapshot db.snapshot
etcd snapshot saved to "db.snapshot"(2015264 bytes)snapshot info: hash c25fd181, revision 4193, total keys 1287, total size 3035136
Note: filename db.snapshot is arbitrary.
This database snapshot can be taken on any healthy control plane node (with IP address <IP> in the example above),
as all etcd instances contain exactly same data.
It is recommended to configure etcd snapshots to be created on some schedule to allow point-in-time recovery using the latest snapshot.
Disaster Database Snapshot
If etcd cluster is not healthy, the talosctl etcd snapshot command might fail.
In that case, copy the database snapshot directly from the control plane node:
This snapshot might not be fully consistent (if the etcd process is running), but it allows
for disaster recovery when latest regular snapshot is not available.
Machine Configuration
Machine configuration might be required to recover the node after hardware failure.
Backup Talos node machine configuration with the command:
talosctl -n IP get mc v1alpha1 -o yaml | yq eval'.spec' -
Recovery
Before starting a disaster recovery procedure, make sure that etcd cluster can’t be recovered:
get etcd cluster member list on all healthy control plane nodes with talosctl -n IP etcd members command and compare across all members.
query etcd health across control plane nodes with talosctl -n IP service etcd.
If the quorum can be restored, restoring quorum might be a better strategy than performing full disaster recovery
procedure.
Latest Etcd Snapshot
Get hold of the latest etcd database snapshot.
If a snapshot is not fresh enough, create a database snapshot (see above), even if the etcd cluster is unhealthy.
Init Node
Make sure that there are no control plane nodes with machine type init:
$ talosctl -n <IP1>,<IP2>,... get machinetype
NODE NAMESPACE TYPE ID VERSION TYPE
172.20.0.2 config MachineType machine-type 2 controlplane
172.20.0.4 config MachineType machine-type 2 controlplane
172.20.0.3 config MachineType machine-type 2 controlplane
Nodes with init type are incompatible with etcd recovery procedure.
init node can be converted to controlplane type with talosctl edit mc --mode=staged command followed
by node reboot with talosctl reboot command.
Preparing Control Plane Nodes
If some control plane nodes experienced hardware failure, replace them with new nodes.
Use machine configuration backup to re-create the nodes with the same secret material and control plane settings
to allow workers to join the recovered control plane.
If a control plane node is healthy but etcd isn’t, wipe the node’s EPHEMERAL partition to remove the etcd
data directory (make sure a database snapshot is taken before doing this):
At this point, all control plane nodes should boot up, and etcd service should be in the Preparing state.
Kubernetes control plane endpoint should be pointed to the new control plane nodes if there were
any changes to the node addresses.
Recovering from the Backup
Make sure all etcd service instances are in Preparing state:
$ talosctl -n <IP> service etcd
NODE 172.20.0.2
ID etcd
STATE Preparing
HEALTH ?
EVENTS [Preparing]: Running pre state (17s ago)[Waiting]: Waiting for service "cri" to be "up", time sync (18s ago)[Waiting]: Waiting for service "cri" to be "up", service "networkd" to be "up", time sync (20s ago)
Execute the bootstrap command against any control plane node passing the path to the etcd database snapshot:
$ talosctl -n <IP> bootstrap --recover-from=./db.snapshot
recovering from snapshot "./db.snapshot": hash c25fd181, revision 4193, total keys 1287, total size 3035136
Note: if database snapshot was copied out directly from the etcd data directory using talosctl cp,
add flag --recover-skip-hash-check to skip integrity check on restore.
Talos node should print matching information in the kernel log:
recovering etcd from snapshot: hash c25fd181, revision 4193, total keys 1287, total size 3035136
{"level":"info","msg":"restoring snapshot","path":"/var/lib/etcd.snapshot","wal-dir":"/var/lib/etcd/member/wal","data-dir":"/var/lib/etcd","snap-dir":"/var/li}
{"level":"info","msg":"restored last compact revision","meta-bucket-name":"meta","meta-bucket-name-key":"finishedCompactRev","restored-compact-revision":3360}
{"level":"info","msg":"added member","cluster-id":"a3390e43eb5274e2","local-member-id":"0","added-peer-id":"eb4f6f534361855e","added-peer-peer-urls":["https:/}
{"level":"info","msg":"restored snapshot","path":"/var/lib/etcd.snapshot","wal-dir":"/var/lib/etcd/member/wal","data-dir":"/var/lib/etcd","snap-dir":"/var/lib/etcd/member/snap"}
Now etcd service should become healthy on the bootstrap node, Kubernetes control plane components
should start and control plane endpoint should become available.
Remaining control plane nodes join etcd cluster once control plane endpoint is up.
Single Control Plane Node Cluster
This guide applies to the single control plane clusters as well.
In fact, it is much more important to take regular snapshots of the etcd database in single control plane node
case, as loss of the control plane node might render the whole cluster irrecoverable without a backup.
4.7 - Extension Services
Use extension services in Talos Linux.
Talos provides a way to run additional system services early in the Talos boot process.
Extension services should be included into the Talos root filesystem (e.g. using system extensions).
Extension services run as privileged containers with ephemeral root filesystem located in the Talos root filesystem.
Extension services can be used to use extend core features of Talos in a way that is not possible via static pods or
Kubernetes DaemonSets.
Potential extension services use-cases:
storage: Open iSCSI, software RAID, etc.
networking: BGP FRR, etc.
platform integration: VMWare open VM tools, etc.
Configuration
Talos on boot scans directory /usr/local/etc/containers for *.yaml files describing the extension services to run.
Format of the extension service config:
Field name sets the service name, valid names are [a-z0-9-_]+.
The service container root filesystem path is derived from the name: /usr/local/lib/containers/<name>.
The extension service will be registered as a Talos service under an ext-<name> identifier.
container
entrypoint defines the container entrypoint relative to the container root filesystem (/usr/local/lib/containers/<name>)
args defines the additional arguments to pass to the entrypoint
mounts defines the volumes to be mounted into the container root
All requested directories will be mounted into the extension service container mount namespace.
If the source directory doesn’t exist in the host filesystem, it will be created (only for writable paths in the Talos root filesystem).
depends
The depends section describes extension service start dependencies: the service will not be started until all dependencies are met.
Available dependencies:
service: <name>: wait for the service <name> to be running and healthy
path: <path>: wait for the <path> to exist
network: [addresses, connectivity, hostname, etcfiles]: wait for the specified network readiness checks to succeed
time: true: wait for the NTP time sync
restart
Field restart defines the service restart policy, it allows to either configure an always running service or a one-shot service:
always: restart service always
never: start service only once and never restart
untilSuccess: restart failing service, stop restarting on successful run
Example
Example layout of the Talos root filesystem contents for the extension service:
Talos starts the container for the extension service with container root filesystem at /usr/local/lib/containers/hello-world:
/
├── hello
└── config.ini
Extension service is registered as ext-hello-world in talosctl services:
$ talosctl service ext-hello-world
NODE 172.20.0.5
ID ext-hello-world
STATE Running
HEALTH ?
EVENTS [Running]: Started task ext-hello-world (PID 1100)for container ext-hello-world (2m47s ago)[Preparing]: Creating service runner (2m47s ago)[Preparing]: Running pre state (2m47s ago)[Waiting]: Waiting for service "containerd" to be "up"(2m48s ago)[Waiting]: Waiting for service "containerd" to be "up", network (2m49s ago)
An extension service can be started, restarted and stopped using talosctl service ext-hello-world start|restart|stop.
Use talosctl logs ext-hello-world to get the logs of the service.
Complete example of the extension service can be found in the extensions repository.
4.8 - Proprietary Kernel Modules
Adding a proprietary kernel module to Talos Linux
Patching and building the kernel image
Clone the pkgs repository from Github and check out the revision corresponding to your version of Talos Linux
Clone the Linux kernel and check out the revision that pkgs uses (this can be found in kernel/kernel-prepare/pkg.yaml and it will be something like the following: https://cdn.kernel.org/pub/linux/kernel/v5.x/linux-x.xx.x.tar.xz)
git clone https://git.kernel.org/pub/scm/linux/kernel/git/torvalds/linux.git &&cd linux
git checkout v5.15
Your module will need to be converted to be in-tree.
The steps for this are different depending on the complexity of the module to port, but generally it would involve moving the module source code into the drivers tree and creating a new Makefile and Kconfig.
Stage your changes in Git with git add -A.
Run git diff --cached --no-prefix > foobar.patch to generate a patch from your changes.
Copy this patch to kernel/kernel/patches in the pkgs repo.
Add a patch line in the prepare segment of kernel/kernel/pkg.yaml:
patch -p0 < /pkg/patches/foobar.patch
Build the kernel image.
Make sure you are logged in to ghcr.io before running this command, and you can change or omit PLATFORM depending on what you want to target.
make kernel PLATFORM=linux/amd64 USERNAME=your-username PUSH=true
Make a note of the image name the make command outputs.
Building the installer image
Copy the following into a new Dockerfile:
FROM scratch AS customizationCOPY --from=ghcr.io/your-username/kernel:<kernel version> /lib/modules /lib/modules
FROM ghcr.io/siderolabs/installer:<talos version>COPY --from=ghcr.io/your-username/kernel:<kernel version> /boot/vmlinuz /usr/install/${TARGETARCH}/vmlinuz
Using Talos Linux to set up static pods in Kubernetes.
Static Pods
Static pods are run directly by the kubelet bypassing the Kubernetes API server checks and validations.
Most of the time DaemonSet is a better alternative to static pods, but some workloads need to run
before the Kubernetes API server is available or might need to bypass security restrictions imposed by the API server.
Talos renders static pod definitions to the kubelet manifest directory (/etc/kubernetes/manifests), kubelet picks up the definition and launches the pod.
Talos accepts changes to the static pod configuration without a reboot.
Usage
Kubelet mirrors pod definition to the API server state, so static pods can be inspected with kubectl get pods, logs can be retrieved with kubectl logs, etc.
$ kubectl get pods
NAME READY STATUS RESTARTS AGE
nginx-talos-default-master-2 1/1 Running 0 17s
If the API server is not available, status of the static pod can also be inspected with talosctl containers --kubernetes:
Logs of static pods can be retrieved with talosctl logs --kubernetes:
$ talosctl logs --kubernetes default/nginx-talos-default-master-2:nginx
172.20.0.3: 2022-02-10T15:26:01.289208227Z stderr F 2022/02/10 15:26:01 [notice] 1#1: using the "epoll" event method
172.20.0.3: 2022-02-10T15:26:01.2892466Z stderr F 2022/02/10 15:26:01 [notice] 1#1: nginx/1.21.6
172.20.0.3: 2022-02-10T15:26:01.28925723Z stderr F 2022/02/10 15:26:01 [notice] 1#1: built by gcc 10.2.1 20210110(Debian 10.2.1-6)
Troubleshooting
Talos doesn’t perform any validation on the static pod definitions.
If the pod isn’t running, use kubelet logs (talosctl logs kubelet) to find the problem:
$ talosctl logs kubelet
172.20.0.2: {"ts":1644505520281.427,"caller":"config/file.go:187","msg":"Could not process manifest file","path":"/etc/kubernetes/manifests/talos-default-nginx-gvisor.yaml","err":"invalid pod: [spec.containers: Required value]"}
Resource Definitions
Static pod definitions are available as StaticPod resources combined with Talos-generated control plane static pods:
$ talosctl get staticpods
NODE NAMESPACE TYPE ID VERSION
172.20.0.3 k8s StaticPod default-nginx 1172.20.0.3 k8s StaticPod kube-apiserver 1172.20.0.3 k8s StaticPod kube-controller-manager 1172.20.0.3 k8s StaticPod kube-scheduler 1
Talos assigns ID <namespace>-<name> to the static pods specified in the machine configuration.
On control plane nodes status of the running static pods is available in the StaticPodStatus resource:
$ talosctl get staticpodstatus
NODE NAMESPACE TYPE ID VERSION READY
172.20.0.3 k8s StaticPodStatus default/nginx-talos-default-master-2 2 True
172.20.0.3 k8s StaticPodStatus kube-system/kube-apiserver-talos-default-master-2 2 True
172.20.0.3 k8s StaticPodStatus kube-system/kube-controller-manager-talos-default-master-2 3 True
172.20.0.3 k8s StaticPodStatus kube-system/kube-scheduler-talos-default-master-2 3 True
4.10 - Troubleshooting Control Plane
Troubleshoot control plane failures for running cluster and bootstrap process.
This guide is written as series of topics and detailed answers for each topic.
It starts with basics of control plane and goes into Talos specifics.
In this guide we assume that Talos client config is available and Talos API access is available.
Kubernetes client configuration can be pulled from control plane nodes with talosctl -n <IP> kubeconfig
(this command works before Kubernetes is fully booted).
What is a control plane node?
A control plane node is a node which:
runs etcd, the Kubernetes database
runs the Kubernetes control plane
kube-apiserver
kube-controller-manager
kube-scheduler
serves as an administrative proxy to the worker nodes
These nodes are critical to the operation of your cluster.
Without control plane nodes, Kubernetes will not respond to changes in the
system, and certain central services may not be available.
Talos nodes which have .machine.type of controlplane are control plane nodes.
Control plane nodes are tainted by default to prevent workloads from being scheduled to control plane nodes.
How many control plane nodes should be deployed?
Because control plane nodes are so important, it is important that they be
deployed with redundancy to ensure consistent, reliable operation of the cluster
during upgrades, reboots, hardware failures, and other such events.
This is also known as high-availability or just HA.
Non-HA clusters are sometimes used as test clusters, CI clusters, or in specific scenarios
which warrant the loss of redundancy, but they should almost never be used in production.
Maintaining the proper count of control plane nodes is also critical.
The etcd database operates on the principles of membership and quorum, so
membership should always be an odd number, and there is exponentially-increasing
overhead for each additional member.
Therefore, the number of control plane nodes should almost always be 3.
In some particularly large or distributed clusters, the count may be 5, but this
is very rare.
See this document on the topic for more information.
What is the control plane endpoint?
The Kubernetes control plane endpoint is the single canonical URL by which the
Kubernetes API is accessed.
Especially with high-availability (HA) control planes, it is common that this endpoint may not point to the Kubernetes API server
directly, but may be instead point to a load balancer or a DNS name which may
have multiple A and AAAA records.
Like Talos’ own API, the Kubernetes API is constructed with mutual TLS, client
certs, and a common Certificate Authority (CA).
Unlike general-purpose websites, there is no need for an upstream CA, so tools
such as cert-manager, services such as Let’s Encrypt, or purchased products such
as validated TLS certificates are not required.
Encryption, however, is, and hence the URL scheme will always be https://.
By default, the Kubernetes API server in Talos runs on port 6443.
As such, the control plane endpoint URLs for Talos will almost always be of the form
https://endpoint:6443, noting that the port, since it is not the https
default of 443 is required.
The endpoint above may be a DNS name or IP address, but it should be
ultimately be directed to the set of all controlplane nodes, as opposed to a
single one.
As mentioned above, this can be achieved by a number of strategies, including:
BGP peering of a shared IP (such as with kube-vip)
Using a DNS name here is usually a good idea, it being the most flexible
option, since it allows the combination with any other option, while offering
a layer of abstraction.
It allows the underlying IP addresses to change over time without impacting the
canonical URL.
Unlike most services in Kubernetes, the API server runs with host networking,
meaning that it shares the network namespace with the host.
This means you can use the IP address(es) of the host to refer to the Kubernetes
API server.
For availability of the API, it is important that any load balancer be aware of
the health of the backend API servers.
This makes a load balancer-based system valuable to minimize disruptions during
common node lifecycle operations like reboots and upgrades.
It is critical that control plane endpoint works correctly during cluster bootstrap phase, as nodes discover
each other using control plane endpoint.
kubelet is not running on control plane node
The kubelet service should be running on control plane nodes as soon as networking is configured:
$ talosctl -n <IP> service kubelet
NODE 172.20.0.2
ID kubelet
STATE Running
HEALTH OK
EVENTS [Running]: Health check successful (2m54s ago)[Running]: Health check failed: Get "http://127.0.0.1:10248/healthz": dial tcp 127.0.0.1:10248: connect: connection refused (3m4s ago)[Running]: Started task kubelet (PID 2334)for container kubelet (3m6s ago)[Preparing]: Creating service runner (3m6s ago)[Preparing]: Running pre state (3m15s ago)[Waiting]: Waiting for service "timed" to be "up"(3m15s ago)[Waiting]: Waiting for service "cri" to be "up", service "timed" to be "up"(3m16s ago)[Waiting]: Waiting for service "cri" to be "up", service "networkd" to be "up", service "timed" to be "up"(3m18s ago)
If the kubelet is not running, it may be due to invalid configuration.
Check kubelet logs with the talosctl logs command:
By far the most likely cause of etcd not running is because the cluster has
not yet been bootstrapped or because bootstrapping is currently in progress.
The talosctl bootstrap command must be run manually and only once per
cluster, and this step is commonly missed.
Once a node is bootstrapped, it will start etcd and, over the course of a
minute or two (depending on the download speed of the control plane nodes), the
other control plane nodes should discover it and join themselves to the cluster.
Also, etcd will only run on control plane nodes.
If a node is designated as a worker node, you should not expect etcd to be
running on it.
When node boots for the first time, the etcd data directory (/var/lib/etcd) is empty, and it will only be populated when etcd is launched.
If etcd is not running, check service etcd state:
$ talosctl -n <IP> service etcd
NODE 172.20.0.2
ID etcd
STATE Running
HEALTH OK
EVENTS [Running]: Health check successful (3m21s ago)[Running]: Started task etcd (PID 2343)for container etcd (3m26s ago)[Preparing]: Creating service runner (3m26s ago)[Preparing]: Running pre state (3m26s ago)[Waiting]: Waiting for service "cri" to be "up", service "networkd" to be "up", service "timed" to be "up"(3m26s ago)
If service is stuck in Preparing state for bootstrap node, it might be related to slow network - at this stage
Talos pulls the etcd image from the container registry.
If the etcd service is crashing and restarting, check its logs with talosctl -n <IP> logs etcd.
The most common reasons for crashes are:
wrong arguments passed via extraArgs in the configuration;
booting Talos on non-empty disk with previous Talos installation, /var/lib/etcd contains data from old cluster.
etcd is not running on non-bootstrap control plane node
The etcd service on control plane nodes which were not the target of the cluster bootstrap will wait until the bootstrapped control plane node has completed.
The bootstrap and discovery processes may take a few minutes to complete.
As soon as the bootstrapped node starts its Kubernetes control plane components, kubectl get endpoints will return the IP of bootstrapped control plane node.
At this point, the other control plane nodes will start their etcd services, join the cluster, and then start their own Kubernetes control plane components.
Kubernetes static pod definitions are not generated
Talos should write the static pod definitions for the Kubernetes control plane
in /etc/kubernetes/manifests:
$ talosctl -n <IP> ls /etc/kubernetes/manifests
NODE NAME
172.20.0.2 .
172.20.0.2 talos-kube-apiserver.yaml
172.20.0.2 talos-kube-controller-manager.yaml
172.20.0.2 talos-kube-scheduler.yaml
If the static pod definitions are not rendered, check etcd and kubelet service health (see above)
and the controller runtime logs (talosctl logs controller-runtime).
Talos prints error an error on the server ("") has prevented the request from succeeding
This is expected during initial cluster bootstrap and sometimes after a reboot:
[ 70.093289][talos] task labelNodeAsMaster (1/1): starting
[ 80.094038][talos] retrying error: an error on the server ("") has prevented the request from succeeding (get nodes talos-default-master-1)
Initially kube-apiserver component is not running yet, and it takes some time before it becomes fully up
during bootstrap (image should be pulled from the Internet, etc.)
Once the control plane endpoint is up, Talos should continue with its boot
process.
If Talos doesn’t proceed, it may be due to a configuration issue.
In any case, the status of the control plane components on each control plane nodes can be checked with talosctl containers -k:
If kube-apiserver shows as CONTAINER_EXITED, it might have exited due to configuration error.
Logs can be checked with taloctl logs --kubernetes (or with -k as a shorthand):
$ talosctl -n <IP> logs -k kube-system/kube-apiserver-talos-default-master-1:kube-apiserver
172.20.0.2: 2021-03-05T20:46:13.133902064Z stderr F 2021/03/05 20:46:13 Running command:
172.20.0.2: 2021-03-05T20:46:13.133933824Z stderr F Command env: (log-file=, also-stdout=false, redirect-stderr=true)172.20.0.2: 2021-03-05T20:46:13.133938524Z stderr F Run from directory:
172.20.0.2: 2021-03-05T20:46:13.13394154Z stderr F Executable path: /usr/local/bin/kube-apiserver
...
Talos prints error nodes "talos-default-master-1" not found
This error means that kube-apiserver is up and the control plane endpoint is healthy, but the kubelet hasn’t received
its client certificate yet, and it wasn’t able to register itself to Kubernetes.
The Kubernetes controller manager (kube-controller-manager)is responsible for monitoring the certificate
signing requests (CSRs) and issuing certificates for each of them.
The kubelet is responsible for generating and submitting the CSRs for its
associated node.
For the kubelet to get its client certificate, then, the Kubernetes control plane
must be healthy:
the API server is running and available at the Kubernetes control plane
endpoint URL
the controller manager is running and a leader has been elected
The states of any CSRs can be checked with kubectl get csr:
$ kubectl get csr
NAME AGE SIGNERNAME REQUESTOR CONDITION
csr-jcn9j 14m kubernetes.io/kube-apiserver-client-kubelet system:bootstrap:q9pyzr Approved,Issued
csr-p6b9q 14m kubernetes.io/kube-apiserver-client-kubelet system:bootstrap:q9pyzr Approved,Issued
csr-sw6rm 14m kubernetes.io/kube-apiserver-client-kubelet system:bootstrap:q9pyzr Approved,Issued
csr-vlghg 14m kubernetes.io/kube-apiserver-client-kubelet system:bootstrap:q9pyzr Approved,Issued
Talos prints error node not ready
A Node in Kubernetes is marked as Ready only once its CNI is up.
It takes a minute or two for the CNI images to be pulled and for the CNI to start.
If the node is stuck in this state for too long, check CNI pods and logs with kubectl.
Usually, CNI-related resources are created in kube-system namespace.
For example, for Talos default Flannel CNI:
$ kubectl -n kube-system get pods
NAME READY STATUS RESTARTS AGE
...
kube-flannel-25drx 1/1 Running 0 23m
kube-flannel-8lmb6 1/1 Running 0 23m
kube-flannel-gl7nx 1/1 Running 0 23m
kube-flannel-jknt9 1/1 Running 0 23m
...
Talos prints error x509: certificate signed by unknown authority
The full error might look like:
x509: certificate signed by unknown authority (possiby because of crypto/rsa: verification error" while trying to verify candidate authority certificate "kubernetes"
Usually, this occurs because the control plane endpoint points to a different
cluster than the client certificate was generated for.
If a node was recycled between clusters, make sure it was properly wiped between
uses.
If a client has multiple client configurations, make sure you are matching the correct talosconfig with the
correct cluster.
etcd is running on bootstrap node, but stuck in pre state on non-bootstrap nodes
Please see question etcd is not running on non-bootstrap control plane node.
Checking kube-controller-manager and kube-scheduler
If the control plane endpoint is up, the status of the pods can be ascertained with kubectl:
$ kubectl get pods -n kube-system -l k8s-app=kube-controller-manager
NAME READY STATUS RESTARTS AGE
kube-controller-manager-talos-default-master-1 1/1 Running 0 28m
kube-controller-manager-talos-default-master-2 1/1 Running 0 28m
kube-controller-manager-talos-default-master-3 1/1 Running 0 28m
If the control plane endpoint is not yet up, the container status of the control plane components can be queried with
talosctl containers --kubernetes:
If some of the containers are not running, it could be that image is still being pulled.
Otherwise the process might crashing.
The logs can be checked with talosctl logs --kubernetes <containerID>:
$ talosctl -n <IP> logs -k kube-system/kube-controller-manager-talos-default-master-1:kube-controller-manager
172.20.0.3: 2021-03-09T13:59:34.291667526Z stderr F 2021/03/09 13:59:34 Running command:
172.20.0.3: 2021-03-09T13:59:34.291702262Z stderr F Command env: (log-file=, also-stdout=false, redirect-stderr=true)172.20.0.3: 2021-03-09T13:59:34.291707121Z stderr F Run from directory:
172.20.0.3: 2021-03-09T13:59:34.291710908Z stderr F Executable path: /usr/local/bin/kube-controller-manager
172.20.0.3: 2021-03-09T13:59:34.291719163Z stderr F Args (comma-delimited): /usr/local/bin/kube-controller-manager,--allocate-node-cidrs=true,--cloud-provider=,--cluster-cidr=10.244.0.0/16,--service-cluster-ip-range=10.96.0.0/12,--cluster-signing-cert-file=/system/secrets/kubernetes/kube-controller-manager/ca.crt,--cluster-signing-key-file=/system/secrets/kubernetes/kube-controller-manager/ca.key,--configure-cloud-routes=false,--kubeconfig=/system/secrets/kubernetes/kube-controller-manager/kubeconfig,--leader-elect=true,--root-ca-file=/system/secrets/kubernetes/kube-controller-manager/ca.crt,--service-account-private-key-file=/system/secrets/kubernetes/kube-controller-manager/service-account.key,--profiling=false172.20.0.3: 2021-03-09T13:59:34.293870359Z stderr F 2021/03/09 13:59:34 Now listening for interrupts
172.20.0.3: 2021-03-09T13:59:34.761113762Z stdout F I0309 13:59:34.760982 10 serving.go:331] Generated self-signed cert in-memory
...
Checking controller runtime logs
Talos runs a set of controllers which operate on resources to build and support the Kubernetes control plane.
Some debugging information can be queried from the controller logs with talosctl logs controller-runtime:
Controllers continuously run a reconcile loop, so at any time, they may be starting, failing, or restarting.
This is expected behavior.
Things to look for:
v1alpha1.BootstrapStatusController: bootkube initialized status not found: control plane is not self-hosted, running with static pods.
k8s.KubeletStaticPodController: writing static pod "/etc/kubernetes/manifests/talos-kube-apiserver.yaml": static pod definitions were rendered successfully.
k8s.ManifestApplyController: controller failed: error creating mapping for object /v1/Secret/bootstrap-token-q9pyzr: an error on the server ("") has prevented the request from succeeding: control plane endpoint is not up yet, bootstrap manifests can’t be injected, controller is going to retry.
k8s.KubeletStaticPodController: controller failed: error refreshing pod status: error fetching pod status: an error on the server ("Authorization error (user=apiserver-kubelet-client, verb=get, resource=nodes, subresource=proxy)") has prevented the request from succeeding: kubelet hasn’t been able to contact kube-apiserver yet to push pod status, controller
is going to retry.
k8s.ManifestApplyController: created rbac.authorization.k8s.io/v1/ClusterRole/psp:privileged: one of the bootstrap manifests got successfully applied.
secrets.KubernetesController: controller failed: missing cluster.aggregatorCA secret: Talos is running with 0.8 configuration, if the cluster was upgraded from 0.8, this is expected, and conversion process will fix machine config
automatically.
If this cluster was bootstrapped with version 0.9, machine configuration should be regenerated with 0.9 talosctl.
If there are no new messages in the controller-runtime log, it means that the controllers have successfully finished reconciling, and that the current system state is the desired system state.
Checking static pod definitions
Talos generates static pod definitions for the kube-apiserver, kube-controller-manager, and kube-scheduler
components based on its machine configuration.
These definitions can be checked as resources with talosctl get staticpods:
The status of the static pods can queried with talosctl get staticpodstatus:
$ talosctl -n <IP> get staticpodstatus
NODE NAMESPACE TYPE ID VERSION READY
172.20.0.2 controlplane StaticPodStatus kube-system/kube-apiserver-talos-default-master-1 1 True
172.20.0.2 controlplane StaticPodStatus kube-system/kube-controller-manager-talos-default-master-1 1 True
172.20.0.2 controlplane StaticPodStatus kube-system/kube-scheduler-talos-default-master-1 1 True
The most important status field is READY, which is the last column printed.
The complete status can be fetched by adding -o yaml flag.
Checking bootstrap manifests
As part of the bootstrap process, Talos injects bootstrap manifests into Kubernetes API server.
There are two kinds of these manifests: system manifests built-in into Talos and extra manifests downloaded (custom CNI, extra manifests in the machine config):
Worker node is stuck with apid health check failures
Control plane nodes have enough secret material to generate apid server certificates, but worker nodes
depend on control plane trustd services to generate certificates.
Worker nodes wait for their kubelet to join the cluster.
Then the Talos apid queries the Kubernetes endpoints via control plane
endpoint to find trustd endpoints.
They then use trustd to request and receive their certificate.
So if apid health checks are failing on worker node:
System_partitions_to_wipe lists specific system disk partitions to be reset (wiped). If system_partitions_to_wipe is empty, all the partitions are erased.
Snapshot can be later used to recover the cluster via Bootstrap method. |
| EtcdSnapshot | EtcdSnapshotRequest | .common.Data stream | EtcdSnapshot method creates etcd data snapshot (backup) from the local etcd instance and streams it back to the client.
--cert-fingerprint strings list of server certificate fingeprints to accept (defaults to no check)
-f, --file string the filename of the updated configuration
-h, --help help for apply-config
-i, --insecure apply the config using the insecure (encrypted with no auth) maintenance service
-m, --mode auto, interactive, no-reboot, reboot, staged apply config mode (default auto)
Options inherited from parent commands
--context string Context to be used in command
-e, --endpoints strings override default endpoints in Talos configuration
-n, --nodes strings target the specified nodes
--talosconfig string The path to the Talos configuration file (default "/home/user/.talos/config")
SEE ALSO
talosctl - A CLI for out-of-band management of Kubernetes nodes created by Talos
talosctl bootstrap
Bootstrap the etcd cluster on the specified node.
Synopsis
When Talos cluster is created etcd service on control plane nodes enter the join loop waiting
to join etcd peers from other control plane nodes. One node should be picked as the boostrap node.
When boostrap command is issued, the node aborts join process and bootstraps etcd cluster as a single node cluster.
Other control plane nodes will join etcd cluster once Kubernetes is boostrapped on the bootstrap node.
This command should not be used when “init” type node are used.
Talos etcd cluster can be recovered from a known snapshot with ‘–recover-from=’ flag.
talosctl bootstrap [flags]
Options
-h, --help help for bootstrap
--recover-from string recover etcd cluster from the snapshot
--recover-skip-hash-check skip integrity check when recovering etcd (use when recovering from data directory copy)
Options inherited from parent commands
--context string Context to be used in command
-e, --endpoints strings override default endpoints in Talos configuration
-n, --nodes strings target the specified nodes
--talosconfig string The path to the Talos configuration file (default "/home/user/.talos/config")
SEE ALSO
talosctl - A CLI for out-of-band management of Kubernetes nodes created by Talos
talosctl cluster create
Creates a local docker-based or QEMU-based kubernetes cluster
talosctl cluster create [flags]
Options
--arch string cluster architecture (default "amd64")
--bad-rtc launch VM with bad RTC state (QEMU only)
--cidr string CIDR of the cluster network (IPv4, ULA network for IPv6 is derived in automated way) (default "10.5.0.0/24")
--cni-bin-path strings search path for CNI binaries (VM only) (default [/home/user/.talos/cni/bin])
--cni-bundle-url string URL to download CNI bundle from (VM only) (default "https://github.com/siderolabs/talos/releases/download/v0.15.0-alpha.2/talosctl-cni-bundle-${ARCH}.tar.gz")
--cni-cache-dir string CNI cache directory path (VM only) (default "/home/user/.talos/cni/cache")
--cni-conf-dir string CNI config directory path (VM only) (default "/home/user/.talos/cni/conf.d")
--config-patch stringArray patch generated machineconfigs (applied to all node types), use @file to read a patch from file
--config-patch-control-plane stringArray patch generated machineconfigs (applied to 'init' and 'controlplane' types)
--config-patch-worker stringArray patch generated machineconfigs (applied to 'worker' type)
--cpus string the share of CPUs as fraction (each control plane/VM) (default "2.0")
--cpus-workers string the share of CPUs as fraction (each worker/VM) (default "2.0")
--crashdump print debug crashdump to stderr when cluster startup fails
--custom-cni-url string install custom CNI from the URL (Talos cluster)
--disk int default limit on disk size in MB (each VM) (default 6144)
--disk-image-path string disk image to use
--dns-domain string the dns domain to use for cluster (default "cluster.local")
--docker-host-ip string Host IP to forward exposed ports to (Docker provisioner only) (default "0.0.0.0")
--encrypt-ephemeral enable ephemeral partition encryption
--encrypt-state enable state partition encryption
--endpoint string use endpoint instead of provider defaults
-p, --exposed-ports string Comma-separated list of ports/protocols to expose on init node. Ex -p <hostPort>:<containerPort>/<protocol (tcp or udp)> (Docker provisioner only)
--extra-boot-kernel-args string add extra kernel args to the initial boot from vmlinuz and initramfs (QEMU only)
--extra-disks int number of extra disks to create for each worker VM
--extra-disks-size int default limit on disk size in MB (each VM) (default 5120)
--extra-uefi-search-paths strings additional search paths for UEFI firmware (only applies when UEFI is enabled)
-h, --help help for create
--image string the image to use (default "ghcr.io/siderolabs/talos:latest")
--init-node-as-endpoint use init node as endpoint instead of any load balancer endpoint
--initrd-path string initramfs image to use (default "_out/initramfs-${ARCH}.xz")
-i, --input-dir string location of pre-generated config files
--install-image string the installer image to use (default "ghcr.io/siderolabs/installer:latest")
--ipv4 enable IPv4 network in the cluster (default true)
--ipv6 enable IPv6 network in the cluster (QEMU provisioner only)
--iso-path string the ISO path to use for the initial boot (VM only)
--kubernetes-version string desired kubernetes version to run (default "1.23.5")
--masters int the number of masters to create (default 1)
--memory int the limit on memory usage in MB (each control plane/VM) (default 2048)
--memory-workers int the limit on memory usage in MB (each worker/VM) (default 2048)
--mtu int MTU of the cluster network (default 1500)
--nameservers strings list of nameservers to use (default [8.8.8.8,1.1.1.1,2001:4860:4860::8888,2606:4700:4700::1111])
--registry-insecure-skip-verify strings list of registry hostnames to skip TLS verification for
--registry-mirror strings list of registry mirrors to use in format: <registry host>=<mirror URL>
--skip-injecting-config skip injecting config from embedded metadata server, write config files to current directory
--skip-kubeconfig skip merging kubeconfig from the created cluster
--talos-version string the desired Talos version to generate config for (if not set, defaults to image version)
--use-vip use a virtual IP for the controlplane endpoint instead of the loadbalancer
--user-disk strings list of disks to create for each VM in format: <mount_point1>:<size1>:<mount_point2>:<size2>
--vmlinuz-path string the compressed kernel image to use (default "_out/vmlinuz-${ARCH}")
--wait wait for the cluster to be ready before returning (default true)
--wait-timeout duration timeout to wait for the cluster to be ready (default 20m0s)
--wireguard-cidr string CIDR of the wireguard network
--with-apply-config enable apply config when the VM is starting in maintenance mode
--with-bootloader enable bootloader to load kernel and initramfs from disk image after install (default true)
--with-cluster-discovery enable cluster discovery (default true)
--with-debug enable debug in Talos config to send service logs to the console
--with-init-node create the cluster with an init node
--with-kubespan enable KubeSpan system
--with-uefi enable UEFI on x86_64 architecture (default true)
--workers int the number of workers to create (default 1)
Options inherited from parent commands
--context string Context to be used in command
-e, --endpoints strings override default endpoints in Talos configuration
--name string the name of the cluster (default "talos-default")
-n, --nodes strings target the specified nodes
--provisioner string Talos cluster provisioner to use (default "docker")
--state string directory path to store cluster state (default "/home/user/.talos/clusters")
--talosconfig string The path to the Talos configuration file (default "/home/user/.talos/config")
SEE ALSO
talosctl cluster - A collection of commands for managing local docker-based or QEMU-based clusters
talosctl cluster destroy
Destroys a local docker-based or firecracker-based kubernetes cluster
talosctl cluster destroy [flags]
Options
-h, --help help for destroy
Options inherited from parent commands
--context string Context to be used in command
-e, --endpoints strings override default endpoints in Talos configuration
--name string the name of the cluster (default "talos-default")
-n, --nodes strings target the specified nodes
--provisioner string Talos cluster provisioner to use (default "docker")
--state string directory path to store cluster state (default "/home/user/.talos/clusters")
--talosconfig string The path to the Talos configuration file (default "/home/user/.talos/config")
SEE ALSO
talosctl cluster - A collection of commands for managing local docker-based or QEMU-based clusters
talosctl cluster show
Shows info about a local provisioned kubernetes cluster
talosctl cluster show [flags]
Options
-h, --help help for show
Options inherited from parent commands
--context string Context to be used in command
-e, --endpoints strings override default endpoints in Talos configuration
--name string the name of the cluster (default "talos-default")
-n, --nodes strings target the specified nodes
--provisioner string Talos cluster provisioner to use (default "docker")
--state string directory path to store cluster state (default "/home/user/.talos/clusters")
--talosconfig string The path to the Talos configuration file (default "/home/user/.talos/config")
SEE ALSO
talosctl cluster - A collection of commands for managing local docker-based or QEMU-based clusters
talosctl cluster
A collection of commands for managing local docker-based or QEMU-based clusters
Options
-h, --help help for cluster
--name string the name of the cluster (default "talos-default")
--provisioner string Talos cluster provisioner to use (default "docker")
--state string directory path to store cluster state (default "/home/user/.talos/clusters")
Options inherited from parent commands
--context string Context to be used in command
-e, --endpoints strings override default endpoints in Talos configuration
-n, --nodes strings target the specified nodes
--talosconfig string The path to the Talos configuration file (default "/home/user/.talos/config")
SEE ALSO
talosctl - A CLI for out-of-band management of Kubernetes nodes created by Talos
Output shell completion code for the specified shell (bash, fish or zsh)
Synopsis
Output shell completion code for the specified shell (bash, fish or zsh).
The shell code must be evaluated to provide interactive
completion of talosctl commands. This can be done by sourcing it from
the .bash_profile.
Note for zsh users: [1] zsh completions are only supported in versions of zsh >= 5.2
talosctl completion SHELL [flags]
Examples
# Installing bash completion on macOS using homebrew
## If running Bash 3.2 included with macOS
brew install bash-completion
## or, if running Bash 4.1+
brew install bash-completion@2
## If talosctl is installed via homebrew, this should start working immediately.
## If you've installed via other means, you may need add the completion to your completion directory
talosctl completion bash > $(brew --prefix)/etc/bash_completion.d/talosctl
# Installing bash completion on Linux
## If bash-completion is not installed on Linux, please install the 'bash-completion' package
## via your distribution's package manager.
## Load the talosctl completion code for bash into the current shell
source <(talosctl completion bash)
## Write bash completion code to a file and source if from .bash_profile
talosctl completion bash > ~/.talos/completion.bash.inc
printf "
# talosctl shell completion
source '$HOME/.talos/completion.bash.inc'
" >> $HOME/.bash_profile
source $HOME/.bash_profile
# Load the talosctl completion code for fish[1] into the current shell
talosctl completion fish | source
# Set the talosctl completion code for fish[1] to autoload on startup
talosctl completion fish > ~/.config/fish/completions/talosctl.fish
# Load the talosctl completion code for zsh[1] into the current shell
source <(talosctl completion zsh)
# Set the talosctl completion code for zsh[1] to autoload on startup
talosctl completion zsh > "${fpath[1]}/_talosctl"
Options
-h, --help help for completion
Options inherited from parent commands
--context string Context to be used in command
-e, --endpoints strings override default endpoints in Talos configuration
-n, --nodes strings target the specified nodes
--talosconfig string The path to the Talos configuration file (default "/home/user/.talos/config")
SEE ALSO
talosctl - A CLI for out-of-band management of Kubernetes nodes created by Talos
talosctl config add
Add a new context
talosctl config add <context> [flags]
Options
--ca string the path to the CA certificate
--crt string the path to the certificate
-h, --help help for add
--key string the path to the key
Options inherited from parent commands
--context string Context to be used in command
-e, --endpoints strings override default endpoints in Talos configuration
-n, --nodes strings target the specified nodes
--talosconfig string The path to the Talos configuration file (default "/home/user/.talos/config")
SEE ALSO
talosctl config - Manage the client configuration file (talosconfig)
talosctl config context
Set the current context
talosctl config context <context> [flags]
Options
-h, --help help for context
Options inherited from parent commands
--context string Context to be used in command
-e, --endpoints strings override default endpoints in Talos configuration
-n, --nodes strings target the specified nodes
--talosconfig string The path to the Talos configuration file (default "/home/user/.talos/config")
SEE ALSO
talosctl config - Manage the client configuration file (talosconfig)
talosctl config contexts
List defined contexts
talosctl config contexts [flags]
Options
-h, --help help for contexts
Options inherited from parent commands
--context string Context to be used in command
-e, --endpoints strings override default endpoints in Talos configuration
-n, --nodes strings target the specified nodes
--talosconfig string The path to the Talos configuration file (default "/home/user/.talos/config")
SEE ALSO
talosctl config - Manage the client configuration file (talosconfig)
talosctl config endpoint
Set the endpoint(s) for the current context
talosctl config endpoint <endpoint>... [flags]
Options
-h, --help help for endpoint
Options inherited from parent commands
--context string Context to be used in command
-e, --endpoints strings override default endpoints in Talos configuration
-n, --nodes strings target the specified nodes
--talosconfig string The path to the Talos configuration file (default "/home/user/.talos/config")
SEE ALSO
talosctl config - Manage the client configuration file (talosconfig)
talosctl config info
Show information about the current context
talosctl config info [flags]
Options
-h, --help help for info
Options inherited from parent commands
--context string Context to be used in command
-e, --endpoints strings override default endpoints in Talos configuration
-n, --nodes strings target the specified nodes
--talosconfig string The path to the Talos configuration file (default "/home/user/.talos/config")
SEE ALSO
talosctl config - Manage the client configuration file (talosconfig)
talosctl config merge
Merge additional contexts from another client configuration file
Synopsis
Contexts with the same name are renamed while merging configs.
talosctl config merge <from> [flags]
Options
-h, --help help for merge
Options inherited from parent commands
--context string Context to be used in command
-e, --endpoints strings override default endpoints in Talos configuration
-n, --nodes strings target the specified nodes
--talosconfig string The path to the Talos configuration file (default "/home/user/.talos/config")
SEE ALSO
talosctl config - Manage the client configuration file (talosconfig)
talosctl config new
Generate a new client configuration file
talosctl config new [<path>] [flags]
Options
--crt-ttl duration certificate TTL (default 87600h0m0s)
-h, --help help for new
--roles strings roles (default [os:admin])
Options inherited from parent commands
--context string Context to be used in command
-e, --endpoints strings override default endpoints in Talos configuration
-n, --nodes strings target the specified nodes
--talosconfig string The path to the Talos configuration file (default "/home/user/.talos/config")
SEE ALSO
talosctl config - Manage the client configuration file (talosconfig)
talosctl config node
Set the node(s) for the current context
talosctl config node <endpoint>... [flags]
Options
-h, --help help for node
Options inherited from parent commands
--context string Context to be used in command
-e, --endpoints strings override default endpoints in Talos configuration
-n, --nodes strings target the specified nodes
--talosconfig string The path to the Talos configuration file (default "/home/user/.talos/config")
SEE ALSO
talosctl config - Manage the client configuration file (talosconfig)
talosctl config
Manage the client configuration file (talosconfig)
Options
-h, --help help for config
Options inherited from parent commands
--context string Context to be used in command
-e, --endpoints strings override default endpoints in Talos configuration
-n, --nodes strings target the specified nodes
--talosconfig string The path to the Talos configuration file (default "/home/user/.talos/config")
SEE ALSO
talosctl - A CLI for out-of-band management of Kubernetes nodes created by Talos
-h, --help help for kubernetes
--mode string conformance test mode: [fast, certified] (default "fast")
Options inherited from parent commands
--context string Context to be used in command
-e, --endpoints strings override default endpoints in Talos configuration
-n, --nodes strings target the specified nodes
--talosconfig string The path to the Talos configuration file (default "/home/user/.talos/config")
--context string Context to be used in command
-e, --endpoints strings override default endpoints in Talos configuration
-n, --nodes strings target the specified nodes
--talosconfig string The path to the Talos configuration file (default "/home/user/.talos/config")
SEE ALSO
talosctl - A CLI for out-of-band management of Kubernetes nodes created by Talos
-h, --help help for containers
-k, --kubernetes use the k8s.io containerd namespace
Options inherited from parent commands
--context string Context to be used in command
-e, --endpoints strings override default endpoints in Talos configuration
-n, --nodes strings target the specified nodes
--talosconfig string The path to the Talos configuration file (default "/home/user/.talos/config")
SEE ALSO
talosctl - A CLI for out-of-band management of Kubernetes nodes created by Talos
talosctl copy
Copy data out from the node
Synopsis
Creates an .tar.gz archive at the node starting at and
streams it back to the client.
If ‘-’ is given for , archive is written to stdout.
Otherwise archive is extracted to which should be an empty directory or
talosctl creates a directory if doesn’t exist. Command doesn’t preserve
ownership and access mode for the files in extract mode, while streamed .tar archive
captures ownership and permission bits.
talosctl copy <src-path> -|<local-path> [flags]
Options
-h, --help help for copy
Options inherited from parent commands
--context string Context to be used in command
-e, --endpoints strings override default endpoints in Talos configuration
-n, --nodes strings target the specified nodes
--talosconfig string The path to the Talos configuration file (default "/home/user/.talos/config")
SEE ALSO
talosctl - A CLI for out-of-band management of Kubernetes nodes created by Talos
talosctl dashboard
Cluster dashboard with real-time metrics
Synopsis
Provide quick UI to navigate through node real-time metrics.
Keyboard shortcuts:
h, : switch one node to the left
l, : switch one node to the right
j, : scroll process list down
k, : scroll process list up
: scroll process list half page down
: scroll process list half page up
: scroll process list one page down
: scroll process list one page up
talosctl dashboard [flags]
Options
-h, --help help for dashboard
-d, --update-interval duration interval between updates (default 3s)
Options inherited from parent commands
--context string Context to be used in command
-e, --endpoints strings override default endpoints in Talos configuration
-n, --nodes strings target the specified nodes
--talosconfig string The path to the Talos configuration file (default "/home/user/.talos/config")
SEE ALSO
talosctl - A CLI for out-of-band management of Kubernetes nodes created by Talos
talosctl disks
Get the list of disks from /sys/block on the machine
talosctl disks [flags]
Options
-h, --help help for disks
-i, --insecure get disks using the insecure (encrypted with no auth) maintenance service
Options inherited from parent commands
--context string Context to be used in command
-e, --endpoints strings override default endpoints in Talos configuration
-n, --nodes strings target the specified nodes
--talosconfig string The path to the Talos configuration file (default "/home/user/.talos/config")
SEE ALSO
talosctl - A CLI for out-of-band management of Kubernetes nodes created by Talos
talosctl dmesg
Retrieve kernel logs
talosctl dmesg [flags]
Options
-f, --follow specify if the kernel log should be streamed
-h, --help help for dmesg
--tail specify if only new messages should be sent (makes sense only when combined with --follow)
Options inherited from parent commands
--context string Context to be used in command
-e, --endpoints strings override default endpoints in Talos configuration
-n, --nodes strings target the specified nodes
--talosconfig string The path to the Talos configuration file (default "/home/user/.talos/config")
SEE ALSO
talosctl - A CLI for out-of-band management of Kubernetes nodes created by Talos
talosctl edit
Edit a resource from the default editor.
Synopsis
The edit command allows you to directly edit any API resource
you can retrieve via the command line tools.
It will open the editor defined by your TALOS_EDITOR,
or EDITOR environment variables, or fall back to ‘vi’ for Linux
or ’notepad’ for Windows.
talosctl edit <type> [<id>] [flags]
Options
-h, --help help for edit
-m, --mode auto, no-reboot, reboot, staged apply config mode (default auto)
--namespace string resource namespace (default is to use default namespace per resource)
Options inherited from parent commands
--context string Context to be used in command
-e, --endpoints strings override default endpoints in Talos configuration
-n, --nodes strings target the specified nodes
--talosconfig string The path to the Talos configuration file (default "/home/user/.talos/config")
SEE ALSO
talosctl - A CLI for out-of-band management of Kubernetes nodes created by Talos
talosctl etcd forfeit-leadership
Tell node to forfeit etcd cluster leadership
talosctl etcd forfeit-leadership [flags]
Options
-h, --help help for forfeit-leadership
Options inherited from parent commands
--context string Context to be used in command
-e, --endpoints strings override default endpoints in Talos configuration
-n, --nodes strings target the specified nodes
--talosconfig string The path to the Talos configuration file (default "/home/user/.talos/config")
--context string Context to be used in command
-e, --endpoints strings override default endpoints in Talos configuration
-n, --nodes strings target the specified nodes
--talosconfig string The path to the Talos configuration file (default "/home/user/.talos/config")
--context string Context to be used in command
-e, --endpoints strings override default endpoints in Talos configuration
-n, --nodes strings target the specified nodes
--talosconfig string The path to the Talos configuration file (default "/home/user/.talos/config")
Use this command only if you want to remove a member which is in broken state.
If there is no access to the node, or the node can’t access etcd to call etcd leave.
Always prefer etcd leave over this command.
talosctl etcd remove-member <hostname> [flags]
Options
-h, --help help for remove-member
Options inherited from parent commands
--context string Context to be used in command
-e, --endpoints strings override default endpoints in Talos configuration
-n, --nodes strings target the specified nodes
--talosconfig string The path to the Talos configuration file (default "/home/user/.talos/config")
--context string Context to be used in command
-e, --endpoints strings override default endpoints in Talos configuration
-n, --nodes strings target the specified nodes
--talosconfig string The path to the Talos configuration file (default "/home/user/.talos/config")
--context string Context to be used in command
-e, --endpoints strings override default endpoints in Talos configuration
-n, --nodes strings target the specified nodes
--talosconfig string The path to the Talos configuration file (default "/home/user/.talos/config")
SEE ALSO
talosctl - A CLI for out-of-band management of Kubernetes nodes created by Talos
--duration duration show events for the past duration interval (one second resolution, default is to show no history)
-h, --help help for events
--since string show events after the specified event ID (default is to show no history)
--tail int32 show specified number of past events (use -1 to show full history, default is to show no history)
Options inherited from parent commands
--context string Context to be used in command
-e, --endpoints strings override default endpoints in Talos configuration
-n, --nodes strings target the specified nodes
--talosconfig string The path to the Talos configuration file (default "/home/user/.talos/config")
SEE ALSO
talosctl - A CLI for out-of-band management of Kubernetes nodes created by Talos
talosctl gen ca
Generates a self-signed X.509 certificate authority
talosctl gen ca [flags]
Options
-h, --help help for ca
--hours int the hours from now on which the certificate validity period ends (default 87600)
--organization string X.509 distinguished name for the Organization
--rsa generate in RSA format
Options inherited from parent commands
--context string Context to be used in command
-e, --endpoints strings override default endpoints in Talos configuration
-n, --nodes strings target the specified nodes
--talosconfig string The path to the Talos configuration file (default "/home/user/.talos/config")
SEE ALSO
talosctl gen - Generate CAs, certificates, and private keys
talosctl gen config
Generates a set of configuration files for Talos cluster
Synopsis
The cluster endpoint is the URL for the Kubernetes API. If you decide to use
a control plane node, common in a single node control plane setup, use port 6443 as
this is the port that the API server binds to on every control plane node. For an HA
setup, usually involving a load balancer, use the IP and port of the load balancer.
talosctl gen config <cluster name> <cluster endpoint> [flags]
Options
--additional-sans strings additional Subject-Alt-Names for the APIServer certificate
--config-patch stringArray patch generated machineconfigs (applied to all node types), use @file to read a patch from file
--config-patch-control-plane stringArray patch generated machineconfigs (applied to 'init' and 'controlplane' types)
--config-patch-worker stringArray patch generated machineconfigs (applied to 'worker' type)
--dns-domain string the dns domain to use for cluster (default "cluster.local")
-h, --help help for config
--install-disk string the disk to install to (default "/dev/sda")
--install-image string the image used to perform an installation (default "ghcr.io/siderolabs/installer:latest")
--kubernetes-version string desired kubernetes version to run (default "1.23.5")
-o, --output-dir string destination to output generated files
-p, --persist the desired persist value for configs (default true)
--registry-mirror strings list of registry mirrors to use in format: <registry host>=<mirror URL>
--talos-version string the desired Talos version to generate config for (backwards compatibility, e.g. v0.8)
--version string the desired machine config version to generate (default "v1alpha1")
--with-cluster-discovery enable cluster discovery feature (default true)
--with-docs renders all machine configs adding the documentation for each field (default true)
--with-examples renders all machine configs with the commented examples (default true)
--with-kubespan enable KubeSpan feature
Options inherited from parent commands
--context string Context to be used in command
-e, --endpoints strings override default endpoints in Talos configuration
-n, --nodes strings target the specified nodes
--talosconfig string The path to the Talos configuration file (default "/home/user/.talos/config")
SEE ALSO
talosctl gen - Generate CAs, certificates, and private keys
talosctl gen crt
Generates an X.509 Ed25519 certificate
talosctl gen crt [flags]
Options
--ca string path to the PEM encoded CERTIFICATE
--csr string path to the PEM encoded CERTIFICATE REQUEST
-h, --help help for crt
--hours int the hours from now on which the certificate validity period ends (default 24)
--name string the basename of the generated file
Options inherited from parent commands
--context string Context to be used in command
-e, --endpoints strings override default endpoints in Talos configuration
-n, --nodes strings target the specified nodes
--talosconfig string The path to the Talos configuration file (default "/home/user/.talos/config")
SEE ALSO
talosctl gen - Generate CAs, certificates, and private keys
talosctl gen csr
Generates a CSR using an Ed25519 private key
talosctl gen csr [flags]
Options
-h, --help help for csr
--ip string generate the certificate for this IP address
--key string path to the PEM encoded EC or RSA PRIVATE KEY
--roles strings roles (default [os:admin])
Options inherited from parent commands
--context string Context to be used in command
-e, --endpoints strings override default endpoints in Talos configuration
-n, --nodes strings target the specified nodes
--talosconfig string The path to the Talos configuration file (default "/home/user/.talos/config")
SEE ALSO
talosctl gen - Generate CAs, certificates, and private keys
talosctl gen key
Generates an Ed25519 private key
talosctl gen key [flags]
Options
-h, --help help for key
--name string the basename of the generated file
Options inherited from parent commands
--context string Context to be used in command
-e, --endpoints strings override default endpoints in Talos configuration
-n, --nodes strings target the specified nodes
--talosconfig string The path to the Talos configuration file (default "/home/user/.talos/config")
SEE ALSO
talosctl gen - Generate CAs, certificates, and private keys
talosctl gen keypair
Generates an X.509 Ed25519 key pair
talosctl gen keypair [flags]
Options
-h, --help help for keypair
--ip string generate the certificate for this IP address
--organization string X.509 distinguished name for the Organization
Options inherited from parent commands
--context string Context to be used in command
-e, --endpoints strings override default endpoints in Talos configuration
-n, --nodes strings target the specified nodes
--talosconfig string The path to the Talos configuration file (default "/home/user/.talos/config")
SEE ALSO
talosctl gen - Generate CAs, certificates, and private keys
talosctl gen
Generate CAs, certificates, and private keys
Options
-h, --help help for gen
Options inherited from parent commands
--context string Context to be used in command
-e, --endpoints strings override default endpoints in Talos configuration
-n, --nodes strings target the specified nodes
--talosconfig string The path to the Talos configuration file (default "/home/user/.talos/config")
SEE ALSO
talosctl - A CLI for out-of-band management of Kubernetes nodes created by Talos
talosctl gen ca - Generates a self-signed X.509 certificate authority
talosctl gen config - Generates a set of configuration files for Talos cluster
Similar to ‘kubectl get’, ’talosctl get’ returns a set of resources from the OS.
To get a list of all available resource definitions, issue ’talosctl get rd’
talosctl get <type> [<id>] [flags]
Options
-h, --help help for get
-i, --insecure get resources using the insecure (encrypted with no auth) maintenance service
--namespace string resource namespace (default is to use default namespace per resource)
-o, --output string output mode (json, table, yaml) (default "table")
-w, --watch watch resource changes
Options inherited from parent commands
--context string Context to be used in command
-e, --endpoints strings override default endpoints in Talos configuration
-n, --nodes strings target the specified nodes
--talosconfig string The path to the Talos configuration file (default "/home/user/.talos/config")
SEE ALSO
talosctl - A CLI for out-of-band management of Kubernetes nodes created by Talos
talosctl health
Check cluster health
talosctl health [flags]
Options
--control-plane-nodes strings specify IPs of control plane nodes
-h, --help help for health
--init-node string specify IPs of init node
--k8s-endpoint string use endpoint instead of kubeconfig default
--run-e2e run Kubernetes e2e test
--server run server-side check (default true)
--wait-timeout duration timeout to wait for the cluster to be ready (default 20m0s)
--worker-nodes strings specify IPs of worker nodes
Options inherited from parent commands
--context string Context to be used in command
-e, --endpoints strings override default endpoints in Talos configuration
-n, --nodes strings target the specified nodes
--talosconfig string The path to the Talos configuration file (default "/home/user/.talos/config")
SEE ALSO
talosctl - A CLI for out-of-band management of Kubernetes nodes created by Talos
talosctl images
List the default images used by Talos
talosctl images [flags]
Options
-h, --help help for images
Options inherited from parent commands
--context string Context to be used in command
-e, --endpoints strings override default endpoints in Talos configuration
-n, --nodes strings target the specified nodes
--talosconfig string The path to the Talos configuration file (default "/home/user/.talos/config")
SEE ALSO
talosctl - A CLI for out-of-band management of Kubernetes nodes created by Talos
talosctl inspect dependencies
Inspect controller-resource dependencies as graphviz graph.
Synopsis
Inspect controller-resource dependencies as graphviz graph.
Pipe the output of the command through the “dot” program (part of graphviz package)
to render the graph:
-h, --help help for dependencies
--with-resources display live resource information with dependencies
Options inherited from parent commands
--context string Context to be used in command
-e, --endpoints strings override default endpoints in Talos configuration
-n, --nodes strings target the specified nodes
--talosconfig string The path to the Talos configuration file (default "/home/user/.talos/config")
--context string Context to be used in command
-e, --endpoints strings override default endpoints in Talos configuration
-n, --nodes strings target the specified nodes
--talosconfig string The path to the Talos configuration file (default "/home/user/.talos/config")
SEE ALSO
talosctl - A CLI for out-of-band management of Kubernetes nodes created by Talos
Download the admin kubeconfig from the node.
If merge flag is defined, config will be merged with ~/.kube/config or [local-path] if specified.
Otherwise kubeconfig will be written to PWD or [local-path] if specified.
talosctl kubeconfig [local-path] [flags]
Options
-f, --force Force overwrite of kubeconfig if already present, force overwrite on kubeconfig merge
--force-context-name string Force context name for kubeconfig merge
-h, --help help for kubeconfig
-m, --merge Merge with existing kubeconfig (default true)
Options inherited from parent commands
--context string Context to be used in command
-e, --endpoints strings override default endpoints in Talos configuration
-n, --nodes strings target the specified nodes
--talosconfig string The path to the Talos configuration file (default "/home/user/.talos/config")
SEE ALSO
talosctl - A CLI for out-of-band management of Kubernetes nodes created by Talos
talosctl list
Retrieve a directory listing
talosctl list [path] [flags]
Options
-d, --depth int32 maximum recursion depth (default 1)
-h, --help help for list
-H, --humanize humanize size and time in the output
-l, --long display additional file details
-r, --recurse recurse into subdirectories
-t, --type strings filter by specified types:
f regular file
d directory
l, L symbolic link
Options inherited from parent commands
--context string Context to be used in command
-e, --endpoints strings override default endpoints in Talos configuration
-n, --nodes strings target the specified nodes
--talosconfig string The path to the Talos configuration file (default "/home/user/.talos/config")
SEE ALSO
talosctl - A CLI for out-of-band management of Kubernetes nodes created by Talos
talosctl logs
Retrieve logs for a service
talosctl logs <service name> [flags]
Options
-f, --follow specify if the logs should be streamed
-h, --help help for logs
-k, --kubernetes use the k8s.io containerd namespace
--tail int32 lines of log file to display (default is to show from the beginning) (default -1)
Options inherited from parent commands
--context string Context to be used in command
-e, --endpoints strings override default endpoints in Talos configuration
-n, --nodes strings target the specified nodes
--talosconfig string The path to the Talos configuration file (default "/home/user/.talos/config")
SEE ALSO
talosctl - A CLI for out-of-band management of Kubernetes nodes created by Talos
talosctl memory
Show memory usage
talosctl memory [flags]
Options
-h, --help help for memory
-v, --verbose display extended memory statistics
Options inherited from parent commands
--context string Context to be used in command
-e, --endpoints strings override default endpoints in Talos configuration
-n, --nodes strings target the specified nodes
--talosconfig string The path to the Talos configuration file (default "/home/user/.talos/config")
SEE ALSO
talosctl - A CLI for out-of-band management of Kubernetes nodes created by Talos
talosctl mounts
List mounts
talosctl mounts [flags]
Options
-h, --help help for mounts
Options inherited from parent commands
--context string Context to be used in command
-e, --endpoints strings override default endpoints in Talos configuration
-n, --nodes strings target the specified nodes
--talosconfig string The path to the Talos configuration file (default "/home/user/.talos/config")
SEE ALSO
talosctl - A CLI for out-of-band management of Kubernetes nodes created by Talos
talosctl patch
Update field(s) of a resource using a JSON patch.
talosctl patch <type> [<id>] [flags]
Options
-h, --help help for patch
-m, --mode auto, no-reboot, reboot, staged apply config mode (default auto)
--namespace string resource namespace (default is to use default namespace per resource)
-p, --patch stringArray the patch to be applied to the resource file, use @file to read a patch from file.
--patch-file string a file containing a patch to be applied to the resource.
Options inherited from parent commands
--context string Context to be used in command
-e, --endpoints strings override default endpoints in Talos configuration
-n, --nodes strings target the specified nodes
--talosconfig string The path to the Talos configuration file (default "/home/user/.talos/config")
SEE ALSO
talosctl - A CLI for out-of-band management of Kubernetes nodes created by Talos
talosctl processes
List running processes
talosctl processes [flags]
Options
-h, --help help for processes
-s, --sort string Column to sort output by. [rss|cpu] (default "rss")
-w, --watch Stream running processes
Options inherited from parent commands
--context string Context to be used in command
-e, --endpoints strings override default endpoints in Talos configuration
-n, --nodes strings target the specified nodes
--talosconfig string The path to the Talos configuration file (default "/home/user/.talos/config")
SEE ALSO
talosctl - A CLI for out-of-band management of Kubernetes nodes created by Talos
talosctl read
Read a file on the machine
talosctl read <path> [flags]
Options
-h, --help help for read
Options inherited from parent commands
--context string Context to be used in command
-e, --endpoints strings override default endpoints in Talos configuration
-n, --nodes strings target the specified nodes
--talosconfig string The path to the Talos configuration file (default "/home/user/.talos/config")
SEE ALSO
talosctl - A CLI for out-of-band management of Kubernetes nodes created by Talos
talosctl reboot
Reboot a node
talosctl reboot [flags]
Options
-h, --help help for reboot
-m, --mode string select the reboot mode: "default", "powercyle" (skips kexec) (default "default")
Options inherited from parent commands
--context string Context to be used in command
-e, --endpoints strings override default endpoints in Talos configuration
-n, --nodes strings target the specified nodes
--talosconfig string The path to the Talos configuration file (default "/home/user/.talos/config")
SEE ALSO
talosctl - A CLI for out-of-band management of Kubernetes nodes created by Talos
talosctl reset
Reset a node
talosctl reset [flags]
Options
--graceful if true, attempt to cordon/drain node and leave etcd (if applicable) (default true)
-h, --help help for reset
--reboot if true, reboot the node after resetting instead of shutting down
--system-labels-to-wipe strings if set, just wipe selected system disk partitions by label but keep other partitions intact
Options inherited from parent commands
--context string Context to be used in command
-e, --endpoints strings override default endpoints in Talos configuration
-n, --nodes strings target the specified nodes
--talosconfig string The path to the Talos configuration file (default "/home/user/.talos/config")
SEE ALSO
talosctl - A CLI for out-of-band management of Kubernetes nodes created by Talos
talosctl restart
Restart a process
talosctl restart <id> [flags]
Options
-h, --help help for restart
-k, --kubernetes use the k8s.io containerd namespace
Options inherited from parent commands
--context string Context to be used in command
-e, --endpoints strings override default endpoints in Talos configuration
-n, --nodes strings target the specified nodes
--talosconfig string The path to the Talos configuration file (default "/home/user/.talos/config")
SEE ALSO
talosctl - A CLI for out-of-band management of Kubernetes nodes created by Talos
talosctl rollback
Rollback a node to the previous installation
talosctl rollback [flags]
Options
-h, --help help for rollback
Options inherited from parent commands
--context string Context to be used in command
-e, --endpoints strings override default endpoints in Talos configuration
-n, --nodes strings target the specified nodes
--talosconfig string The path to the Talos configuration file (default "/home/user/.talos/config")
SEE ALSO
talosctl - A CLI for out-of-band management of Kubernetes nodes created by Talos
talosctl service
Retrieve the state of a service (or all services), control service state
Synopsis
Service control command. If run without arguments, lists all the services and their state.
If service ID is specified, default action ‘status’ is executed which shows status of a single list service.
With actions ‘start’, ‘stop’, ‘restart’, service state is updated respectively.
talosctl service [<id> [start|stop|restart|status]] [flags]
Options
-h, --help help for service
Options inherited from parent commands
--context string Context to be used in command
-e, --endpoints strings override default endpoints in Talos configuration
-n, --nodes strings target the specified nodes
--talosconfig string The path to the Talos configuration file (default "/home/user/.talos/config")
SEE ALSO
talosctl - A CLI for out-of-band management of Kubernetes nodes created by Talos
talosctl shutdown
Shutdown a node
talosctl shutdown [flags]
Options
--force if true, force a node to shutdown without a cordon/drain
-h, --help help for shutdown
Options inherited from parent commands
--context string Context to be used in command
-e, --endpoints strings override default endpoints in Talos configuration
-n, --nodes strings target the specified nodes
--talosconfig string The path to the Talos configuration file (default "/home/user/.talos/config")
SEE ALSO
talosctl - A CLI for out-of-band management of Kubernetes nodes created by Talos
talosctl stats
Get container stats
talosctl stats [flags]
Options
-h, --help help for stats
-k, --kubernetes use the k8s.io containerd namespace
Options inherited from parent commands
--context string Context to be used in command
-e, --endpoints strings override default endpoints in Talos configuration
-n, --nodes strings target the specified nodes
--talosconfig string The path to the Talos configuration file (default "/home/user/.talos/config")
SEE ALSO
talosctl - A CLI for out-of-band management of Kubernetes nodes created by Talos
talosctl support
Dump debug information about the cluster
Synopsis
Generated bundle contains the following debug information:
For each node:
Kernel logs.
All Talos internal services logs.
All kube-system pods logs.
Talos COSI resources without secrets.
COSI runtime state graph.
Processes snapshot.
IO pressure snapshot.
Mounts list.
PCI devices info.
Talos version.
For the cluster:
Kubernetes nodes and kube-system pods manifests.
talosctl support [flags]
Options
-h, --help help for support
-w, --num-workers int number of workers per node (default 1)
-O, --output string output file to write support archive to
-v, --verbose verbose output
Options inherited from parent commands
--context string Context to be used in command
-e, --endpoints strings override default endpoints in Talos configuration
-n, --nodes strings target the specified nodes
--talosconfig string The path to the Talos configuration file (default "/home/user/.talos/config")
SEE ALSO
talosctl - A CLI for out-of-band management of Kubernetes nodes created by Talos
talosctl time
Gets current server time
talosctl time [--check server] [flags]
Options
-c, --check string checks server time against specified ntp server
-h, --help help for time
Options inherited from parent commands
--context string Context to be used in command
-e, --endpoints strings override default endpoints in Talos configuration
-n, --nodes strings target the specified nodes
--talosconfig string The path to the Talos configuration file (default "/home/user/.talos/config")
SEE ALSO
talosctl - A CLI for out-of-band management of Kubernetes nodes created by Talos
talosctl upgrade
Upgrade Talos on the target node
talosctl upgrade [flags]
Options
-f, --force force the upgrade (skip checks on etcd health and members, might lead to data loss)
-h, --help help for upgrade
-i, --image string the container image to use for performing the install
-p, --preserve preserve data
-s, --stage stage the upgrade to perform it after a reboot
Options inherited from parent commands
--context string Context to be used in command
-e, --endpoints strings override default endpoints in Talos configuration
-n, --nodes strings target the specified nodes
--talosconfig string The path to the Talos configuration file (default "/home/user/.talos/config")
SEE ALSO
talosctl - A CLI for out-of-band management of Kubernetes nodes created by Talos
talosctl upgrade-k8s
Upgrade Kubernetes control plane in the Talos cluster.
Synopsis
Command runs upgrade of Kubernetes control plane components between specified versions.
talosctl upgrade-k8s [flags]
Options
--dry-run skip the actual upgrade and show the upgrade plan instead
--endpoint string the cluster control plane endpoint
--from string the Kubernetes control plane version to upgrade from
-h, --help help for upgrade-k8s
--to string the Kubernetes control plane version to upgrade to (default "1.23.5")
--upgrade-kubelet upgrade kubelet service (default true)
Options inherited from parent commands
--context string Context to be used in command
-e, --endpoints strings override default endpoints in Talos configuration
-n, --nodes strings target the specified nodes
--talosconfig string The path to the Talos configuration file (default "/home/user/.talos/config")
SEE ALSO
talosctl - A CLI for out-of-band management of Kubernetes nodes created by Talos
-a, --all write counts for all files, not just directories
-d, --depth int32 maximum recursion depth
-h, --help help for usage
-H, --humanize humanize size and time in the output
-t, --threshold int threshold exclude entries smaller than SIZE if positive, or entries greater than SIZE if negative
Options inherited from parent commands
--context string Context to be used in command
-e, --endpoints strings override default endpoints in Talos configuration
-n, --nodes strings target the specified nodes
--talosconfig string The path to the Talos configuration file (default "/home/user/.talos/config")
SEE ALSO
talosctl - A CLI for out-of-band management of Kubernetes nodes created by Talos
talosctl validate
Validate config
talosctl validate [flags]
Options
-c, --config string the path of the config file
-h, --help help for validate
-m, --mode string the mode to validate the config for (valid values are metal, cloud, and container)
--strict treat validation warnings as errors
Options inherited from parent commands
--context string Context to be used in command
-e, --endpoints strings override default endpoints in Talos configuration
-n, --nodes strings target the specified nodes
--talosconfig string The path to the Talos configuration file (default "/home/user/.talos/config")
SEE ALSO
talosctl - A CLI for out-of-band management of Kubernetes nodes created by Talos
talosctl version
Prints the version
talosctl version [flags]
Options
--client Print client version only
-h, --help help for version
--short Print the short version
Options inherited from parent commands
--context string Context to be used in command
-e, --endpoints strings override default endpoints in Talos configuration
-n, --nodes strings target the specified nodes
--talosconfig string The path to the Talos configuration file (default "/home/user/.talos/config")
SEE ALSO
talosctl - A CLI for out-of-band management of Kubernetes nodes created by Talos
talosctl
A CLI for out-of-band management of Kubernetes nodes created by Talos
Options
--context string Context to be used in command
-e, --endpoints strings override default endpoints in Talos configuration
-h, --help help for talosctl
-n, --nodes strings target the specified nodes
--talosconfig string The path to the Talos configuration file (default "/home/user/.talos/config")
type: controlplane
# InstallConfig represents the installation options for preparing a node.install:
disk: /dev/sda # The disk used for installations.# Allows for supplying extra kernel args via the bootloader.extraKernelArgs:
- console=ttyS1
- panic=10
image: ghcr.io/siderolabs/installer:latest # Allows for supplying the image used to perform the installation.bootloader: true# Indicates if a bootloader should be installed.wipe: false# Indicates if the installation disk should be wiped at installation time.# # Look up disk using disk attributes like model, size, serial and others.# diskSelector:# size: 4GB # Disk size.# model: WDC* # Disk model `/sys/block/<dev>/device/model`.# busPath: /pci0000:00/0000:00:17.0/ata1/host0/target0:0:0/0:0:0:0 # Disk bus path.# # Allows for supplying additional system extension images to install on top of base Talos image.# extensions: ghcr.io/siderolabs/gvisor:20220117.0-v1.0.0
Field
Type
Description
Value(s)
type
string
Defines the role of the machine within the cluster. Control Plane
Control Plane node type designates the node as a control plane member. This means it will host etcd along with the Kubernetes master components such as API Server, Controller Manager, Scheduler.
Worker
Worker node type designates the node as a worker node. This means it will be an available compute node for scheduling workloads.
This node type was previously known as “join”; that value is still supported but deprecated.
controlplane worker
token
string
The token is used by a machine to join the PKI of the cluster.Using this token, a machine will create a certificate signing request (CSR), and request a certificate that will be used as its’ identity.Show example(s)
token: 328hom.uqjzh6jnn2eie9oi
ca
PEMEncodedCertificateAndKey
The root certificate authority of the PKI.It is composed of a base64 encoded crt and key.Show example(s)
Extra certificate subject alternative names for the machine’s certificate.By default, all non-loopback interface IPs are automatically added to the certificate’s SANs.Show example(s)
Provides machine specific control plane configuration options. Show example(s)
controlPlane:
# Controller manager machine specific configuration options.controllerManager:
disabled: false# Disable kube-controller-manager on the node.# Scheduler machine specific configuration options.scheduler:
disabled: true# Disable kube-scheduler on the node.
Used to provide additional options to the kubelet. Show example(s)
kubelet:
image: ghcr.io/siderolabs/kubelet:v1.23.5 # The `image` field is an optional reference to an alternative kubelet image.# The `extraArgs` field is used to provide additional flags to the kubelet.extraArgs:
feature-gates: ServerSideApply=true
# # The `ClusterDNS` field is an optional reference to an alternative kubelet clusterDNS ip list.# clusterDNS:# - 10.96.0.10# - 169.254.2.53# # The `extraMounts` field is used to add additional mounts to the kubelet container.# extraMounts:# - destination: /var/lib/example# type: bind# source: /var/lib/example# options:# - bind# - rshared# - rw# # The `extraConfig` field is used to provide kubelet configuration overrides.# extraConfig:# serverTLSBootstrap: true# # The `nodeIP` field is used to configure `--node-ip` flag for the kubelet.# nodeIP:# # The `validSubnets` field configures the networks to pick kubelet node IP from.# validSubnets:# - 10.0.0.0/8# - '!10.0.0.3/32'# - fdc7::/16
pods
[]Unstructured
Used to provide static pod definitions to be run by the kubelet directly bypassing the kube-apiserver. Static pods can be used to run components which should be started before the Kubernetes control plane is up. Talos doesn’t validate the pod definition. Updates to this field can be applied without a reboot.
Provides machine specific network configuration options. Show example(s)
network:
hostname: worker-1 # Used to statically set the hostname for the machine.# `interfaces` is used to define the network interface configuration.interfaces:
- interface: eth0 # The interface name.# Assigns static IP addresses to the interface.addresses:
- 192.168.2.0/24
# A list of routes associated with the interface.routes:
- network: 0.0.0.0/0 # The route's network (destination).gateway: 192.168.2.1# The route's gateway (if empty, creates link scope route).metric: 1024# The optional metric for the route.mtu: 1500# The interface's MTU.# # Bond specific options.# bond:# # The interfaces that make up the bond.# interfaces:# - eth0# - eth1# mode: 802.3ad # A bond option.# lacpRate: fast # A bond option.# # Indicates if DHCP should be used to configure the interface.# dhcp: true# # DHCP specific options.# dhcpOptions:# routeMetric: 1024 # The priority of all routes received via DHCP.# # Wireguard specific configuration.# # wireguard server example# wireguard:# privateKey: ABCDEF... # Specifies a private key configuration (base64 encoded).# listenPort: 51111 # Specifies a device's listening port.# # Specifies a list of peer configurations to apply to a device.# peers:# - publicKey: ABCDEF... # Specifies the public key of this peer.# endpoint: 192.168.1.3 # Specifies the endpoint of this peer entry.# # AllowedIPs specifies a list of allowed IP addresses in CIDR notation for this peer.# allowedIPs:# - 192.168.1.0/24# # wireguard peer example# wireguard:# privateKey: ABCDEF... # Specifies a private key configuration (base64 encoded).# # Specifies a list of peer configurations to apply to a device.# peers:# - publicKey: ABCDEF... # Specifies the public key of this peer.# endpoint: 192.168.1.2 # Specifies the endpoint of this peer entry.# persistentKeepaliveInterval: 10s # Specifies the persistent keepalive interval for this peer.# # AllowedIPs specifies a list of allowed IP addresses in CIDR notation for this peer.# allowedIPs:# - 192.168.1.0/24# # Virtual (shared) IP address configuration.# vip:# ip: 172.16.199.55 # Specifies the IP address to be used.# Used to statically set the nameservers for the machine.nameservers:
- 9.8.7.6 - 8.7.6.5# # Allows for extra entries to be added to the `/etc/hosts` file# extraHostEntries:# - ip: 192.168.1.100 # The IP of the host.# # The host alias.# aliases:# - example# - example.domain.tld# # Configures KubeSpan feature.# kubespan:# enabled: true # Enable the KubeSpan feature.
Used to partition, format and mount additional disks.Since the rootfs is read only with the exception of /var, mounts are only valid if they are under /var. Note that the partitioning and formating is done only once, if and only if no existing partitions are found. If size: is omitted, the partition is sized to occupy the full disk.Show example(s)
disks:
- device: /dev/sdb # The name of the disk to use.# A list of partitions to create on the disk.partitions:
- mountpoint: /var/mnt/extra # Where to mount the partition.# # The size of partition: either bytes or human readable representation. If `size:` is omitted, the partition is sized to occupy the full disk.# # Human readable representation.# size: 100 MB# # Precise value in bytes.# size: 1073741824
Used to provide instructions for installations. Show example(s)
install:
disk: /dev/sda # The disk used for installations.# Allows for supplying extra kernel args via the bootloader.extraKernelArgs:
- console=ttyS1
- panic=10
image: ghcr.io/siderolabs/installer:latest # Allows for supplying the image used to perform the installation.bootloader: true# Indicates if a bootloader should be installed.wipe: false# Indicates if the installation disk should be wiped at installation time.# # Look up disk using disk attributes like model, size, serial and others.# diskSelector:# size: 4GB # Disk size.# model: WDC* # Disk model `/sys/block/<dev>/device/model`.# busPath: /pci0000:00/0000:00:17.0/ata1/host0/target0:0:0/0:0:0:0 # Disk bus path.# # Allows for supplying additional system extension images to install on top of base Talos image.# extensions: ghcr.io/siderolabs/gvisor:20220117.0-v1.0.0
Allows the addition of user specified files.The value of op can be create, overwrite, or append. In the case of create, path must not exist. In the case of overwrite, and append, path must be a valid file. If an op value of append is used, the existing file will be appended. Note that the file contents are not required to be base64 encoded.Show example(s)
files:
- content: '...'# The contents of the file.permissions: 0o666# The file's permissions in octal.path: /tmp/file.txt # The path of the file.op: append # The operation to use
env
Env
The env field allows for the addition of environment variables.All environment variables are set on PID 1 in addition to every service.Show example(s)
env:
GRPC_GO_LOG_SEVERITY_LEVEL: info
GRPC_GO_LOG_VERBOSITY_LEVEL: "99"https_proxy: http://SERVER:PORT/
Used to configure the machine’s time settings. Show example(s)
time:
disabled: false# Indicates if the time service is disabled for the machine.# Specifies time (NTP) servers to use for setting the system time.servers:
- time.cloudflare.com
bootTimeout: 2m0s # Specifies the timeout when the node time is considered to be in sync unlocking the boot sequence.
sysctls
map[string]string
Used to configure the machine’s sysctls. Show example(s)
Used to configure the machine’s container image registry mirrors. Automatically generates matching CRI configuration for registry mirrors.
The mirrors section allows to redirect requests for images to non-default registry, which might be local registry or caching mirror.
The config section provides a way to authenticate to the registry with TLS client identity, provide registry CA, or authentication information. Authentication information has same meaning with the corresponding field in .docker/config.json.
registries:
# Specifies mirror configuration for each registry.mirrors:
docker.io:
# List of endpoints (URLs) for registry mirrors to use.endpoints:
- https://registry.local
# Specifies TLS & auth configuration for HTTPS image registries.config:
registry.local:
# The TLS configuration for the registry.tls:
# Enable mutual TLS authentication with the registry.clientIdentity:
crt: TFMwdExTMUNSVWRKVGlCRFJWSlVTVVpKUTBGVVJTMHRMUzB0Q2sxSlNVSklla05DTUhGLi4u
key: TFMwdExTMUNSVWRKVGlCRlJESTFOVEU1SUZCU1NWWkJWRVVnUzBWWkxTMHRMUzBLVFVNLi4u
# The auth configuration for this registry.auth:
username: username # Optional registry authentication.password: password # Optional registry authentication.
Machine system disk encryption configuration.Defines each system partition encryption parameters.Show example(s)
systemDiskEncryption:
# Ephemeral partition encryption.ephemeral:
provider: luks2 # Encryption provider to use for the encryption.# Defines the encryption keys generation and storage method.keys:
- # Deterministically generated key from the node UUID and PartitionLabel.nodeID: {}
slot: 0# Key slot number for LUKS2 encryption.# # Cipher kind to use for the encryption. Depends on the encryption provider.# cipher: aes-xts-plain64# # Defines the encryption sector size.# blockSize: 4096# # Additional --perf parameters for the LUKS2 encryption.# options:# - no_read_workqueue# - no_write_workqueue
# ControlPlaneConfig represents the control plane configuration options.controlPlane:
endpoint: https://1.2.3.4 # Endpoint is the canonical controlplane endpoint, which can be an IP address or a DNS hostname.localAPIServerPort: 443# The port that the API server listens on internally.clusterName: talos.local
# ClusterNetworkConfig represents kube networking configuration options.network:
# The CNI used.cni:
name: flannel # Name of CNI to use.dnsDomain: cluster.local # The domain used by Kubernetes DNS.# The pod subnet CIDR.podSubnets:
- 10.244.0.0/16
# The service subnet CIDR.serviceSubnets:
- 10.96.0.0/12
Field
Type
Description
Value(s)
id
string
Globally unique identifier for this cluster (base64 encoded random 32 bytes).
secret
string
Shared secret of cluster (base64 encoded random 32 bytes).This secret is shared among cluster members but should never be sent over the network.
Provides control plane specific configuration options. Show example(s)
controlPlane:
endpoint: https://1.2.3.4 # Endpoint is the canonical controlplane endpoint, which can be an IP address or a DNS hostname.localAPIServerPort: 443# The port that the API server listens on internally.
Provides cluster specific network configuration options. Show example(s)
network:
# The CNI used.cni:
name: flannel # Name of CNI to use.dnsDomain: cluster.local # The domain used by Kubernetes DNS.# The pod subnet CIDR.podSubnets:
- 10.244.0.0/16
# The service subnet CIDR.serviceSubnets:
- 10.96.0.0/12
token
string
The bootstrap token used to join the cluster. Show example(s)
The base64 encoded aggregator certificate authority used by Kubernetes for front-proxy certificate generation. This CA can be self-signed.Show example(s)
API server specific configuration options. Show example(s)
apiServer:
image: k8s.gcr.io/kube-apiserver:v1.23.5 # The container image used in the API server manifest.# Extra arguments to supply to the API server.extraArgs:
feature-gates: ServerSideApply=true
http2-max-streams-per-connection: "32"# Extra certificate subject alternative names for the API server's certificate.certSANs:
- 1.2.3.4 - 4.5.6.7# # Configure the API server admission plugins.# admissionControl:# - name: PodSecurity # Name is the name of the admission controller.# # Configuration is an embedded configuration object to be used as the plugin's# configuration:# apiVersion: pod-security.admission.config.k8s.io/v1alpha1# defaults:# audit: restricted# audit-version: latest# enforce: baseline# enforce-version: latest# warn: restricted# warn-version: latest# exemptions:# namespaces:# - kube-system# runtimeClasses: []# usernames: []# kind: PodSecurityConfiguration
Controller manager server specific configuration options. Show example(s)
controllerManager:
image: k8s.gcr.io/kube-controller-manager:v1.23.5 # The container image used in the controller manager manifest.# Extra arguments to supply to the controller manager.extraArgs:
feature-gates: ServerSideApply=true
Kube-proxy server-specific configuration options Show example(s)
proxy:
image: k8s.gcr.io/kube-proxy:v1.23.5 # The container image used in the kube-proxy manifest.mode: ipvs # proxy mode of kube-proxy.# Extra arguments to supply to kube-proxy.extraArgs:
proxy-mode: iptables
Scheduler server specific configuration options. Show example(s)
scheduler:
image: k8s.gcr.io/kube-scheduler:v1.23.5 # The container image used in the scheduler manifest.# Extra arguments to supply to the scheduler.extraArgs:
feature-gates: AllBeta=true
Configures cluster member discovery. Show example(s)
discovery:
enabled: true# Enable the cluster membership discovery feature.# Configure registries used for cluster member discovery.registries:
# Kubernetes registry uses Kubernetes API server to discover cluster members and stores additional informationkubernetes: {}
# Service registry is using an external service to push and pull information about cluster members.service:
endpoint: https://discovery.talos.dev/ # External service endpoint.
Etcd specific configuration options. Show example(s)
etcd:
image: gcr.io/etcd-development/etcd:v3.5.3 # The container image used to create the etcd service.# The `ca` is the root certificate authority of the PKI.ca:
crt: TFMwdExTMUNSVWRKVGlCRFJWSlVTVVpKUTBGVVJTMHRMUzB0Q2sxSlNVSklla05DTUhGLi4u
key: TFMwdExTMUNSVWRKVGlCRlJESTFOVEU1SUZCU1NWWkJWRVVnUzBWWkxTMHRMUzBLVFVNLi4u
# Extra arguments to supply to etcd.extraArgs:
election-timeout: "5000"# # The subnet from which the advertise URL should be.# subnet: 10.0.0.0/8
External cloud provider configuration. Show example(s)
externalCloudProvider:
enabled: true# Enable external cloud provider.# A list of urls that point to additional manifests for an external cloud provider.manifests:
- https://raw.githubusercontent.com/kubernetes/cloud-provider-aws/v1.20.0-alpha.0/manifests/rbac.yaml
- https://raw.githubusercontent.com/kubernetes/cloud-provider-aws/v1.20.0-alpha.0/manifests/aws-cloud-controller-manager-daemonset.yaml
extraManifests
[]string
A list of urls that point to additional manifests.These will get automatically deployed as part of the bootstrap.Show example(s)
A map of key value pairs that will be added while fetching the extraManifests. Show example(s)
extraManifestHeaders:
Token: "1234567"X-ExtraInfo: info
inlineManifests
ClusterInlineManifests
A list of inline Kubernetes manifests.These will get automatically deployed as part of the bootstrap.Show example(s)
inlineManifests:
- name: namespace-ci # Name of the manifest.contents: |- # Manifest contents as a string.apiVersion: v1
kind: Namespace
metadata:
name: ci
# Controller manager machine specific configuration options.controllerManager:
disabled: false# Disable kube-controller-manager on the node.# Scheduler machine specific configuration options.scheduler:
disabled: true# Disable kube-scheduler on the node.
image: ghcr.io/siderolabs/kubelet:v1.23.5 # The `image` field is an optional reference to an alternative kubelet image.# The `extraArgs` field is used to provide additional flags to the kubelet.extraArgs:
feature-gates: ServerSideApply=true
# # The `ClusterDNS` field is an optional reference to an alternative kubelet clusterDNS ip list.# clusterDNS:# - 10.96.0.10# - 169.254.2.53# # The `extraMounts` field is used to add additional mounts to the kubelet container.# extraMounts:# - destination: /var/lib/example# type: bind# source: /var/lib/example# options:# - bind# - rshared# - rw# # The `extraConfig` field is used to provide kubelet configuration overrides.# extraConfig:# serverTLSBootstrap: true# # The `nodeIP` field is used to configure `--node-ip` flag for the kubelet.# nodeIP:# # The `validSubnets` field configures the networks to pick kubelet node IP from.# validSubnets:# - 10.0.0.0/8# - '!10.0.0.3/32'# - fdc7::/16
Field
Type
Description
Value(s)
image
string
The image field is an optional reference to an alternative kubelet image. Show example(s)
image: ghcr.io/siderolabs/kubelet:v1.23.5
clusterDNS
[]string
The ClusterDNS field is an optional reference to an alternative kubelet clusterDNS ip list. Show example(s)
clusterDNS:
- 10.96.0.10 - 169.254.2.53
extraArgs
map[string]string
The extraArgs field is used to provide additional flags to the kubelet. Show example(s)
The extraMounts field is used to add additional mounts to the kubelet container.Note that either bind or rbind are required in the options.Show example(s)
The extraConfig field is used to provide kubelet configuration overrides. Some fields are not allowed to be overridden: authentication and authorization, cgroups configuration, ports, etc.Show example(s)
extraConfig:
serverTLSBootstrap: true
registerWithFQDN
bool
The registerWithFQDN field is used to force kubelet to use the node FQDN for registration.This is required in clouds like AWS.
# The `validSubnets` field configures the networks to pick kubelet node IP from.validSubnets:
- 10.0.0.0/8
- '!10.0.0.3/32' - fdc7::/16
Field
Type
Description
Value(s)
validSubnets
[]string
The validSubnets field configures the networks to pick kubelet node IP from.For dual stack configuration, there should be two subnets: one for IPv4, another for IPv6. IPs can be excluded from the list by using negative match with !, e.g !10.0.0.0/8. Negative subnet matches should be specified last to filter out IPs picked by positive matches. If not specified, node IP is picked based on cluster podCIDRs: IPv4/IPv6 address or both.
NetworkConfig
NetworkConfig represents the machine’s networking config values.
hostname: worker-1 # Used to statically set the hostname for the machine.# `interfaces` is used to define the network interface configuration.interfaces:
- interface: eth0 # The interface name.# Assigns static IP addresses to the interface.addresses:
- 192.168.2.0/24
# A list of routes associated with the interface.routes:
- network: 0.0.0.0/0 # The route's network (destination).gateway: 192.168.2.1# The route's gateway (if empty, creates link scope route).metric: 1024# The optional metric for the route.mtu: 1500# The interface's MTU.# # Bond specific options.# bond:# # The interfaces that make up the bond.# interfaces:# - eth0# - eth1# mode: 802.3ad # A bond option.# lacpRate: fast # A bond option.# # Indicates if DHCP should be used to configure the interface.# dhcp: true# # DHCP specific options.# dhcpOptions:# routeMetric: 1024 # The priority of all routes received via DHCP.# # Wireguard specific configuration.# # wireguard server example# wireguard:# privateKey: ABCDEF... # Specifies a private key configuration (base64 encoded).# listenPort: 51111 # Specifies a device's listening port.# # Specifies a list of peer configurations to apply to a device.# peers:# - publicKey: ABCDEF... # Specifies the public key of this peer.# endpoint: 192.168.1.3 # Specifies the endpoint of this peer entry.# # AllowedIPs specifies a list of allowed IP addresses in CIDR notation for this peer.# allowedIPs:# - 192.168.1.0/24# # wireguard peer example# wireguard:# privateKey: ABCDEF... # Specifies a private key configuration (base64 encoded).# # Specifies a list of peer configurations to apply to a device.# peers:# - publicKey: ABCDEF... # Specifies the public key of this peer.# endpoint: 192.168.1.2 # Specifies the endpoint of this peer entry.# persistentKeepaliveInterval: 10s # Specifies the persistent keepalive interval for this peer.# # AllowedIPs specifies a list of allowed IP addresses in CIDR notation for this peer.# allowedIPs:# - 192.168.1.0/24# # Virtual (shared) IP address configuration.# vip:# ip: 172.16.199.55 # Specifies the IP address to be used.# Used to statically set the nameservers for the machine.nameservers:
- 9.8.7.6 - 8.7.6.5# # Allows for extra entries to be added to the `/etc/hosts` file# extraHostEntries:# - ip: 192.168.1.100 # The IP of the host.# # The host alias.# aliases:# - example# - example.domain.tld# # Configures KubeSpan feature.# kubespan:# enabled: true # Enable the KubeSpan feature.
Field
Type
Description
Value(s)
hostname
string
Used to statically set the hostname for the machine.
interfaces is used to define the network interface configuration.By default all network interfaces will attempt a DHCP discovery. This can be further tuned through this configuration parameter.Show example(s)
interfaces:
- interface: eth0 # The interface name.# Assigns static IP addresses to the interface.addresses:
- 192.168.2.0/24
# A list of routes associated with the interface.routes:
- network: 0.0.0.0/0 # The route's network (destination).gateway: 192.168.2.1# The route's gateway (if empty, creates link scope route).metric: 1024# The optional metric for the route.mtu: 1500# The interface's MTU.# # Bond specific options.# bond:# # The interfaces that make up the bond.# interfaces:# - eth0# - eth1# mode: 802.3ad # A bond option.# lacpRate: fast # A bond option.# # Indicates if DHCP should be used to configure the interface.# dhcp: true# # DHCP specific options.# dhcpOptions:# routeMetric: 1024 # The priority of all routes received via DHCP.# # Wireguard specific configuration.# # wireguard server example# wireguard:# privateKey: ABCDEF... # Specifies a private key configuration (base64 encoded).# listenPort: 51111 # Specifies a device's listening port.# # Specifies a list of peer configurations to apply to a device.# peers:# - publicKey: ABCDEF... # Specifies the public key of this peer.# endpoint: 192.168.1.3 # Specifies the endpoint of this peer entry.# # AllowedIPs specifies a list of allowed IP addresses in CIDR notation for this peer.# allowedIPs:# - 192.168.1.0/24# # wireguard peer example# wireguard:# privateKey: ABCDEF... # Specifies a private key configuration (base64 encoded).# # Specifies a list of peer configurations to apply to a device.# peers:# - publicKey: ABCDEF... # Specifies the public key of this peer.# endpoint: 192.168.1.2 # Specifies the endpoint of this peer entry.# persistentKeepaliveInterval: 10s # Specifies the persistent keepalive interval for this peer.# # AllowedIPs specifies a list of allowed IP addresses in CIDR notation for this peer.# allowedIPs:# - 192.168.1.0/24# # Virtual (shared) IP address configuration.# vip:# ip: 172.16.199.55 # Specifies the IP address to be used.
nameservers
[]string
Used to statically set the nameservers for the machine.Defaults to 1.1.1.1 and 8.8.8.8Show example(s)
disk: /dev/sda # The disk used for installations.# Allows for supplying extra kernel args via the bootloader.extraKernelArgs:
- console=ttyS1
- panic=10
image: ghcr.io/siderolabs/installer:latest # Allows for supplying the image used to perform the installation.bootloader: true# Indicates if a bootloader should be installed.wipe: false# Indicates if the installation disk should be wiped at installation time.# # Look up disk using disk attributes like model, size, serial and others.# diskSelector:# size: 4GB # Disk size.# model: WDC* # Disk model `/sys/block/<dev>/device/model`.# busPath: /pci0000:00/0000:00:17.0/ata1/host0/target0:0:0/0:0:0:0 # Disk bus path.# # Allows for supplying additional system extension images to install on top of base Talos image.# extensions: ghcr.io/siderolabs/gvisor:20220117.0-v1.0.0
Look up disk using disk attributes like model, size, serial and others.Always has priority over disk.Show example(s)
diskSelector:
size: 4GB # Disk size.model: WDC* # Disk model `/sys/block/<dev>/device/model`.busPath: /pci0000:00/0000:00:17.0/ata1/host0/target0:0:0/0:0:0:0 # Disk bus path.
extraKernelArgs
[]string
Allows for supplying extra kernel args via the bootloader. Show example(s)
Allows for supplying the image used to perform the installation.Image reference for each Talos release can be found on GitHub releases page.Show example(s)
Indicates if the installation disk should be wiped at installation time.Defaults to true.
true yes false no
legacyBIOSSupport
bool
Indicates if MBR partition should be marked as bootable (active).Should be enabled only for the systems with legacy BIOS that doesn’t support GPT partitioning scheme.
InstallDiskSelector
InstallDiskSelector represents a disk query parameters for the install disk lookup.
size: 4GB # Disk size.model: WDC* # Disk model `/sys/block/<dev>/device/model`.busPath: /pci0000:00/0000:00:17.0/ata1/host0/target0:0:0/0:0:0:0 # Disk bus path.
disabled: false# Indicates if the time service is disabled for the machine.# Specifies time (NTP) servers to use for setting the system time.servers:
- time.cloudflare.com
bootTimeout: 2m0s # Specifies the timeout when the node time is considered to be in sync unlocking the boot sequence.
Field
Type
Description
Value(s)
disabled
bool
Indicates if the time service is disabled for the machine.Defaults to false.
servers
[]string
Specifies time (NTP) servers to use for setting the system time.Defaults to pool.ntp.org
bootTimeout
Duration
Specifies the timeout when the node time is considered to be in sync unlocking the boot sequence.NTP sync will be still running in the background. Defaults to “infinity” (waiting forever for time sync)
RegistriesConfig
RegistriesConfig represents the image pull options.
# Specifies mirror configuration for each registry.mirrors:
docker.io:
# List of endpoints (URLs) for registry mirrors to use.endpoints:
- https://registry.local
# Specifies TLS & auth configuration for HTTPS image registries.config:
registry.local:
# The TLS configuration for the registry.tls:
# Enable mutual TLS authentication with the registry.clientIdentity:
crt: TFMwdExTMUNSVWRKVGlCRFJWSlVTVVpKUTBGVVJTMHRMUzB0Q2sxSlNVSklla05DTUhGLi4u
key: TFMwdExTMUNSVWRKVGlCRlJESTFOVEU1SUZCU1NWWkJWRVVnUzBWWkxTMHRMUzBLVFVNLi4u
# The auth configuration for this registry.auth:
username: username # Optional registry authentication.password: password # Optional registry authentication.
Specifies mirror configuration for each registry.This setting allows to use local pull-through caching registires, air-gapped installations, etc.
Registry name is the first segment of image identifier, with ‘docker.io’ being default one. To catch any registry names not specified explicitly, use ‘*’.Show example(s)
mirrors:
ghcr.io:
# List of endpoints (URLs) for registry mirrors to use.endpoints:
- https://registry.insecure
- https://ghcr.io/v2/
endpoint: https://1.2.3.4 # Endpoint is the canonical controlplane endpoint, which can be an IP address or a DNS hostname.localAPIServerPort: 443# The port that the API server listens on internally.
Endpoint is the canonical controlplane endpoint, which can be an IP address or a DNS hostname.It is single-valued, and may optionally include a port number.Show example(s)
endpoint: https://1.2.3.4:6443
endpoint: https://cluster1.internal:6443
localAPIServerPort
int
The port that the API server listens on internally.This may be different than the port portion listed in the endpoint field above. The default is 6443.
APIServerConfig
APIServerConfig represents the kube apiserver configuration options.
image: k8s.gcr.io/kube-apiserver:v1.23.5 # The container image used in the API server manifest.# Extra arguments to supply to the API server.extraArgs:
feature-gates: ServerSideApply=true
http2-max-streams-per-connection: "32"# Extra certificate subject alternative names for the API server's certificate.certSANs:
- 1.2.3.4 - 4.5.6.7# # Configure the API server admission plugins.# admissionControl:# - name: PodSecurity # Name is the name of the admission controller.# # Configuration is an embedded configuration object to be used as the plugin's# configuration:# apiVersion: pod-security.admission.config.k8s.io/v1alpha1# defaults:# audit: restricted# audit-version: latest# enforce: baseline# enforce-version: latest# warn: restricted# warn-version: latest# exemptions:# namespaces:# - kube-system# runtimeClasses: []# usernames: []# kind: PodSecurityConfiguration
Field
Type
Description
Value(s)
image
string
The container image used in the API server manifest. Show example(s)
Configure the API server admission plugins. Show example(s)
admissionControl:
- name: PodSecurity # Name is the name of the admission controller.# Configuration is an embedded configuration object to be used as the plugin'sconfiguration:
apiVersion: pod-security.admission.config.k8s.io/v1alpha1
defaults:
audit: restricted
audit-version: latest
enforce: baseline
enforce-version: latest
warn: restricted
warn-version: latest
exemptions:
namespaces:
- kube-system
runtimeClasses: []
usernames: []
kind: PodSecurityConfiguration
AdmissionPluginConfig
AdmissionPluginConfig represents the API server admission plugin configuration.
- name: PodSecurity # Name is the name of the admission controller.# Configuration is an embedded configuration object to be used as the plugin'sconfiguration:
apiVersion: pod-security.admission.config.k8s.io/v1alpha1
defaults:
audit: restricted
audit-version: latest
enforce: baseline
enforce-version: latest
warn: restricted
warn-version: latest
exemptions:
namespaces:
- kube-system
runtimeClasses: []
usernames: []
kind: PodSecurityConfiguration
Field
Type
Description
Value(s)
name
string
Name is the name of the admission controller.It must match the registered admission plugin name.
configuration
Unstructured
Configuration is an embedded configuration object to be used as the plugin’sconfiguration.
ControllerManagerConfig
ControllerManagerConfig represents the kube controller manager configuration options.
image: k8s.gcr.io/kube-controller-manager:v1.23.5 # The container image used in the controller manager manifest.# Extra arguments to supply to the controller manager.extraArgs:
feature-gates: ServerSideApply=true
Field
Type
Description
Value(s)
image
string
The container image used in the controller manager manifest. Show example(s)
image: k8s.gcr.io/kube-controller-manager:v1.23.5
extraArgs
map[string]string
Extra arguments to supply to the controller manager.
image: k8s.gcr.io/kube-proxy:v1.23.5 # The container image used in the kube-proxy manifest.mode: ipvs # proxy mode of kube-proxy.# Extra arguments to supply to kube-proxy.extraArgs:
proxy-mode: iptables
Field
Type
Description
Value(s)
disabled
bool
Disable kube-proxy deployment on cluster bootstrap. Show example(s)
disabled: false
image
string
The container image used in the kube-proxy manifest. Show example(s)
image: k8s.gcr.io/kube-proxy:v1.23.5
mode
string
proxy mode of kube-proxy.The default is ‘iptables’.
extraArgs
map[string]string
Extra arguments to supply to kube-proxy.
SchedulerConfig
SchedulerConfig represents the kube scheduler configuration options.
image: k8s.gcr.io/kube-scheduler:v1.23.5 # The container image used in the scheduler manifest.# Extra arguments to supply to the scheduler.extraArgs:
feature-gates: AllBeta=true
Field
Type
Description
Value(s)
image
string
The container image used in the scheduler manifest. Show example(s)
image: gcr.io/etcd-development/etcd:v3.5.3 # The container image used to create the etcd service.# The `ca` is the root certificate authority of the PKI.ca:
crt: TFMwdExTMUNSVWRKVGlCRFJWSlVTVVpKUTBGVVJTMHRMUzB0Q2sxSlNVSklla05DTUhGLi4u
key: TFMwdExTMUNSVWRKVGlCRlJESTFOVEU1SUZCU1NWWkJWRVVnUzBWWkxTMHRMUzBLVFVNLi4u
# Extra arguments to supply to etcd.extraArgs:
election-timeout: "5000"# # The subnet from which the advertise URL should be.# subnet: 10.0.0.0/8
Field
Type
Description
Value(s)
image
string
The container image used to create the etcd service. Show example(s)
image: gcr.io/etcd-development/etcd:v3.5.3
ca
PEMEncodedCertificateAndKey
The ca is the root certificate authority of the PKI.It is composed of a base64 encoded crt and key.Show example(s)
# The CNI used.cni:
name: flannel # Name of CNI to use.dnsDomain: cluster.local # The domain used by Kubernetes DNS.# The pod subnet CIDR.podSubnets:
- 10.244.0.0/16
# The service subnet CIDR.serviceSubnets:
- 10.96.0.0/12
The CNI used.Composed of “name” and “urls”. The “name” key supports the following options: “flannel”, “custom”, and “none”. “flannel” uses Talos-managed Flannel CNI, and that’s the default option. “custom” uses custom manifests that should be provided in “urls”. “none” indicates that Talos will not manage any CNI installation.Show example(s)
cni:
name: custom # Name of CNI to use.# URLs containing manifests to apply for the CNI.urls:
- https://docs.projectcalico.org/archive/v3.20/manifests/canal.yaml
dnsDomain
string
The domain used by Kubernetes DNS.The default is cluster.localShow example(s)
dnsDomain: cluser.local
podSubnets
[]string
The pod subnet CIDR. Show example(s)
podSubnets:
- 10.244.0.0/16
serviceSubnets
[]string
The service subnet CIDR. Show example(s)
serviceSubnets:
- 10.96.0.0/12
CNIConfig
CNIConfig represents the CNI configuration options.
name: custom # Name of CNI to use.# URLs containing manifests to apply for the CNI.urls:
- https://docs.projectcalico.org/archive/v3.20/manifests/canal.yaml
Field
Type
Description
Value(s)
name
string
Name of CNI to use.
flannel custom none
urls
[]string
URLs containing manifests to apply for the CNI.Should be present for “custom”, must be empty for “flannel” and “none”.
enabled: true# Enable external cloud provider.# A list of urls that point to additional manifests for an external cloud provider.manifests:
- https://raw.githubusercontent.com/kubernetes/cloud-provider-aws/v1.20.0-alpha.0/manifests/rbac.yaml
- https://raw.githubusercontent.com/kubernetes/cloud-provider-aws/v1.20.0-alpha.0/manifests/aws-cloud-controller-manager-daemonset.yaml
Field
Type
Description
Value(s)
enabled
bool
Enable external cloud provider.
true yes false no
manifests
[]string
A list of urls that point to additional manifests for an external cloud provider.These will get automatically deployed as part of the bootstrap.Show example(s)
- device: /dev/sdb # The name of the disk to use.# A list of partitions to create on the disk.partitions:
- mountpoint: /var/mnt/extra # Where to mount the partition.# # The size of partition: either bytes or human readable representation. If `size:` is omitted, the partition is sized to occupy the full disk.# # Human readable representation.# size: 100 MB# # Precise value in bytes.# size: 1073741824
The size of partition: either bytes or human readable representation. If size: is omitted, the partition is sized to occupy the full disk. Show example(s)
- content: '...'# The contents of the file.permissions: 0o666# The file's permissions in octal.path: /tmp/file.txt # The path of the file.op: append # The operation to use
- interface: eth0 # The interface name.# Assigns static IP addresses to the interface.addresses:
- 192.168.2.0/24
# A list of routes associated with the interface.routes:
- network: 0.0.0.0/0 # The route's network (destination).gateway: 192.168.2.1# The route's gateway (if empty, creates link scope route).metric: 1024# The optional metric for the route.mtu: 1500# The interface's MTU.# # Bond specific options.# bond:# # The interfaces that make up the bond.# interfaces:# - eth0# - eth1# mode: 802.3ad # A bond option.# lacpRate: fast # A bond option.# # Indicates if DHCP should be used to configure the interface.# dhcp: true# # DHCP specific options.# dhcpOptions:# routeMetric: 1024 # The priority of all routes received via DHCP.# # Wireguard specific configuration.# # wireguard server example# wireguard:# privateKey: ABCDEF... # Specifies a private key configuration (base64 encoded).# listenPort: 51111 # Specifies a device's listening port.# # Specifies a list of peer configurations to apply to a device.# peers:# - publicKey: ABCDEF... # Specifies the public key of this peer.# endpoint: 192.168.1.3 # Specifies the endpoint of this peer entry.# # AllowedIPs specifies a list of allowed IP addresses in CIDR notation for this peer.# allowedIPs:# - 192.168.1.0/24# # wireguard peer example# wireguard:# privateKey: ABCDEF... # Specifies a private key configuration (base64 encoded).# # Specifies a list of peer configurations to apply to a device.# peers:# - publicKey: ABCDEF... # Specifies the public key of this peer.# endpoint: 192.168.1.2 # Specifies the endpoint of this peer entry.# persistentKeepaliveInterval: 10s # Specifies the persistent keepalive interval for this peer.# # AllowedIPs specifies a list of allowed IP addresses in CIDR notation for this peer.# allowedIPs:# - 192.168.1.0/24# # Virtual (shared) IP address configuration.# vip:# ip: 172.16.199.55 # Specifies the IP address to be used.
Field
Type
Description
Value(s)
interface
string
The interface name. Show example(s)
interface: eth0
addresses
[]string
Assigns static IP addresses to the interface.An address can be specified either in proper CIDR notation or as a standalone address (netmask of all ones is assumed).Show example(s)
A list of routes associated with the interface.If used in combination with DHCP, these routes will be appended to routes returned by DHCP server.Show example(s)
routes:
- network: 0.0.0.0/0 # The route's network (destination).gateway: 10.5.0.1# The route's gateway (if empty, creates link scope route). - network: 10.2.0.0/16 # The route's network (destination).gateway: 10.2.0.1# The route's gateway (if empty, creates link scope route).
Wireguard specific configuration.Includes things like private key, listen port, peers.Show example(s)
wireguard:
privateKey: ABCDEF... # Specifies a private key configuration (base64 encoded).listenPort: 51111# Specifies a device's listening port.# Specifies a list of peer configurations to apply to a device.peers:
- publicKey: ABCDEF... # Specifies the public key of this peer.endpoint: 192.168.1.3# Specifies the endpoint of this peer entry.# AllowedIPs specifies a list of allowed IP addresses in CIDR notation for this peer.allowedIPs:
- 192.168.1.0/24
wireguard:
privateKey: ABCDEF... # Specifies a private key configuration (base64 encoded).# Specifies a list of peer configurations to apply to a device.peers:
- publicKey: ABCDEF... # Specifies the public key of this peer.endpoint: 192.168.1.2# Specifies the endpoint of this peer entry.persistentKeepaliveInterval: 10s # Specifies the persistent keepalive interval for this peer.# AllowedIPs specifies a list of allowed IP addresses in CIDR notation for this peer.allowedIPs:
- 192.168.1.0/24
privateKey: ABCDEF... # Specifies a private key configuration (base64 encoded).listenPort: 51111# Specifies a device's listening port.# Specifies a list of peer configurations to apply to a device.peers:
- publicKey: ABCDEF... # Specifies the public key of this peer.endpoint: 192.168.1.3# Specifies the endpoint of this peer entry.# AllowedIPs specifies a list of allowed IP addresses in CIDR notation for this peer.allowedIPs:
- 192.168.1.0/24
privateKey: ABCDEF... # Specifies a private key configuration (base64 encoded).# Specifies a list of peer configurations to apply to a device.peers:
- publicKey: ABCDEF... # Specifies the public key of this peer.endpoint: 192.168.1.2# Specifies the endpoint of this peer entry.persistentKeepaliveInterval: 10s # Specifies the persistent keepalive interval for this peer.# AllowedIPs specifies a list of allowed IP addresses in CIDR notation for this peer.allowedIPs:
- 192.168.1.0/24
Field
Type
Description
Value(s)
privateKey
string
Specifies a private key configuration (base64 encoded).Can be generated by wg genkey.
ghcr.io:
# List of endpoints (URLs) for registry mirrors to use.endpoints:
- https://registry.insecure
- https://ghcr.io/v2/
Field
Type
Description
Value(s)
endpoints
[]string
List of endpoints (URLs) for registry mirrors to use.Endpoint configures HTTP/HTTPS access mode, host name, port and path (if path is not set, it defaults to /v2).
RegistryConfig
RegistryConfig specifies auth & TLS config per registry.
The auth configuration for this registry.Note: changes to the registry auth will not be picked up by the CRI containerd plugin without a reboot.Show example(s)
# Ephemeral partition encryption.ephemeral:
provider: luks2 # Encryption provider to use for the encryption.# Defines the encryption keys generation and storage method.keys:
- # Deterministically generated key from the node UUID and PartitionLabel.nodeID: {}
slot: 0# Key slot number for LUKS2 encryption.# # Cipher kind to use for the encryption. Depends on the encryption provider.# cipher: aes-xts-plain64# # Defines the encryption sector size.# blockSize: 4096# # Additional --perf parameters for the LUKS2 encryption.# options:# - no_read_workqueue# - no_write_workqueue
Enable the KubeSpan feature.Cluster discovery should be enabled with .cluster.discovery.enabled for KubeSpan to be enabled.
allowDownPeerBypass
bool
Skip sending traffic via KubeSpan if the peer connection state is not up.This provides configurable choice between connectivity and security: either traffic is always forced to go via KubeSpan (even if Wireguard peer connection is not up), or traffic can go directly to the peer if Wireguard connection can’t be established.
enabled: true# Enable the cluster membership discovery feature.# Configure registries used for cluster member discovery.registries:
# Kubernetes registry uses Kubernetes API server to discover cluster members and stores additional informationkubernetes: {}
# Service registry is using an external service to push and pull information about cluster members.service:
endpoint: https://discovery.talos.dev/ # External service endpoint.
Field
Type
Description
Value(s)
enabled
bool
Enable the cluster membership discovery feature.Cluster discovery is based on individual registries which are configured under the registries field.
Talos supports a number of kernel commandline parameters. Some are required for
it to operate. Others are optional and useful in certain circumstances.
Several of these are enforced by the Kernel Self Protection Project KSPP.
Required parameters:
talos.platform: can be one of aws, azure, container, digitalocean, gcp, metal, equinixMetal, or vmware
init_on_alloc=1: required by KSPP
slab_nomerge: required by KSPP
pti=on: required by KSPP
Recommended parameters:
init_on_free=1: advised by KSPP if minimizing stale data lifetime is
important
Available Talos-specific parameters
ip
Initial configuration of the interface, routes, DNS, NTP servers.
Talos will use the configuration supplied via the kernel parameter as the initial network configuration.
This parameter is useful in the environments where DHCP doesn’t provide IP addresses or when default DNS and NTP servers should be overridden
before loading machine configuration.
Partial configuration can be applied as well, e.g. ip=<:::::::<dns0-ip>:<dns1-ip>:<ntp0-ip> sets only the DNS and NTP servers.
IPv6 addresses can be specified by enclosing them in the square brackets, e.g. ip=[2001:db8::a]:[2001:db8::b]:[fe80::1]::master1:eth1::[2001:4860:4860::6464]:[2001:4860:4860::64]:[2001:4860:4806::].
Talos will use the bond= kernel parameter if supplied to set the initial bond configuration.
This parameter is useful in environments where the switch ports are suspended if the machine doesn’t setup a LACP bond.
If only the bond name is supplied, the bond will be created with eth0 and eth1 as slaves and bond mode set as balance-rr
All these below configurations are equivalent:
bond=bond0
bond=bond0:
bond=bond0::
bond=bond0:::
bond=bond0:eth0,eth1
bond=bond0:eth0,eth1:balance-rr
An example of a bond configuration with all options specified:
This will create a bond interface named bond1 with eth3 and eth4 as slaves and set the bond mode to 802.3ad, the transmit hash policy to layer2+3 and bond interface MTU to 1450.
panic
The amount of time to wait after a panic before a reboot is issued.
Talos will always reboot if it encounters an unrecoverable error.
However, when collecting debug information, it may reboot too quickly for
humans to read the logs.
This option allows the user to delay the reboot to give time to collect debug
information from the console screen.
A value of 0 disables automatic rebooting entirely.
talos.config
The URL at which the machine configuration data may be found.
The board name, if Talos is being used on an ARM64 SBC.
Supported boards are:
- bananapi_m64: Banana Pi M64
- libretech_all_h3_cc_h5: Libre Computer ALL-H3-CC
- rock64: Pine64 Rock64
- rpi_4: Raspberry Pi 4, Model B
talos.hostname
The hostname to be used.
The hostname is generally specified in the machine config.
However, in some cases, the DHCP server needs to know the hostname
before the machine configuration has been acquired.
Unless specifically required, the machine configuration should be used
instead.
talos.shutdown
The type of shutdown to use when Talos is told to shutdown.
Valid options are:
- halt
- poweroff
talos.network.interface.ignore
A network interface which should be ignored and not configured by Talos.
Before a configuration is applied (early on each boot), Talos attempts to
configure each network interface by DHCP.
If there are many network interfaces on the machine which have link but no
DHCP server, this can add significant boot delays.
This option may be specified multiple times for multiple network interfaces.
talos.experimental.wipe
Resets the disk before starting up the system.
Valid options are:
- system resets system disk.
5.5 - Platform
Visualization of the bootstrap process on bare metal machines.
Metal
Below is a image to visualize the process of bootstrapping nodes.
6 - Learn More
6.1 - Philosophy
Learn about the philosophy behind the need for Talos Linux.
Distributed
Talos is intended to be operated in a distributed manner.
That is, it is built for a high-availability dataplane first.
Its etcd cluster is built in an ad-hoc manner, with each appointed node joining on its own directive (with proper security validations enforced, of course).
Like as kubernetes itself, workloads are intended to be distributed across any number of compute nodes.
There should be no single points of failure, and the level of required coordination is as low as each platform allows.
Immutable
Talos takes immutability very seriously.
Talos itself, even when installed on a disk, always runs from a SquashFS image, meaning that even if a directory is mounted to be writable, the image itself is never modified.
All images are signed and delivered as single, versioned files.
We can always run integrity checks on our image to verify that it has not been modified.
While Talos does allow a few, highly-controlled write points to the filesystem, we strive to make them as non-unique and non-critical as possible.
In fact, we call the writable partition the “ephemeral” partition precisely because we want to make sure none of us ever uses it for unique, non-replicated, non-recreatable data.
Thus, if all else fails, we can always wipe the disk and get back up and running.
Minimal
We are always trying to reduce and keep small Talos’ footprint.
Because nearly the entire OS is built from scratch in Go, we are already
starting out in a good position.
We have no shell.
We have no SSH.
We have none of the GNU utilities, not even a rollup tool such as busybox.
Everything which is included in Talos is there because it is necessary, and
nothing is included which isn’t.
As a result, the OS right now produces a SquashFS image size of less than 80 MB.
Ephemeral
Everything Talos writes to its disk is either replicated or reconstructable.
Since the controlplane is high availability, the loss of any node will cause
neither service disruption nor loss of data.
No writes are even allowed to the vast majority of the filesystem.
We even call the writable partition “ephemeral” to keep this idea always in
focus.
Secure
Talos has always been designed with security in mind.
With its immutability, its minimalism, its signing, and its componenture, we are
able to simply bypass huge classes of vulnerabilities.
Moreover, because of the way we have designed Talos, we are able to take
advantage of a number of additional settings, such as the recommendations of the Kernel Self Protection Project (kspp) and the complete disablement of dynamic modules.
There are no passwords in Talos.
All networked communication is encrypted and key-authenticated.
The Talos certificates are short-lived and automatically-rotating.
Kubernetes is always constructed with its own separate PKI structure which is
enforced.
Declarative
Everything which can be configured in Talos is done so through a single YAML
manifest.
There is no scripting and no procedural steps.
Everything is defined by the one declarative YAML file.
This configuration includes that of both Talos itself and the Kubernetes which
it forms.
This is achievable because Talos is tightly focused to do one thing: run
kubernetes, in the easiest, most secure, most reliable way it can.
6.2 - Architecture
Learn the system architecture of Talos Linux itself.
Talos is designed to be atomic in deployment and modular in composition.
It is atomic in that the entirety of Talos is distributed as a
single, self-contained image, which is versioned, signed, and immutable.
It is modular in that it is composed of many separate components
which have clearly defined gRPC interfaces which facilitate internal flexibility
and external operational guarantees.
All of the main Talos components communicate with each other by gRPC, through a socket on the local machine.
This imposes a clear separation of concerns and ensures that changes over time which affect the interoperation of components are a part of the public git record.
The benefit is that each component may be iterated and changed as its needs dictate, so long as the external API is controlled.
This is a key component in reducing coupling and maintaining modularity.
File system partitions
Talos uses these partitions with the following labels:
EFI - stores EFI boot data.
BIOS - used for GRUB’s second stage boot.
BOOT - used for the boot loader, stores initramfs and kernel data.
META - stores metadata about the talos node, such as node id’s.
STATE - stores machine configuration, node identity data for cluster discovery and KubeSpan info
EPHEMERAL - stores ephemeral state information, mounted at /var
The File System
One of the unique design decisions in Talos is the layout of the root file system.
There are three “layers” to the Talos root file system.
At its core the rootfs is a read-only squashfs.
The squashfs is then mounted as a loop device into memory.
This provides Talos with an immutable base.
The next layer is a set of tmpfs file systems for runtime specific needs.
Aside from the standard pseudo file systems such as /dev, /proc, /run, /sys and /tmp, a special /system is created for internal needs.
One reason for this is that we need special files such as /etc/hosts, and /etc/resolv.conf to be writable (remember that the rootfs is read-only).
For example, at boot Talos will write /system/etc/hosts and then bind mount it over /etc/hosts.
This means that instead of making all of /etc writable, Talos only makes very specific files writable under /etc.
All files under /system are completely recreated on each boot.
For files and directories that need to persist across boots, Talos creates overlayfs file systems.
The /etc/kubernetes is a good example of this.
Directories like this are overlayfs backed by an XFS file system mounted at /var.
The /var directory is owned by Kubernetes with the exception of the above overlayfs file systems.
This directory is writable and used by etcd (in the case of control plane nodes), the kubelet, and the CRI (containerd).
6.3 - Concepts
Summary of Talos Linux.
When people come across Talos, they frequently want a nice, bite-sized summary
of it.
This is surprisingly difficult when Talos represents such a
fundamentally-rethought operating system.
Not based on X distro
A useful way to summarize an operating system is to say that it is based on X, but focused on Y.
For instance, Mint was originally based on Ubuntu, but focused on Gnome 2 (instead of, at the time, Unity).
Or maybe something like Raspbian is based on Debian, but it is focused on the Raspberry Pi.
CentOS is RHEL, but made license-free.
Talos Linux isn’t based on any other distribution.
We often think of ourselves as being the second-generation of
container-optimised operating systems, where things like CoreOS, Flatcar, and Rancher represent the first generation, but that implies heredity where there is none.
Talos Linux is actually a ground-up rewrite of the userspace, from PID 1.
We run the Linux kernel, but everything downstream of that is our own custom
code, written in Go, rigorously-tested, and published as an immutable,
integrated, cohesive image.
The Linux kernel launches what we call machined, for instance, not systemd.
There is no systemd on our system.
There are no GNU utilities, no shell, no SSH, no packages, nothing you could associate with
any other distribution.
We don’t even have a build toolchain in the normal sense of the word.
Not for individual use
Technically, Talos Linux installs to a computer much as other operating systems.
Unlike other operating systems, Talos is not meant to run alone, on a
single machine.
Talos Linux comes with tooling from the very foundation to form clusters, even
before Kubernetes comes into play.
A design goal of Talos Linux is eliminating the management
of individual nodes as much as possible.
In order to do that, Talos Linux operates as a cluster of machines, with lots of
checking and coordination between them, at all levels.
Break from your mind the idea of running an application on a computer.
There are no individual computers.
There is only a cluster.
Talos is meant to do one thing: maintain a Kubernetes cluster, and it does this
very, very well.
The entirety of the configuration of any machine is specified by a single,
simple configuration file, which can often be the same configuration file used
across many machines.
Much like a biological system, if some component misbehaves, just cut it out and
let a replacement grow.
Rebuilds of Talos are remarkably fast, whether they be new machines, upgrades,
or reinstalls.
Never get hung up on an individual machine.
Control Planes are not linear replicas
People familiar with traditional relational database replication often
overlook a critical design concept of the Kubernetes (and Talos) database:
etcd.
Unlike linear replicas, which have dedicated masters and slaves/replicas, etcd
is highly dynamic.
The master in an etcd cluster is entirely temporal.
This means fail-overs are handled easily, and usually without any notice
of operators.
This also means that the operational architecture is fundamentally different.
Properly managed (which Talos Linux does), etcd should never have split brain
and should never encounter noticeable down time.
In order to do this, though, etcd maintains the concept of “membership” and of
“quorum”.
In order to perform any operation, read or write, the database requires
quorum to be sustained.
That is, a strict majority must agree on the current leader, and absenteeism
counts as a negative.
In other words, if there are three registered members (voters), at least two out
of the three must be actively asserting that the current master is the master.
If any two disagree or even fail to answer, the etcd database will lock itself
until quorum is again achieved in order to protect itself and the integrity of
the data.
This is fantastically important for handling distributed systems and the various
types of contention which may arise.
This design means, however, that having an incorrect number of members can be
devastating.
Having only two controlplane nodes, for instance, is mostly worse than having
only one, because if either goes down, your entire database will lock.
You would be better off just making periodic snapshots of the data and restoring
it when necessary.
Another common situation occurs when replacing controlplane nodes.
If you have three controlplane nodes and replace one, you will not have three
members, you will have four, and one of those will never be available again.
Thus, if any of your three remaining nodes goes down, your database will lock,
because only two out of the four members will be available: four nodes is
worse than three nodes!
So it is critical that controlplane members which are replaced be removed.
Luckily, the Talos API makes this easy.
Bootstrap once
In the old days, Talos Linux had the idea of an init node.
The init node was a “special” controlplane node which was designated as the
founder of the cluster.
It was the first, was guaranteed to be the elector, and was authorised to create
a cluster…
even if one already existed.
This made the formation of a cluster cluster really easy, but it had a lot of
down sides.
Mostly, these related to rebuilding or replacing that init node:
you could easily end up with a split-brain scenario in which you had two different clusters:
a single node one and a two-node one.
Needless to say, this was an unhappy arrangement.
Fortunately, init nodes are gone, but that means that the critical operation
of forming a cluster is a manual process.
It’s an easy process, consisting of a single API call, but it can be a
confusing one, until you understand what it does.
Every new cluster must be bootstrapped exactly and only once.
This means you do NOT bootstrap each node in a cluster, not even each
controlplane node.
You bootstrap only a single controlplane node, because you are bootstrapping the
cluster, not the node.
It doesn’t matter which controlplane node is told to bootstrap, but it must be
a controlplane node, and it must be only one.
Bootstrapping is fast and sure.
Even if your Kubernetes cluster fails to form for other reasons (say, a bad
configuration option or unavailable container repository), if the bootstrap API
call returns successfully, you do NOT need to bootstrap again:
just fix the config or let Kubernetes retry.
Bootstrapping itself does not do anything with Kubernetes.
Bootstrapping only tells etcd to form a cluster, so don’t judge the success of
a bootstrap by the failure of Kubernetes to start.
Kubernetes relies on etcd, so bootstrapping is required, but it is not
sufficient for Kubernetes to start.
6.4 - Components
Understand the system components that make up Talos Linux.
In this section, we discuss the various components that underpin Talos.
Components
Component
Description
apid
When interacting with Talos, the gRPC API endpoint you interact with directly is provided by apid. apid acts as the gateway for all component interactions and forwards the requests to machined.
containerd
An industry-standard container runtime with an emphasis on simplicity, robustness, and portability. To learn more, see the containerd website.
machined
Talos replacement for the traditional Linux init-process. Specially designed to run Kubernetes and does not allow starting arbitrary user services.
networkd
Handles all of the host level network configuration. The configuration is defined under the networking key
kernel
The Linux kernel included with Talos is configured according to the recommendations outlined in the Kernel Self Protection Project.
trustd
To run and operate a Kubernetes cluster, a certain level of trust is required. Based on the concept of a ‘Root of Trust’, trustd is a simple daemon responsible for establishing trust within the system.
udevd
Implementation of eudev into machined. eudev is Gentoo’s fork of udev, systemd’s device file manager for the Linux kernel. It manages device nodes in /dev and handles all user space actions when adding or removing devices. To learn more, see the Gentoo Wiki.
apid
When interacting with Talos, the gRPC api endpoint you will interact with directly is apid.
Apid acts as the gateway for all component interactions.
Apid provides a mechanism to route requests to the appropriate destination when running on a control plane node.
We’ll use some examples below to illustrate what apid is doing.
When a user wants to interact with a Talos component via talosctl, there are two flags that control the interaction with apid.
The -e | --endpoints flag specifies which Talos node ( via apid ) should handle the connection.
Typically this is a public-facing server.
The -n | --nodes flag specifies which Talos node(s) should respond to the request.
If --nodes is omitted, the first endpoint will be used.
Note: Typically, there will be an endpoint already defined in the Talos config file.
Optionally, nodes can be included here as well.
For example, if a user wants to interact with machined, a command like talosctl -e cluster.talos.dev memory may be used.
$ talosctl -e cluster.talos.dev memory
NODE TOTAL USED FREE SHARED BUFFERS CACHE AVAILABLE
cluster.talos.dev 7938176823901455337246571
In this case, talosctl is interacting with apid running on cluster.talos.dev and forwarding the request to the machined api.
If we wanted to extend our example to retrieve memory from another node in our cluster, we could use the command talosctl -e cluster.talos.dev -n node02 memory.
$ talosctl -e cluster.talos.dev -n node02 memory
NODE TOTAL USED FREE SHARED BUFFERS CACHE AVAILABLE
node02 7938176823901455337246571
The apid instance on cluster.talos.dev receives the request and forwards it to apid running on node02, which forwards the request to the machined api.
We can further extend our example to retrieve memory for all nodes in our cluster by appending additional -n node flags or using a comma separated list of nodes ( -n node01,node02,node03 ):
$ talosctl -e cluster.talos.dev -n node01 -n node02 -n node03 memory
NODE TOTAL USED FREE SHARED BUFFERS CACHE AVAILABLE
node01 793887140711374929457042node02 25784414408190796181384952589227492node03 257844183025518612549777254556
The apid instance on cluster.talos.dev receives the request and forwards it to node01, node02, and node03, which then forwards the request to their local machined api.
containerd
Containerd provides the container runtime to launch workloads on Talos and Kubernetes.
Talos services are namespaced under the system namespace in containerd, whereas the Kubernetes services are namespaced under the k8s.io namespace.
machined
A common theme throughout the design of Talos is minimalism.
We believe strongly in the UNIX philosophy that each program should do one job well.
The init included in Talos is one example of this, and we are calling it “machined”.
We wanted to create a focused init that had one job - run Kubernetes.
To that extent, machined is relatively static in that it does not allow for arbitrary user-defined services.
Only the services necessary to run Kubernetes and manage the node are available.
This includes:
Networkd handles all of the host level network configuration.
The configuration is defined under the networking key.
By default, we attempt to issue a DHCP request for every interface on the server.
This can be overridden by supplying one of the following kernel arguments:
talos.network.interface.ignore - specify a list of interfaces to skip discovery on
ip - ip=<client-ip>:<server-ip>:<gw-ip>:<netmask>:<hostname>:<device>:<autoconf>:<dns0-ip>:<dns1-ip>:<ntp0-ip> as documented in the kernel here
The Linux kernel included with Talos is configured according to the recommendations outlined in the Kernel Self Protection Project (KSSP).
trustd
Security is one of the highest priorities within Talos.
To run a Kubernetes cluster, a certain level of trust is required to operate a cluster.
For example, orchestrating the bootstrap of a highly available control plane requires sensitive PKI data distribution.
To that end, we created trustd.
Based on a Root of Trust concept, trustd is a simple daemon responsible for establishing trust within the system.
Once trust is established, various methods become available to the trustee.
For example, it can accept a write request from another node to place a file on disk.
Additional methods and capabilities will be added to the trustd component to support new functionality in the rest of the Talos environment.
udevd
Udevd handles the kernel device notifications and sets up the necessary links in /dev.
6.5 - Control Plane
Understand the Kubernetes Control Plane.
This guide provides details on how Talos runs and bootstraps the Kubernetes control plane.
High-level Overview
Talos cluster bootstrap flow:
The etcd service is started on control plane nodes.
Instances of etcd on control plane nodes build the etcd cluster.
The kubelet service is started.
Control plane components are started as static pods via the kubelet, and the kube-apiserver component connects to the local (running on the same node) etcd instance.
The kubelet issues client certificate using the bootstrap token using the control plane endpoint (via kube-apiserver and kube-controller-manager).
The kubelet registers the node in the API server.
Kubernetes control plane schedules pods on the nodes.
Cluster Bootstrapping
All nodes start the kubelet service.
The kubelet tries to contact the control plane endpoint, but as it is not up yet, it keeps retrying.
One of the control plane nodes is chosen as the bootstrap node.
The node’s type can be either init or controlplane, where the controlplane type is promoted using the bootstrap API (talosctl bootstrap).
The bootstrap node initiates the etcd bootstrap process by initializing etcd as the first member of the cluster.
Note: there should be only one bootstrap node for the cluster lifetime.
Once etcd is bootstrapped, the bootstrap node has no special role and acts the same way as other control plane nodes.
Services etcd on non-bootstrap nodes try to get Endpoints resource via control plane endpoint, but that request fails as control plane endpoint is not up yet.
As soon as etcd is up on the bootstrap node, static pod definitions for the Kubernetes control plane components (kube-apiserver, kube-controller-manager, kube-scheduler) are rendered to disk.
The kubelet service on the bootstrap node picks up the static pod definitions and starts the Kubernetes control plane components.
As soon as kube-apiserver is launched, the control plane endpoint comes up.
The bootstrap node acquires an etcd mutex and injects the bootstrap manifests into the API server.
The set of the bootstrap manifests specify the Kubernetes join token and kubelet CSR auto-approval.
The kubelet service on all the nodes is now able to issue client certificates for themselves and register nodes in the API server.
Other bootstrap manifests specify additional resources critical for Kubernetes operations (i.e. CNI, PSP, etc.)
The etcd service on non-bootstrap nodes is now able to discover other members of the etcd cluster via the Kubernetes Endpoints resource.
The etcd cluster is now formed and consists of all control plane nodes.
All control plane nodes render static pod manifests for the control plane components.
Each node now runs a full set of components to make the control plane HA.
The kubelet service on worker nodes is now able to issue the client certificate and register itself with the API server.
Scaling Up the Control Plane
When new nodes are added to the control plane, the process is the same as the bootstrap process above: the etcd service discovers existing members of the control plane via the
control plane endpoint, joins the etcd cluster, and the control plane components are scheduled on the node.
Scaling Down the Control Plane
Scaling down the control plane involves removing a node from the cluster.
The most critical part is making sure that the node which is being removed leaves the etcd cluster.
When using talosctl reset command, the targeted control plane node leaves the etcd cluster as part of the reset sequence.
Upgrading Control Plane Nodes
When a control plane node is upgraded, Talos leaves etcd, wipes the system disk, installs a new version of itself, and reboots.
The upgraded node then joins the etcd cluster on reboot.
So upgrading a control plane node is equivalent to scaling down the control plane node followed by scaling up with a new version of Talos.
6.6 - Controllers and Resources
Discover how Talos Linux uses the concepts on Controllers and Resources.
Talos implements concepts of resources and controllers to facilitate internal operations of the operating system.
Talos resources and controllers are very similar to Kubernetes resources and controllers, but there are some differences.
The content of this document is not required to operate Talos, but it is useful for troubleshooting.
Starting with Talos 0.9, most of the Kubernetes control plane boostrapping and operations is implemented via controllers and resources which allows Talos to be reactive to configuration changes, environment changes (e.g. time sync).
Resources
A resource captures a piece of system state.
Each resource belongs to a “Type” which defines resource contents.
Resource state can be split in two parts:
metadata: fixed set of fields describing resource - namespace, type, ID, etc.
spec: contents of the resource (depends on resource type).
Resource is uniquely identified by (namespace, type, id).
Namespaces provide a way to avoid conflicts on duplicate resource IDs.
At the moment of this writing, all resources are local to the node and stored in memory.
So on every reboot resource state is rebuilt from scratch (the only exception is MachineConfig resource which reflects current machine config).
Controllers
Controllers run as independent lightweight threads in Talos.
The goal of the controller is to reconcile the state based on inputs and eventually update outputs.
A controller can have any number of resource types (and namespaces) as inputs.
In other words, it watches specified resources for changes and reconciles when these changes occur.
A controller might also have additional inputs: running reconcile on schedule, watching etcd keys, etc.
A controller has a single output: a set of resources of fixed type in a fixed namespace.
Only one controller can manage resource type in the namespace, so conflicts are avoided.
Querying Resources
Talos CLI tool talosctl provides read-only access to the resource API which includes getting specific resource,
listing resources and watching for changes.
Talos stores resources describing resource types and namespaces in meta namespace:
$ talosctl get resourcedefinitions
NODE NAMESPACE TYPE ID VERSION
172.20.0.2 meta ResourceDefinition bootstrapstatuses.v1alpha1.talos.dev 1172.20.0.2 meta ResourceDefinition etcdsecrets.secrets.talos.dev 1172.20.0.2 meta ResourceDefinition kubernetescontrolplaneconfigs.config.talos.dev 1172.20.0.2 meta ResourceDefinition kubernetessecrets.secrets.talos.dev 1172.20.0.2 meta ResourceDefinition machineconfigs.config.talos.dev 1172.20.0.2 meta ResourceDefinition machinetypes.config.talos.dev 1172.20.0.2 meta ResourceDefinition manifests.kubernetes.talos.dev 1172.20.0.2 meta ResourceDefinition manifeststatuses.kubernetes.talos.dev 1172.20.0.2 meta ResourceDefinition namespaces.meta.cosi.dev 1172.20.0.2 meta ResourceDefinition resourcedefinitions.meta.cosi.dev 1172.20.0.2 meta ResourceDefinition rootsecrets.secrets.talos.dev 1172.20.0.2 meta ResourceDefinition secretstatuses.kubernetes.talos.dev 1172.20.0.2 meta ResourceDefinition services.v1alpha1.talos.dev 1172.20.0.2 meta ResourceDefinition staticpods.kubernetes.talos.dev 1172.20.0.2 meta ResourceDefinition staticpodstatuses.kubernetes.talos.dev 1172.20.0.2 meta ResourceDefinition timestatuses.v1alpha1.talos.dev 1
$ talosctl get namespaces
NODE NAMESPACE TYPE ID VERSION
172.20.0.2 meta Namespace config 1172.20.0.2 meta Namespace controlplane 1172.20.0.2 meta Namespace meta 1172.20.0.2 meta Namespace runtime 1172.20.0.2 meta Namespace secrets 1
Most of the time namespace flag (--namespace) can be omitted, as ResourceDefinition contains default
namespace which is used if no namespace is given:
Resource definition also contains type aliases which can be used interchangeably with canonical resource name:
$ talosctl get ns config
NODE NAMESPACE TYPE ID VERSION
172.20.0.2 meta Namespace config 1
Output
Command talosctl get supports following output modes:
table (default) prints resource list as a table
yaml prints pretty formatted resources with details, including full metadata spec.
This format carries most details from the backend resource (e.g. comments in MachineConfig resource)
json prints same information as yaml, some additional details (e.g. comments) might be lost.
This format is useful for automated processing with tools like jq.
Watching Changes
If flag --watch is appended to the talosctl get command, the command switches to watch mode.
If list of resources was requested, talosctl prints initial contents of the list and then appends resource information for every change:
$ talosctl get svc -w
NODE * NAMESPACE TYPE ID VERSION RUNNING HEALTHY
172.20.0.2 + runtime Service timed 2truetrue172.20.0.2 + runtime Service trustd 2truetrue172.20.0.2 + runtime Service udevd 2truetrue172.20.0.2 - runtime Service timed 2truetrue172.20.0.2 + runtime Service timed 1truefalse172.20.0.2 runtime Service timed 2truetrue
Column * specifies event type:
+ is created
- is deleted
is updated
In YAML/JSON output, field event is added to the resource representation to describe the event type.
Examples
Getting machine config:
$ talosctl get machineconfig -o yaml
node: 172.20.0.2
metadata:
namespace: config
type: MachineConfigs.config.talos.dev
id: v1alpha1
version: 2 phase: running
spec:
version: v1alpha1 # Indicates the schema used to decode the contents. debug: false# Enable verbose logging to the console. persist: true# Indicates whether to pull the machine config upon every boot.# Provides machine specific configuration options....
Getting control plane static pod statuses:
$ talosctl get staticpodstatus
NODE NAMESPACE TYPE ID VERSION READY
172.20.0.2 controlplane StaticPodStatus kube-system/kube-apiserver-talos-default-master-1 3 True
172.20.0.2 controlplane StaticPodStatus kube-system/kube-controller-manager-talos-default-master-1 3 True
172.20.0.2 controlplane StaticPodStatus kube-system/kube-scheduler-talos-default-master-1 4 True
Starting with version 0.11, a new implementation of the network configuration subsystem is powered by COSI.
The new implementation is still using the same machine configuration file format and external sources to configure a node’s network, so there should be no difference
in the way Talos works in 0.11.
The most notable change in Talos 0.11 is that all changes to machine configuration .machine.network can be applied now in immediate mode (without a reboot) via
talosctl edit mc --mode=no-reboot or talosctl apply-config --mode=no-reboot.
Resources
There are six basic network configuration items in Talos:
Address (IP address assigned to the interface/link);
Route (route to a destination);
Link (network interface/link configuration);
Resolver (list of DNS servers);
Hostname (node hostname and domainname);
TimeServer (list of NTP servers).
Each network configuration item has two counterparts:
*Status (e.g. LinkStatus) describes the current state of the system (Linux kernel state);
*Spec (e.g. LinkSpec) defines the desired configuration.
Resource
Status
Spec
Address
AddressStatus
AddressSpec
Route
RouteStatus
RouteSpec
Link
LinkStatus
LinkSpec
Resolver
ResolverStatus
ResolverSpec
Hostname
HostnameStatus
HostnameSpec
TimeServer
TimeServerStatus
TimeServerSpec
Status resources have aliases with the Status suffix removed, so for example
AddressStatus is also available as Address.
Talos networking controllers reconcile the state so that *Status equals the desired *Spec.
Observing State
The current network configuration state can be observed by querying *Status resources via
talosctl:
$ talosctl get addresses
NODE NAMESPACE TYPE ID VERSION ADDRESS LINK
172.20.0.2 network AddressStatus eth0/172.20.0.2/24 1 172.20.0.2/24 eth0
172.20.0.2 network AddressStatus eth0/fe80::9804:17ff:fe9d:3058/64 2 fe80::9804:17ff:fe9d:3058/64 eth0
172.20.0.2 network AddressStatus flannel.1/10.244.4.0/32 1 10.244.4.0/32 flannel.1
172.20.0.2 network AddressStatus flannel.1/fe80::10b5:44ff:fe62:6fb8/64 2 fe80::10b5:44ff:fe62:6fb8/64 flannel.1
172.20.0.2 network AddressStatus lo/127.0.0.1/8 1 127.0.0.1/8 lo
172.20.0.2 network AddressStatus lo/::1/128 1 ::1/128 lo
In the output there are addresses set up by Talos (e.g. eth0/172.20.0.2/24) and
addresses set up by other facilities (e.g. flannel.1/10.244.4.0/32 set up by CNI).
Talos networking controllers watch the kernel state and update resources
accordingly.
Additional details about the address can be accessed via the YAML output:
Resources can be watched for changes with the --watch flag to see how configuration changes over time.
Other networking status resources can be inspected with talosctl get routes, talosctl get links, etc.
For example:
$ talosctl get resolvers
NODE NAMESPACE TYPE ID VERSION RESOLVERS
172.20.0.2 network ResolverStatus resolvers 2["8.8.8.8","1.1.1.1"]
Inspecting Configuration
The desired networking configuration is combined from multiple sources and presented
as *Spec resources:
$ talosctl get addressspecs
NODE NAMESPACE TYPE ID VERSION
172.20.0.2 network AddressSpec eth0/172.20.0.2/24 2172.20.0.2 network AddressSpec lo/127.0.0.1/8 2172.20.0.2 network AddressSpec lo/::1/128 2
These AddressSpecs are applied to the Linux kernel to reach the desired state.
If, for example, an AddressSpec is removed, the address is removed from the Linux network interface as well.
*Spec resources can’t be manipulated directly, they are generated automatically by Talos
from multiple configuration sources (see a section below for details).
If a *Spec resource is queried in YAML format, some additional information is available:
An important field is the layer field, which describes a configuration layer this spec is coming from: in this case, it’s generated by a network operator (see below) and is set by the DHCPv4 operator.
Configuration Merging
Spec resources described in the previous section show the final merged configuration state,
while initial specs are put to a different unmerged namespace network-config.
Spec resources in the network-config namespace are merged with conflict resolution to produce the final merged representation in the network namespace.
Let’s take HostnameSpec as an example.
The final merged representation is:
We can see that the final configuration for the hostname is talos-default-master-1.
And this is the hostname that was actually applied.
This can be verified by querying a HostnameStatus resource:
$ talosctl get hostnamestatus
NODE NAMESPACE TYPE ID VERSION HOSTNAME DOMAINNAME
172.20.0.2 network HostnameStatus hostname 1 talos-default-master-1
Initial configuration for the hostname in the network-config namespace is:
We can see that there are two specs for the hostname:
one from the default configuration layer which defines the hostname as talos-172-20-0-2 (default driven by the default node address);
another one from the layer operator that defines the hostname as talos-default-master-1 (DHCP).
Talos merges these two specs into a final HostnameSpec based on the configuration layer and merge rules.
Here is the order of precedence from low to high:
configuration (derived from the machine configuration).
So in our example the operator layer HostnameSpec overwrites the default layer producing the final hostname talos-default-master-1.
The merge process applies to all six core networking specs.
For each spec, the layer controls the merge behavior
If multiple configuration specs
appear at the same layer, they can be merged together if possible, otherwise merge result
is stable but not defined (e.g. if DHCP on multiple interfaces provides two different hostnames for the node).
LinkSpecs are merged across layers, so for example, machine configuration for the interface MTU overrides an MTU set by the DHCP server.
Network Operators
Network operators provide dynamic network configuration which can change over time as the node is running:
DHCPv4
DHCPv6
Virtual IP
Network operators produce specs for addresses, routes, links, etc., which are then merged and applied according to the rules described above.
Operators are configured with OperatorSpec resources which describe when operators
should run and additional configuration for the operator:
OperatorSpec resources are generated by Talos based on machine configuration mostly.
DHCP4 operator is created automatically for all physical network links which are not configured explicitly via the kernel command line or the machine configuration.
This also means that on the first boot, without a machine configuration, a DHCP request is made on all physical network interfaces by default.
Specs generated by operators are prefixed with the operator ID (dhcp4/eth0 in the example above) in the unmerged network-config namespace:
$ talosctl -n 172.20.0.2 get addressspecs --namespace network-config
NODE NAMESPACE TYPE ID VERSION
172.20.0.2 network-config AddressSpec dhcp4/eth0/eth0/172.20.0.2/24 1
Other Network Resources
There are some additional resources describing the network subsystem state.
The NodeAddress resource presents node addresses excluding link-local and loopback addresses:
$ talosctl get nodeaddresses
NODE NAMESPACE TYPE ID VERSION ADDRESSES
10.100.2.23 network NodeAddress accumulative 6["10.100.2.23","147.75.98.173","147.75.195.143","192.168.95.64","2604:1380:1:ca00::17"]10.100.2.23 network NodeAddress current 5["10.100.2.23","147.75.98.173","192.168.95.64","2604:1380:1:ca00::17"]10.100.2.23 network NodeAddress default 1["10.100.2.23"]
default is the node default address;
current is the set of addresses a node currently has;
accumulative is the set of addresses a node had over time (it might include virtual IPs which are not owned by the node at the moment).
NodeAddress resources are used to pick up the default address for etcd peer URL, to populate SANs field in the generated certificates, etc.
Another important resource is Nodename which provides Node name in Kubernetes:
$ talosctl get nodename
NODE NAMESPACE TYPE ID VERSION NODENAME
10.100.2.23 controlplane Nodename nodename 1 infra-green-cp-mmf7v
Depending on the machine configuration nodename might be just a hostname or the FQDN of the node.
NetworkStatus aggregates the current state of the network configuration:
For each of the six basic resource types, there are several controllers:
*StatusController populates *Status resources observing the Linux kernel state.
*ConfigController produces the initial unmerged *Spec resources in the network-config namespace based on defaults, kernel command line, and machine configuration.
*MergeController merges *Spec resources into the final representation in the network namespace.
*SpecController applies merged *Spec resources to the kernel state.
For the network operators:
OperatorConfigController produces OperatorSpec resources based on machine configuration and deafauls.
OperatorSpecController runs network operators watching OperatorSpec resources and producing various *Spec resources in the network-config namespace.
Configuration Sources
There are several configuration sources for the network configuration, which are described in this section.
Defaults
lo interface is assigned addresses 127.0.0.1/8 and ::1/128;
hostname is set to the talos-<IP> where IP is the default node address;
resolvers are set to 8.8.8.8, 1.1.1.1;
time servers are set to pool.ntp.org;
DHCP4 operator is run on any physical interface which is not configured explicitly.
Cmdline
The kernel command line is parsed for the following options:
ip= option is parsed for node IP, default gateway, hostname, DNS servers, NTP servers;
talos.hostname= option is used to set node hostname;
talos.network.interface.ignore= can be used to make Talos skip network interface configuration completely.
Platform
Platform configuration delivers cloud environment-specific options (e.g. the hostname).
Operator
Network operators provide configuration for all basic resource types.
Machine Configuration
The machine configuration is parsed for link configuration, addresses, routes, hostname,
resolvers and time servers.
Any changes to .machine.network configuration can be applied in immediate mode.
Network Configuration Debugging
Most of the network controller operations and failures are logged to the kernel console,
additional logs with debug level are available with talosctl logs controller-runtime command.
If the network configuration can’t be established and the API is not available, debug level
logs can be sent to the console with debug: true option in the machine configuration.
6.8 - Network Connectivity
Description of the Networking Connectivity needed by Talos Linux
Configuring Network Connectivity
The simplest way to deploy Talos is by ensuring that all the remote components of the system (talosctl, the control plane nodes, and worker nodes) all have layer 2 connectivity.
This is not always possible, however, so this page lays out the minimal network access that is required to configure and operate a talos cluster.
Note: These are the ports required for Talos specifically, and should be configured in addition to the ports required by kubernetes.
See the kubernetes docs for information on the ports used by kubernetes itself.
Ports marked with a * are not currently configurable, but that may change in the future.
Follow along here.
6.9 - Discovery
Discover how Sidero Labs impliments Talos node discovery.
We maintain a public discovery service whereby members of your cluster can use a common and unique key to coordinate the most basic connection information (i.e. the set of possible “endpoints”, or IP:port pairs).
We call this data “affiliate data.”
Note: If KubeSpan is enabled the data has the addition of the WireGuard public key.
Before sending data to the discovery service, Talos will encrypt the affiliate data with AES-GCM encryption and separately encrypt endpoints with AES in ECB mode so that endpoints coming from different sources can be deduplicated server-side.
Each node submits it’s data encrypted plus it submits the endpoints it sees from other peers to the discovery service
The discovery service aggregates the data, deduplicates the endpoints, and sends updates to each connected peer.
Each peer receives information back about other affiliates from the discovery service, decrypts it and uses it to drive KubeSpan and cluster discovery.
Moreover, the discovery service has no persistence.
Data is stored in memory only with a TTL set by the clients (i.e. Talos).
The cluster ID is used as a key to select the affiliates (so that different clusters see different affiliates).
To summarize, the discovery service knows the client version, cluster ID, the number of affiliates, some encrypted data for each affiliate, and a list of encrypted endpoints.
6.10 - KubeSpan
Understand more about KubeSpan for Talos Linux.
WireGuard Peer Discovery
The key pieces of information needed for WireGuard generally are:
the public key of the host you wish to connect to
an IP address and port of the host you wish to connect to
The latter is really only required of one side of the pair.
Once traffic is received, that information is known and updated by WireGuard automatically and internally.
For Kubernetes, though, this is not quite sufficient.
Kubernetes also needs to know which traffic goes to which WireGuard peer.
Because this information may be dynamic, we need a way to be able to constantly keep this information up to date.
If we have a functional connection to Kubernetes otherwise, it’s fairly easy: we can just keep that information in Kubernetes.
Otherwise, we have to have some way to discover it.
In our solution, we have a multi-tiered approach to gathering this information.
Each tier can operate independently, but the amalgamation of the tiers produces a more robust set of connection criteria.
For this discussion, we will point out two of these tiers:
The Kubernetes-based system utilises annotations on Kubernetes Nodes which describe each node’s public key and local addresses.
On top of this, we also route Pod subnets.
This is often (maybe even usually) taken care of by the CNI, but there are many situations where the CNI fails to be able to do this itself, across networks.
So we also scrape the Kubernetes Node resource to discover its podCIDRs.
NAT, Multiple Routes, Multiple IPs
One of the difficulties in communicating across networks is that there is often not a single address and port which can identify a connection for each node on the system.
For instance, a node sitting on the same network might see its peer as 192.168.2.10, but a node across the internet may see it as 2001:db8:1ef1::10.
We need to be able to handle any number of addresses and ports, and we also need to have a mechanism to try them.
WireGuard only allows us to select one at a time.
For our implementation, then, we have built a controller which continuously discovers and rotates these IP:port pairs until a connection is established.
It then starts trying again if that connection ever fails.
Packet Routing
After we have established a WireGuard connection, our work is not done.
We still have to make sure that the right packets get sent to the WireGuard interface.
WireGuard supplies a convenient facility for tagging packets which come from it, which is great.
But in our case, we need to be able to allow traffic which both does not come from WireGuard and also is not destined for another Kubernetes node to flow through the normal mechanisms.
Unlike many corporate or privacy-oriented VPNs, we need to allow general internet traffic to flow normally.
Also, as our cluster grows, this set of IP addresses can become quite large and quite dynamic.
This would be very cumbersome and slow in iptables.
Luckily, the kernel supplies a convenient mechanism by which to define this arbitrarily large set of IP addresses: IP sets.
Talos collects all of the IPs and subnets which are considered “in-cluster” and maintains these in the kernel as an IP set.
Now that we have the IP set defined, we need to tell the kernel how to use it.
The traditional way of doing this would be to use iptables.
However, there is a big problem with IPTables.
It is a common namespace in which any number of other pieces of software may dump things.
We have no surety that what we add will not be wiped out by something else (from Kubernetes itself, to the CNI, to some workload application), be rendered unusable by higher-priority rules, or just generally cause trouble and conflicts.
Instead, we use a three-pronged system which is both more foundational and less centralised.
NFTables offers a separately namespaced, decentralised way of marking packets for later processing based on IP sets.
Instead of a common set of well-known tables, NFTables uses hooks into the kernel’s netfilter system, which are less vulnerable to being usurped, bypassed, or a source of interference than IPTables, but which are rendered down by the kernel to the same underlying XTables system.
Our NFTables system is where we store the IP sets.
Any packet which enters the system, either by forward from inside Kubernetes or by generation from the host itself, is compared against a hash table of this IP set.
If it is matched, it is marked for later processing by our next stage.
This is a high-performance system which exists fully in the kernel and which ultimately becomes an eBPF program, so it scales well to hundreds of nodes.
The next stage is the kernel router’s route rules.
These are defined as a common ordered list of operations for the whole operating system, but they are intended to be tightly constrained and are rarely used by applications in any case.
The rules we add are very simple: if a packet is marked by our NFTables system, send it to an alternate routing table.
This leads us to our third and final stage of packet routing.
We have a custom routing table with two rules:
send all IPv4 traffic to the WireGuard interface
send all IPv6 traffic to the WireGuard interface
So in summary, we:
mark packets destined for Kubernetes applications or Kubernetes nodes
send marked packets to a special routing table
send anything which is sent to that routing table through the WireGuard interface
This gives us an isolated, resilient, tolerant, and non-invasive way to route Kubernetes traffic safely, automatically, and transparently through WireGuard across almost any set of network topologies.
6.11 - talosctl
The design and use of the Talos Linux control application.
The talosctl tool packs a lot of power into a small package.
It acts as a reference implementation for the Talos API, but it also handles a lot of
conveniences for the use of Talos and its clusters.
Video Walkthrough
To see some live examples of talosctl usage, view the following video:
Client Configuration
Talosctl configuration is located in $XDG_CONFIG_HOME/talos/config.yaml if $XDG_CONFIG_HOME is defined.
Otherwise it is in $HOME/.talos/config.
The location can always be overridden by the TALOSCONFIG environment variable or the --talosconfig parameter.
Like kubectl, talosctl uses the concept of configuration contexts, so any number of Talos clusters can be managed with a single configuration file.
Unlike kubectl, it also comes with some intelligent tooling to manage the merging of new contexts into the config.
The default operation is a non-destructive merge, where if a context of the same name already exists in the file, the context to be added is renamed by appending an index number.
You can easily overwrite instead, as well.
See the talosctl config help for more information.
Endpoints and Nodes
The endpoints are the communication endpoints to which the client directly talks.
These can be load balancers, DNS hostnames, a list of IPs, etc.
Further, if multiple endpoints are specified, the client will automatically load
balance and fail over between them.
In general, it is recommended that these point to the set of control plane nodes, either directly or through a reverse proxy or load balancer.
Each endpoint will automatically proxy requests destined to another node through it, so it is not necessary to change the endpoint configuration just because you wish to talk to a different node within the cluster.
Endpoints do, however, need to be members of the same Talos cluster as the target node, because these proxied connections reply on certificate-based authentication.
The node is the target node on which you wish to perform the API call.
While you can configure the target node (or even set of target nodes) inside the ’talosctl’ configuration file, it is often useful to simply and explicitly declare the target node(s) using the -n or --nodes command-line parameter.
Keep in mind, when specifying nodes that their IPs and/or hostnames are as seen by the endpoint servers, not as from the client.
This is because all connections are proxied first through the endpoints.
Kubeconfig
The configuration for accessing a Talos Kubernetes cluster is obtained with talosctl.
By default, talosctl will safely merge the cluster into the default kubeconfig.
Like talosctl itself, in the event of a naming conflict, the new context name will be index-appended before insertion.
The --force option can be used to overwrite instead.
You can also specify an alternate path by supplying it as a positional parameter.
Thus, like Talos clusters themselves, talosctl makes it easy to manage any
number of kubernetes clusters from the same workstation.
Commands
Please see the CLI reference for the entire list of commands which are available from talosctl.
6.12 - FAQs
Frequently Asked Questions about Talos Linux.
How is Talos different from other container optimized Linux distros?
Talos shares a lot of attributes with other distros, but there are some important differences.
Talos integrates tightly with Kubernetes, and is not meant to be a general-purpose operating system.
The most important difference is that Talos is fully controlled by an API via a gRPC interface, instead of an ordinary shell.
We don’t ship SSH, and there is no console access.
Removing components such as these has allowed us to dramatically reduce the footprint of Talos, and in turn, improve a number of other areas like security, predictability, reliability, and consistency across platforms.
It’s a big change from how operating systems have been managed in the past, but we believe that API-driven OSes are the future.
Why no shell or SSH?
Since Talos is fully API-driven, all maintenance and debugging operations should be possible via the OS API.
We would like for Talos users to start thinking about what a “machine” is in the context of a Kubernetes cluster.
That is, that a Kubernetes cluster can be thought of as one massive machine, and the nodes are merely additional, undifferentiated resources.
We don’t want humans to focus on the nodes, but rather on the machine that is the Kubernetes cluster.
Should an issue arise at the node level, talosctl should provide the necessary tooling to assist in the identification, debugging, and remediation of the issue.
However, the API is based on the Principle of Least Privilege, and exposes only a limited set of methods.
We envision Talos being a great place for the application of control theory in order to provide a self-healing platform.
Why the name “Talos”?
Talos was an automaton created by the Greek God of the forge to protect the island of Crete.
He would patrol the coast and enforce laws throughout the land.
We felt it was a fitting name for a security focused operating system designed to run Kubernetes.
Why does Talos rely on a separate configuration from Kubernetes?
The talosconfig file contains client credentials to access the Talos Linux API.
Sometimes Kubernetes might be down for a number of reasons (etcd issues, misconfiguration, etc.), while Talos API access will always be available.
The Talos API is a way to access the operating system and fix issues, e.g. fixing access to Kubernetes.
When Talos Linux is running fine, using the Kubernetes APIs (via kubeconfig) is all you should need to deploy and manage Kubernetes workloads.
6.13 - Knowledge Base
Recipes for common configuration tasks with Talos Linux.
If using loki-stack helm chart to gather logs from the Kubernetes cluster, you can use the helm values to configure loki-stack to log Kubernetes API server audit logs:
promtail:
extraArgs:
- -config.expand-env
# // this is required so that the promtail process can read the kube-apiserver audit logs written as `nobody` usercontainerSecurityContext:
capabilities:
add:
- DAC_READ_SEARCH
extraVolumes:
- name: audit-logs
hostPath:
path: /var/log/audit/kube
extraVolumeMounts:
- name: audit-logs
mountPath: /var/log/audit/kube
readOnly: trueconfig:
snippets:
extraScrapeConfigs: | - job_name: auditlogs
static_configs:
- targets:
- localhost
labels:
job: auditlogs
host: ${HOSTNAME}
__path__: /var/log/audit/kube/*.log