This is the multi-page printable view of this section. Click here to print.
Introduction
1 - What is Talos?
Talos is a container optimized Linux distro; a reimagining of Linux for distributed systems such as Kubernetes. Designed to be as minimal as possible while still maintaining practicality. For these reasons, Talos has a number of features unique to it:
- it is immutable
- it is atomic
- it is ephemeral
- it is minimal
- it is secure by default
- it is managed via a single declarative configuration file and gRPC API
Talos can be deployed on container, cloud, virtualized, and bare metal platforms.
Why Talos
In having less, Talos offers more. Security. Efficiency. Resiliency. Consistency.
All of these areas are improved simply by having less.
2 - Quickstart
Local Docker Cluster
The easiest way to try Talos is by using the CLI (talosctl) to create a cluster on a machine with docker installed.
Prerequisites
talosctl
Download talosctl:
amd64
curl -Lo /usr/local/bin/talosctl https://github.com/siderolabs/talos/releases/download/v1.1.1/talosctl-$(uname -s | tr "[:upper:]" "[:lower:]")-amd64
chmod +x /usr/local/bin/talosctl
arm64
For linux and darwin operating systems talosctl is also available for the arm64 processor architecture.
curl -Lo /usr/local/bin/talosctl https://github.com/siderolabs/talos/releases/download/v1.1.1/talosctl-$(uname -s | tr "[:upper:]" "[:lower:]")-arm64
chmod +x /usr/local/bin/talosctl
kubectl
Download kubectl via one of methods outlined in the documentation.
Create the Cluster
Now run the following:
talosctl cluster create
Verify that you can reach Kubernetes:
$ kubectl get nodes -o wide
NAME                     STATUS   ROLES    AGE    VERSION   INTERNAL-IP   EXTERNAL-IP   OS-IMAGE         KERNEL-VERSION   CONTAINER-RUNTIME
talos-default-master-1   Ready    master   115s   v1.24.2   10.5.0.2      <none>        Talos (v1.1.1)   <host kernel>    containerd://1.5.5
talos-default-worker-1   Ready    <none>   115s   v1.24.2   10.5.0.3      <none>        Talos (v1.1.1)   <host kernel>    containerd://1.5.5
Destroy the Cluster
When you are all done, remove the cluster:
talosctl cluster destroy
3 - Getting Started
This document will walk you through installing a full Talos Cluster. You may wish to try the Quickstart first, to quickly create a local virtual cluster on your workstation.
Regardless of where you run Talos, there is a pattern to deploying it. In general you need to:
- acquire the installation image
- decide on the endpoint for Kubernetes
- optionally create a load balancer
- configure Talos
- configure
talosctl - bootstrap Kubernetes
Prerequisites
talosctl
talosctl is a CLI tool which interfaces with the Talos API in
an easy manner.
It also includes a number of useful options for creating and managing clusters.
You should install talosctl before continuing:
amd64
curl -Lo /usr/local/bin/talosctl https://github.com/siderolabs/talos/releases/download/v1.1.1/talosctl-$(uname -s | tr "[:upper:]" "[:lower:]")-amd64
chmod +x /usr/local/bin/talosctl
arm64
For linux and darwin operating systems talosctl is also available for the arm64 processor architecture.
curl -Lo /usr/local/bin/talosctl https://github.com/siderolabs/talos/releases/download/v1.1.1/talosctl-$(uname -s | tr "[:upper:]" "[:lower:]")-arm64
chmod +x /usr/local/bin/talosctl
Acquire the installation image
The easiest way to install Talos is to use the ISO image.
The latest ISO image can be found on the Github Releases page:
- X86: https://github.com/siderolabs/talos/releases/download/v1.1.1/talos-amd64.iso
- ARM64: https://github.com/siderolabs/talos/releases/download/v1.1.1/talos-arm64.iso
When booted from the ISO, Talos will run in RAM, and it will not install itself until it is provided a configuration. Thus, it is safe to boot the ISO onto any machine.
Alternative Booting
For network booting and self-built media, you can use the published kernel and initramfs images:
Note that to use alternate booting, there are a number of required kernel parameters. Please see the kernel docs for more information.
Decide the Kubernetes Endpoint
In order to configure Kubernetes and bootstrap the cluster, Talos needs to know what the endpoint (DNS name or IP address) of the Kubernetes API Server will be.
The endpoint should be the fully-qualified HTTP(S) URL for the Kubernetes API Server, which (by default) runs on port 6443 using HTTPS.
Thus, the format of the endpoint may be something like:
https://192.168.0.10:6443https://kube.mycluster.mydomain.com:6443https://[2001:db8:1234::80]:6443
Because the Kubernetes controlplane is meant to be highly available, we must also choose how to bind the API server endpoint to the servers themselves. There are three common ways to do this:
Dedicated Load-balancer
If you are using a cloud provider or have your own load-balancer available (such as HAProxy, nginx reverse proxy, or an F5 load-balancer), using a dedicated load balancer is a natural choice. Create an appropriate frontend matching the endpoint, and point the backends at each of the addresses of the Talos controlplane nodes.
Layer 2 Shared IP
Talos has integrated support for serving Kubernetes from a shared (sometimes called “virtual”) IP address. This method relies on OSI Layer 2 connectivity between controlplane Talos nodes.
In this case, we choose an IP address on the same subnet as the Talos controlplane nodes which is not otherwise assigned to any machine. For instance, if your controlplane node IPs are:
- 192.168.0.10
- 192.168.0.11
- 192.168.0.12
you could choose the ip 192.168.0.15 as your shared IP address.
Just make sure that 192.168.0.15 is not used by any other machine and that your DHCP
will not serve it to any other machine.
Once chosen, form the full HTTPS URL from this IP:
https://192.168.0.15:6443
You are free to set a DNS record to this IP address to identify the Kubernetes API endpoint, but you will need to use the IP address itself, not the DNS name, to configure the shared IP (machine.network.interfaces[].vip.ip) in the Talos configuration.
For more information about using a shared IP, see the related Guide
DNS records
If neither of the other methods work for you, you can use DNS records to provide a measure of redundancy. In this case, you would add multiple A or AAAA records (one for each controlpane node) to a DNS name.
For instance, you could add:
kube.cluster1.mydomain.com  IN  A  192.168.0.10
kube.cluster1.mydomain.com  IN  A  192.168.0.11
kube.cluster1.mydomain.com  IN  A  192.168.0.12
Then, your endpoint would be:
https://kube.cluster1.mydomain.com:6443
Decide how to access the Talos API
Since Talos is entirely API-driven, Talos comes with a number of mechanisms to make accessing the API easier.
Controlplane nodes can proxy requests for worker nodes. This means that you only need access to the controlplane nodes in order to access the rest of the network. This is useful for security (your worker nodes do not need to have public IPs or be otherwise connected to the Internet), and it also makes working with highly-variable clusters easier, since you only need to know the controlplane nodes in advance.
Even better, the talosctl tool will automatically load balance requests and fail over
between all of your controlplane nodes, so long as it is informed of the
controlplane node IPs.
This means you need to tell your client (talosctl) how to communicate with the controlplane nodes, which is done by defining the endpoints.
In general, it is recommended that these point to the set of control plane
nodes, either directly or through a reverse proxy or load balancer, similarly to accessing the Kubernetes API.
The difference is that the Talos API listens on port 50000/tcp.
Whichever way you wish to access the Talos API, be sure to note the IP(s) or
hostname(s) so that you can configure your talosctl tool’s endpoints below.
NOTE: The Virtual IP method is not recommended when accessing the Talos API as it requires etcd to be bootstrapped and functional. This can make debugging any issues via the Talos API more difficult as issues with Talos configuration may result in etcd not achieving quorum, and therefore the Virtual IP not being available. In this case setting the endpoints to the IP or hostnames of the control plane nodes themselves is preferred.
Configure Talos
When Talos boots without a configuration, such as when using the Talos ISO, it enters a limited maintenance mode and waits for a configuration to be provided.
Alternatively, the Talos installer can be booted with the talos.config kernel
commandline argument set to an HTTP(s) URL from which it should receive its
configuration.
In cases where a PXE server can be available, this is much more efficient than
manually configuring each node.
If you do use this method, just note that Talos does require a number of other
kernel commandline parameters.
See the required kernel parameters for more information.
In either case, we need to generate the configuration which is to be provided.
Luckily, the talosctl tool comes with a configuration generator for exactly
this purpose.
talosctl gen config "cluster-name" "cluster-endpoint"
Here, cluster-name is an arbitrary name for the cluster which will be used
in your local client configuration as a label.
It does not affect anything in the cluster itself, but it should be unique in the configuration on your local workstation.
The cluster-endpoint is where you insert the Kubernetes Endpoint you
selected from above.
This is the Kubernetes API URL, and it should be a complete URL, with https://
and port.
(The default port is 6443.)
When you run this command, you will receive a number of files in your current directory:
controlplane.yamlworker.yamltalosconfig
The .yaml files are what we call Machine Configs.
They are installed onto the Talos servers, and they provide their complete configuration,
describing everything from what disk Talos should be installed to, to what
sysctls to set, to what network settings it should have.
In the case of the controlplane.yaml, it even describes how Talos should form its Kubernetes cluster.
The talosconfig file (which is also YAML) is your local client configuration
file.
Controlplane and Worker
The two types of Machine Configs correspond to the two roles of Talos nodes.
The Controlplane Machine Config describes the configuration of a Talos server on which the Kubernetes Controlplane should run. The Worker Machine Config describes everything else: workload servers.
The main difference between Controlplane Machine Config files and Worker Machine Config files is that the former contains information about how to form the Kubernetes cluster.
Templates
The generated files can be thought of as templates.
Individual machines may need specific settings (for instance, each may have a
different static IP address).
When different files are needed for machines of the same type, simply
copy the source template (controlplane.yaml or worker.yaml) and make whatever
modifications need to be done.
For instance, if you had three controlplane nodes and three worker nodes, you may do something like this:
  for i in $(seq 0 2); do
    cp controlplane.yaml cp$i.yaml
  end
  for i in $(seq 0 2); do
    cp worker.yaml w$i.yaml
  end
In cases where there is no special configuration needed, you may use the same file for each machine of the same type.
Apply Configuration
After you have generated each machine’s Machine Config, you need to load them into the machines themselves. For that, you need to know their IP addresses.
If you have access to the console or console logs of the machines, you can read them to find the IP address(es). Talos will print them out during the boot process:
[    4.605369] [talos] task loadConfig (1/1): this machine is reachable at:
[    4.607358] [talos] task loadConfig (1/1):   192.168.0.2
[    4.608766] [talos] task loadConfig (1/1): server certificate fingerprint:
[    4.611106] [talos] task loadConfig (1/1):   xA9a1t2dMxB0NJ0qH1pDzilWbA3+DK/DjVbFaJBYheE=
[    4.613822] [talos] task loadConfig (1/1):
[    4.614985] [talos] task loadConfig (1/1): upload configuration using talosctl:
[    4.616978] [talos] task loadConfig (1/1):   talosctl apply-config --insecure --nodes 192.168.0.2 --file <config.yaml>
[    4.620168] [talos] task loadConfig (1/1): or apply configuration using talosctl interactive installer:
[    4.623046] [talos] task loadConfig (1/1):   talosctl apply-config --insecure --nodes 192.168.0.2 --mode=interactive
[    4.626365] [talos] task loadConfig (1/1): optionally with node fingerprint check:
[    4.628692] [talos] task loadConfig (1/1):   talosctl apply-config --insecure --nodes 192.168.0.2 --cert-fingerprint 'xA9a1t2dMxB0NJ0qH1pDzilWbA3+DK/DjVbFaJBYheE=' --file <config.yaml>
If you do not have console access, the IP address may also be discoverable from your DHCP server.
Once you have the IP address, you can then apply the correct configuration.
  talosctl apply-config --insecure \
    --nodes 192.168.0.2 \
    --file cp0.yaml
The insecure flag is necessary at this point because the PKI infrastructure has not yet been made available to the node. Note that the connection will be encrypted, it is just unauthenticated.
If you have console access, though, you can extract the server certificate fingerprint and use it for an additional layer of validation:
  talosctl apply-config --insecure \
    --nodes 192.168.0.2 \
    --cert-fingerprint xA9a1t2dMxB0NJ0qH1pDzilWbA3+DK/DjVbFaJBYheE= \
    --file cp0.yaml
Using the fingerprint allows you to be sure you are sending the configuration to the right machine, but it is completely optional.
After the configuration is applied to a node, it will reboot.
You may repeat this process for each of the nodes in your cluster.
Configure your talosctl client
Now that the nodes are running Talos with its full PKI security suite, you need
to use that PKI to talk to the machines.
That means configuring your client, and that is what that talosconfig file is for.
Endpoints
Endpoints are the communication endpoints to which the client directly talks. These can be load balancers, DNS hostnames, a list of IPs, etc. In general, it is recommended that these point to the set of control plane nodes, either directly or through a reverse proxy or load balancer.
Each endpoint will automatically proxy requests destined to another node through it, so it is not necessary to change the endpoint configuration just because you wish to talk to a different node within the cluster.
Endpoints do, however, need to be members of the same Talos cluster as the target node, because these proxied connections reply on certificate-based authentication.
We need to set the endpoints in your talosconfig.
talosctl will automatically load balance and fail over among the endpoints,
so no external load balancer or DNS abstraction is required
(though you are free to use them).
As an example, if the IP addresses of our controlplane nodes are:
- 192.168.0.2
- 192.168.0.3
- 192.168.0.4
We would set those in the talosconfig with:
  talosctl --talosconfig=./talosconfig \
    config endpoint 192.168.0.2 192.168.0.3 192.168.0.4
Nodes
The node is the target node on which you wish to perform the API call.
Keep in mind, when specifying nodes, their IPs and/or hostnames are as seen by the endpoint servers, not as from the client. This is because all connections are proxied through the endpoints.
Some people also like to set a default set of nodes in the talosconfig.
This can be done in the same manner, replacing endpoint with node.
If you do this, however, know that you could easily reboot the wrong machine
by forgetting to declare the right one explicitly.
Worse, if you set several nodes as defaults, you could, with one talosctl upgrade
command upgrade your whole cluster all at the same time.
It’s a powerful tool, and with that comes great responsibility.
The author of this document generally sets a single controlplane node to be the default node, which provides the most flexible default operation while limiting the scope of the disaster should a command be entered erroneously:
  talosctl --talosconfig=./talosconfig \
    config node 192.168.0.2
You may simply provide -n or --nodes to any talosctl command to
supply the node or (comma-delimited) nodes on which you wish to perform the
operation.
Supplying the commandline parameter will override any default nodes
in the configuration file.
To verify default node(s) you’re currently configured to use, you can run:
$ talosctl version
Client:
        ...
Server:
        NODE:        <node>
        ...
For a more in-depth discussion of Endpoints and Nodes, please see talosctl.
Default configuration file
You can reference which configuration file to use directly with the --talosconfig parameter:
  talosctl --talosconfig=./talosconfig \
    --nodes 192.168.0.2 version
However, talosctl comes with tooling to help you integrate and merge this
configuration into the default talosctl configuration file.
This is done with the merge option.
talosctl config merge ./talosconfig
This will merge your new talosconfig into the default configuration file
($XDG_CONFIG_HOME/talos/config.yaml), creating it if necessary.
Like Kubernetes, the talosconfig configuration files has multiple “contexts”
which correspond to multiple clusters.
The <cluster-name> you chose above will be used as the context name.
Kubernetes Bootstrap
All of your machines are configured, and your talosctl client is set up.
Now, you are ready to bootstrap your Kubernetes cluster.
If that sounds daunting, you haven’t used Talos before.
Bootstrapping your Kubernetes cluster with Talos is as simple as:
talosctl bootstrap --nodes 192.168.0.2
IMPORTANT: the bootstrap operation should only be called ONCE and only on a SINGLE controlplane node!
The IP can be any of your controlplanes (or the loadbalancer, if you have one). It should only be issued once.
At this point, Talos will form an etcd cluster, generate all of the core
Kubernetes assets, and start the Kubernetes controlplane components.
After a few moments, you will be able to download your Kubernetes client configuration and get started:
talosctl kubeconfig
Running this command will add (merge) you new cluster into you local Kubernetes
configuration in the same way as talosctl config merge merged the Talos client
configuration into your local Talos client configuration file.
If you would prefer for the configuration to not be merged into your default Kubernetes configuration file, simple tell it a filename:
talosctl kubeconfig alternative-kubeconfig
If all goes well, you should now be able to connect to Kubernetes and see your nodes:
kubectl get nodes
4 - Theila UI for Talos
Once you have a Talos cluster running, you may find it easier to get insights on your cluster(s) using a visual user interface rather than the talosctl CLI.
For this, Sidero Labs provides Theila, a simple, single-binary web-based visual user interface for Talos clusters.
Prerequisites
You should have a Talos cluster up & running, and the talosconfig file for Theila to access it.
Installation
Theila is published as a single static binary compiled for various platforms and architectures, as well as a container image.
Binary
You can download the correct binary for your system from the releases page, or use the following commands in your terminal.
curl -Lo /usr/local/bin/theila https://github.com/siderolabs/theila/releases/download/v0.2.1/theila-$(uname -s | tr "[:upper:]" "[:lower:]")-amd64
chmod +x /usr/local/bin/theila
Use
Once installed, you can run Theila by simply running it.
# address and port are not required and default to the values shown
theila --address 127.0.0.1 --port 8080
docker run --rm --volume ${HOME}/.talos/config:/opt/talosconfig:ro --env TALOSCONFIG=/opt/talosconfig --publish 8080:8080 ghcr.io/siderolabs/theila --address 0.0.0.0Once it is running you should be able to point a browser at http://localhost:8080 to open the Theila UI.
Clusters
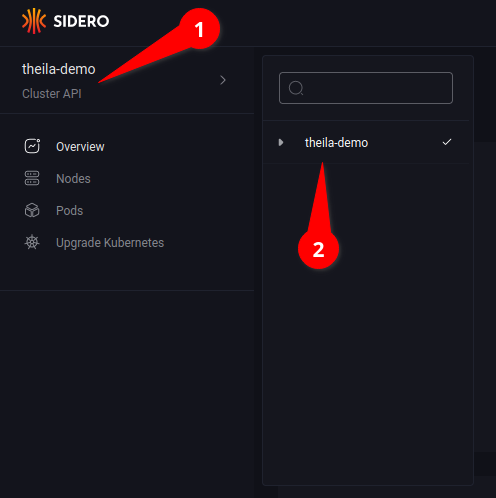
You can navigate around various Talos clusters using the menu at the upper-left corner (see 1.1), then selecting the specific cluster from the list (see 1.2).
Cluster Overview
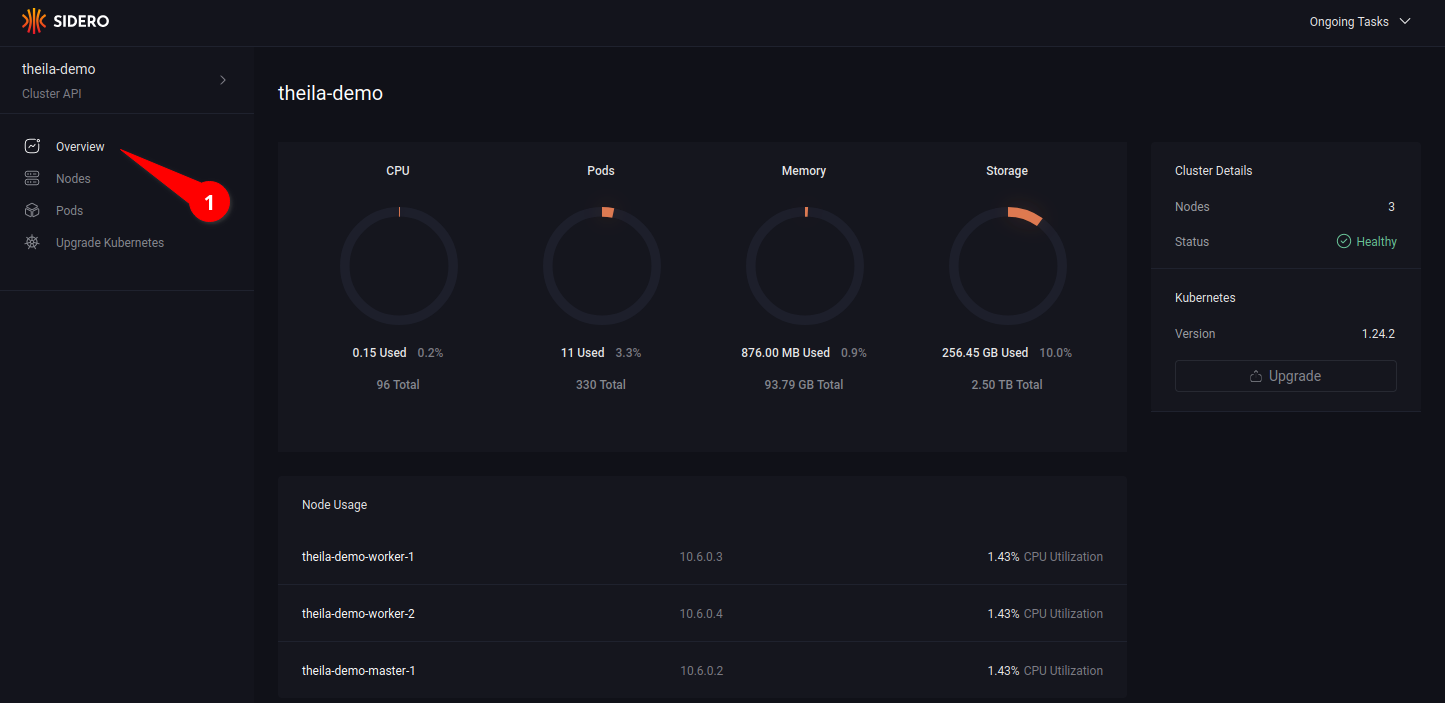
Clicking on the “Overview” option in the menu (see 2.1) will display an overview of resource use & health of the cluster.
Nodes
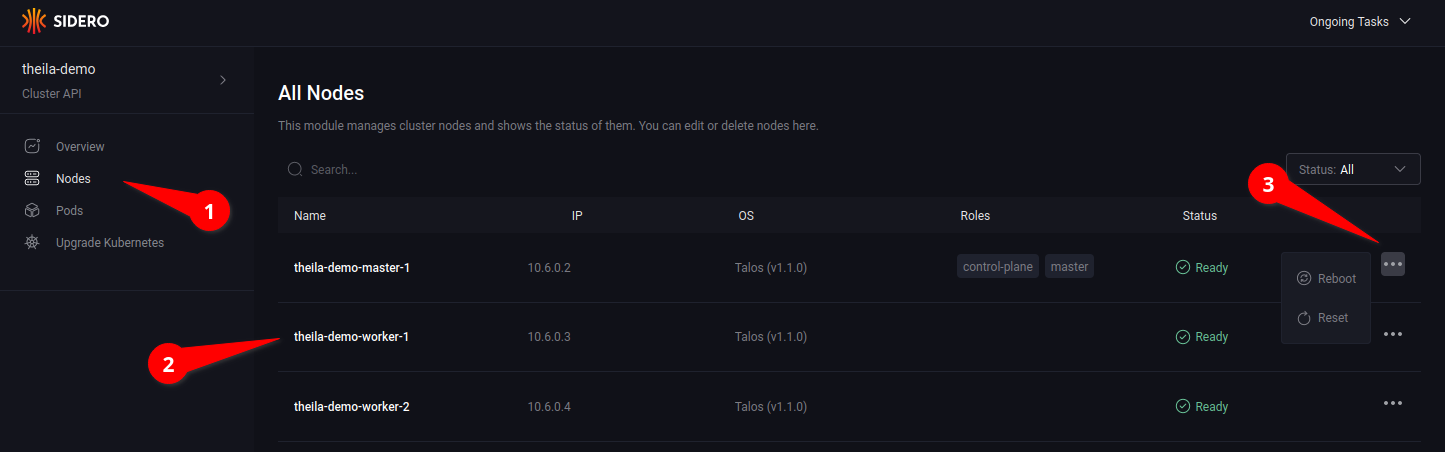
Entering the “Nodes” section on the menu (see 3.1) will give a list of nodes in the cluster (see 3.2), along with information such as IP address, status, and any roles assigned to the node.
Opening the node menu (see 3.3) show the actions that can be taken on a specific node.
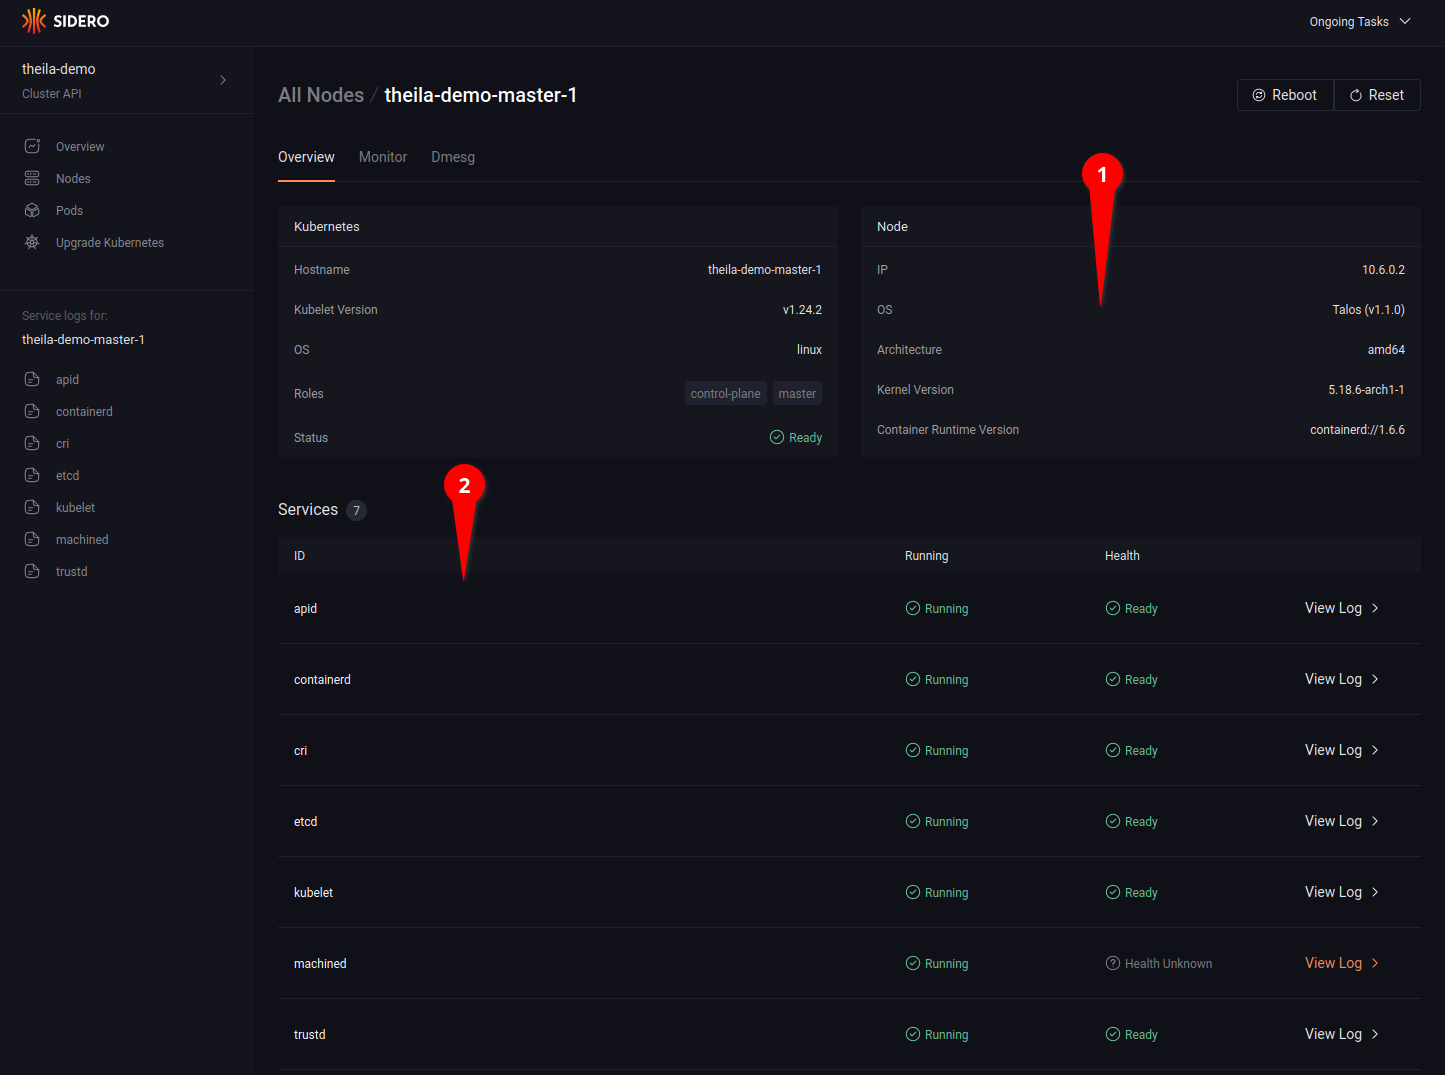
Clicking on a specific node name in the node list will open the node detail page for more information on each specific node (see 4.1), including running services and their logs (see 4.2).
Clicking on the “Monitor” tab (see 5.1) allows you to watch resource use over time, with CPU and memory consumption graphs updated in real time, and a detailed list of running process each with their individual resource use (see 5.2).
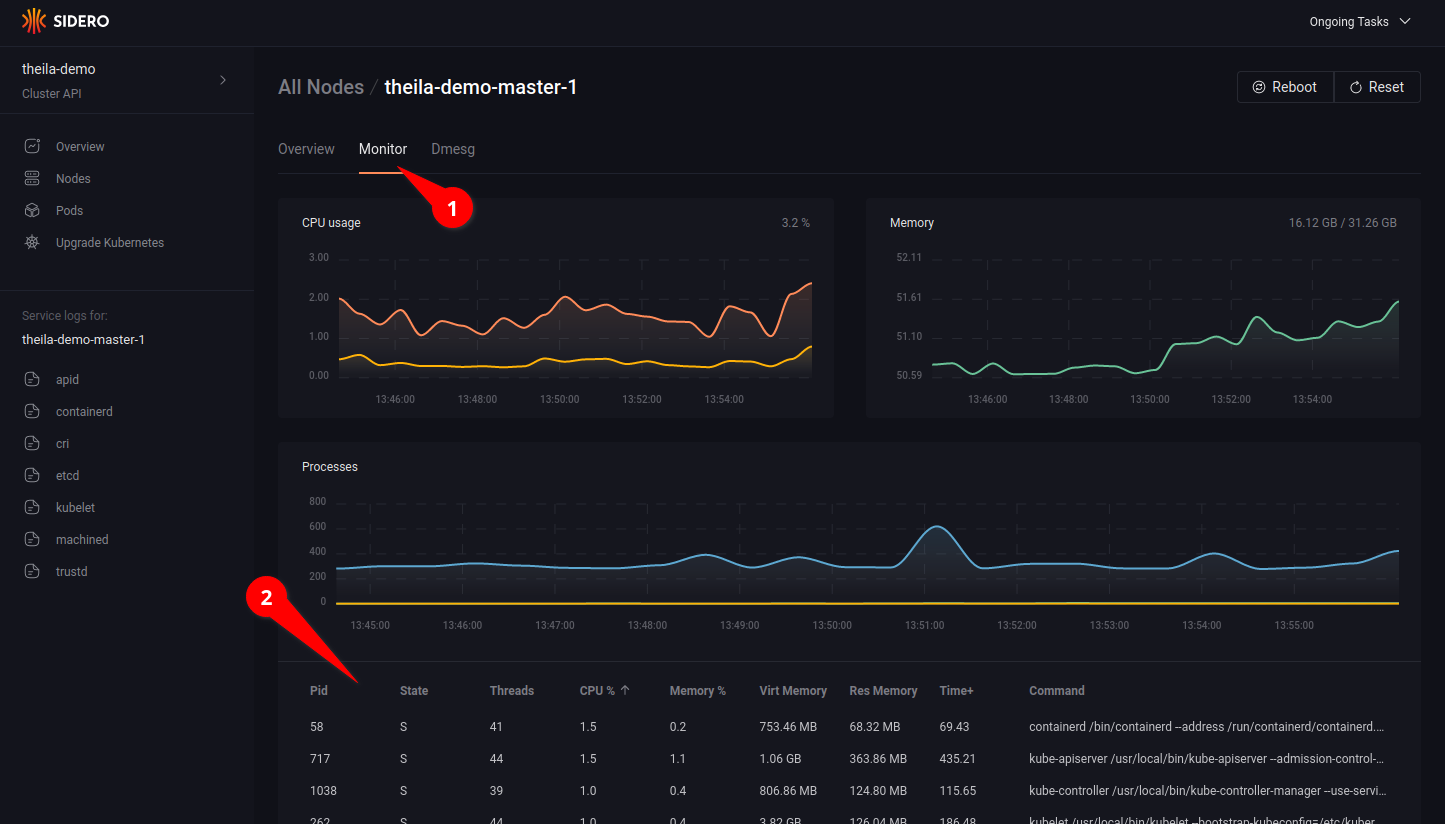
Lastly, the “Dmesg” tab shows all kernel messages of the node since boot.
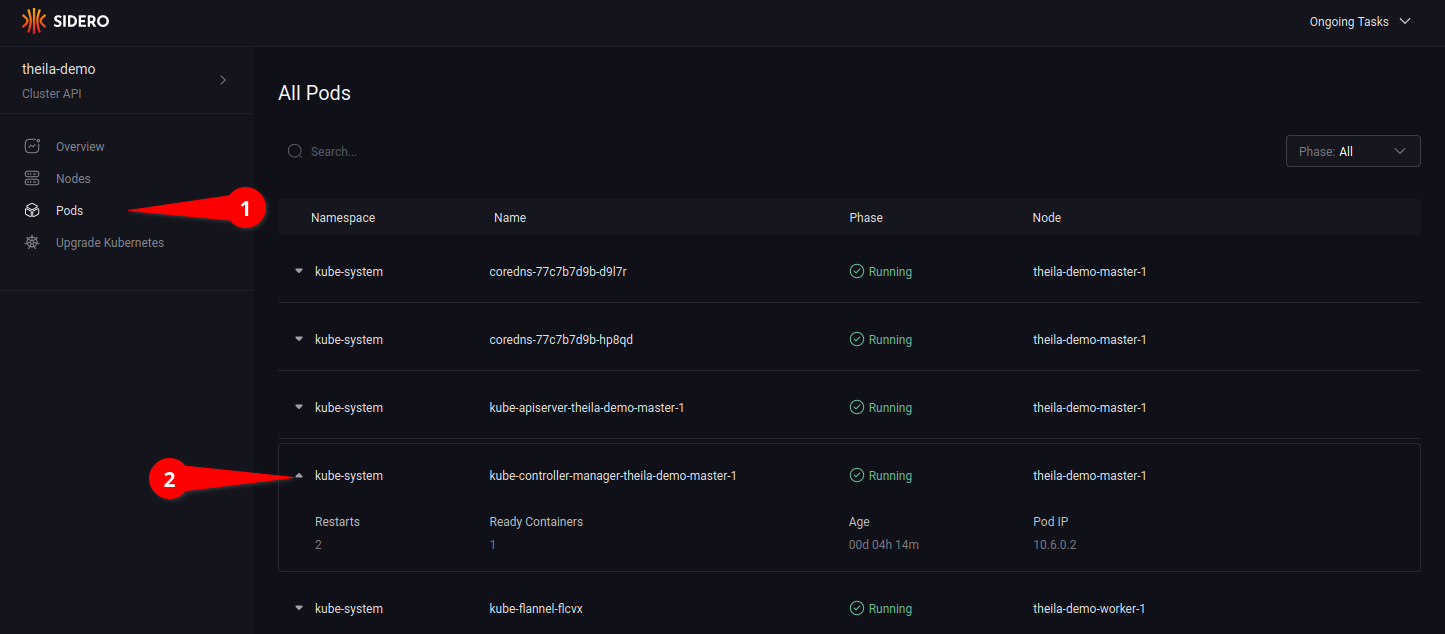
Pods
Using the “Pods” section on the menu (see 6.1) will list all pods in the cluster, across all namespaces.
Clicking on the drop-down arrow (see 6.2) will open up more detailed information of the specified pod.
5 - System Requirements
Minimum Requirements
| Role | Memory | Cores |
|---|---|---|
| Init/Control Plane | 2GB | 2 |
| Worker | 1GB | 1 |
Recommended
| Role | Memory | Cores |
|---|---|---|
| Init/Control Plane | 4GB | 4 |
| Worker | 2GB | 2 |
These requirements are similar to that of kubernetes.
6 - What's New in Talos 1.1
Kubernetes
Pod Security Admission
Pod Security Admission controller is enabled by default with the following policy:
apiVersion: apiserver.config.k8s.io/v1
kind: AdmissionConfiguration
plugins:
- configuration:
    apiVersion: pod-security.admission.config.k8s.io/v1alpha1
    defaults:
      audit: restricted
      audit-version: latest
      enforce: baseline
      enforce-version: latest
      warn: restricted
      warn-version: latest
    exemptions:
      namespaces:
      - kube-system
      runtimeClasses: []
      usernames: []
    kind: PodSecurityConfiguration
  name: PodSecurity
  path: ""
The policy is part of the Talos machine configuration, and it can be modified to suite your needs.
Kubernetes API Server Anonymous Auth
Anonymous authentication is now disabled by default for the kube-apiserver (CIS compliance).
To enable anonymous authentication, update the machine config with:
cluster:
    apiServer:
        extraArgs:
            anonymous-auth: true
Machine Configuration
Apply Config --dry-run
The commands talosctl apply-config, talosctl patch mc and talosctl edit mc now support --dry-run flag.
If enabled it just prints out the selected config application mode and the configuration diff.
Apply Config --mode=try
The commands talosctl apply-config, talosctl patch mc and talosctl edit mc now support the new mode called try.
In this mode the config change is applied for a period of time and then reverted back to the state it was before the change.
--timeout parameter can be used to customize the config rollback timeout.
This new mode can be used only with the parts of the config that can be changed without a reboot and can help to check that
the new configuration doesn’t break the node.
Can be especially useful to check network interfaces changes that may lead to the loss of connectivity to the node.
Networking
Network Device Selector
Talos machine configuration supports specifying network interfaces by selectors instead of interface name. See documentation for more details.
SBCs
RockPi 4 variants A and B
Talos now supports RockPi variants A and B in addition to RockPi 4C
Raspberry Pi PoE Hat Fan
Talos now enables the Raspberry Pi PoE fan control by pulling in the poe overlay that works with upstream kernel
Miscellaneous
IPv6 in Docker-based Talos Clusters
The command talosctl cluster create now enables IPv6 by default for the Docker containers
created for Talos nodes.
This allows to use IPv6 addresses in Kubernetes networking.
If talosctl cluster create fails to work on Linux due to the lack of IPv6 support,
please use the flag --disable-docker-ipv6 to revert the change.
eudev Default Rules
Drops some default eudev rules that doesn’t make sense in the context of Talos OS. Especially the ones around sound devices, cd-roms and renaming the network interfaces to be predictable.
7 - Support Matrix
| Talos Version | 1.1 | 1.0 |
|---|---|---|
| Release Date | 2022-06-22 | 2022-03-29 (1.0.0) |
| End of Community Support | 1.2.0 release (2022-09-01, TBD) | 1.1.0 release (2022-06-22) |
| Enterprise Support | offered by Sidero Labs Inc. | offered by Sidero Labs Inc. |
| Kubernetes | 1.24, 1.23, 1.22 | 1.23, 1.22, 1.21 |
| Architecture | amd64, arm64 | amd64, arm64 |
| Platforms | ||
| - cloud | AWS, GCP, Azure, Digital Ocean, Hetzner, OpenStack, Oracle Cloud, Scaleway, Vultr, Upcloud | AWS, GCP, Azure, Digital Ocean, Hetzner, OpenStack, Oracle Cloud, Scaleway, Vultr, Upcloud |
| - bare metal | x86: BIOS, UEFI; arm64: UEFI; boot: ISO, PXE, disk image | x86: BIOS, UEFI; arm64: UEFI; boot: ISO, PXE, disk image |
| - virtualized | VMware, Hyper-V, KVM, Proxmox, Xen | VMware, Hyper-V, KVM, Proxmox, Xen |
| - SBCs | Banana Pi M64, Jetson Nano, Libre Computer Board ALL-H3-CC, Pine64, Pine64 Rock64, Radxa ROCK Pi 4c, Raspberry Pi 4B | Banana Pi M64, Jetson Nano, Libre Computer Board ALL-H3-CC, Pine64, Pine64 Rock64, Radxa ROCK Pi 4c, Raspberry Pi 4B |
| - local | Docker, QEMU | Docker, QEMU |
| Cluster API | ||
| CAPI Bootstrap Provider Talos | >= 0.5.4 | >= 0.5.3 |
| CAPI Control Plane Provider Talos | >= 0.4.6 | >= 0.4.5 |
| Sidero | >= 0.5.4 | >= 0.5.0 |
| UI | ||
| Theila | ✓ | ✓ |
Platform Tiers
- Tier 1: Automated tests, high-priority fixes.
- Tier 2: Tested from time to time, medium-priority bugfixes.
- Tier 3: Not tested by core Talos team, community tested.
Tier 1
- Metal
- AWS
- GCP
Tier 2
- Azure
- Digital Ocean
- OpenStack
- VMWare
Tier 3
- Hetzner
- nocloud
- Oracle Cloud
- Scaleway
- Vultr
- Upcloud