This is the multi-page printable view of this section. Click here to print.
Learn More
- 1: Philosophy
- 2: Architecture
- 3: Concepts
- 4: Components
- 5: Control Plane
- 6: Controllers and Resources
- 7: Networking Resources
- 8: Network Connectivity
- 9: Discovery
- 10: KubeSpan
- 11: talosctl
- 12: FAQs
- 13: Knowledge Base
1 - Philosophy
Distributed
Talos is intended to be operated in a distributed manner.
That is, it is built for a high-availability dataplane first.
Its etcd cluster is built in an ad-hoc manner, with each appointed node joining on its own directive (with proper security validations enforced, of course).
Like as kubernetes itself, workloads are intended to be distributed across any number of compute nodes.
There should be no single points of failure, and the level of required coordination is as low as each platform allows.
Immutable
Talos takes immutability very seriously. Talos itself, even when installed on a disk, always runs from a SquashFS image, meaning that even if a directory is mounted to be writable, the image itself is never modified. All images are signed and delivered as single, versioned files. We can always run integrity checks on our image to verify that it has not been modified.
While Talos does allow a few, highly-controlled write points to the filesystem, we strive to make them as non-unique and non-critical as possible. In fact, we call the writable partition the “ephemeral” partition precisely because we want to make sure none of us ever uses it for unique, non-replicated, non-recreatable data. Thus, if all else fails, we can always wipe the disk and get back up and running.
Minimal
We are always trying to reduce and keep small Talos’ footprint. Because nearly the entire OS is built from scratch in Go, we are already starting out in a good position. We have no shell. We have no SSH. We have none of the GNU utilities, not even a rollup tool such as busybox. Everything which is included in Talos is there because it is necessary, and nothing is included which isn’t.
As a result, the OS right now produces a SquashFS image size of less than 80 MB.
Ephemeral
Everything Talos writes to its disk is either replicated or reconstructable. Since the controlplane is high availability, the loss of any node will cause neither service disruption nor loss of data. No writes are even allowed to the vast majority of the filesystem. We even call the writable partition “ephemeral” to keep this idea always in focus.
Secure
Talos has always been designed with security in mind. With its immutability, its minimalism, its signing, and its componenture, we are able to simply bypass huge classes of vulnerabilities. Moreover, because of the way we have designed Talos, we are able to take advantage of a number of additional settings, such as the recommendations of the Kernel Self Protection Project (kspp) and the complete disablement of dynamic modules.
There are no passwords in Talos. All networked communication is encrypted and key-authenticated. The Talos certificates are short-lived and automatically-rotating. Kubernetes is always constructed with its own separate PKI structure which is enforced.
Declarative
Everything which can be configured in Talos is done so through a single YAML manifest. There is no scripting and no procedural steps. Everything is defined by the one declarative YAML file. This configuration includes that of both Talos itself and the Kubernetes which it forms.
This is achievable because Talos is tightly focused to do one thing: run kubernetes, in the easiest, most secure, most reliable way it can.
2 - Architecture
Talos is designed to be atomic in deployment and modular in composition.
It is atomic in that the entirety of Talos is distributed as a single, self-contained image, which is versioned, signed, and immutable.
It is modular in that it is composed of many separate components which have clearly defined gRPC interfaces which facilitate internal flexibility and external operational guarantees.
All of the main Talos components communicate with each other by gRPC, through a socket on the local machine. This imposes a clear separation of concerns and ensures that changes over time which affect the interoperation of components are a part of the public git record. The benefit is that each component may be iterated and changed as its needs dictate, so long as the external API is controlled. This is a key component in reducing coupling and maintaining modularity.
File system partitions
Talos uses these partitions with the following labels:
- EFI - stores EFI boot data.
- BIOS - used for GRUB’s second stage boot.
- BOOT - used for the boot loader, stores initramfs and kernel data.
- META - stores metadata about the talos node, such as node id’s.
- STATE - stores machine configuration, node identity data for cluster discovery and KubeSpan info
- EPHEMERAL - stores ephemeral state information, mounted at
/var
The File System
One of the unique design decisions in Talos is the layout of the root file system. There are three “layers” to the Talos root file system. At its core the rootfs is a read-only squashfs. The squashfs is then mounted as a loop device into memory. This provides Talos with an immutable base.
The next layer is a set of tmpfs file systems for runtime specific needs.
Aside from the standard pseudo file systems such as /dev, /proc, /run, /sys and /tmp, a special /system is created for internal needs.
One reason for this is that we need special files such as /etc/hosts, and /etc/resolv.conf to be writable (remember that the rootfs is read-only).
For example, at boot Talos will write /system/etc/hosts and then bind mount it over /etc/hosts.
This means that instead of making all of /etc writable, Talos only makes very specific files writable under /etc.
All files under /system are completely recreated on each boot.
For files and directories that need to persist across boots, Talos creates overlayfs file systems.
The /etc/kubernetes is a good example of this.
Directories like this are overlayfs backed by an XFS file system mounted at /var.
The /var directory is owned by Kubernetes with the exception of the above overlayfs file systems.
This directory is writable and used by etcd (in the case of control plane nodes), the kubelet, and the CRI (containerd).
3 - Concepts
When people come across Talos, they frequently want a nice, bite-sized summary of it. This is surprisingly difficult when Talos represents such a fundamentally-rethought operating system.
Not based on X distro
A useful way to summarize an operating system is to say that it is based on X, but focused on Y. For instance, Mint was originally based on Ubuntu, but focused on Gnome 2 (instead of, at the time, Unity). Or maybe something like Raspbian is based on Debian, but it is focused on the Raspberry Pi. CentOS is RHEL, but made license-free.
Talos Linux isn’t based on any other distribution. We often think of ourselves as being the second-generation of container-optimised operating systems, where things like CoreOS, Flatcar, and Rancher represent the first generation, but that implies heredity where there is none.
Talos Linux is actually a ground-up rewrite of the userspace, from PID 1.
We run the Linux kernel, but everything downstream of that is our own custom
code, written in Go, rigorously-tested, and published as an immutable,
integrated, cohesive image.
The Linux kernel launches what we call machined, for instance, not systemd.
There is no systemd on our system.
There are no GNU utilities, no shell, no SSH, no packages, nothing you could associate with
any other distribution.
We don’t even have a build toolchain in the normal sense of the word.
Not for individual use
Technically, Talos Linux installs to a computer much as other operating systems. Unlike other operating systems, Talos is not meant to run alone, on a single machine. Talos Linux comes with tooling from the very foundation to form clusters, even before Kubernetes comes into play. A design goal of Talos Linux is eliminating the management of individual nodes as much as possible. In order to do that, Talos Linux operates as a cluster of machines, with lots of checking and coordination between them, at all levels.
Break from your mind the idea of running an application on a computer. There are no individual computers. There is only a cluster. Talos is meant to do one thing: maintain a Kubernetes cluster, and it does this very, very well.
The entirety of the configuration of any machine is specified by a single, simple configuration file, which can often be the same configuration file used across many machines. Much like a biological system, if some component misbehaves, just cut it out and let a replacement grow. Rebuilds of Talos are remarkably fast, whether they be new machines, upgrades, or reinstalls. Never get hung up on an individual machine.
Control Planes are not linear replicas
People familiar with traditional relational database replication often
overlook a critical design concept of the Kubernetes (and Talos) database:
etcd.
Unlike linear replicas, which have dedicated masters and slaves/replicas, etcd
is highly dynamic.
The master in an etcd cluster is entirely temporal.
This means fail-overs are handled easily, and usually without any notice
of operators.
This also means that the operational architecture is fundamentally different.
Properly managed (which Talos Linux does), etcd should never have split brain
and should never encounter noticeable down time.
In order to do this, though, etcd maintains the concept of “membership” and of
“quorum”.
In order to perform any operation, read or write, the database requires
quorum to be sustained.
That is, a strict majority must agree on the current leader, and absenteeism
counts as a negative.
In other words, if there are three registered members (voters), at least two out
of the three must be actively asserting that the current master is the master.
If any two disagree or even fail to answer, the etcd database will lock itself
until quorum is again achieved in order to protect itself and the integrity of
the data.
This is fantastically important for handling distributed systems and the various
types of contention which may arise.
This design means, however, that having an incorrect number of members can be devastating. Having only two controlplane nodes, for instance, is mostly worse than having only one, because if either goes down, your entire database will lock. You would be better off just making periodic snapshots of the data and restoring it when necessary.
Another common situation occurs when replacing controlplane nodes. If you have three controlplane nodes and replace one, you will not have three members, you will have four, and one of those will never be available again. Thus, if any of your three remaining nodes goes down, your database will lock, because only two out of the four members will be available: four nodes is worse than three nodes! So it is critical that controlplane members which are replaced be removed. Luckily, the Talos API makes this easy.
Bootstrap once
In the old days, Talos Linux had the idea of an init node.
The init node was a “special” controlplane node which was designated as the
founder of the cluster.
It was the first, was guaranteed to be the elector, and was authorised to create
a cluster…
even if one already existed.
This made the formation of a cluster cluster really easy, but it had a lot of
down sides.
Mostly, these related to rebuilding or replacing that init node:
you could easily end up with a split-brain scenario in which you had two different clusters:
a single node one and a two-node one.
Needless to say, this was an unhappy arrangement.
Fortunately, init nodes are gone, but that means that the critical operation
of forming a cluster is a manual process.
It’s an easy process, consisting of a single API call, but it can be a
confusing one, until you understand what it does.
Every new cluster must be bootstrapped exactly and only once. This means you do NOT bootstrap each node in a cluster, not even each controlplane node. You bootstrap only a single controlplane node, because you are bootstrapping the cluster, not the node.
It doesn’t matter which controlplane node is told to bootstrap, but it must be a controlplane node, and it must be only one.
Bootstrapping is fast and sure. Even if your Kubernetes cluster fails to form for other reasons (say, a bad configuration option or unavailable container repository), if the bootstrap API call returns successfully, you do NOT need to bootstrap again: just fix the config or let Kubernetes retry.
Bootstrapping itself does not do anything with Kubernetes.
Bootstrapping only tells etcd to form a cluster, so don’t judge the success of
a bootstrap by the failure of Kubernetes to start.
Kubernetes relies on etcd, so bootstrapping is required, but it is not
sufficient for Kubernetes to start.
4 - Components
In this section, we discuss the various components that underpin Talos.
Components
| Component | Description |
|---|---|
| apid | When interacting with Talos, the gRPC API endpoint you interact with directly is provided by apid. apid acts as the gateway for all component interactions and forwards the requests to machined. |
| containerd | An industry-standard container runtime with an emphasis on simplicity, robustness, and portability. To learn more, see the containerd website. |
| machined | Talos replacement for the traditional Linux init-process. Specially designed to run Kubernetes and does not allow starting arbitrary user services. |
| networkd | Handles all of the host level network configuration. The configuration is defined under the networking key |
| kernel | The Linux kernel included with Talos is configured according to the recommendations outlined in the Kernel Self Protection Project. |
| trustd | To run and operate a Kubernetes cluster, a certain level of trust is required. Based on the concept of a ‘Root of Trust’, trustd is a simple daemon responsible for establishing trust within the system. |
| udevd | Implementation of eudev into machined. eudev is Gentoo’s fork of udev, systemd’s device file manager for the Linux kernel. It manages device nodes in /dev and handles all user space actions when adding or removing devices. To learn more, see the Gentoo Wiki. |
apid
When interacting with Talos, the gRPC api endpoint you will interact with directly is apid.
Apid acts as the gateway for all component interactions.
Apid provides a mechanism to route requests to the appropriate destination when running on a control plane node.
We’ll use some examples below to illustrate what apid is doing.
When a user wants to interact with a Talos component via talosctl, there are two flags that control the interaction with apid.
The -e | --endpoints flag specifies which Talos node ( via apid ) should handle the connection.
Typically this is a public-facing server.
The -n | --nodes flag specifies which Talos node(s) should respond to the request.
If --nodes is omitted, the first endpoint will be used.
Note: Typically, there will be an
endpointalready defined in the Talos config file. Optionally,nodescan be included here as well.
For example, if a user wants to interact with machined, a command like talosctl -e cluster.talos.dev memory may be used.
$ talosctl -e cluster.talos.dev memory
NODE                TOTAL   USED   FREE   SHARED   BUFFERS   CACHE   AVAILABLE
cluster.talos.dev   7938    1768   2390   145      53        3724    6571
In this case, talosctl is interacting with apid running on cluster.talos.dev and forwarding the request to the machined api.
If we wanted to extend our example to retrieve memory from another node in our cluster, we could use the command talosctl -e cluster.talos.dev -n node02 memory.
$ talosctl -e cluster.talos.dev -n node02 memory
NODE    TOTAL   USED   FREE   SHARED   BUFFERS   CACHE   AVAILABLE
node02  7938    1768   2390   145      53        3724    6571
The apid instance on cluster.talos.dev receives the request and forwards it to apid running on node02, which forwards the request to the machined api.
We can further extend our example to retrieve memory for all nodes in our cluster by appending additional -n node flags or using a comma separated list of nodes ( -n node01,node02,node03 ):
$ talosctl -e cluster.talos.dev -n node01 -n node02 -n node03 memory
NODE     TOTAL    USED    FREE     SHARED   BUFFERS   CACHE   AVAILABLE
node01   7938     871     4071     137      49        2945    7042
node02   257844   14408   190796   18138    49        52589   227492
node03   257844   1830    255186   125      49        777     254556
The apid instance on cluster.talos.dev receives the request and forwards it to node01, node02, and node03, which then forwards the request to their local machined api.
containerd
Containerd provides the container runtime to launch workloads on Talos and Kubernetes.
Talos services are namespaced under the system namespace in containerd, whereas the Kubernetes services are namespaced under the k8s.io namespace.
machined
A common theme throughout the design of Talos is minimalism.
We believe strongly in the UNIX philosophy that each program should do one job well.
The init included in Talos is one example of this, and we are calling it “machined”.
We wanted to create a focused init that had one job - run Kubernetes.
To that extent, machined is relatively static in that it does not allow for arbitrary user-defined services.
Only the services necessary to run Kubernetes and manage the node are available.
This includes:
- containerd
- kubelet
- networkd
- trustd
- udevd
networkd
Networkd handles all of the host level network configuration.
The configuration is defined under the networking key.
By default, we attempt to issue a DHCP request for every interface on the server. This can be overridden by supplying one of the following kernel arguments:
talos.network.interface.ignore- specify a list of interfaces to skip discovery onip-ip=<client-ip>:<server-ip>:<gw-ip>:<netmask>:<hostname>:<device>:<autoconf>:<dns0-ip>:<dns1-ip>:<ntp0-ip>as documented in the kernel here- ex,
ip=10.0.0.99:::255.0.0.0:control-1:eth0:off:10.0.0.1
- ex,
kernel
The Linux kernel included with Talos is configured according to the recommendations outlined in the Kernel Self Protection Project (KSSP).
trustd
Security is one of the highest priorities within Talos. To run a Kubernetes cluster, a certain level of trust is required to operate a cluster. For example, orchestrating the bootstrap of a highly available control plane requires sensitive PKI data distribution.
To that end, we created trustd.
Based on a Root of Trust concept, trustd is a simple daemon responsible for establishing trust within the system.
Once trust is established, various methods become available to the trustee.
For example, it can accept a write request from another node to place a file on disk.
Additional methods and capabilities will be added to the trustd component to support new functionality in the rest of the Talos environment.
udevd
Udevd handles the kernel device notifications and sets up the necessary links in /dev.
5 - Control Plane
This guide provides details on how Talos runs and bootstraps the Kubernetes control plane.
High-level Overview
Talos cluster bootstrap flow:
- The
etcdservice is started on control plane nodes. Instances ofetcdon control plane nodes build theetcdcluster. - The
kubeletservice is started. - Control plane components are started as static pods via the
kubelet, and thekube-apiservercomponent connects to the local (running on the same node)etcdinstance. - The
kubeletissues client certificate using the bootstrap token using the control plane endpoint (viakube-apiserverandkube-controller-manager). - The
kubeletregisters the node in the API server. - Kubernetes control plane schedules pods on the nodes.
Cluster Bootstrapping
All nodes start the kubelet service.
The kubelet tries to contact the control plane endpoint, but as it is not up yet, it keeps retrying.
One of the control plane nodes is chosen as the bootstrap node.
The node’s type can be either init or controlplane, where the controlplane type is promoted using the bootstrap API (talosctl bootstrap).
The bootstrap node initiates the etcd bootstrap process by initializing etcd as the first member of the cluster.
Note: there should be only one bootstrap node for the cluster lifetime. Once
etcdis bootstrapped, the bootstrap node has no special role and acts the same way as other control plane nodes.
Services etcd on non-bootstrap nodes try to get Endpoints resource via control plane endpoint, but that request fails as control plane endpoint is not up yet.
As soon as etcd is up on the bootstrap node, static pod definitions for the Kubernetes control plane components (kube-apiserver, kube-controller-manager, kube-scheduler) are rendered to disk.
The kubelet service on the bootstrap node picks up the static pod definitions and starts the Kubernetes control plane components.
As soon as kube-apiserver is launched, the control plane endpoint comes up.
The bootstrap node acquires an etcd mutex and injects the bootstrap manifests into the API server.
The set of the bootstrap manifests specify the Kubernetes join token and kubelet CSR auto-approval.
The kubelet service on all the nodes is now able to issue client certificates for themselves and register nodes in the API server.
Other bootstrap manifests specify additional resources critical for Kubernetes operations (i.e. CNI, PSP, etc.)
The etcd service on non-bootstrap nodes is now able to discover other members of the etcd cluster via the Kubernetes Endpoints resource.
The etcd cluster is now formed and consists of all control plane nodes.
All control plane nodes render static pod manifests for the control plane components. Each node now runs a full set of components to make the control plane HA.
The kubelet service on worker nodes is now able to issue the client certificate and register itself with the API server.
Scaling Up the Control Plane
When new nodes are added to the control plane, the process is the same as the bootstrap process above: the etcd service discovers existing members of the control plane via the
control plane endpoint, joins the etcd cluster, and the control plane components are scheduled on the node.
Scaling Down the Control Plane
Scaling down the control plane involves removing a node from the cluster.
The most critical part is making sure that the node which is being removed leaves the etcd cluster.
When using talosctl reset command, the targeted control plane node leaves the etcd cluster as part of the reset sequence.
Upgrading Control Plane Nodes
When a control plane node is upgraded, Talos leaves etcd, wipes the system disk, installs a new version of itself, and reboots.
The upgraded node then joins the etcd cluster on reboot.
So upgrading a control plane node is equivalent to scaling down the control plane node followed by scaling up with a new version of Talos.
6 - Controllers and Resources
Talos implements concepts of resources and controllers to facilitate internal operations of the operating system. Talos resources and controllers are very similar to Kubernetes resources and controllers, but there are some differences. The content of this document is not required to operate Talos, but it is useful for troubleshooting.
Starting with Talos 0.9, most of the Kubernetes control plane boostrapping and operations is implemented via controllers and resources which allows Talos to be reactive to configuration changes, environment changes (e.g. time sync).
Resources
A resource captures a piece of system state. Each resource belongs to a “Type” which defines resource contents. Resource state can be split in two parts:
- metadata: fixed set of fields describing resource - namespace, type, ID, etc.
- spec: contents of the resource (depends on resource type).
Resource is uniquely identified by (namespace, type, id).
Namespaces provide a way to avoid conflicts on duplicate resource IDs.
At the moment of this writing, all resources are local to the node and stored in memory.
So on every reboot resource state is rebuilt from scratch (the only exception is MachineConfig resource which reflects current machine config).
Controllers
Controllers run as independent lightweight threads in Talos. The goal of the controller is to reconcile the state based on inputs and eventually update outputs.
A controller can have any number of resource types (and namespaces) as inputs.
In other words, it watches specified resources for changes and reconciles when these changes occur.
A controller might also have additional inputs: running reconcile on schedule, watching etcd keys, etc.
A controller has a single output: a set of resources of fixed type in a fixed namespace. Only one controller can manage resource type in the namespace, so conflicts are avoided.
Querying Resources
Talos CLI tool talosctl provides read-only access to the resource API which includes getting specific resource,
listing resources and watching for changes.
Talos stores resources describing resource types and namespaces in meta namespace:
$ talosctl get resourcedefinitions
NODE         NAMESPACE   TYPE                 ID                                               VERSION
172.20.0.2   meta        ResourceDefinition   bootstrapstatuses.v1alpha1.talos.dev             1
172.20.0.2   meta        ResourceDefinition   etcdsecrets.secrets.talos.dev                    1
172.20.0.2   meta        ResourceDefinition   kubernetescontrolplaneconfigs.config.talos.dev   1
172.20.0.2   meta        ResourceDefinition   kubernetessecrets.secrets.talos.dev              1
172.20.0.2   meta        ResourceDefinition   machineconfigs.config.talos.dev                  1
172.20.0.2   meta        ResourceDefinition   machinetypes.config.talos.dev                    1
172.20.0.2   meta        ResourceDefinition   manifests.kubernetes.talos.dev                   1
172.20.0.2   meta        ResourceDefinition   manifeststatuses.kubernetes.talos.dev            1
172.20.0.2   meta        ResourceDefinition   namespaces.meta.cosi.dev                         1
172.20.0.2   meta        ResourceDefinition   resourcedefinitions.meta.cosi.dev                1
172.20.0.2   meta        ResourceDefinition   rootsecrets.secrets.talos.dev                    1
172.20.0.2   meta        ResourceDefinition   secretstatuses.kubernetes.talos.dev              1
172.20.0.2   meta        ResourceDefinition   services.v1alpha1.talos.dev                      1
172.20.0.2   meta        ResourceDefinition   staticpods.kubernetes.talos.dev                  1
172.20.0.2   meta        ResourceDefinition   staticpodstatuses.kubernetes.talos.dev           1
172.20.0.2   meta        ResourceDefinition   timestatuses.v1alpha1.talos.dev                  1
$ talosctl get namespaces
NODE         NAMESPACE   TYPE        ID             VERSION
172.20.0.2   meta        Namespace   config         1
172.20.0.2   meta        Namespace   controlplane   1
172.20.0.2   meta        Namespace   meta           1
172.20.0.2   meta        Namespace   runtime        1
172.20.0.2   meta        Namespace   secrets        1
Most of the time namespace flag (--namespace) can be omitted, as ResourceDefinition contains default
namespace which is used if no namespace is given:
$ talosctl get resourcedefinitions resourcedefinitions.meta.cosi.dev -o yaml
node: 172.20.0.2
metadata:
    namespace: meta
    type: ResourceDefinitions.meta.cosi.dev
    id: resourcedefinitions.meta.cosi.dev
    version: 1
    phase: running
spec:
    type: ResourceDefinitions.meta.cosi.dev
    displayType: ResourceDefinition
    aliases:
        - resourcedefinitions
        - resourcedefinition
        - resourcedefinitions.meta
        - resourcedefinitions.meta.cosi
        - rd
        - rds
    printColumns: []
    defaultNamespace: meta
Resource definition also contains type aliases which can be used interchangeably with canonical resource name:
$ talosctl get ns config
NODE         NAMESPACE   TYPE        ID             VERSION
172.20.0.2   meta        Namespace   config         1
Output
Command talosctl get supports following output modes:
table(default) prints resource list as a tableyamlprints pretty formatted resources with details, including full metadata spec. This format carries most details from the backend resource (e.g. comments inMachineConfigresource)jsonprints same information asyaml, some additional details (e.g. comments) might be lost. This format is useful for automated processing with tools likejq.
Watching Changes
If flag --watch is appended to the talosctl get command, the command switches to watch mode.
If list of resources was requested, talosctl prints initial contents of the list and then appends resource information for every change:
$ talosctl get svc -w
NODE         *   NAMESPACE   TYPE      ID     VERSION   RUNNING   HEALTHY
172.20.0.2   +   runtime   Service   timed   2   true   true
172.20.0.2   +   runtime   Service   trustd   2   true   true
172.20.0.2   +   runtime   Service   udevd   2   true   true
172.20.0.2   -   runtime   Service   timed   2   true   true
172.20.0.2   +   runtime   Service   timed   1   true   false
172.20.0.2       runtime   Service   timed   2   true   true
Column * specifies event type:
+is created-is deletedis updated
In YAML/JSON output, field event is added to the resource representation to describe the event type.
Examples
Getting machine config:
$ talosctl get machineconfig -o yaml
node: 172.20.0.2
metadata:
    namespace: config
    type: MachineConfigs.config.talos.dev
    id: v1alpha1
    version: 2
    phase: running
spec:
    version: v1alpha1 # Indicates the schema used to decode the contents.
    debug: false # Enable verbose logging to the console.
    persist: true # Indicates whether to pull the machine config upon every boot.
    # Provides machine specific configuration options.
...
Getting control plane static pod statuses:
$ talosctl get staticpodstatus
NODE         NAMESPACE      TYPE              ID                                                           VERSION   READY
172.20.0.2   controlplane   StaticPodStatus   kube-system/kube-apiserver-talos-default-master-1            3         True
172.20.0.2   controlplane   StaticPodStatus   kube-system/kube-controller-manager-talos-default-master-1   3         True
172.20.0.2   controlplane   StaticPodStatus   kube-system/kube-scheduler-talos-default-master-1            4         True
Getting static pod definition for kube-apiserver:
$ talosctl get sp kube-apiserver -n 172.20.0.2 -o yaml
node: 172.20.0.2
metadata:
    namespace: controlplane
    type: StaticPods.kubernetes.talos.dev
    id: kube-apiserver
    version: 3
    phase: running
    finalizers:
        - k8s.StaticPodStatus("kube-apiserver")
spec:
    apiVersion: v1
    kind: Pod
    metadata:
        annotations:
            talos.dev/config-version: "1"
            talos.dev/secrets-version: "2"
...
Inspecting Controller Dependencies
Talos can report current dependencies between controllers and resources for debugging purposes:
$ talosctl inspect dependencies
digraph  {

  n1[label="config.K8sControlPlaneController",shape="box"];
  n3[label="config.MachineTypeController",shape="box"];
  n2[fillcolor="azure2",label="config:KubernetesControlPlaneConfigs.config.talos.dev",shape="note",style="filled"];
...
This outputs graph in graphviz format which can be rendered to PNG with command:
talosctl inspect dependencies | dot -T png > deps.png
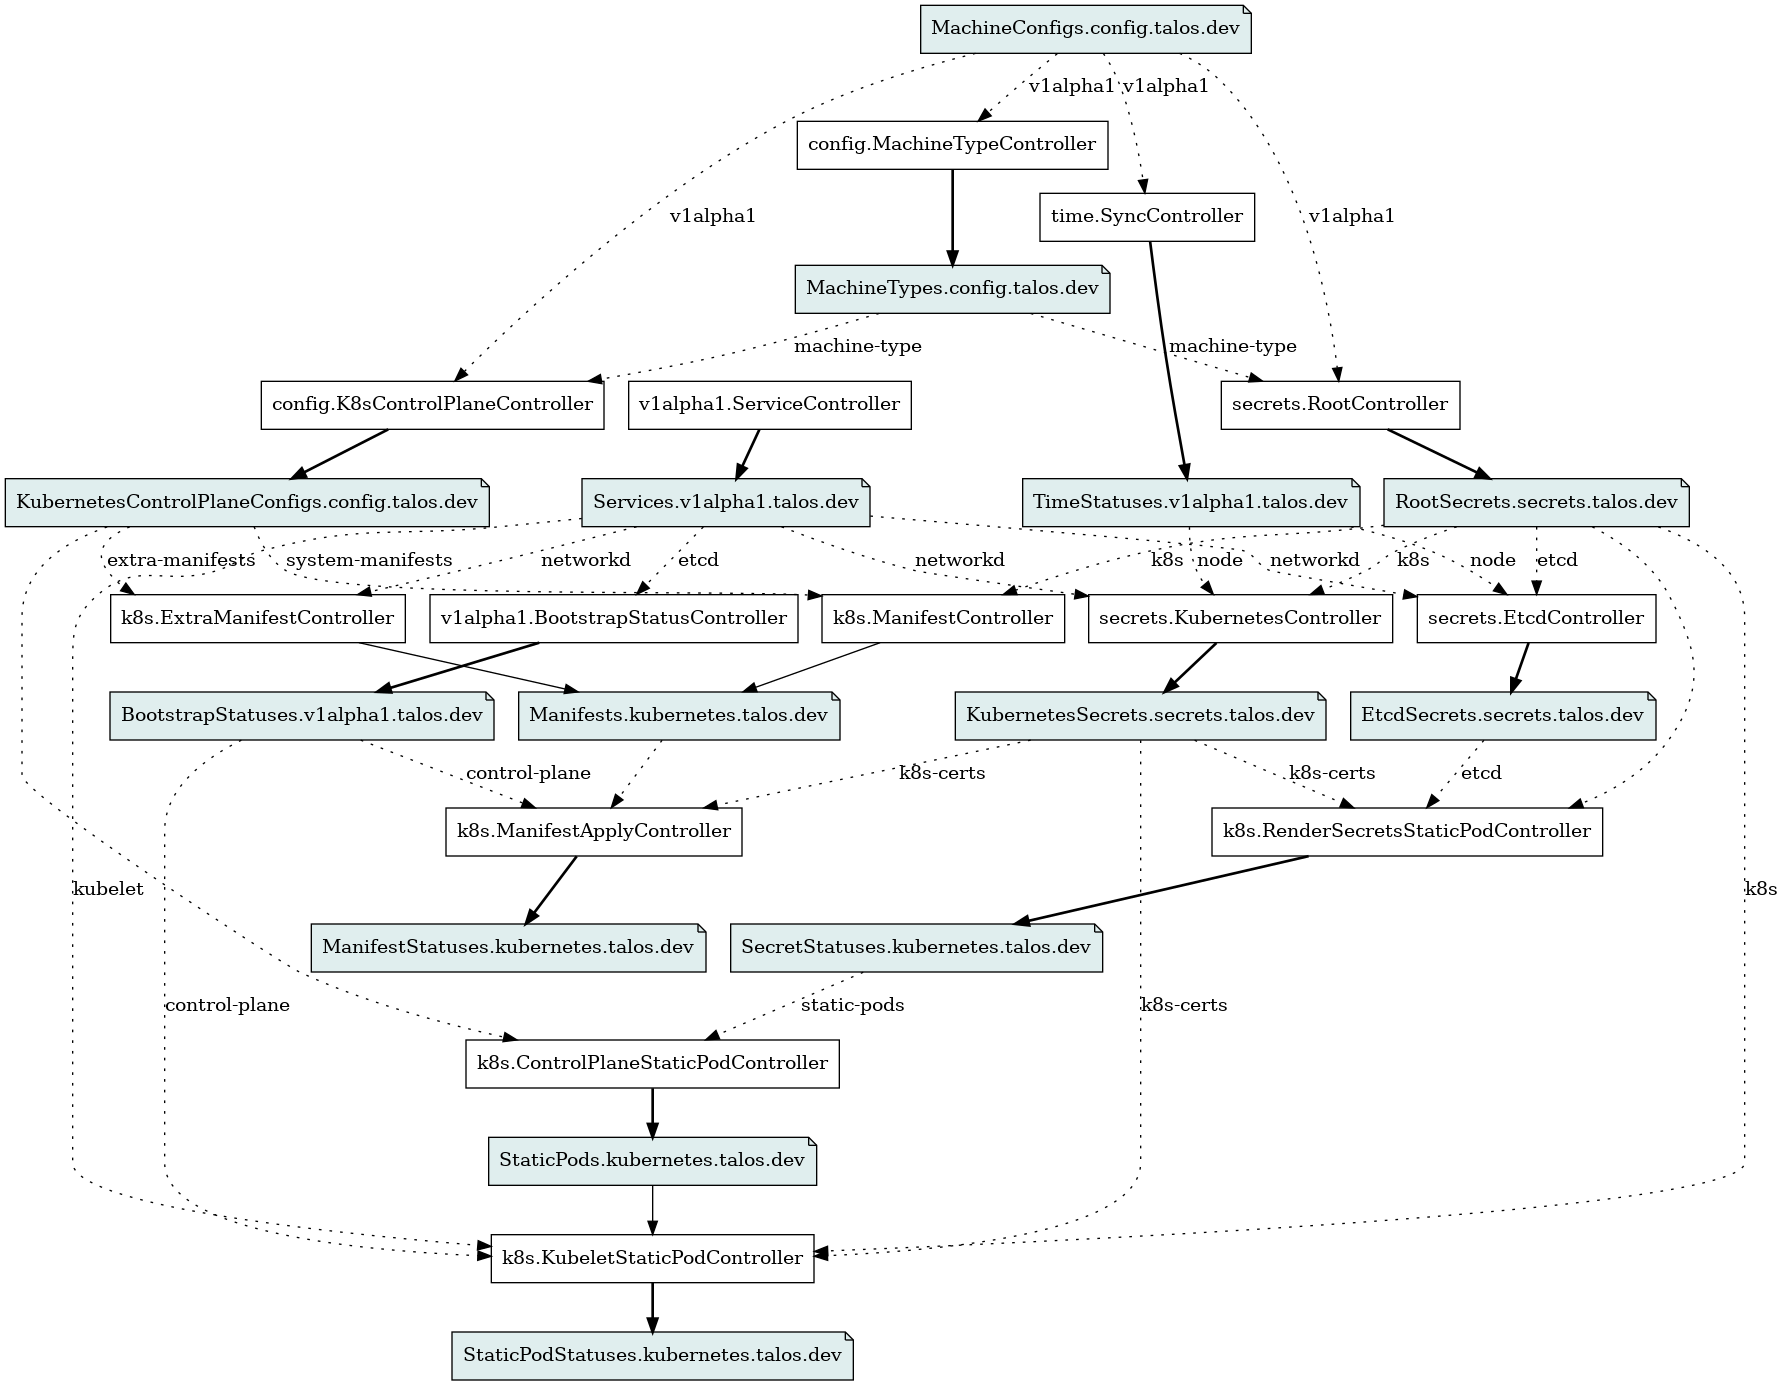
Graph can be enhanced by replacing resource types with actual resource instances:
talosctl inspect dependencies --with-resources | dot -T png > deps.png

7 - Networking Resources
Talos network configuration subsystem is powered by COSI. Talos translates network configuration from multiple sources: machine configuration, cloud metadata, network automatic configuration (e.g. DHCP) into COSI resources.
Network configuration and network state can be inspected using talosctl get command.
Network machine configuration can be modified using talosctl edit mc command (also variants talosctl patch mc, talosctl apply-config) without a reboot.
As API access requires network connection, --mode=try
can be used to test the configuration with automatic rollback to avoid losing network access to the node.
Resources
There are six basic network configuration items in Talos:
Address(IP address assigned to the interface/link);Route(route to a destination);Link(network interface/link configuration);Resolver(list of DNS servers);Hostname(node hostname and domainname);TimeServer(list of NTP servers).
Each network configuration item has two counterparts:
*Status(e.g.LinkStatus) describes the current state of the system (Linux kernel state);*Spec(e.g.LinkSpec) defines the desired configuration.
| Resource | Status | Spec |
|---|---|---|
Address | AddressStatus | AddressSpec |
Route | RouteStatus | RouteSpec |
Link | LinkStatus | LinkSpec |
Resolver | ResolverStatus | ResolverSpec |
Hostname | HostnameStatus | HostnameSpec |
TimeServer | TimeServerStatus | TimeServerSpec |
Status resources have aliases with the Status suffix removed, so for example
AddressStatus is also available as Address.
Talos networking controllers reconcile the state so that *Status equals the desired *Spec.
Observing State
The current network configuration state can be observed by querying *Status resources via
talosctl:
$ talosctl get addresses
NODE         NAMESPACE   TYPE            ID                                       VERSION   ADDRESS                        LINK
172.20.0.2   network     AddressStatus   eth0/172.20.0.2/24                       1         172.20.0.2/24                  eth0
172.20.0.2   network     AddressStatus   eth0/fe80::9804:17ff:fe9d:3058/64        2         fe80::9804:17ff:fe9d:3058/64   eth0
172.20.0.2   network     AddressStatus   flannel.1/10.244.4.0/32                  1         10.244.4.0/32                  flannel.1
172.20.0.2   network     AddressStatus   flannel.1/fe80::10b5:44ff:fe62:6fb8/64   2         fe80::10b5:44ff:fe62:6fb8/64   flannel.1
172.20.0.2   network     AddressStatus   lo/127.0.0.1/8                           1         127.0.0.1/8                    lo
172.20.0.2   network     AddressStatus   lo/::1/128                               1         ::1/128                        lo
In the output there are addresses set up by Talos (e.g. eth0/172.20.0.2/24) and
addresses set up by other facilities (e.g. flannel.1/10.244.4.0/32 set up by CNI).
Talos networking controllers watch the kernel state and update resources accordingly.
Additional details about the address can be accessed via the YAML output:
# talosctl get address eth0/172.20.0.2/24 -o yaml
node: 172.20.0.2
metadata:
    namespace: network
    type: AddressStatuses.net.talos.dev
    id: eth0/172.20.0.2/24
    version: 1
    owner: network.AddressStatusController
    phase: running
    created: 2021-06-29T20:23:18Z
    updated: 2021-06-29T20:23:18Z
spec:
    address: 172.20.0.2/24
    local: 172.20.0.2
    broadcast: 172.20.0.255
    linkIndex: 4
    linkName: eth0
    family: inet4
    scope: global
    flags: permanent
Resources can be watched for changes with the --watch flag to see how configuration changes over time.
Other networking status resources can be inspected with talosctl get routes, talosctl get links, etc.
For example:
$ talosctl get resolvers
NODE         NAMESPACE   TYPE             ID          VERSION   RESOLVERS
172.20.0.2   network     ResolverStatus   resolvers   2         ["8.8.8.8","1.1.1.1"]
# talosctl get links -o yaml
node: 172.20.0.2
metadata:
    namespace: network
    type: LinkStatuses.net.talos.dev
    id: eth0
    version: 2
    owner: network.LinkStatusController
    phase: running
    created: 2021-06-29T20:23:18Z
    updated: 2021-06-29T20:23:18Z
spec:
    index: 4
    type: ether
    linkIndex: 0
    flags: UP,BROADCAST,RUNNING,MULTICAST,LOWER_UP
    hardwareAddr: 4e:95:8e:8f:e4:47
    broadcastAddr: ff:ff:ff:ff:ff:ff
    mtu: 1500
    queueDisc: pfifo_fast
    operationalState: up
    kind: ""
    slaveKind: ""
    driver: virtio_net
    linkState: true
    speedMbit: 4294967295
    port: Other
    duplex: Unknown
Inspecting Configuration
The desired networking configuration is combined from multiple sources and presented
as *Spec resources:
$ talosctl get addressspecs
NODE         NAMESPACE   TYPE          ID                   VERSION
172.20.0.2   network     AddressSpec   eth0/172.20.0.2/24   2
172.20.0.2   network     AddressSpec   lo/127.0.0.1/8       2
172.20.0.2   network     AddressSpec   lo/::1/128           2
These AddressSpecs are applied to the Linux kernel to reach the desired state.
If, for example, an AddressSpec is removed, the address is removed from the Linux network interface as well.
*Spec resources can’t be manipulated directly, they are generated automatically by Talos
from multiple configuration sources (see a section below for details).
If a *Spec resource is queried in YAML format, some additional information is available:
# talosctl get addressspecs eth0/172.20.0.2/24 -o yaml
node: 172.20.0.2
metadata:
    namespace: network
    type: AddressSpecs.net.talos.dev
    id: eth0/172.20.0.2/24
    version: 2
    owner: network.AddressMergeController
    phase: running
    created: 2021-06-29T20:23:18Z
    updated: 2021-06-29T20:23:18Z
    finalizers:
        - network.AddressSpecController
spec:
    address: 172.20.0.2/24
    linkName: eth0
    family: inet4
    scope: global
    flags: permanent
    layer: operator
An important field is the layer field, which describes a configuration layer this spec is coming from: in this case, it’s generated by a network operator (see below) and is set by the DHCPv4 operator.
Configuration Merging
Spec resources described in the previous section show the final merged configuration state,
while initial specs are put to a different unmerged namespace network-config.
Spec resources in the network-config namespace are merged with conflict resolution to produce the final merged representation in the network namespace.
Let’s take HostnameSpec as an example.
The final merged representation is:
# talosctl get hostnamespec -o yaml
node: 172.20.0.2
metadata:
    namespace: network
    type: HostnameSpecs.net.talos.dev
    id: hostname
    version: 2
    owner: network.HostnameMergeController
    phase: running
    created: 2021-06-29T20:23:18Z
    updated: 2021-06-29T20:23:18Z
    finalizers:
        - network.HostnameSpecController
spec:
    hostname: talos-default-master-1
    domainname: ""
    layer: operator
We can see that the final configuration for the hostname is talos-default-master-1.
And this is the hostname that was actually applied.
This can be verified by querying a HostnameStatus resource:
$ talosctl get hostnamestatus
NODE         NAMESPACE   TYPE             ID         VERSION   HOSTNAME                 DOMAINNAME
172.20.0.2   network     HostnameStatus   hostname   1         talos-default-master-1
Initial configuration for the hostname in the network-config namespace is:
# talosctl get hostnamespec -o yaml --namespace network-config
node: 172.20.0.2
metadata:
    namespace: network-config
    type: HostnameSpecs.net.talos.dev
    id: default/hostname
    version: 2
    owner: network.HostnameConfigController
    phase: running
    created: 2021-06-29T20:23:18Z
    updated: 2021-06-29T20:23:18Z
spec:
    hostname: talos-172-20-0-2
    domainname: ""
    layer: default
---
node: 172.20.0.2
metadata:
    namespace: network-config
    type: HostnameSpecs.net.talos.dev
    id: dhcp4/eth0/hostname
    version: 1
    owner: network.OperatorSpecController
    phase: running
    created: 2021-06-29T20:23:18Z
    updated: 2021-06-29T20:23:18Z
spec:
    hostname: talos-default-master-1
    domainname: ""
    layer: operator
We can see that there are two specs for the hostname:
- one from the
defaultconfiguration layer which defines the hostname astalos-172-20-0-2(default driven by the default node address); - another one from the layer
operatorthat defines the hostname astalos-default-master-1(DHCP).
Talos merges these two specs into a final HostnameSpec based on the configuration layer and merge rules.
Here is the order of precedence from low to high:
default(defaults provided by Talos);cmdline(from the kernel command line);platform(driven by the cloud provider);operator(various dynamic configuration options: DHCP, Virtual IP, etc);configuration(derived from the machine configuration).
So in our example the operator layer HostnameSpec overrides the default layer producing the final hostname talos-default-master-1.
The merge process applies to all six core networking specs.
For each spec, the layer controls the merge behavior
If multiple configuration specs
appear at the same layer, they can be merged together if possible, otherwise merge result
is stable but not defined (e.g. if DHCP on multiple interfaces provides two different hostnames for the node).
LinkSpecs are merged across layers, so for example, machine configuration for the interface MTU overrides an MTU set by the DHCP server.
Network Operators
Network operators provide dynamic network configuration which can change over time as the node is running:
- DHCPv4
- DHCPv6
- Virtual IP
Network operators produce specs for addresses, routes, links, etc., which are then merged and applied according to the rules described above.
Operators are configured with OperatorSpec resources which describe when operators
should run and additional configuration for the operator:
# talosctl get operatorspecs -o yaml
node: 172.20.0.2
metadata:
    namespace: network
    type: OperatorSpecs.net.talos.dev
    id: dhcp4/eth0
    version: 1
    owner: network.OperatorConfigController
    phase: running
    created: 2021-06-29T20:23:18Z
    updated: 2021-06-29T20:23:18Z
spec:
    operator: dhcp4
    linkName: eth0
    requireUp: true
    dhcp4:
        routeMetric: 1024
OperatorSpec resources are generated by Talos based on machine configuration mostly.
DHCP4 operator is created automatically for all physical network links which are not configured explicitly via the kernel command line or the machine configuration.
This also means that on the first boot, without a machine configuration, a DHCP request is made on all physical network interfaces by default.
Specs generated by operators are prefixed with the operator ID (dhcp4/eth0 in the example above) in the unmerged network-config namespace:
$ talosctl -n 172.20.0.2 get addressspecs --namespace network-config
NODE         NAMESPACE        TYPE          ID                              VERSION
172.20.0.2   network-config   AddressSpec   dhcp4/eth0/eth0/172.20.0.2/24   1
Other Network Resources
There are some additional resources describing the network subsystem state.
The NodeAddress resource presents node addresses excluding link-local and loopback addresses:
$ talosctl get nodeaddresses
NODE          NAMESPACE   TYPE          ID             VERSION   ADDRESSES
10.100.2.23   network     NodeAddress   accumulative   6         ["10.100.2.23","147.75.98.173","147.75.195.143","192.168.95.64","2604:1380:1:ca00::17"]
10.100.2.23   network     NodeAddress   current        5         ["10.100.2.23","147.75.98.173","192.168.95.64","2604:1380:1:ca00::17"]
10.100.2.23   network     NodeAddress   default        1         ["10.100.2.23"]
defaultis the node default address;currentis the set of addresses a node currently has;accumulativeis the set of addresses a node had over time (it might include virtual IPs which are not owned by the node at the moment).
NodeAddress resources are used to pick up the default address for etcd peer URL, to populate SANs field in the generated certificates, etc.
Another important resource is Nodename which provides Node name in Kubernetes:
$ talosctl get nodename
NODE          NAMESPACE      TYPE       ID         VERSION   NODENAME
10.100.2.23   controlplane   Nodename   nodename   1         infra-green-cp-mmf7v
Depending on the machine configuration nodename might be just a hostname or the FQDN of the node.
NetworkStatus aggregates the current state of the network configuration:
# talosctl get networkstatus -o yaml
node: 10.100.2.23
metadata:
    namespace: network
    type: NetworkStatuses.net.talos.dev
    id: status
    version: 5
    owner: network.StatusController
    phase: running
    created: 2021-06-24T18:56:00Z
    updated: 2021-06-24T18:56:02Z
spec:
    addressReady: true
    connectivityReady: true
    hostnameReady: true
    etcFilesReady: true
Network Controllers
For each of the six basic resource types, there are several controllers:
*StatusControllerpopulates*Statusresources observing the Linux kernel state.*ConfigControllerproduces the initial unmerged*Specresources in thenetwork-confignamespace based on defaults, kernel command line, and machine configuration.*MergeControllermerges*Specresources into the final representation in thenetworknamespace.*SpecControllerapplies merged*Specresources to the kernel state.
For the network operators:
OperatorConfigControllerproducesOperatorSpecresources based on machine configuration and deafauls.OperatorSpecControllerruns network operators watchingOperatorSpecresources and producing various*Specresources in thenetwork-confignamespace.
Configuration Sources
There are several configuration sources for the network configuration, which are described in this section.
Defaults
lointerface is assigned addresses127.0.0.1/8and::1/128;- hostname is set to the
talos-<IP>whereIPis the default node address; - resolvers are set to
8.8.8.8,1.1.1.1; - time servers are set to
pool.ntp.org; - DHCP4 operator is run on any physical interface which is not configured explicitly.
Cmdline
The kernel command line is parsed for the following options:
ip=option is parsed for node IP, default gateway, hostname, DNS servers, NTP servers;bond=option is parsed for bonding interfaces and their options;talos.hostname=option is used to set node hostname;talos.network.interface.ignore=can be used to make Talos skip network interface configuration completely.
Platform
Platform configuration delivers cloud environment-specific options (e.g. the hostname).
Platform configuration is specific to the environment metadata: for example, on Equinix Metal, Talos automatically configures public and private IPs, routing, link bonding, hostname.
Platform configuration is cached across reboots in /system/state/platform-network.yaml.
Operator
Network operators provide configuration for all basic resource types.
Machine Configuration
The machine configuration is parsed for link configuration, addresses, routes, hostname,
resolvers and time servers.
Any changes to .machine.network configuration can be applied in immediate mode.
Network Configuration Debugging
Most of the network controller operations and failures are logged to the kernel console,
additional logs with debug level are available with talosctl logs controller-runtime command.
If the network configuration can’t be established and the API is not available, debug level
logs can be sent to the console with debug: true option in the machine configuration.
8 - Network Connectivity
Configuring Network Connectivity
The simplest way to deploy Talos is by ensuring that all the remote components of the system (talosctl, the control plane nodes, and worker nodes) all have layer 2 connectivity.
This is not always possible, however, so this page lays out the minimal network access that is required to configure and operate a talos cluster.
Note: These are the ports required for Talos specifically, and should be configured in addition to the ports required by kuberenetes. See the kubernetes docs for information on the ports used by kubernetes itself.
Control plane node(s)
| Protocol | Direction | Port Range | Purpose | Used By |
|---|---|---|---|---|
| TCP | Inbound | 50000* | apid | talosctl |
| TCP | Inbound | 50001* | trustd | Control plane nodes, worker nodes |
Ports marked with a
*are not currently configurable, but that may change in the future. Follow along here.
Worker node(s)
| Protocol | Direction | Port Range | Purpose | Used By |
|---|---|---|---|---|
| TCP | Inbound | 50000* | apid | Control plane nodes |
Ports marked with a
*are not currently configurable, but that may change in the future. Follow along here.
9 - Discovery
We maintain a public discovery service whereby members of your cluster can use a shared key that is globally unique to coordinate the most basic connection information (i.e. the set of possible “endpoints”, or IP:port pairs). We call this data “affiliate data.”
Note: If KubeSpan is enabled the data has the addition of the WireGuard public key.
Before sending data to the discovery service, Talos will encrypt the affiliate data with AES-GCM encryption and separately encrypt endpoints with AES in ECB mode so that endpoints coming from different sources can be deduplicated server-side. Each node submits its data encrypted plus it submits the endpoints it sees from other peers to the discovery service. The discovery service aggregates the data, deduplicates the endpoints, and sends updates to each connected peer. Each peer receives information back about other affiliates from the discovery service, decrypts it and uses it to drive KubeSpan and cluster discovery.
The discovery service has no persistence. Data is stored in memory only with a TTL set by the clients (i.e. Talos). The cluster ID is used as a key to select the affiliates (so that different clusters see different affiliates).
To summarize, the discovery service knows the client version, cluster ID, the number of affiliates, some encrypted data for each affiliate, and a list of encrypted endpoints.
10 - KubeSpan
WireGuard Peer Discovery
The key pieces of information needed for WireGuard generally are:
- the public key of the host you wish to connect to
- an IP address and port of the host you wish to connect to
The latter is really only required of one side of the pair. Once traffic is received, that information is known and updated by WireGuard automatically and internally.
For Kubernetes, though, this is not quite sufficient. Kubernetes also needs to know which traffic goes to which WireGuard peer. Because this information may be dynamic, we need a way to be able to constantly keep this information up to date.
If we have a functional connection to Kubernetes otherwise, it’s fairly easy: we can just keep that information in Kubernetes. Otherwise, we have to have some way to discover it.
In our solution, we have a multi-tiered approach to gathering this information. Each tier can operate independently, but the amalgamation of the tiers produces a more robust set of connection criteria.
For this discussion, we will point out two of these tiers:
- an external service
- a Kubernetes-based system
See discovery service to learn more about the external service.
The Kubernetes-based system utilises annotations on Kubernetes Nodes which describe each node’s public key and local addresses.
On top of this, we also route Pod subnets.
This is often (maybe even usually) taken care of by the CNI, but there are many situations where the CNI fails to be able to do this itself, across networks.
So we also scrape the Kubernetes Node resource to discover its podCIDRs.
NAT, Multiple Routes, Multiple IPs
One of the difficulties in communicating across networks is that there is often not a single address and port which can identify a connection for each node on the system.
For instance, a node sitting on the same network might see its peer as 192.168.2.10, but a node across the internet may see it as 2001:db8:1ef1::10.
We need to be able to handle any number of addresses and ports, and we also need to have a mechanism to try them. WireGuard only allows us to select one at a time.
For our implementation, then, we have built a controller which continuously discovers and rotates these IP:port pairs until a connection is established. It then starts trying again if that connection ever fails.
Packet Routing
After we have established a WireGuard connection, our work is not done. We still have to make sure that the right packets get sent to the WireGuard interface.
WireGuard supplies a convenient facility for tagging packets which come from it, which is great. But in our case, we need to be able to allow traffic which both does not come from WireGuard and also is not destined for another Kubernetes node to flow through the normal mechanisms.
Unlike many corporate or privacy-oriented VPNs, we need to allow general internet traffic to flow normally.
Also, as our cluster grows, this set of IP addresses can become quite large and quite dynamic.
This would be very cumbersome and slow in iptables.
Luckily, the kernel supplies a convenient mechanism by which to define this arbitrarily large set of IP addresses: IP sets.
Talos collects all of the IPs and subnets which are considered “in-cluster” and maintains these in the kernel as an IP set.
Now that we have the IP set defined, we need to tell the kernel how to use it.
The traditional way of doing this would be to use iptables.
However, there is a big problem with IPTables.
It is a common namespace in which any number of other pieces of software may dump things.
We have no surety that what we add will not be wiped out by something else (from Kubernetes itself, to the CNI, to some workload application), be rendered unusable by higher-priority rules, or just generally cause trouble and conflicts.
Instead, we use a three-pronged system which is both more foundational and less centralised.
NFTables offers a separately namespaced, decentralised way of marking packets for later processing based on IP sets. Instead of a common set of well-known tables, NFTables uses hooks into the kernel’s netfilter system, which are less vulnerable to being usurped, bypassed, or a source of interference than IPTables, but which are rendered down by the kernel to the same underlying XTables system.
Our NFTables system is where we store the IP sets. Any packet which enters the system, either by forward from inside Kubernetes or by generation from the host itself, is compared against a hash table of this IP set. If it is matched, it is marked for later processing by our next stage. This is a high-performance system which exists fully in the kernel and which ultimately becomes an eBPF program, so it scales well to hundreds of nodes.
The next stage is the kernel router’s route rules. These are defined as a common ordered list of operations for the whole operating system, but they are intended to be tightly constrained and are rarely used by applications in any case. The rules we add are very simple: if a packet is marked by our NFTables system, send it to an alternate routing table.
This leads us to our third and final stage of packet routing. We have a custom routing table with two rules:
- send all IPv4 traffic to the WireGuard interface
- send all IPv6 traffic to the WireGuard interface
So in summary, we:
- mark packets destined for Kubernetes applications or Kubernetes nodes
- send marked packets to a special routing table
- send anything which is sent to that routing table through the WireGuard interface
This gives us an isolated, resilient, tolerant, and non-invasive way to route Kubernetes traffic safely, automatically, and transparently through WireGuard across almost any set of network topologies.
11 - talosctl
The talosctl tool packs a lot of power into a small package.
It acts as a reference implementation for the Talos API, but it also handles a lot of
conveniences for the use of Talos and its clusters.
Video Walkthrough
To see some live examples of talosctl usage, view the following video:
Client Configuration
Talosctl configuration is located in $XDG_CONFIG_HOME/talos/config.yaml if $XDG_CONFIG_HOME is defined.
Otherwise it is in $HOME/.talos/config.
The location can always be overridden by the TALOSCONFIG environment variable or the --talosconfig parameter.
Like kubectl, talosctl uses the concept of configuration contexts, so any number of Talos clusters can be managed with a single configuration file.
Unlike kubectl, it also comes with some intelligent tooling to manage the merging of new contexts into the config.
The default operation is a non-destructive merge, where if a context of the same name already exists in the file, the context to be added is renamed by appending an index number.
You can easily overwrite instead, as well.
See the talosctl config help for more information.
Endpoints and Nodes
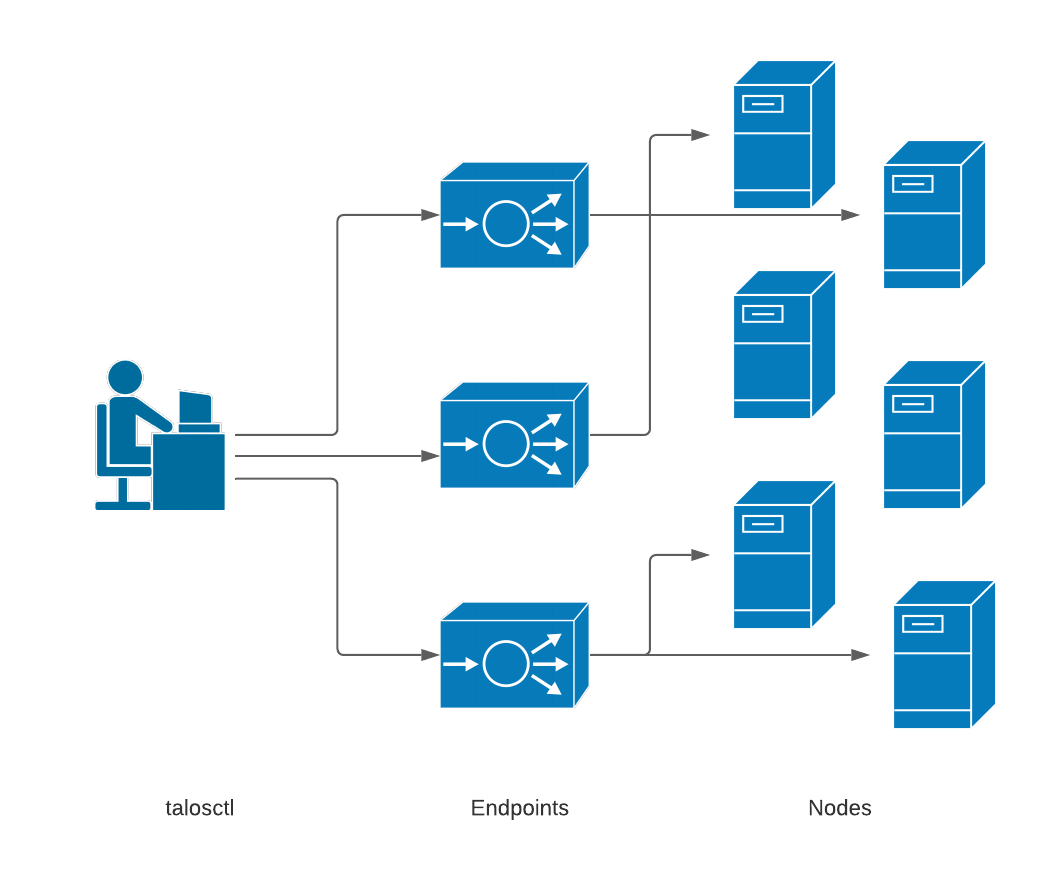
The endpoints are the communication endpoints to which the client directly talks.
These can be load balancers, DNS hostnames, a list of IPs, etc.
Further, if multiple endpoints are specified, the client will automatically load
balance and fail over between them.
In general, it is recommended that these point to the set of control plane nodes, either directly or through a reverse proxy or load balancer.
Each endpoint will automatically proxy requests destined to another node through it, so it is not necessary to change the endpoint configuration just because you wish to talk to a different node within the cluster.
Endpoints do, however, need to be members of the same Talos cluster as the target node, because these proxied connections reply on certificate-based authentication.
The node is the target node on which you wish to perform the API call.
While you can configure the target node (or even set of target nodes) inside the ’talosctl’ configuration file, it is often useful to simply and explicitly declare the target node(s) using the -n or --nodes command-line parameter.
Keep in mind, when specifying nodes that their IPs and/or hostnames are as seen by the endpoint servers, not as from the client. This is because all connections are proxied first through the endpoints.
Kubeconfig
The configuration for accessing a Talos Kubernetes cluster is obtained with talosctl.
By default, talosctl will safely merge the cluster into the default kubeconfig.
Like talosctl itself, in the event of a naming conflict, the new context name will be index-appended before insertion.
The --force option can be used to overwrite instead.
You can also specify an alternate path by supplying it as a positional parameter.
Thus, like Talos clusters themselves, talosctl makes it easy to manage any
number of kubernetes clusters from the same workstation.
Commands
Please see the CLI reference for the entire list of commands which are available from talosctl.
12 - FAQs
How is Talos different from other container optimized Linux distros?
Talos shares a lot of attributes with other distros, but there are some important differences. Talos integrates tightly with Kubernetes, and is not meant to be a general-purpose operating system. The most important difference is that Talos is fully controlled by an API via a gRPC interface, instead of an ordinary shell. We don’t ship SSH, and there is no console access. Removing components such as these has allowed us to dramatically reduce the footprint of Talos, and in turn, improve a number of other areas like security, predictability, reliability, and consistency across platforms. It’s a big change from how operating systems have been managed in the past, but we believe that API-driven OSes are the future.
Why no shell or SSH?
Since Talos is fully API-driven, all maintenance and debugging operations should be possible via the OS API.
We would like for Talos users to start thinking about what a “machine” is in the context of a Kubernetes cluster.
That is, that a Kubernetes cluster can be thought of as one massive machine, and the nodes are merely additional, undifferentiated resources.
We don’t want humans to focus on the nodes, but rather on the machine that is the Kubernetes cluster.
Should an issue arise at the node level, talosctl should provide the necessary tooling to assist in the identification, debugging, and remediation of the issue.
However, the API is based on the Principle of Least Privilege, and exposes only a limited set of methods.
We envision Talos being a great place for the application of control theory in order to provide a self-healing platform.
Why the name “Talos”?
Talos was an automaton created by the Greek God of the forge to protect the island of Crete. He would patrol the coast and enforce laws throughout the land. We felt it was a fitting name for a security focused operating system designed to run Kubernetes.
Why does Talos rely on a separate configuration from Kubernetes?
The talosconfig file contains client credentials to access the Talos Linux API.
Sometimes Kubernetes might be down for a number of reasons (etcd issues, misconfiguration, etc.), while Talos API access will always be available.
The Talos API is a way to access the operating system and fix issues, e.g. fixing access to Kubernetes.
When Talos Linux is running fine, using the Kubernetes APIs (via kubeconfig) is all you should need to deploy and manage Kubernetes workloads.
13 - Knowledge Base
Disabling GracefulNodeShutdown on a node
Talos Linux enables Graceful Node Shutdown Kubernetes feature by default.
If this feature should be disabled, modify the kubelet part of the machine configuration with:
machine:
  kubelet:
    extraArgs:
      feature-gates: GracefulNodeShutdown=false
    extraConfig:
      shutdownGracePeriod: 0s
      shutdownGracePeriodCriticalPods: 0s
Generating Talos Linux ISO image with custom kernel arguments
Pass additional kernel arguments using --extra-kernel-arg flag:
$ docker run --rm -i ghcr.io/siderolabs/imager:v1.1.1 iso --arch amd64 --tar-to-stdout --extra-kernel-arg console=ttyS1 --extra-kernel-arg console=tty0 | tar xz
2022/05/25 13:18:47 copying /usr/install/amd64/vmlinuz to /mnt/boot/vmlinuz
2022/05/25 13:18:47 copying /usr/install/amd64/initramfs.xz to /mnt/boot/initramfs.xz
2022/05/25 13:18:47 creating grub.cfg
2022/05/25 13:18:47 creating ISO
ISO will be output to the file talos-<arch>.iso in the current directory.
Logging Kubernetes audit logs with loki
If using loki-stack helm chart to gather logs from the Kubernetes cluster, you can use the helm values to configure loki-stack to log Kubernetes API server audit logs:
promtail:
  extraArgs:
    - -config.expand-env
  # // this is required so that the promtail process can read the kube-apiserver audit logs written as `nobody` user
  containerSecurityContext:
    capabilities:
      add:
        - DAC_READ_SEARCH
  extraVolumes:
    - name: audit-logs
      hostPath:
        path: /var/log/audit/kube
  extraVolumeMounts:
    - name: audit-logs
      mountPath: /var/log/audit/kube
      readOnly: true
  config:
    snippets:
      extraScrapeConfigs: |
        - job_name: auditlogs
          static_configs:
            - targets:
                - localhost
              labels:
                job: auditlogs
                host: ${HOSTNAME}
                __path__: /var/log/audit/kube/*.log