This is the multi-page printable view of this section. Click here to print.
Virtualized Platforms
1 - Hyper-V
Pre-requisities
- Download the latest
talos-amd64.isoISO from github releases page - Create a New-TalosVM folder in any of your PS Module Path folders
$env:PSModulePath -split ';'and save the New-TalosVM.psm1 there
Plan Overview
Here we will create a basic 3 node cluster with a single control-plane node and two worker nodes. The only difference between control plane and worker node is the amount of RAM and an additional storage VHD. This is personal preference and can be configured to your liking.
We are using a VMNamePrefix argument for a VM Name prefix and not the full hostname.
This command will find any existing VM with that prefix and “+1” the highest suffix it finds.
For example, if VMs talos-cp01 and talos-cp02 exist, this will create VMs starting from talos-cp03, depending on NumberOfVMs argument.
Setup a Control Plane Node
Use the following command to create a single control plane node:
New-TalosVM -VMNamePrefix talos-cp -CPUCount 2 -StartupMemory 4GB -SwitchName LAB -TalosISOPath C:\ISO\talos-amd64.iso -NumberOfVMs 1 -VMDestinationBasePath 'D:\Virtual Machines\Test VMs\Talos'
This will create talos-cp01 VM and power it on.
Setup Worker Nodes
Use the following command to create 2 worker nodes:
New-TalosVM -VMNamePrefix talos-worker -CPUCount 4 -StartupMemory 8GB -SwitchName LAB -TalosISOPath C:\ISO\talos-amd64.iso -NumberOfVMs 2 -VMDestinationBasePath 'D:\Virtual Machines\Test VMs\Talos' -StorageVHDSize 50GB
This will create two VMs: talos-worker01 and talos-wworker02 and attach an additional VHD of 50GB for storage (which in my case will be passed to Mayastor).
Pushing Config to the Nodes
Now that our VMs are ready, find their IP addresses from console of VM. With that information, push config to the control plane node with:
# set control plane IP variable
$CONTROL_PLANE_IP='10.10.10.x'

# Generate talos config
talosctl gen config talos-cluster https://$($CONTROL_PLANE_IP):6443 --output-dir .

# Apply config to control plane node
talosctl apply-config --insecure --nodes $CONTROL_PLANE_IP --file .\controlplane.yaml
Pushing Config to Worker Nodes
Similarly, for the workers:
talosctl apply-config --insecure --nodes 10.10.10.x --file .\worker.yaml
Apply the config to both nodes.
Bootstrap Cluster
Now that our nodes are ready, we are ready to bootstrap the Kubernetes cluster.
# Use following command to set node and endpoint permanantly in config so you dont have to type it everytime
talosctl config endpoint $CONTROL_PLANE_IP
talosctl config node $CONTROL_PLANE_IP

# Bootstrap cluster
talosctl bootstrap

# Generate kubeconfig
talosctl kubeconfig .
This will generate the kubeconfig file, you can use to connect to the cluster.
2 - KVM
Talos is known to work on KVM. We don’t yet have a documented guide specific to KVM; however, you can follow the General Getting Started Guide. If you run into any issues, our community can probably help!
3 - Proxmox
In this guide we will create a Kubernetes cluster using Proxmox.
Video Walkthrough
To see a live demo of this writeup, visit Youtube here:
Installation
How to Get Proxmox
It is assumed that you have already installed Proxmox onto the server you wish to create Talos VMs on. Visit the Proxmox downloads page if necessary.
Install talosctl
You can download talosctl via
github.com/siderolabs/talos/releases
curl https://github.com/siderolabs/talos/releases/download/<version>/talosctl-<platform>-<arch> -L -o talosctl
For example version v1.1.1 for linux platform:
curl https://github.com/siderolabs/talos/releases/download/v1.1.1/talosctl-linux-amd64 -L -o talosctl
sudo cp talosctl /usr/local/bin
sudo chmod +x /usr/local/bin/talosctl
Download ISO Image
In order to install Talos in Proxmox, you will need the ISO image from the Talos release page.
You can download talos-amd64.iso via
github.com/siderolabs/talos/releases
mkdir -p _out/
curl https://github.com/siderolabs/talos/releases/download/<version>/talos-<arch>.iso -L -o _out/talos-<arch>.iso
For example version v1.1.1 for linux platform:
mkdir -p _out/
curl https://github.com/siderolabs/talos/releases/download/v1.1.1/talos-amd64.iso -L -o _out/talos-amd64.iso
Upload ISO
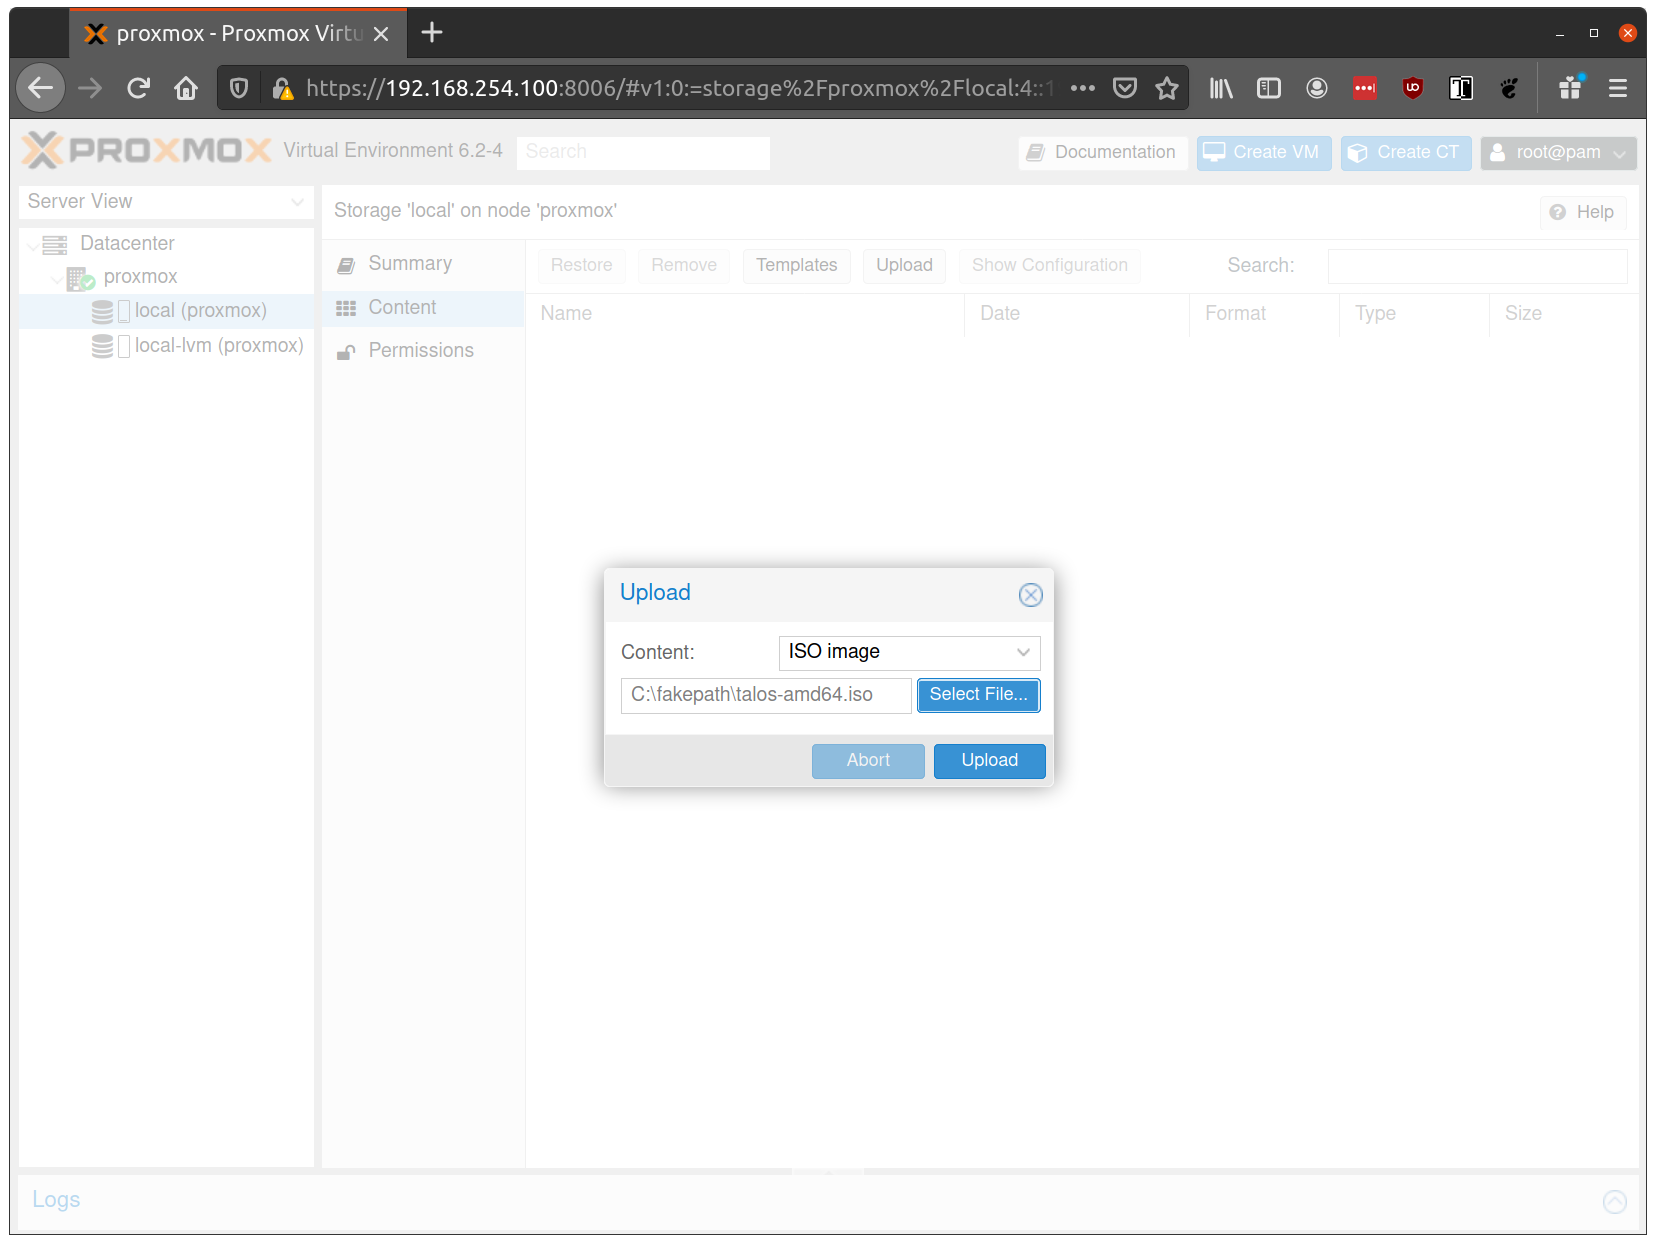
From the Proxmox UI, select the “local” storage and enter the “Content” section. Click the “Upload” button:
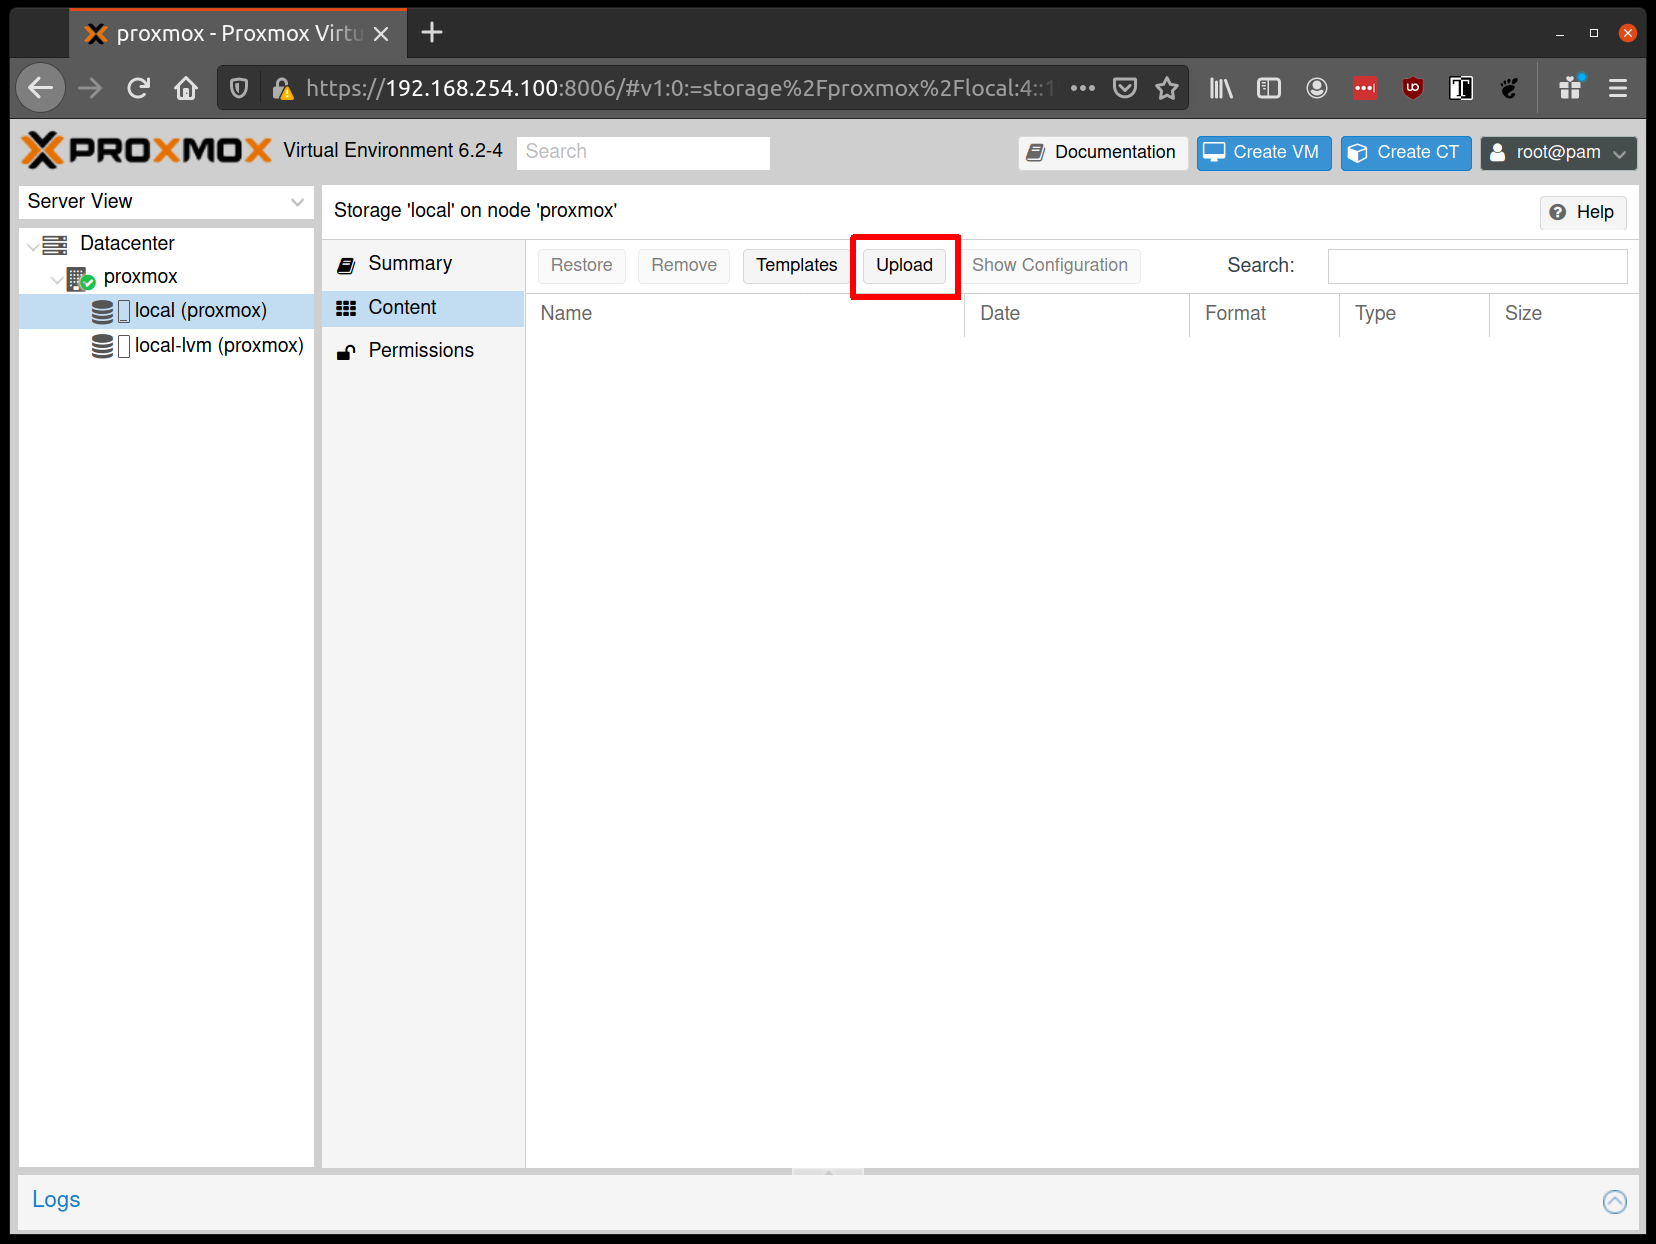
Select the ISO you downloaded previously, then hit “Upload”
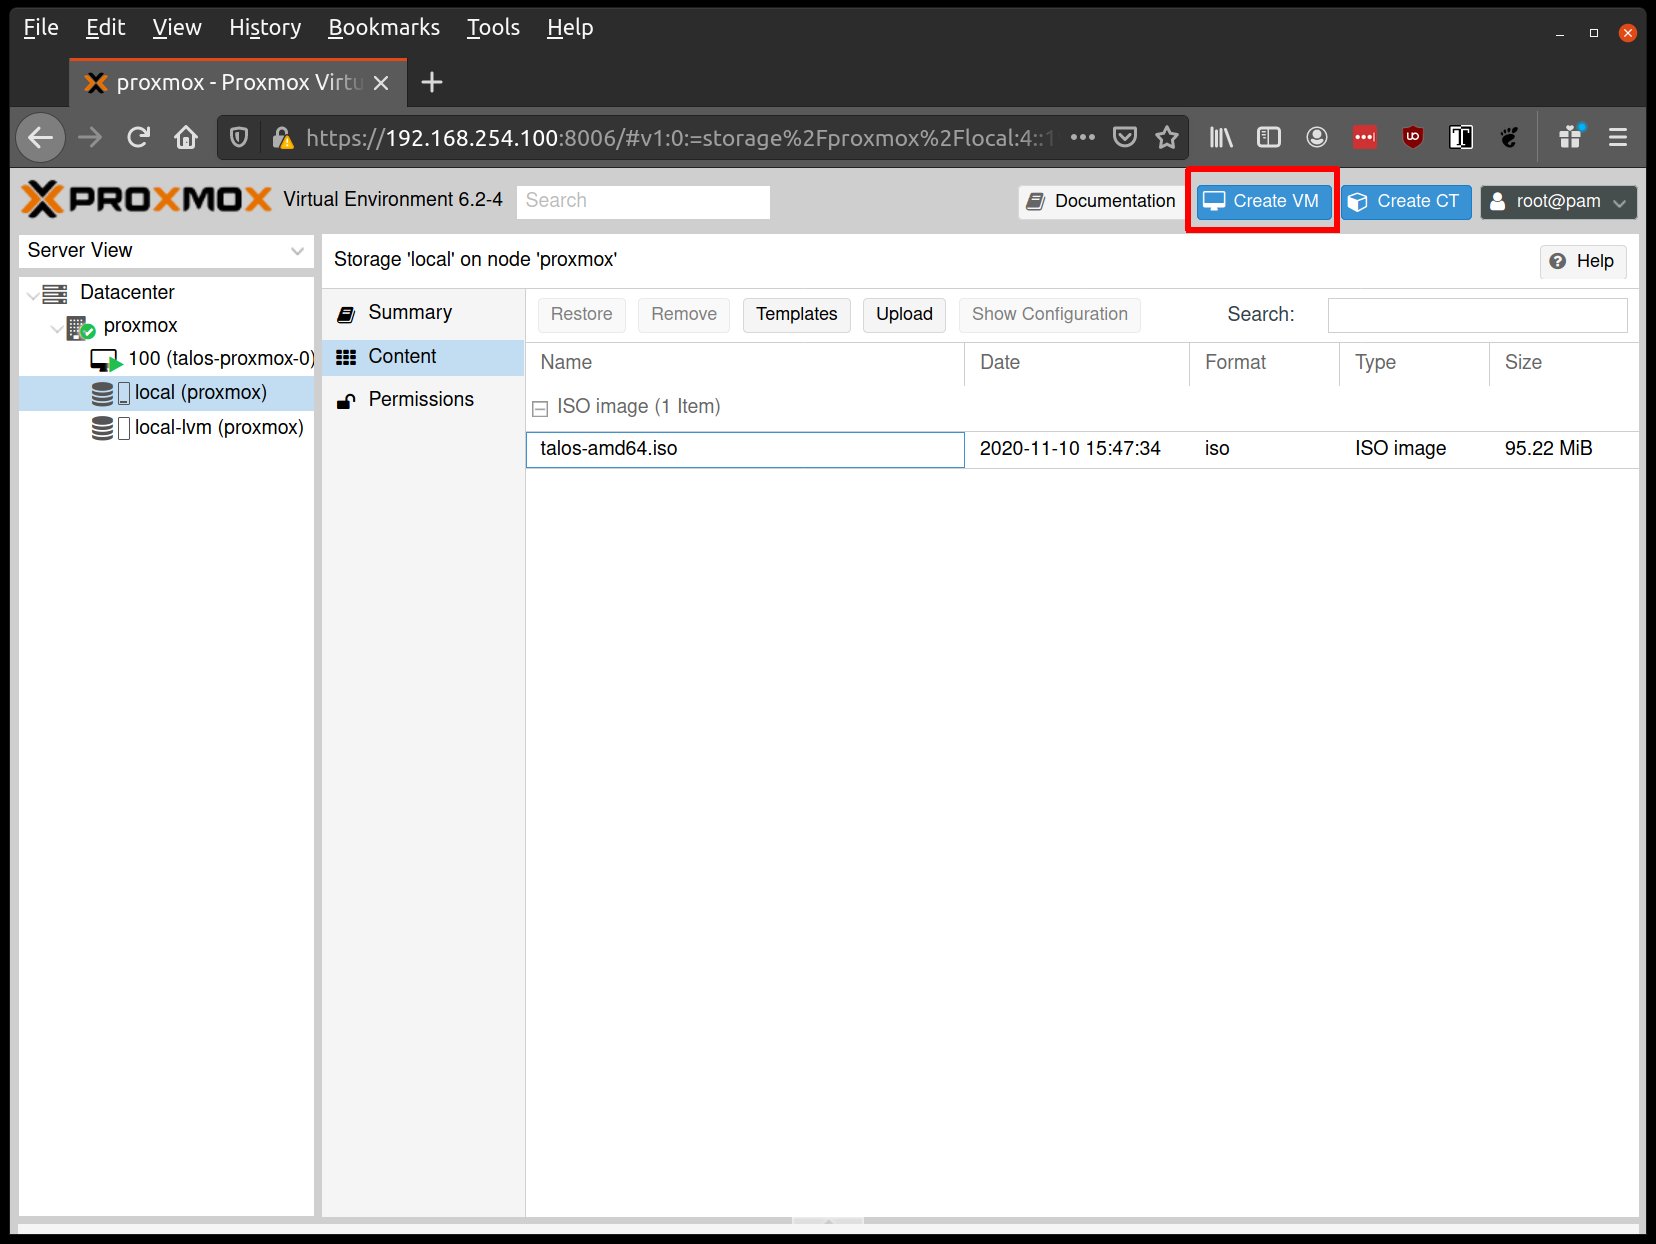
Create VMs
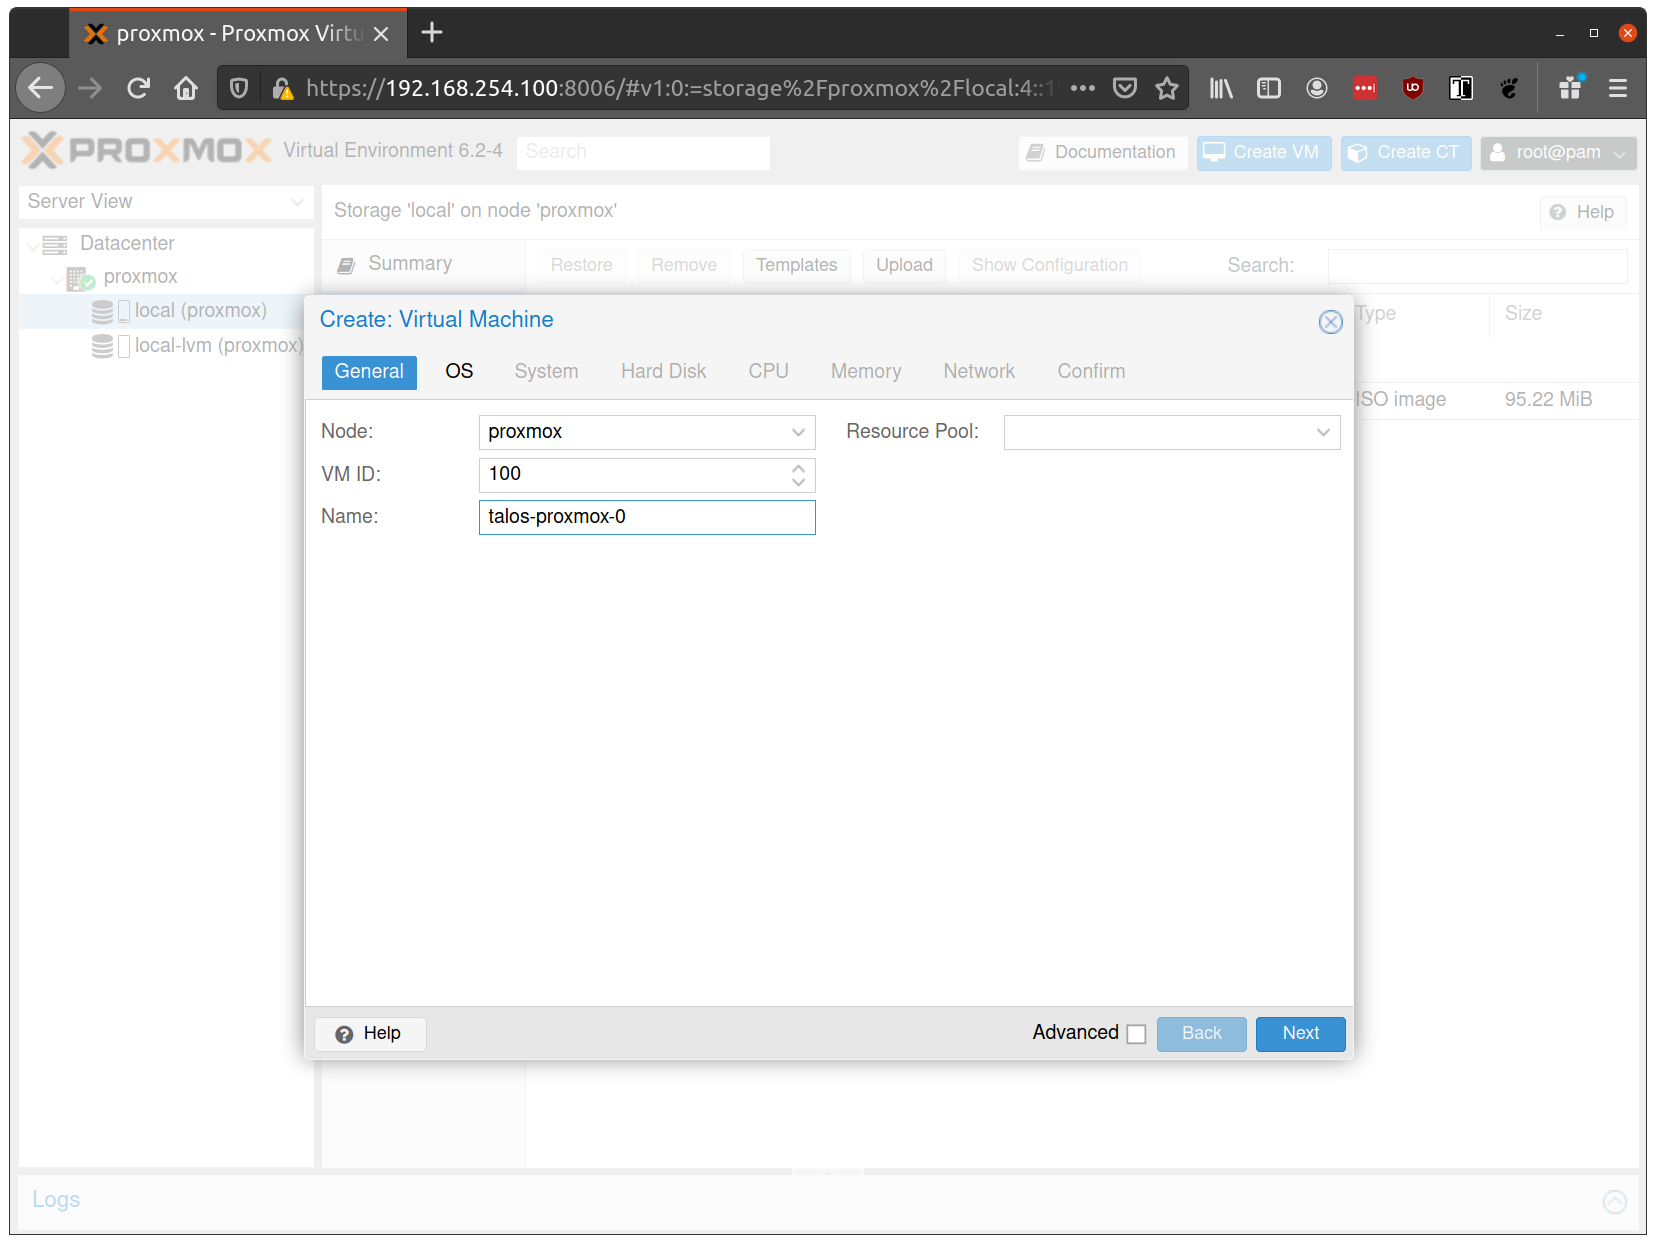
Start by creating a new VM by clicking the “Create VM” button in the Proxmox UI:
Fill out a name for the new VM:
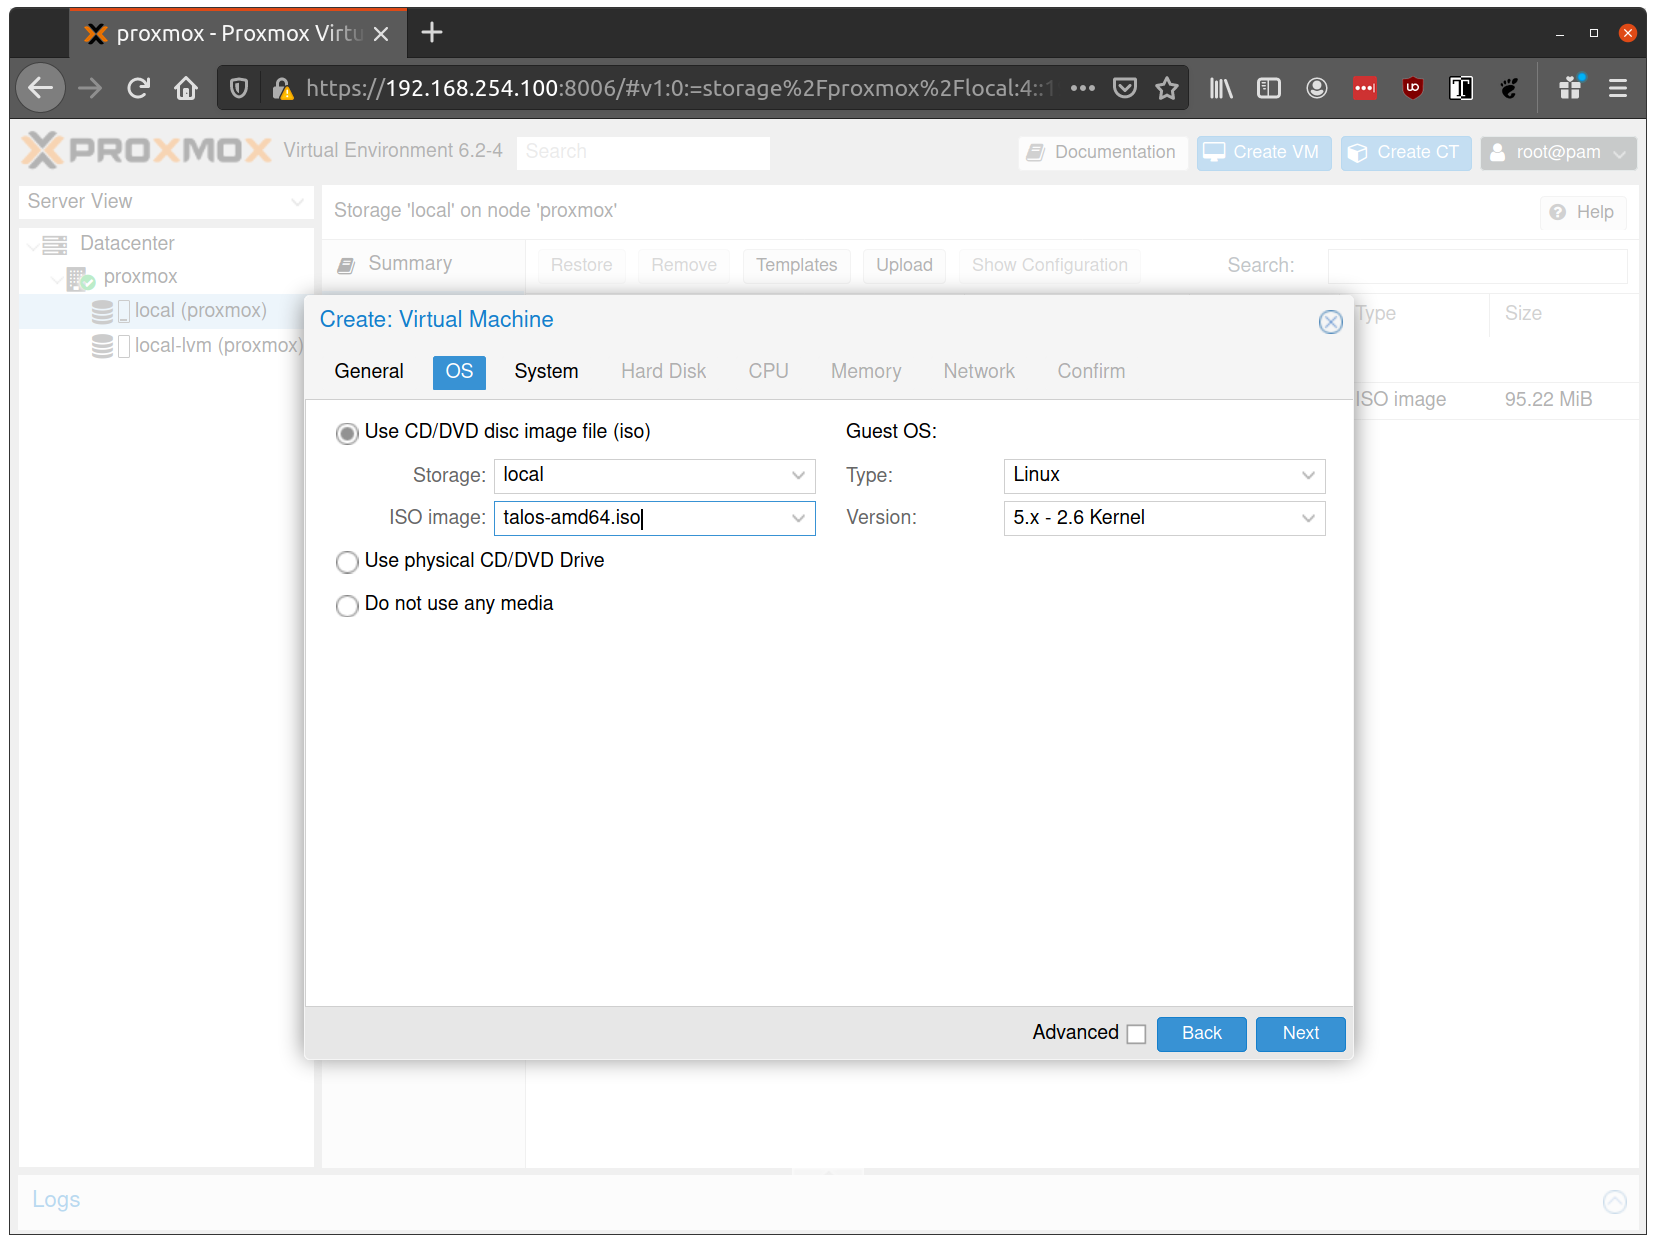
In the OS tab, select the ISO we uploaded earlier:
Keep the defaults set in the “System” tab.
Keep the defaults in the “Hard Disk” tab as well, only changing the size if desired.
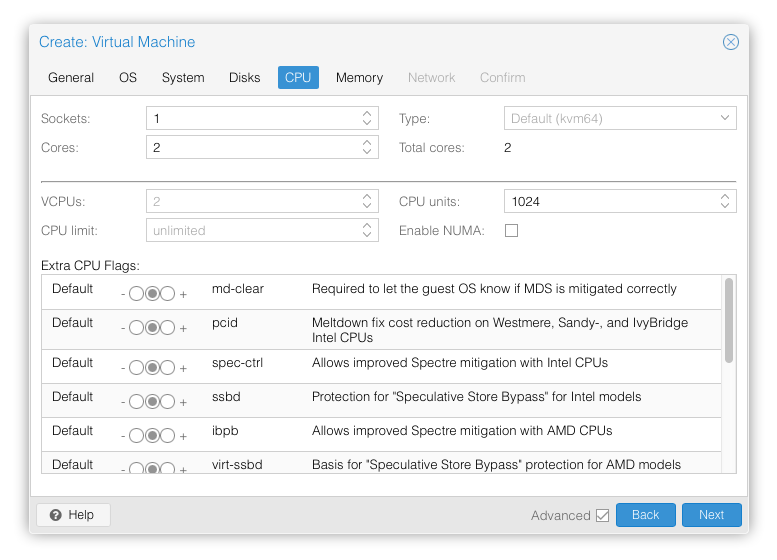
In the “CPU” section, give at least 2 cores to the VM:
Note: As of Talos v1.0 (which requires the x86-64-v2 microarchitecture), booting with the default Processor Type
kvm64will not work. You can enable the required CPU features after creating the VM by adding the following line in the corresponding/etc/pve/qemu-server/<vmid>.conffile:args: -cpu kvm64,+cx16,+lahf_lm,+popcnt,+sse3,+ssse3,+sse4.1,+sse4.2Alternatively, you can set the Processor Type to
hostif your Proxmox host supports these CPU features, this however prevents using live VM migration.
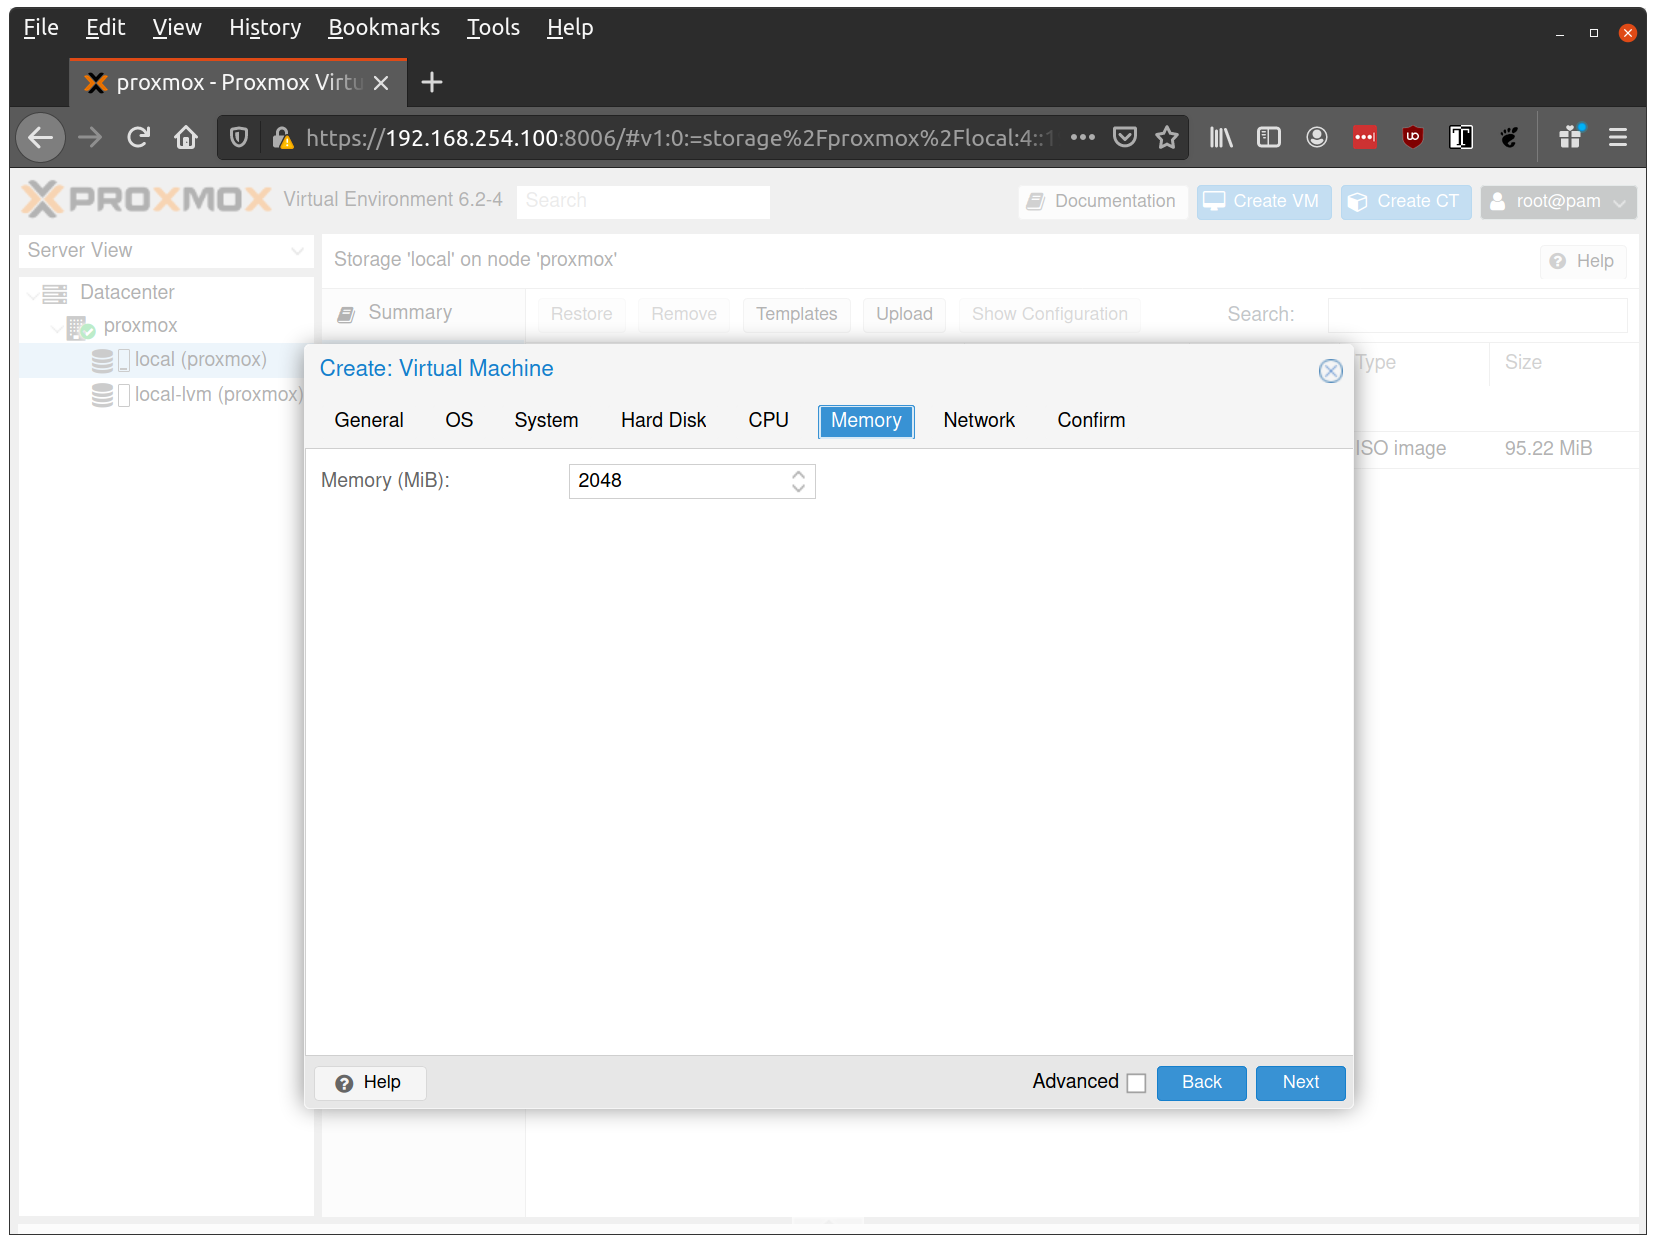
Verify that the RAM is set to at least 2GB:
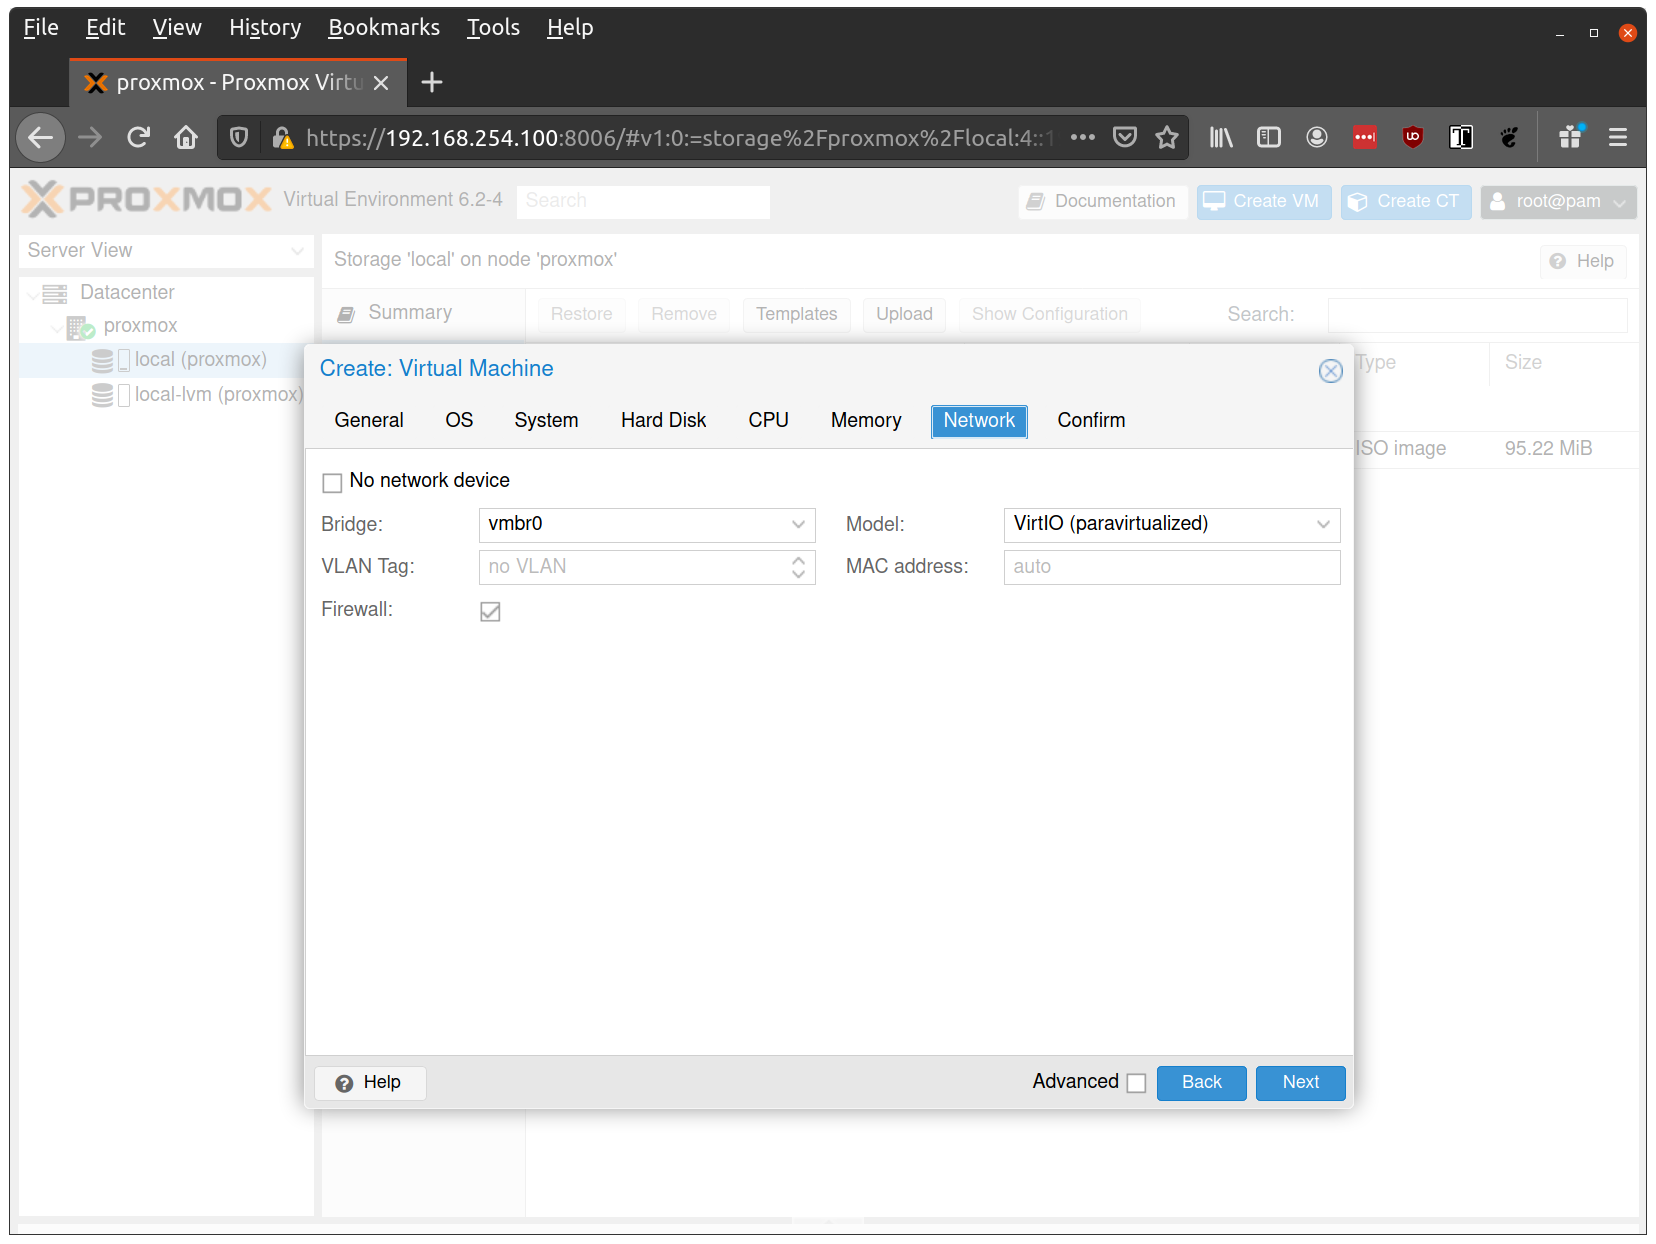
Keep the default values for networking, verifying that the VM is set to come up on the bridge interface:
Finish creating the VM by clicking through the “Confirm” tab and then “Finish”.
Repeat this process for a second VM to use as a worker node. You can also repeat this for additional nodes desired.
Start Control Plane Node
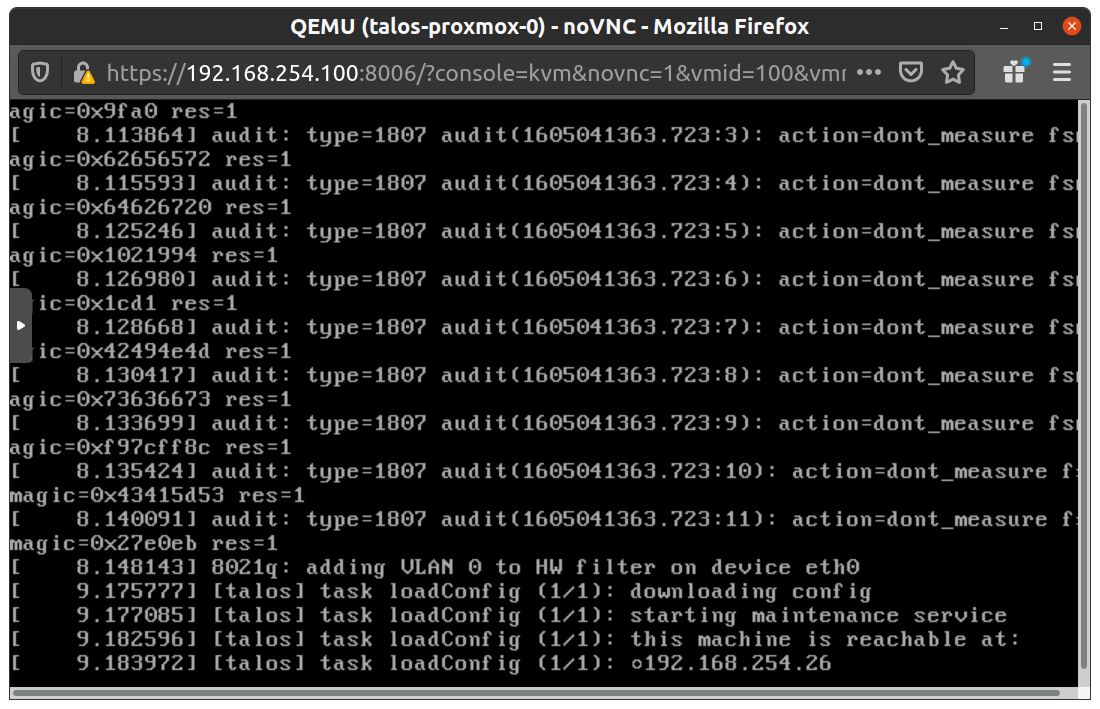
Once the VMs have been created and updated, start the VM that will be the first control plane node. This VM will boot the ISO image specified earlier and enter “maintenance mode”.
With DHCP server
Once the machine has entered maintenance mode, there will be a console log that details the IP address that the node received.
Take note of this IP address, which will be referred to as $CONTROL_PLANE_IP for the rest of this guide.
If you wish to export this IP as a bash variable, simply issue a command like export CONTROL_PLANE_IP=1.2.3.4.
Without DHCP server
To apply the machine configurations in maintenance mode, VM has to have IP on the network. So you can set it on boot time manually.

Press e on the boot time.
And set the IP parameters for the VM.
Format is:
ip=<client-ip>:<srv-ip>:<gw-ip>:<netmask>:<host>:<device>:<autoconf>
For example $CONTROL_PLANE_IP will be 192.168.0.100 and gateway 192.168.0.1
linux /boot/vmlinuz init_on_alloc=1 slab_nomerge pti=on panic=0 consoleblank=0 printk.devkmsg=on earlyprintk=ttyS0 console=tty0 console=ttyS0 talos.platform=metal ip=192.168.0.100::192.168.0.1:255.255.255.0::eth0:off
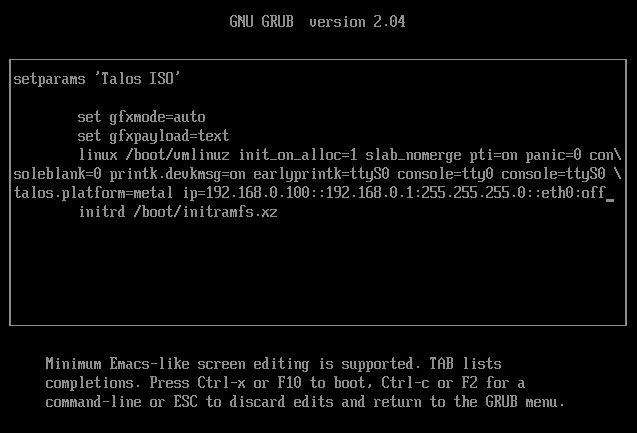
Then press Ctrl-x or F10
Generate Machine Configurations
With the IP address above, you can now generate the machine configurations to use for installing Talos and Kubernetes. Issue the following command, updating the output directory, cluster name, and control plane IP as you see fit:
talosctl gen config talos-vbox-cluster https://$CONTROL_PLANE_IP:6443 --output-dir _out
This will create several files in the _out directory: controlplane.yaml, worker.yaml, and talosconfig.
Create Control Plane Node
Using the controlplane.yaml generated above, you can now apply this config using talosctl.
Issue:
talosctl apply-config --insecure --nodes $CONTROL_PLANE_IP --file _out/controlplane.yaml
You should now see some action in the Proxmox console for this VM. Talos will be installed to disk, the VM will reboot, and then Talos will configure the Kubernetes control plane on this VM.
Note: This process can be repeated multiple times to create an HA control plane.
Create Worker Node
Create at least a single worker node using a process similar to the control plane creation above.
Start the worker node VM and wait for it to enter “maintenance mode”.
Take note of the worker node’s IP address, which will be referred to as $WORKER_IP
Issue:
talosctl apply-config --insecure --nodes $WORKER_IP --file _out/worker.yaml
Note: This process can be repeated multiple times to add additional workers.
Using the Cluster
Once the cluster is available, you can make use of talosctl and kubectl to interact with the cluster.
For example, to view current running containers, run talosctl containers for a list of containers in the system namespace, or talosctl containers -k for the k8s.io namespace.
To view the logs of a container, use talosctl logs <container> or talosctl logs -k <container>.
First, configure talosctl to talk to your control plane node by issuing the following, updating paths and IPs as necessary:
export TALOSCONFIG="_out/talosconfig"
talosctl config endpoint $CONTROL_PLANE_IP
talosctl config node $CONTROL_PLANE_IP
Bootstrap Etcd
Set the endpoints and nodes:
talosctl --talosconfig _out/talosconfig config endpoint <control plane 1 IP>
talosctl --talosconfig _out/talosconfig config node <control plane 1 IP>
Bootstrap etcd:
talosctl --talosconfig _out/talosconfig bootstrap
Retrieve the kubeconfig
At this point we can retrieve the admin kubeconfig by running:
talosctl --talosconfig _out/talosconfig kubeconfig .
Cleaning Up
To cleanup, simply stop and delete the virtual machines from the Proxmox UI.
4 - VMware
Creating a Cluster via the govc CLI
In this guide we will create an HA Kubernetes cluster with 2 worker nodes.
We will use the govc cli which can be downloaded here.
Prereqs/Assumptions
This guide will use the virtual IP (“VIP”) functionality that is built into Talos in order to provide a stable, known IP for the Kubernetes control plane. This simply means the user should pick an IP on their “VM Network” to designate for this purpose and keep it handy for future steps.
Create the Machine Configuration Files
Generating Base Configurations
Using the VIP chosen in the prereq steps, we will now generate the base configuration files for the Talos machines.
This can be done with the talosctl gen config ... command.
Take note that we will also use a JSON6902 patch when creating the configs so that the control plane nodes get some special information about the VIP we chose earlier, as well as a daemonset to install vmware tools on talos nodes.
First, download cp.patch.yaml to your local machine and edit the VIP to match your chosen IP.
You can do this by issuing: curl -fsSLO https://raw.githubusercontent.com/siderolabs/talos/master/website/content/v1.1/talos-guides/install/virtualized-platforms/vmware/cp.patch.yaml.
It’s contents should look like the following:
- op: add
  path: /machine/network
  value:
    interfaces:
    - interface: eth0
      dhcp: true
      vip:
        ip: <VIP>
- op: replace
  path: /cluster/extraManifests
  value:
    - "https://raw.githubusercontent.com/mologie/talos-vmtoolsd/master/deploy/unstable.yaml"
With the patch in hand, generate machine configs with:
$ talosctl gen config vmware-test https://<VIP>:<port> --config-patch-control-plane @cp.patch.yaml
created controlplane.yaml
created worker.yaml
created talosconfig
At this point, you can modify the generated configs to your liking if needed.
Optionally, you can specify additional patches by adding to the cp.patch.yaml file downloaded earlier, or create your own patch files.
Validate the Configuration Files
$ talosctl validate --config controlplane.yaml --mode cloud
controlplane.yaml is valid for cloud mode
$ talosctl validate --config worker.yaml --mode cloud
worker.yaml is valid for cloud mode
Set Environment Variables
govc makes use of the following environment variables
export GOVC_URL=<vCenter url>
export GOVC_USERNAME=<vCenter username>
export GOVC_PASSWORD=<vCenter password>
Note: If your vCenter installation makes use of self signed certificates, you’ll want to export
GOVC_INSECURE=true.
There are some additional variables that you may need to set:
export GOVC_DATACENTER=<vCenter datacenter>
export GOVC_RESOURCE_POOL=<vCenter resource pool>
export GOVC_DATASTORE=<vCenter datastore>
export GOVC_NETWORK=<vCenter network>
Choose Install Approach
As part of this guide, we have a more automated install script that handles some of the complexity of importing OVAs and creating VMs. If you wish to use this script, we will detail that next. If you wish to carry out the manual approach, simply skip ahead to the “Manual Approach” section.
Scripted Install
Download the vmware.sh script to your local machine.
You can do this by issuing curl -fsSLO "https://raw.githubusercontent.com/siderolabs/talos/master/website/content/v1.1/talos-guides/install/virtualized-platforms/vmware/vmware.sh".
This script has default variables for things like Talos version and cluster name that may be interesting to tweak before deploying.
Import OVA
To create a content library and import the Talos OVA corresponding to the mentioned Talos version, simply issue:
./vmware.sh upload_ova
Create Cluster
With the OVA uploaded to the content library, you can create a 5 node (by default) cluster with 3 control plane and 2 worker nodes:
./vmware.sh create
This step will create a VM from the OVA, edit the settings based on the env variables used for VM size/specs, then power on the VMs.
You may now skip past the “Manual Approach” section down to “Bootstrap Cluster”.
Manual Approach
Import the OVA into vCenter
A talos.ova asset is published with each release.
We will refer to the version of the release as $TALOS_VERSION below.
It can be easily exported with export TALOS_VERSION="v0.3.0-alpha.10" or similar.
curl -LO https://github.com/siderolabs/talos/releases/download/$TALOS_VERSION/talos.ova
Create a content library (if needed) with:
govc library.create <library name>
Import the OVA to the library with:
govc library.import -n talos-${TALOS_VERSION} <library name> /path/to/downloaded/talos.ova
Create the Bootstrap Node
We’ll clone the OVA to create the bootstrap node (our first control plane node).
govc library.deploy <library name>/talos-${TALOS_VERSION} control-plane-1
Talos makes use of the guestinfo facility of VMware to provide the machine/cluster configuration.
This can be set using the govc vm.change command.
To facilitate persistent storage using the vSphere cloud provider integration with Kubernetes, disk.enableUUID=1 is used.
govc vm.change \
  -e "guestinfo.talos.config=$(cat controlplane.yaml | base64)" \
  -e "disk.enableUUID=1" \
  -vm control-plane-1
Update Hardware Resources for the Bootstrap Node
-cis used to configure the number of cpus-mis used to configure the amount of memory (in MB)
govc vm.change \
  -c 2 \
  -m 4096 \
  -vm control-plane-1
The following can be used to adjust the EPHEMERAL disk size.
govc vm.disk.change -vm control-plane-1 -disk.name disk-1000-0 -size 10G
govc vm.power -on control-plane-1
Create the Remaining Control Plane Nodes
govc library.deploy <library name>/talos-${TALOS_VERSION} control-plane-2
govc vm.change \
  -e "guestinfo.talos.config=$(base64 controlplane.yaml)" \
  -e "disk.enableUUID=1" \
  -vm control-plane-2

govc library.deploy <library name>/talos-${TALOS_VERSION} control-plane-3
govc vm.change \
  -e "guestinfo.talos.config=$(base64 controlplane.yaml)" \
  -e "disk.enableUUID=1" \
  -vm control-plane-3
govc vm.change \
  -c 2 \
  -m 4096 \
  -vm control-plane-2

govc vm.change \
  -c 2 \
  -m 4096 \
  -vm control-plane-3
govc vm.disk.change -vm control-plane-2 -disk.name disk-1000-0 -size 10G

govc vm.disk.change -vm control-plane-3 -disk.name disk-1000-0 -size 10G
govc vm.power -on control-plane-2

govc vm.power -on control-plane-3
Update Settings for the Worker Nodes
govc library.deploy <library name>/talos-${TALOS_VERSION} worker-1
govc vm.change \
  -e "guestinfo.talos.config=$(base64 worker.yaml)" \
  -e "disk.enableUUID=1" \
  -vm worker-1

govc library.deploy <library name>/talos-${TALOS_VERSION} worker-2
govc vm.change \
  -e "guestinfo.talos.config=$(base64 worker.yaml)" \
  -e "disk.enableUUID=1" \
  -vm worker-2
govc vm.change \
  -c 4 \
  -m 8192 \
  -vm worker-1

govc vm.change \
  -c 4 \
  -m 8192 \
  -vm worker-2
govc vm.disk.change -vm worker-1 -disk.name disk-1000-0 -size 10G

govc vm.disk.change -vm worker-2 -disk.name disk-1000-0 -size 10G
govc vm.power -on worker-1

govc vm.power -on worker-2
Bootstrap Cluster
In the vSphere UI, open a console to one of the control plane nodes. You should see some output stating that etcd should be bootstrapped. This text should look like:
"etcd is waiting to join the cluster, if this node is the first node in the cluster, please run `talosctl bootstrap` against one of the following IPs:
Take note of the IP mentioned here and issue:
talosctl --talosconfig talosconfig bootstrap -e <control plane IP> -n <control plane IP>
Keep this IP handy for the following steps as well.
Retrieve the kubeconfig
At this point we can retrieve the admin kubeconfig by running:
talosctl --talosconfig talosconfig config endpoint <control plane IP>
talosctl --talosconfig talosconfig config node <control plane IP>
talosctl --talosconfig talosconfig kubeconfig .
Configure talos-vmtoolsd
The talos-vmtoolsd application was deployed as a daemonset as part of the cluster creation; however, we must now provide a talos credentials file for it to use.
Create a new talosconfig with:
talosctl --talosconfig talosconfig -n <control plane IP> config new vmtoolsd-secret.yaml --roles os:admin
Create a secret from the talosconfig:
kubectl -n kube-system create secret generic talos-vmtoolsd-config \
  --from-file=talosconfig=./vmtoolsd-secret.yaml
Clean up the generated file from local system:
rm vmtoolsd-secret.yaml
Once configured, you should now see these daemonset pods go into “Running” state and in vCenter, you will now see IPs and info from the Talos nodes present in the UI.
5 - Xen
Talos is known to work on Xen. We don’t yet have a documented guide specific to Xen; however, you can follow the General Getting Started Guide. If you run into any issues, our community can probably help!